Tương tác với Google Calendar trong ứng dụng Rails
Bài đăng này đã không được cập nhật trong 7 năm
Chào các bạn, hôm nay mình sẽ giới thiệu đến các bạn cách tương tác với Google Calendar qua Rails app của bạn.
Tạo mới project trên Google API Console
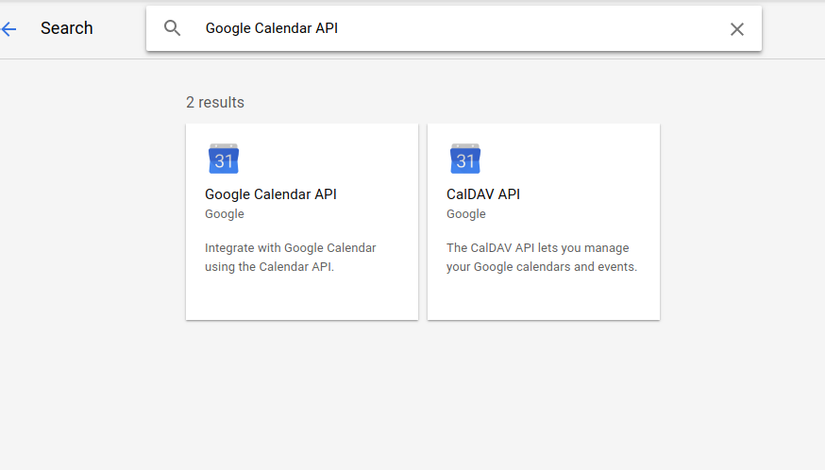
Đầu tiên, các bạn đăng nhập vào Google API Console và tạo mới một project cho ứng dụng của các bạn. Sau đó các bạn search Google Calendar API trong Library

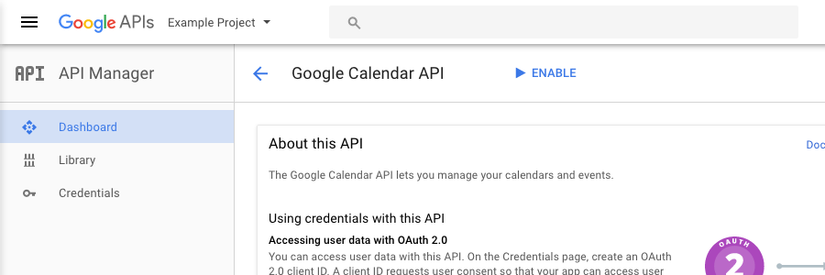
rồi click và nut ENABLE để enable Google Calendar API cho project của bạn

Cấu hình OAuth
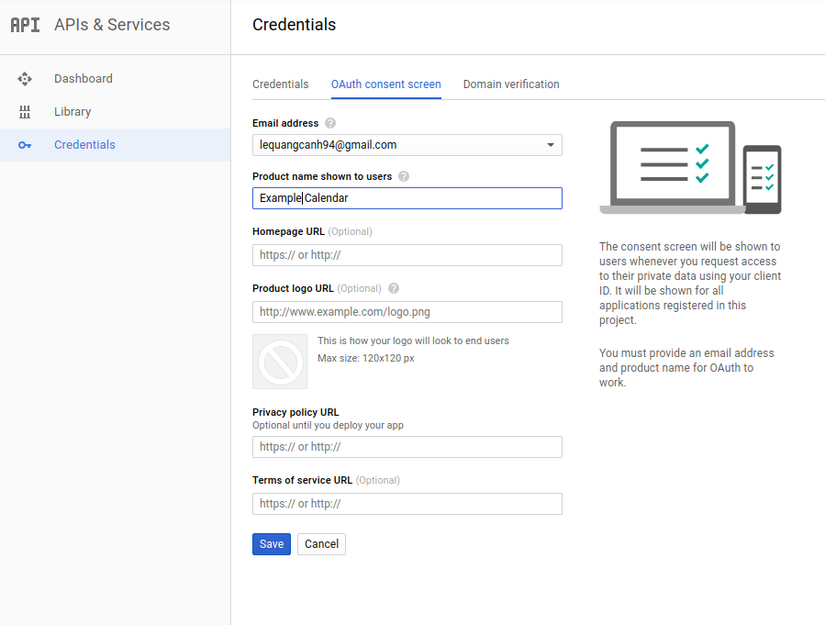
Bước tiếp theo các bạn đi tới màn hình OAuth consent screen để config. Đây là màn hình mà users trong ứng dụng của bạn sẽ đi tới khi ủy quyền cho Google và đồng ý chia sẻ dữ liệu của họ với ứng dụng của bạn

Tạo thông tin xác thực
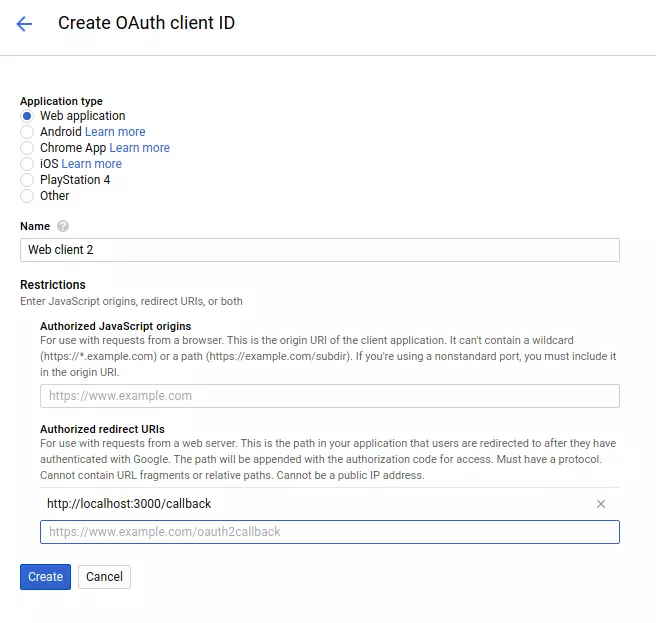
Từ tab Credentials click vào button Create credentials chọn OAuth client ID sẽ chuyển tới màn hình Credentials. Chọn vào Web application, điền các thông tin và nhấn Create, Google sẽ cung cấp cho bạn Client ID và Client Secret để xác thực ứng dụng của bạn với Google

Copy 2 key này vào file quản lý biến môi trường trong ứng dụng của bạn
google_client_id: YOUR_GOOGLE_CLIENT_ID
google_client_secret: YOUR_GOOGLE_CLIENT_SECRET
Install gem google-api-client
Xong việc với Google, bây giờ các bạn trở lại ứng dụng Rails của mình, add gem google-api-client vào Gemfile
gem 'google-api-client', require: 'google/apis/calendar_v3'
bundle install để install gem vào ứng dụng của bạn. Gem này có rất nhiều dependencies giúp bạn tương tác với Google API mà không cần phải viết bất kỳ mã HTTP nào
Ủy quyền truy cập cho Google
Bước đầu tiên, bạn phải chuyển hướng người dùng đến màn hình đăng nhập Google để họ đăng nhập vào đồng ý quyền truy cập mà bạn đang yêu cầu
class GoogleCalendarsController < ApplicationController
  def redirect
    client = Signet::OAuth2::Client.new(client_options)
    redirect_to client.authorization_uri.to_s
  end

  private
  def client_options
    {
      client_id: ENV["google_client_id"],
      client_secret: ENV["google_client_secret"],
      authorization_uri: "https://accounts.google.com/o/oauth2/auth",
      token_credential_uri: "https://accounts.google.com/o/oauth2/token",
      scope: Google::Apis::CalendarV3::AUTH_CALENDAR,
      redirect_uri: callback_url
    }
  end
end
Config routes
get "/redirect", to: "google_calendars#redirect", as: "redirect"
Bây giờ các bạn truy cập vào /redirect thì sẽ dẫn tới trang đăng nhập và yêu cầu xác thực của Google.
Nếu bạn đăng nhập thành công sẽ được redirect tới /callback như chúng ta đã config ở trên.
Add thêm action callback vào GoogleCalendarsController ở trên
def callback
  client = Signet::OAuth2::Client.new(client_options)
  client.code = params[:code]
  response = client.fetch_access_token!
  session[:authorization] = response
  redirect_to calendars_url
end
# routes.rb
get "/callback", to: "google_calendars#callback", as: "callback"
Trong action này, method fetch_access_token! sẽ trả về cho bạn một access token để giữ kết nối giữa users và Google API, lưu token này vào session để users không phải đăng nhập lại google ở lần sau. Tuy nhiên token này chỉ có thời gian sống trong vòng 1h. Vậy thì hết hạn là phải đăng nhập lại à. Không đâu, các bạn tiếp tục theo dõi nhé
Lấy tất cả event đang có trên Google Calendar
Add action events vào google_calendars_controller ở trên
def events
  client = Signet::OAuth2::Client.new(client_options)
  client.update!(session[:authorization])
  service = Google::Apis::CalendarV3::CalendarService.new
  service.authorization = client
  @event_list = service.list_events(params[:calendar_id])
end
#routes.rb
get "/events/:calendar_id", to: "google_calendars#events", as: "events", calendar_id: /[^\/]+/
Mỗi tài khoản Google sẽ có thể tạo nhiều calendar, bạn bắt buộc vào truyền calendar_id để Google Calendar biết bạn muốn lấy event từ calendar nào. Để lấy calendar mặc định bạn hãy truyền params[:calendar_id] = "primary"
Add new event lên Google Calendar
Add thêm action new_event vào google_calendars_controller ở trên:
def new_event
  client = Signet::OAuth2::Client.new(client_options)
  client.update!(session[:authorization])
  service = Google::Apis::CalendarV3::CalendarService.new
  service.authorization = client
  event = Google::Apis::CalendarV3::Event.new({
    start: Google::Apis::CalendarV3::EventDateTime.new(date: params[:start].to_date),
    end: Google::Apis::CalendarV3::EventDateTime.new(date: params[:end].to_date),
    summary: params["title"]
  })
  service.insert_event(params[:calendar_id], event)
  redirect_to events_url(calendar_id: params[:calendar_id])
end
# routes.rb
post "/events/:calendar_id", to: "google_calendars#new_event", as: "new_event", calendar_id: /[^\/]+/
Refresh access token
Như mình đã đề cập ở trên thì access token Google API trả về chỉ có giá trị trong vòng 1 giờ. Vậy khi hết hạn bắt buộc các bạn phải đăng nhập lại, điều này khá là bất tiện.
Để giải quyết việc này, Google API sẽ trả về cho các bạn một refresh_token để xác thực làm mới lại access token khi nó hết hạn.
Để có được refresh_token, các bạn thêm vào client_options mà chúng ta sử dụng nãy giờ grant_type: :refresh_token
private
def client_options
  {
    client_id: ENV["google_client_id"],
    client_secret: ENV["google_client_secret"],
    authorization_uri: "https://accounts.google.com/o/oauth2/auth",
    token_credential_uri: "https://accounts.google.com/o/oauth2/token",
    scope: Google::Apis::CalendarV3::AUTH_CALENDAR,
    redirect_uri: callback_url,
    grant_type: :refresh_token
  }
end
Sau đó, bắt exception mà Google API raise về để refresh lại token. Ví dụ:
def new_event
  client = Signet::OAuth2::Client.new(client_options)
  client.update!(session[:authorization])
  service = Google::Apis::CalendarV3::CalendarService.new
  service.authorization = client
  event = Google::Apis::CalendarV3::Event.new({
    start: Google::Apis::CalendarV3::EventDateTime.new(date: params[:start].to_date),
    end: Google::Apis::CalendarV3::EventDateTime.new(date: params[:end].to_date),
    summary: params["title"]
  })
  service.insert_event(params[:calendar_id], event)
  redirect_to events_url(calendar_id: params[:calendar_id])
rescue Google::Apis::AuthorizationError
  session[:authorization] = session[:authorization].merge(client.refresh!)
  retry
end
Tham khảo
Bài trên mình đã hướng dẫn các bạn get list event và tạo event lên Google Calendar qua ứng dụng Rails.
Còn rất nhiều hàm tương tác với Google Calendar, các bạn có thể tham khảo thêm tại đây
Cảm ơn các bạn đã theo dõi!
All rights reserved