Tự động triển khai và tích hợp bảo mật cho hạ tầng trên AWS bằng các công cụ mã nguồn mở
Bài đăng này đã không được cập nhật trong 3 năm
Giới thiệu
Bài viết này giới thiệu cách triển khai hạ tầng trên AWS một cách tự động hóa với Terraform và tích hợp một số phương pháp bảo mật cho hệ thống của bạn.
Các bạn tham khảo repository tại đây
Mô hình triển khai
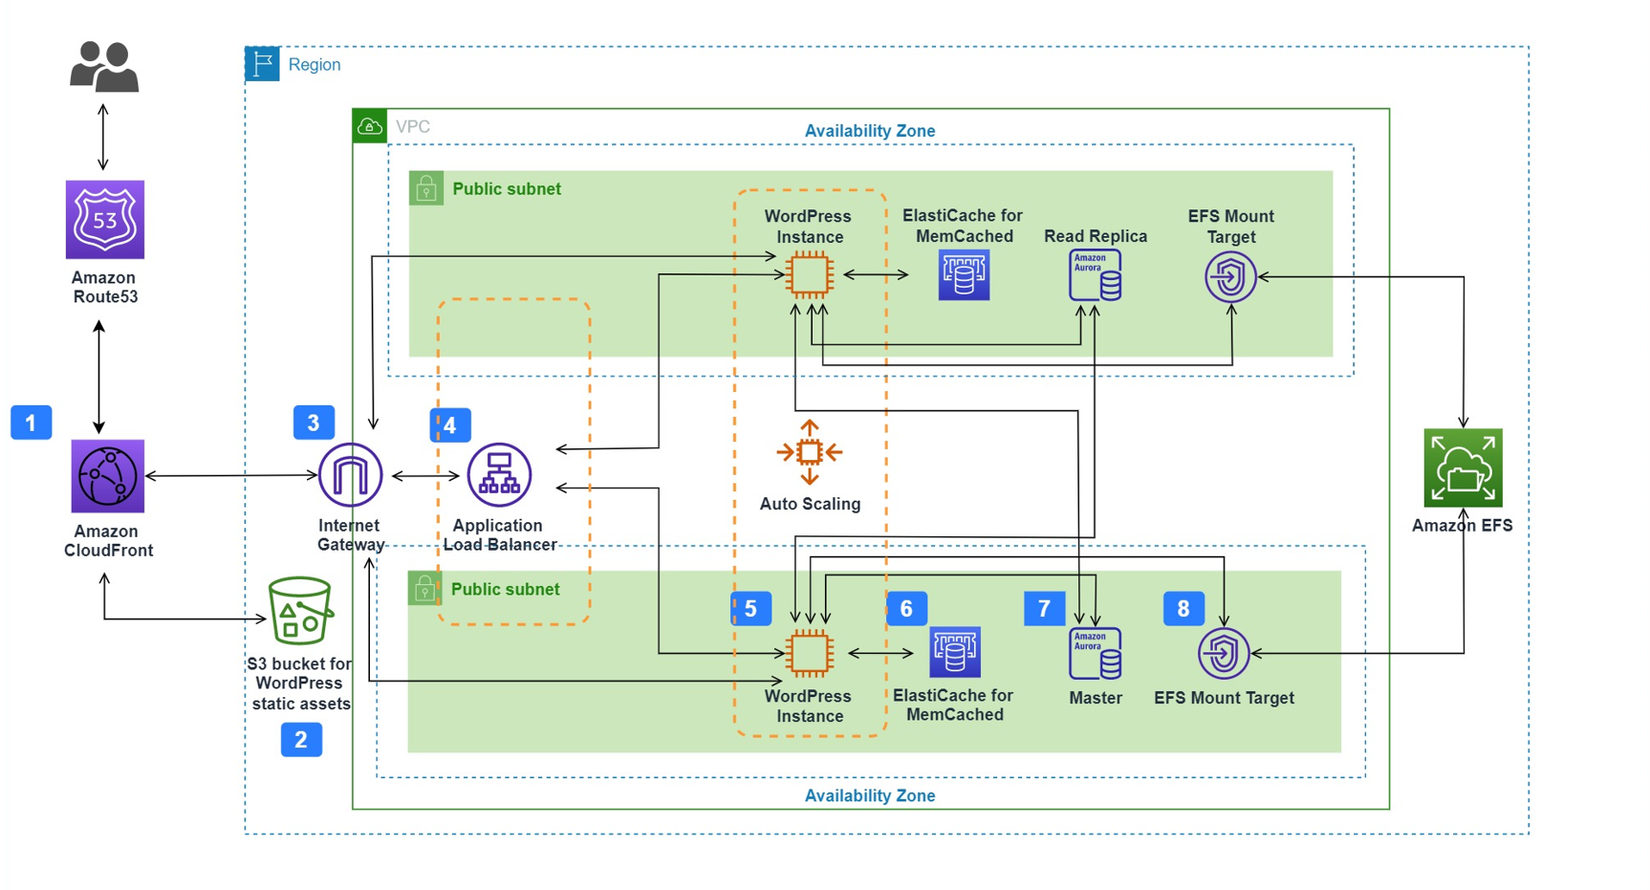
Kiến trúc hạ tầng
Trong topic này chúng tôi triển khai một mô hình multi-layer web và cài đặt WordPress để kiểm tra các service.
* Network layer : VPC, Internet Gateway, Security Groups rules,...
* Database layer : Amazon RDS Mysql hoặc Amazon Aurora MySql, AWS Secrets Manager, AWS Backup,...
* Application layer : EC2, EFS, AutoScaling Group, Application Load Balancer, ElastiCache Memcached, S3, Cloudfront,...
Note : Chúng tôi không sử dụng Private subnet để tối ưu một phần chi phí, thay vào đó cấu hình các Security groups's rules để kiểm soát traffic đến các tài nguyên
Triển khai trên Git
Với việc quản lý source code trên Github hay Gitlab hoặc Bitbucket,... , chúng ta cần các tool CI/CD, tự động check lỗi để quá trình tích hợp và triển khai code đảm bảo việc commit code giữa các contributor không bị conflict với nhau.
Lưu ý: Các giá trị mặc định cho các resource nằm trong file /main/variables.tf
Workflow
Checkov
Checkov là một công cụ tự động kiểm tra các cấu hình của các file IaC trước khi chúng được triển khai, nó scan các file IaC để tìm ra các cấu hình không phù hợp liên quan đến bảo mật hoặc tuân thủ các tiêu chuẩn. Checkov hỗ trợ các loại file IaaC như Terraform, CloudFormation, Docker, Kubernetes,... . Policy của Checkov có thể là predefined(cấu hình sẵn) hoặc custom(tùy chỉnh).
Trong hệ thống này, Checkov được setup như sau :
.github/workflow/release.yaml
name: Release
on: push

jobs:
  checkov-job:
    runs-on: ubuntu-latest
    name: Release
    steps:
      - name: Checkout repo
        uses: actions/checkout@master

      - name: Run Checkov action
        id: checkov
        uses: bridgecrewio/checkov-action@v12.1347.0
        with:
          directory: ./main
          # file: example/tfplan.json # optional: provide the path for resource to be scanned. This will override the directory if both are provided.
          # check: CKV_AWS_1 # optional: run only a specific check_id. can be comma separated list
          # skip_check: CKV_AWS_2 # optional: skip a specific check_id. can be comma separated list
          quiet: true # optional: display only failed checks
          soft_fail: true # optional: do not return an error code if there are failed checks
          framework: terraform # optional: run only on a specific infrastructure {cloudformation,terraform,kubernetes,all}
          output_format: github_failed_only # optional: the output format, one of: cli, json, junitxml, github_failed_only, or sarif. Default: sarif
          download_external_modules: true # optional: download external terraform modules from public git repositories and terraform registry
          log_level: WARNING # optional: set log level. Default WARNING
          # external_checks_dirs: ../Modules/S3, ../Modules/Database, ../Modules
          # config_file: path/this_file
          # baseline: ./checkov-report/.checkov.baseline # optional: Path to a generated baseline file. Will only report results not in the baseline.
          container_user: 1000 # optional: Define what UID and / or what GID to run the container under to prevent permission issue

      - name: Render terraform docs and push changes back to PR
        uses: terraform-docs/gh-actions@main
        with:
          working-dir: ./main
          output-file: README.md
          output-method: inject
          git-push: "true"
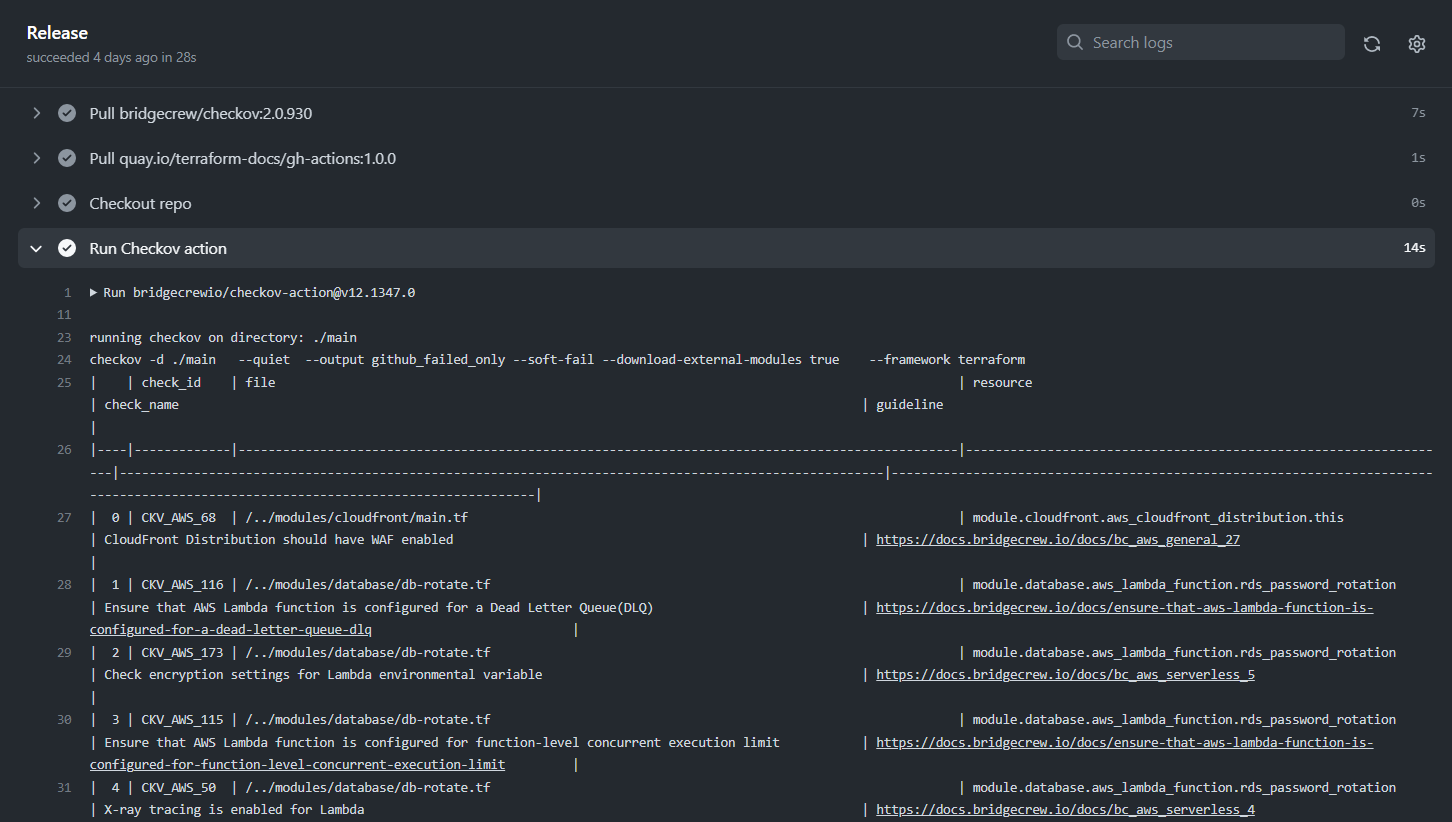
Checkov sẽ kiểm tra xem các tài nguyên được tạo ra có đáp ứng được yêu cầu bảo mật hay không, nó cũng sẽ đưa ra các recommend cho developer thực hiện :
Cost Estimate
Song song với việc triển khai các tài nguyên, việc quản lý chi phí triển khai và vận hành cũng là một vấn đề cần được kiểm soát. Tự động dự toán chi phí với các resource được tạo ra bởi Terraform sử dụng infracost.io ngay trên Pull request, điều này giúp cho team dễ dàng phân tích các chi phí trước khi có những thay đổi.
.github/workflow/infra-cost.yaml
# The GitHub Actions docs (https://docs.github.com/en/actions/reference/workflow-syntax-for-github-actions#on)
# describe other options for 'on', 'pull_request' is a good default.
on: [pull_request]
# env:
  # If you use private modules you'll need this env variable to use
  # the same ssh-agent socket value across all jobs & steps.
#   SSH_AUTH_SOCK: /tmp/ssh_agent.sock
jobs:
  infracost:
    name: Infracost
    runs-on: ubuntu-latest
    permissions:
      contents: read
      pull-requests: write

    env:
      TF_ROOT: ./main
      # This instructs the CLI to send cost estimates to Infracost Cloud. Our SaaS product
      #   complements the open source CLI by giving teams advanced visibility and controls.
      #   The cost estimates are transmitted in JSON format and do not contain any cloud
      #   credentials or secrets (see https://infracost.io/docs/faq/ for more information).
      INFRACOST_ENABLE_CLOUD: true
      # If you're using Terraform Cloud/Enterprise and have variables or private modules stored
      # on there, specify the following to automatically retrieve the variables:
      #   INFRACOST_TERRAFORM_CLOUD_TOKEN: ${{ secrets.TFC_TOKEN }}
      #   INFRACOST_TERRAFORM_CLOUD_HOST: app.terraform.io # Change this if you're using Terraform Enterprise

    steps:
      # If you use private modules, add an environment variable or secret
      # called GIT_SSH_KEY with your private key, so Infracost can access
      # private repositories (similar to how Terraform/Terragrunt does).
      # - name: add GIT_SSH_KEY
      #   run: |
      #     ssh-agent -a $SSH_AUTH_SOCK
      #     mkdir -p ~/.ssh
      #     echo "${{ secrets.GIT_SSH_KEY }}" | tr -d '\r' | ssh-add -
      #     ssh-keyscan github.com >> ~/.ssh/known_hosts

      - name: Setup Infracost
        uses: infracost/actions/setup@v2
        # See https://github.com/infracost/actions/tree/master/setup for other inputs
        # If you can't use this action, see Docker images in https://infracost.io/cicd
        with:
          api-key: ${{ secrets.INFRACOST_API_KEY }}

      # Checkout the base branch of the pull request (e.g. main/master).
      - name: Checkout base branch
        uses: actions/checkout@v2
        with:
          ref: '${{ github.event.pull_request.base.ref }}'

      # Generate Infracost JSON file as the baseline.
      - name: Generate Infracost cost estimate baseline
        run: |
          infracost breakdown --path=${TF_ROOT} \
                              --format=json \
                              --out-file=/tmp/infracost-base.json

      # Checkout the current PR branch so we can create a diff.
      - name: Checkout PR branch
        uses: actions/checkout@v2

      # Generate an Infracost diff and save it to a JSON file.
      - name: Generate Infracost diff
        run: |
          infracost diff --path=${TF_ROOT} \
                          --format=json \
                          --compare-to=/tmp/infracost-base.json \
                          --out-file=/tmp/infracost.json

      # Posts a comment to the PR using the 'update' behavior.
      # This creates a single comment and updates it. The "quietest" option.
      # The other valid behaviors are:
      #   delete-and-new - Delete previous comments and create a new one.
      #   hide-and-new - Minimize previous comments and create a new one.
      #   new - Create a new cost estimate comment on every push.
      # See https://www.infracost.io/docs/features/cli_commands/#comment-on-pull-requests for other options.
      - name: Post Infracost comment
        run: |
            infracost comment github --path=/tmp/infracost.json \
                                     --repo=$GITHUB_REPOSITORY \
                                     --github-token=${{github.token}} \
                                     --pull-request=${{github.event.pull_request.number}} \
                                     --behavior=update
Atlantis
Atlantis là một công cụ mã nguồn mở được tích hợp với Terraform cho phép chạy các lệnh terraform plan và terraform apply trực tiếp từ một Pull request. Bằng cách comment trên Pull request, một trigger sẽ được gửi đến http endpoint của Atlantis, và sau khi thực thi plan hoặc apply nó sẽ trả về kết quả Output ngay trên comment của Pull request. Từ đó ta có thể review lại code trong Terraform trước khi merge vào nhánh Master.
Note : Vì lý do bảo mật nên trong repository này sẽ không có Atlantis.
Nếu không có Atlantis, workflow của chúng ta có thể như sau :

Workflow khi được tích hợp Atlantis:

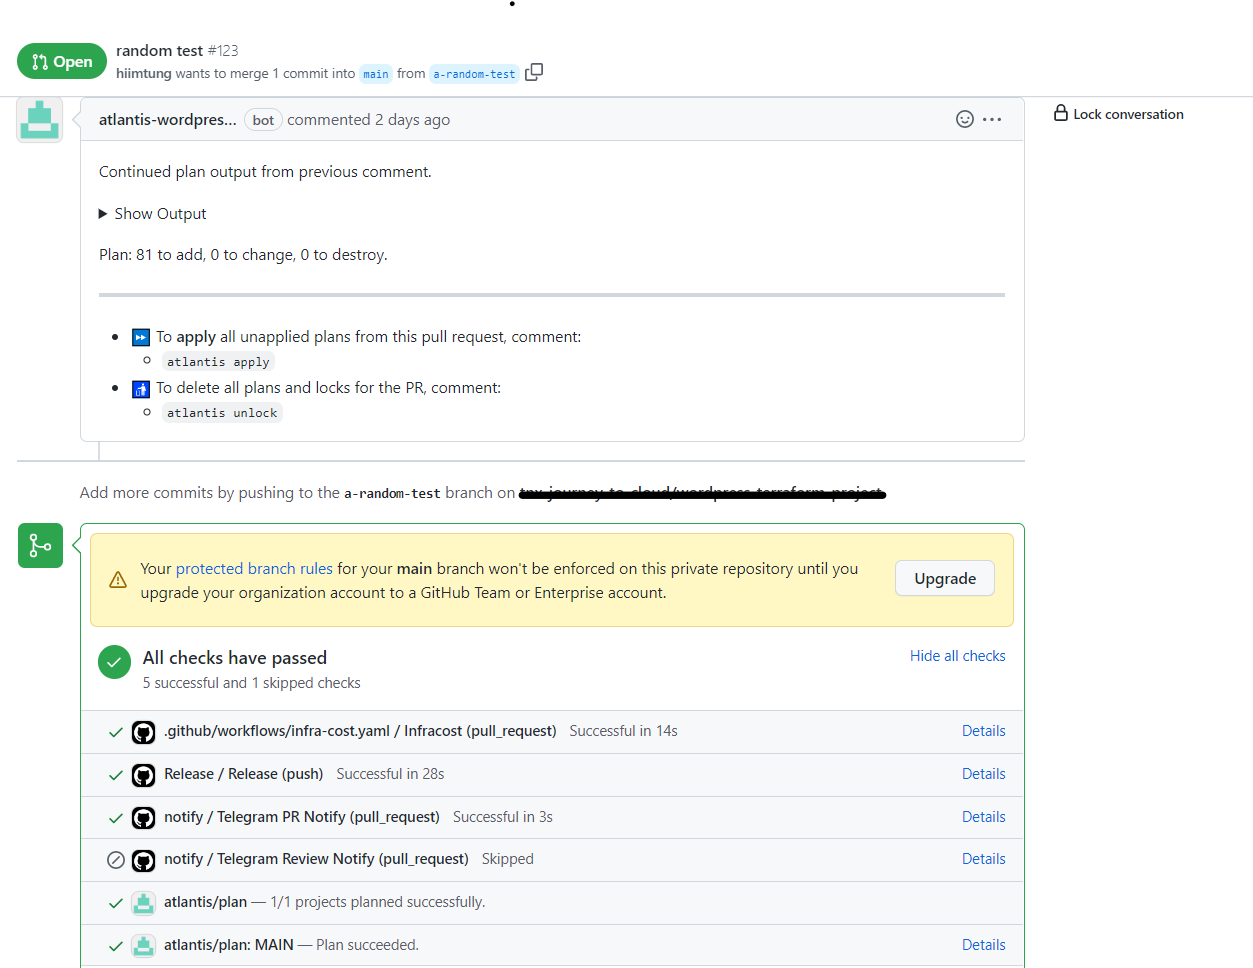
Ngay sau khi có thay đổi, Pull request được tạo ra sẽ gửi một trigger đến Atlantis để chạy plan, hoặc comment atlantis plan:
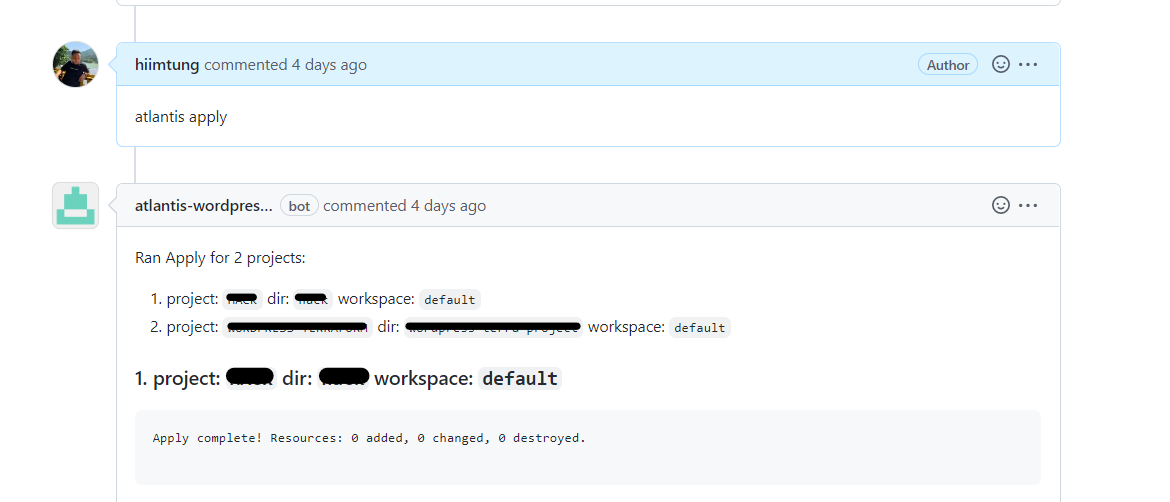
Sau khi quá trình review code đã OK và Pull request được approve, comment atlantis apply để gửi một trigger đến Atlantis và apply vào hệ thống:
Atlantis rất hiệu quả khi làm việc theo team, bằng cách quản lý source code trên Git, các Pull request được tạo ra bởi các member trong team sẽ được team leader review hoặc plan để quyết định có merge hay không ngay trên Pull request đó. Để triển khai một server Atlantis với Git, các bạn tham khảo tại đây
Workflow cho Atlantis trong hệ thống này được define như sau:
atlantis/repos.yaml
repos:
- id: /.*/
  allowed_overrides: [workflow]
  allow_custom_workflows: true
  apply_requirements: [approved]
/atlantis.yaml
version: 3
projects:
  - name: MAIN
    dir: main
    autoplan:
      when_modified:
       - "*.tf"
       - "../Modules/**/*.tf"
    apply_requirements: [approved]
Giúp hạ tầng bảo mật hơn
Security Groups
Traffic đến các tài nguyên được kiểm soát bởi các rule trong security groups. Đối với EC2, chỉ cho phép các traffic đến từ Application Load Balancer và đối với Database, chỉ cho phép các traffic đến từ EC2.
Create security group for EC2 (/modules/networking/main.tf)
module "ec2_sg" {
  source  = "terraform-aws-modules/security-group/aws"
  version = "4.9.0"

  name        = "${var.sg_prefix}-ec2-sg"
  description = "Security group for EC2 instance in Auto Scaling"
  vpc_id      = module.vpc.vpc_id

  ingress_cidr_blocks = var.ssh_whitelist
  ingress_rules       = ["ssh-tcp"]

  ingress_with_source_security_group_id = [
    {
      rule                     = "http-80-tcp"
      source_security_group_id = module.alb_sg.security_group_id
      description              = "Allow HTTP from Load Balancer to EC2 instance"
    }
  ]
  egress_cidr_blocks = ["0.0.0.0/0"]
  egress_rules       = ["all-all"]
}
Create security group for database (/modules/networking/main.tf)
module "db_sg" {
  source  = "terraform-aws-modules/security-group/aws"
  version = "4.9.0"

  name        = "${var.sg_prefix}-db-sg"
  description = "Security group for DB instance/cluster"
  vpc_id      = module.vpc.vpc_id

  ingress_with_source_security_group_id = [
    {
      rule                     = "mysql-tcp"
      source_security_group_id = module.ec2_sg.security_group_id
      description              = "Allow connection from EC2 instance to DB"
    }
  ]
  egress_cidr_blocks = ["0.0.0.0/0"]
  egress_rules       = ["all-all"]
}
AWS Secrets Manager
AWS Secrets Manager giúp bạn lưu trữ và bảo mật các credentials truy xuất đến các ứng dụng hoặc dịch vụ. Người dùng và ứng dụng truy xuất đến các credentials bằng lệnh gọi đến API Secrets Manager. Nó cũng có khả năng tự động hoặc tích hợp với Lambda để rotate các credentials theo chu kì, giúp các tài nguyên an toàn hơn khi sử dụng các thông tin đăng nhập nhạy cảm.
Trong hệ thống này, chúng tôi sử dụng AWS Secrets Manager để lưu trữ thông tin đăng nhập của Database, và sau đó mỗi 30 ngày password của Database sẽ được thay đổi thông qua Lambda.
Lưu credentials của Database trên AWS Secrets Manager (/modules/database/db-rotate.tf)
resource "aws_secretsmanager_secret" "rds_master_credentials" {
  name = "${var.db_identifier}-rds-master-credentials"
  recovery_window_in_days = 0
  # kms_key_id = data.aws_kms_key.this.arn
}

resource "aws_secretsmanager_secret_version" "rds_master_credentials_version" {
  depends_on = [
    aws_secretsmanager_secret.rds_master_credentials
  ]
  secret_id     = aws_secretsmanager_secret.rds_master_credentials.id
  secret_string = <<EOF
{
  "engine": "mysql",
  "username": "${var.master_username}",
  "password": "${var.master_password}",
  "host": "${local.db_enpoint}",
  "port": 3306,
  "dbname": "${var.db_name}"
}
EOF
}
Tự động rotate password (/modules/database/db-rotate.tf)
resource "aws_lambda_function" "rds_password_rotation" {
  # If the file is not in the current working directory you will need to include a
  # path.module in the filename.
  filename      = "${path.module}/resources/rds_password_rotation/lambda_function.zip"
  function_name = "${var.db_identifier}-lambda-rds-password-rotation"
  role          = aws_iam_role.lambda_rotation_role.arn
  handler       = "lambda_function.lambda_handler"

  # The filebase64sha256() function is available in Terraform 0.11.12 and later
  # For Terraform 0.11.11 and earlier, use the base64sha256() function and the file() function:
  # source_code_hash = "${base64sha256(file("lambda_function_payload.zip"))}"
  source_code_hash = filebase64sha256("${path.module}/resources/rds_password_rotation/lambda_function.zip")

  runtime = "python3.7"
  vpc_config {
    subnet_ids = var.subnet_ids_group
    security_group_ids = flatten([
      aws_security_group.lambda_rotation_sg.id,
      var.vpc_security_group_ids
    ])
  }
  # kms_key_arn = data.aws_kms_key.this.arn
  environment {
    variables = {
      SECRETS_MANAGER_ENDPOINT = "https://secretsmanager.ap-southeast-1.amazonaws.com"
    }
  }
}

resource "aws_lambda_permission" "allow_secret_manager_rotate_postgre_password" {
  function_name = aws_lambda_function.rds_password_rotation.function_name
  statement_id  = "AllowExecutionSecretManager"
  action        = "lambda:InvokeFunction"
  principal     = "secretsmanager.amazonaws.com"
}
resource "aws_secretsmanager_secret_rotation" "password_rotation" {
  secret_id           = aws_secretsmanager_secret.rds_master_credentials.id
  rotation_lambda_arn = aws_lambda_function.rds_password_rotation.arn

  rotation_rules {
    automatically_after_days = var.db_password_rotation_days
  }

  depends_on = [
    aws_rds_cluster.this,
    aws_rds_cluster_instance.this,
    aws_db_instance.this,
    aws_secretsmanager_secret_version.rds_master_credentials_version
  ]
}
Chu kì rotate password (/main/variables.tf)
variable "db_password_rotation_days" {
  type        = number
  description = "Password RDS rotation day"
  default     = 30
}
Triển khai ở local
Tương tự với triển khai trên Git nhưng không có workflow, thích hợp với việc tự quản lý source code.
Yêu cầu
Để triển khai một hạ tầng trên AWS với Terraform, các bạn cần cài đặt AWS CLI và Terraform.
Các bước triển khai
- Download source code trên Github
- Mở Terminal và cd đến thư mục đã tải về
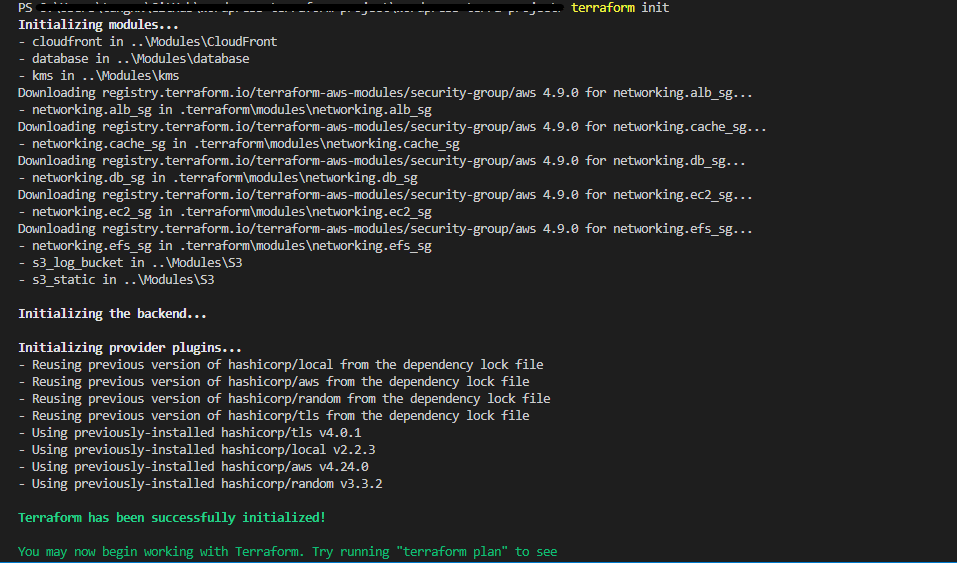
cd ./main - Cấu hình hạ tầng mới với
terraform init, bước này là bắt buộc để các tài nguyên từ provider sẽ được tải về khi ta viết trong filemain.tf![]()
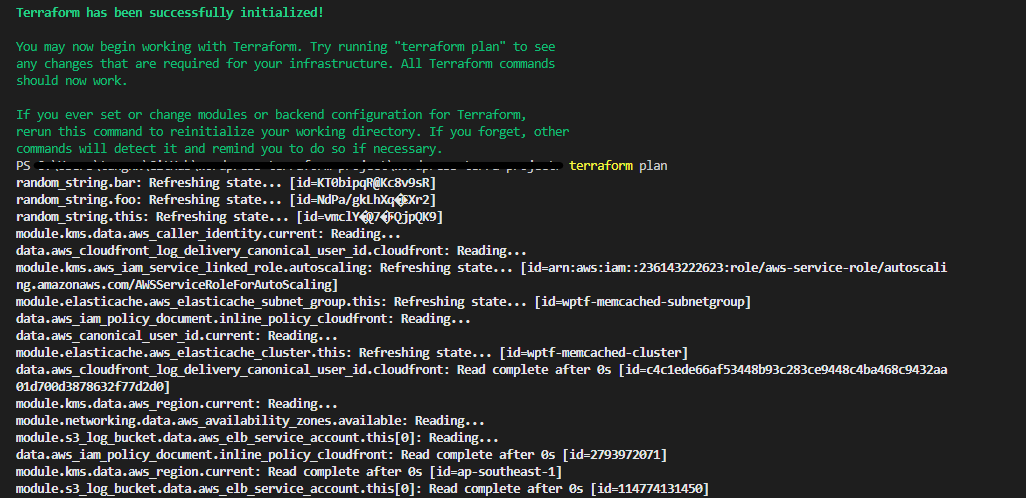
- Kiểm tra trước khi apply :
terraform plan![]()
- Thực hiện apply cấu hình :
terraform apply -auto-approve![]()
- Để hủy bỏ hạ tầng, sử dụng
terraform destroy -auto-approve
Kiểm tra kết quả
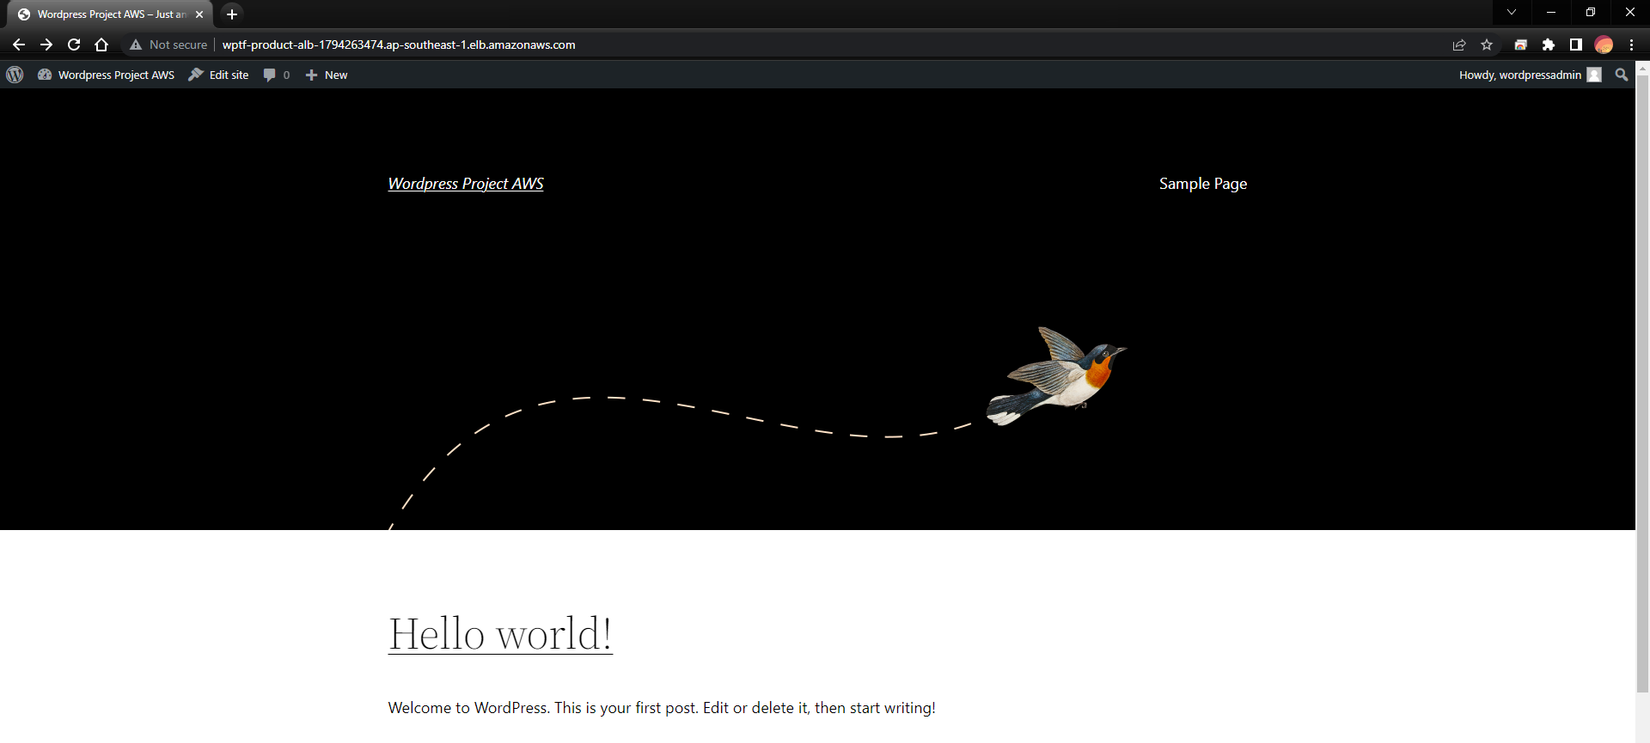
- Sau khi apply, Outputs sẽ cho ra các dns tương ứng. Truy cập vào wordpress webserver với dns = lb_dns_name
![]()
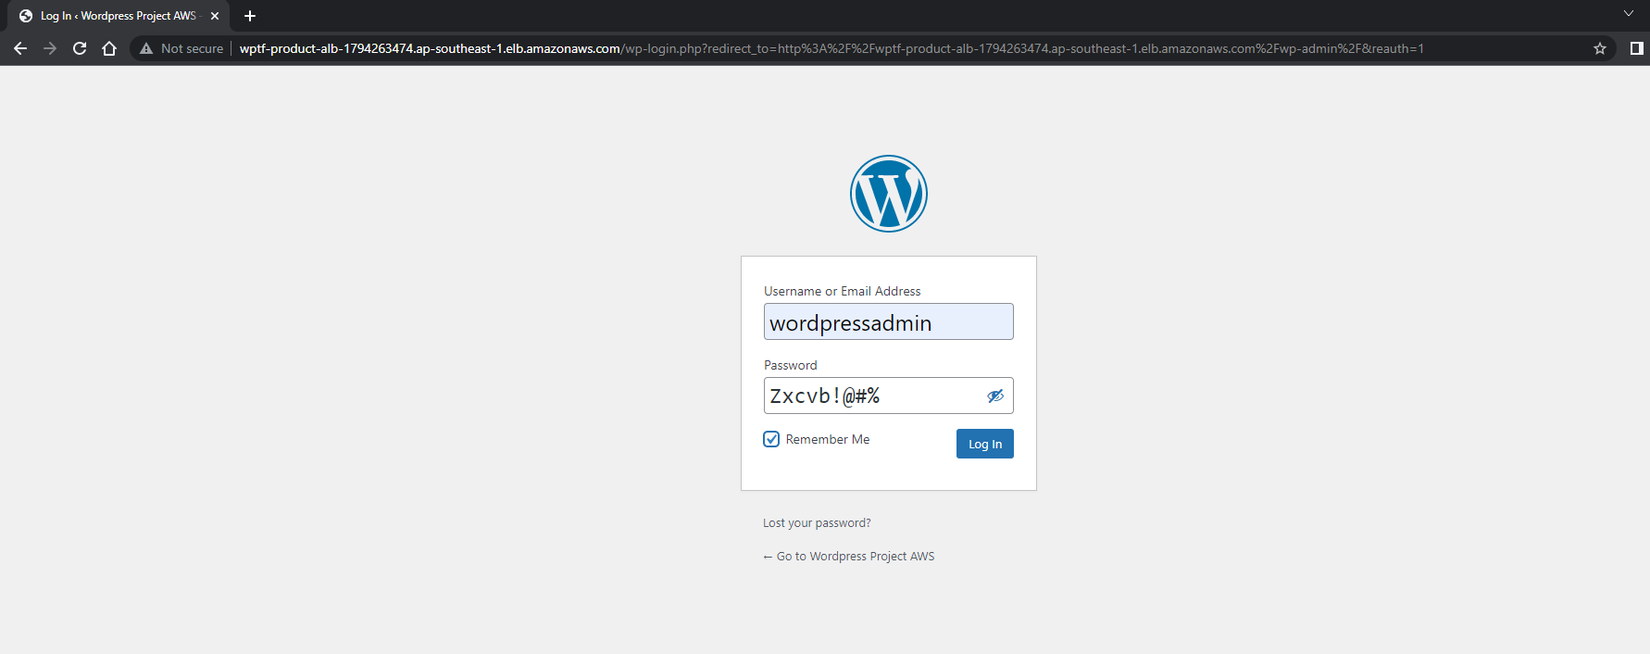
- Để login vào Admin site, các bạn thêm /wp-admin vào sau đường dẫn của trang web
![]()
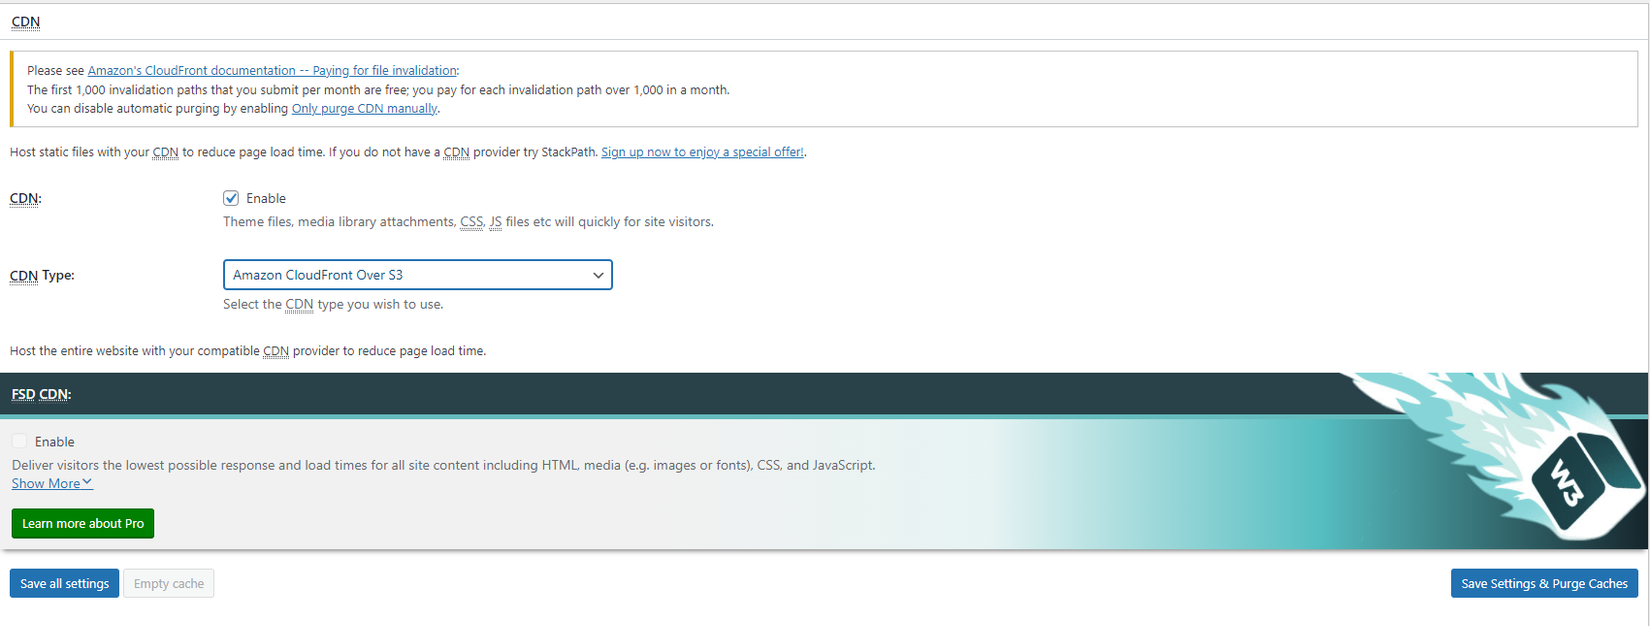
- Để sử dụng được CDN và Memcached, tại mục Plugins các bạn activate W3 Total Cache
![]() Enable Memcached và CDN trong General Settings của W3 Total Cache
Enable Memcached và CDN trong General Settings của W3 Total Cache
![]()
![]()
- Kiểm tra Database Cache với Memcached
![]()
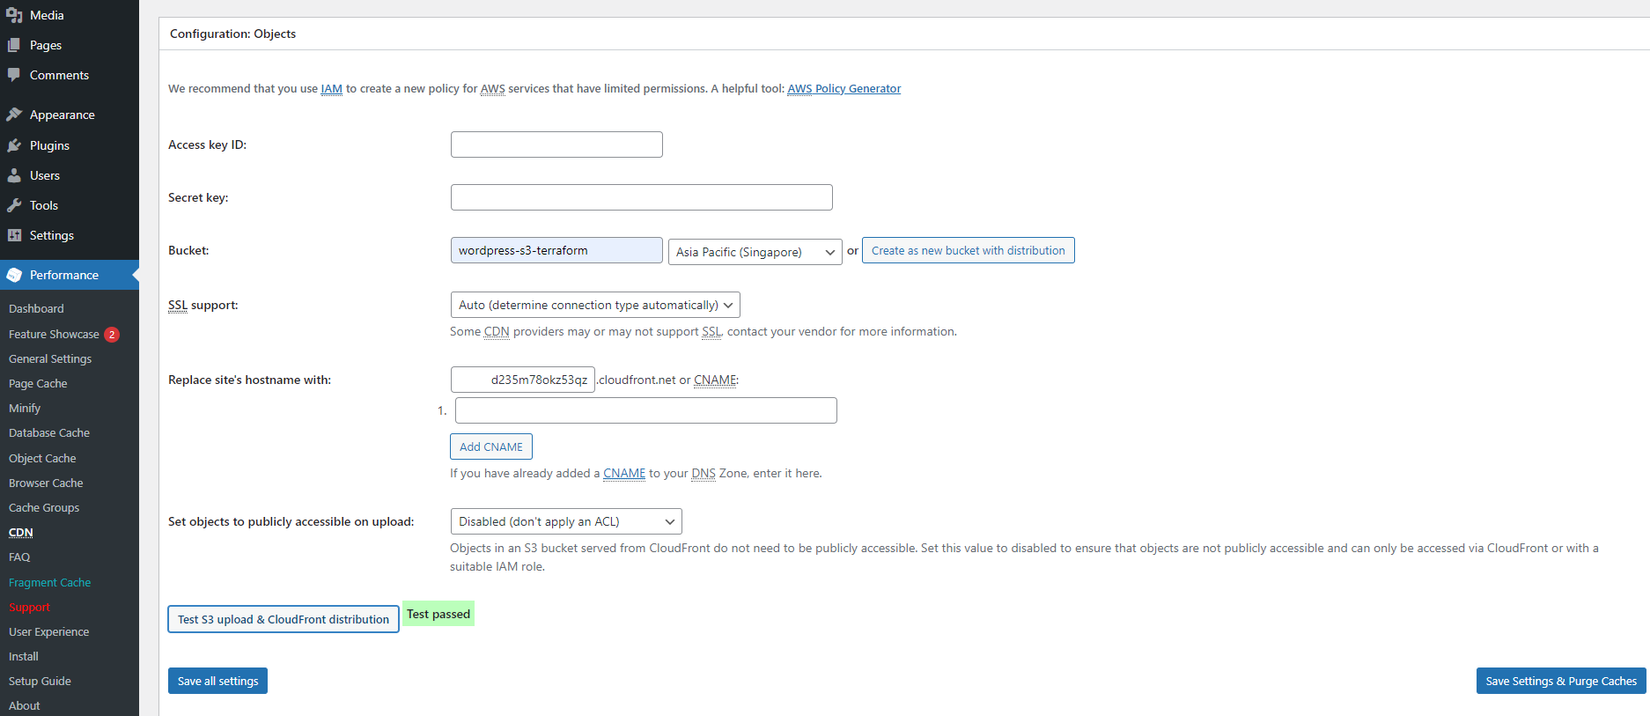
- Kiểm tra CDN với Cloudfront
![]()
Lưu ý
Các giá trị mặc định nằm trong file /main/variables.tf . Các bạn có thể thay đổi các giá trị này phù thuộc với mục đích sử dụng.
All rights reserved
