Truy vấn iOS Photos, Videos với PhotosFramework
Bài đăng này đã không được cập nhật trong 4 năm
Cùng với sự phát triển không ngừng của nền tảng iOS và sự phổ biến của các ứng dụng liên quan tới Media (bao gồm: ảnh, video,...) dẫn tới các câu hỏi về truy vấn local Photos, Videos của thiết bị (iDevice) xuất hiện ngày càng nhiều.
Bài viết này nhằm mục đích giới thiệu về cách sử dụng PhotosFramework để truy vấn Media file trong thiết bị.
PhotosFramework support ios 7.0 trở lên
Tạo project và thiết lập project:
-
Creating project: PhotoAlbumBrowser
-
- Using Swift 2.0 language
-
Root view controller: ViewController
-
- import PhotoFramework:
import Photos
- import PhotoFramework:
-
- Creating tableview as ViewController's subview : selecting order for query
-
- tableview Style:
Grouped
- tableview Style:
-
-
- Chúng ta sẽ có 3 group
-
-
-
- AllPhotos
-
-
-
- Smart Allbum (album grouped by iOS framework)
-
-
-
- Albums (album grouped by user)
-
-
-
- Cell identifier:
AllPhotosCellIdentifier,SmartAlbumCellIdentifiervàAllbumCellIdentifier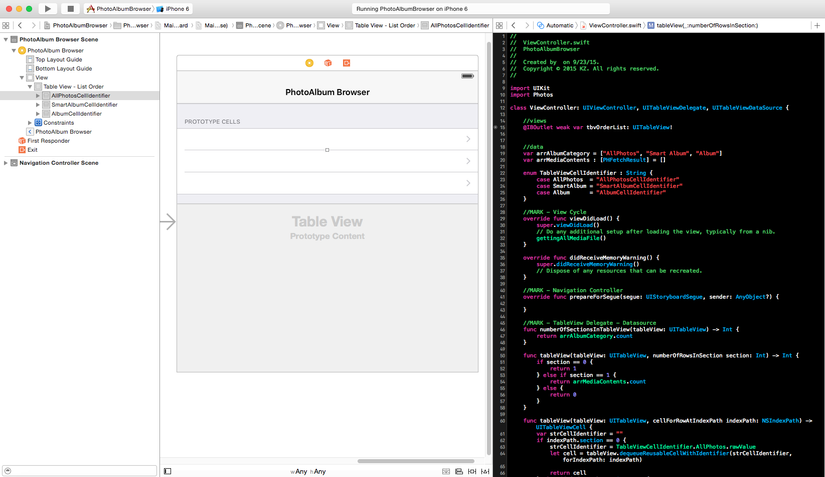
- Cell identifier:
-
-
View Controller
Chúng ta sẽ thiết lập observer cho sự kiện thay đổi của iOS Photo Library.
Mục đích: cập nhật lại dữ liệu cho tableview khi user thêm/thay/sửa/xoá media.
override func viewWillAppear(animated: Bool) {
        super.viewWillAppear(true)
        gettingAllMediaFile()
        PHPhotoLibrary.sharedPhotoLibrary().registerChangeObserver(self)
    }

    override func viewWillDisappear(animated: Bool) {
        super.viewWillDisappear(true)
        PHPhotoLibrary.sharedPhotoLibrary().unregisterChangeObserver(self)
    }
- Photos Controller
Getting Media
    func gettingAllMediaFile () {
        let smartAlbums = PHAssetCollection.fetchAssetCollectionsWithType(PHAssetCollectionType.SmartAlbum, subtype: PHAssetCollectionSubtype.AlbumRegular, options: nil)
        arrMediaContents.append(smartAlbums)

        let topLevelUserCollections = PHCollectionList.fetchTopLevelUserCollectionsWithOptions(nil)
        arrMediaContents.append(topLevelUserCollections)

        tbvOrderList.reloadData()
    }
Getting Change of iOS Photo Library
func photoLibraryDidChange(changeInstance: PHChange) {
        dispatch_async(dispatch_get_main_queue()) { () -> Void in
            let updatedCollectionsFetchResults: NSMutableArray = []
            for collectionsFetchResult in self.arrMediaContents {
                let changeDetails : PHFetchResultChangeDetails = changeInstance.changeDetailsForFetchResult(collectionsFetchResult)!
                if changeDetails.hasIncrementalChanges {
                    if updatedCollectionsFetchResults.count > 0 {
                        updatedCollectionsFetchResults.removeAllObjects()
                    }
                    updatedCollectionsFetchResults.addObjectsFromArray(self.arrMediaContents)
                    updatedCollectionsFetchResults.replaceObjectAtIndex(self.arrMediaContents.indexOf(collectionsFetchResult)!, withObject: changeDetails.fetchResultAfterChanges)
                }
            }
            if updatedCollectionsFetchResults.count > 0 {
                self.arrMediaContents.removeAll(keepCapacity: false)
                for obj in updatedCollectionsFetchResults {
                    self.arrMediaContents.append(obj as! PHFetchResult)
                }
                self.tbvOrderList.reloadData()
            }
        }
    }
Như vậy là chúng ta cơ bản đã hoàn thiện nội dung cho phần kết nối và truy vấn tới Photo Library của iDevice. Tiếp theo, chúng ta sẽ xây dựng màn hình để hiển thị nội dung.
Để hiển thị nội dung của media, tôi lựa chọn Collection View để chứa content.
Tiến hành thiết lập CollectioViewController cũng như cell content MediaCollectionViewCell
Tuy nhiên, trước khi chuyển sang view hiển thị dữ liệu media, chúng ta cần thiết lập dữ liệu pass giữa 2 view controller thông qua segue.
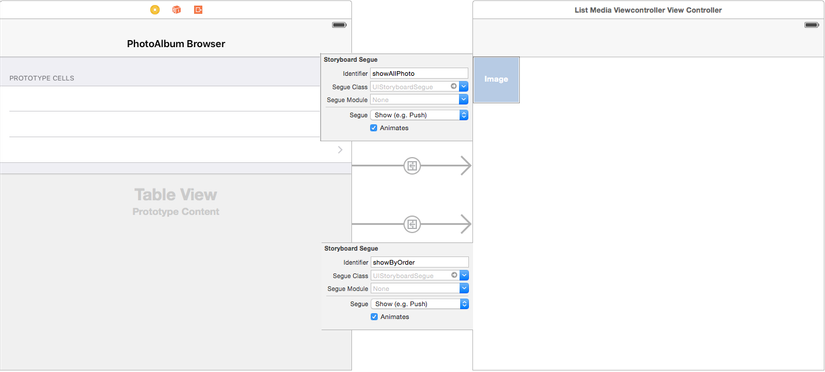
Và phần setting cho segue:
override func prepareForSegue(segue: UIStoryboardSegue, sender: AnyObject?) {
        if segue.identifier == NaviSegueIdentifier.ShowAllPhoto.rawValue {
            let listMediaViewController = segue.destinationViewController as! ListMediaViewcontrollerViewController

            // Fetch all assets, sorted by date created.
            let options :PHFetchOptions = PHFetchOptions()
            options.sortDescriptors = [NSSortDescriptor(key: "creationDate", ascending: true)]
            listMediaViewController.assetsFetchResults = PHAsset.fetchAssetsWithOptions(options)
        } else if segue.identifier == NaviSegueIdentifier.ShowByOrder.rawValue {
            let listMediaViewController = segue.destinationViewController as! ListMediaViewcontrollerViewController

            let indexPath : NSIndexPath = sender as! NSIndexPath
            let fetchResult = arrMediaContents[indexPath.section - 1]
            let collection = fetchResult[indexPath.row]
            if collection.isKindOfClass(PHAssetCollection) {
                let assetCollection = collection as! PHAssetCollection
                let assetsFetchResult = PHAsset.fetchAssetsInAssetCollection(assetCollection, options: nil)

                listMediaViewController.assetsFetchResults = assetsFetchResult
                listMediaViewController.assetCollection = assetCollection
            }
        }
    }
MediaCollectionViewCell
Chúng ta tiến hành thiết lập cho Collection View Cell.
MediaCollectionViewCell sẽ có 1 property là image view để chứa media.
//view
    @IBOutlet weak var imgvCellImage: UIImageView!

    //data
    var imgCellContent : UIImage?

    //MARK - View Utils
    func settingCellContent (image : UIImage) {
        imgCellContent = image
        imgvCellImage.image = imgCellContent
    }
ListMediaViewcontrollerViewController
Đây sẽ là collection view chứa media content.
Chúng ta sẽ thiết lập biến để làm datasource cho collection view
var assetsFetchResults : PHFetchResult = PHFetchResult()
Ngoài ra, chúng ta sẽ sử dụng PHCachingImageManager để truy vấn tới media content :
let imageManager : PHCachingImageManager = PHCachingImageManager()
Và func hiển thị media content
func collectionView(collectionView: UICollectionView, cellForItemAtIndexPath indexPath: NSIndexPath) -> UICollectionViewCell
chúng ta cần truy vấn tới asset cụ thể như sau:
let asset = assetsFetchResults[indexPath.item]
        imageManager.requestImageForAsset(asset as! PHAsset, targetSize: AssetGridThumbnailSize, contentMode: PHImageContentMode.AspectFill, options: nil) { (image, dict) -> Void in
            // Only update the thumbnail if the cell tag hasn't changed. Otherwise, the cell has been re-used.
            if (cell.tag == currentTag) {
                cell.settingCellContent(image!)
            }
        }
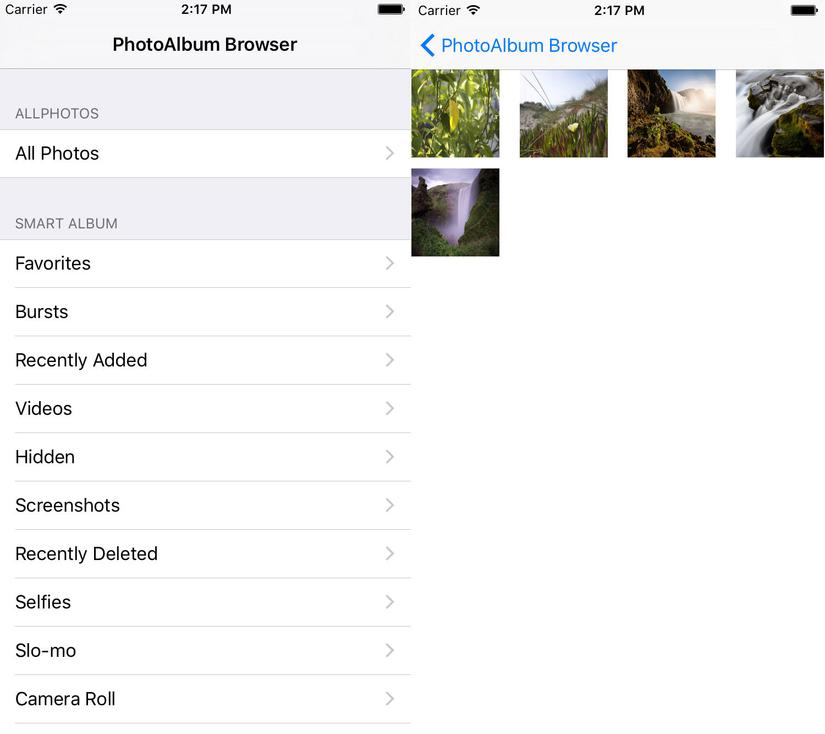
Sau khi build project chúng ta sẽ được kết quả như sau:
Như vậy, với việc sử dụng thư viện
import Photoschúng ta có thể truy vấn vào Library Album của iDevice dễ dàng hơn.
Đây là thư viện được bổ sung và hỗ trợ từ iOS 8.0 trở lên.
Link source code demo: PhotoAlbumBrowser Demo
Thank you!
All rights reserved
