Triển khai AI Agent vào Website và Landing Page chỉ với một file (HTML/JS/CSS)
Muốn nhúng AI Agent trực tiếp lên website mà không cần React, Vue hay framework phức tạp?
Bài viết này chia sẻ một widget chat gọn nhẹ chỉ trong một file, có thể dán thẳng vào bất kỳ Website hoặc Landing Page nào.
Bạn sẽ học được cách:
- Gọi API thật của Agent.
- Tùy biến giao diện bằng CSS thuần.
- Theo dõi hành vi người dùng qua JS event.
- Giữ hiệu năng tải trang dưới 30KB.
Vì sao nên cài AI Agent trực tiếp trên Website?
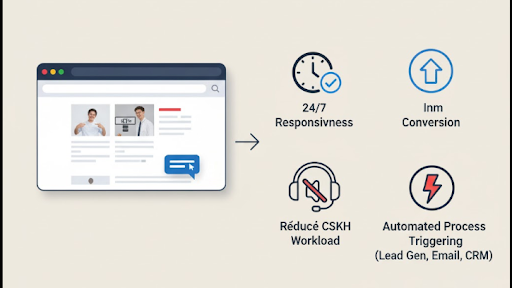
Ngày nay, website không chỉ là nơi hiển thị nội dung tĩnh. Nó cần trở thành điểm chạm thông minh, nơi khách hàng được hỗ trợ và tư vấn tự động. Khi được tích hợp trực tiếp, AI Agent có thể:
- Phản hồi tức thời 24/7: Trả lời câu hỏi, tư vấn sản phẩm hoặc điều hướng khách hàng.
- Tăng tỷ lệ chuyển đổi: Giữ người dùng lâu hơn bằng hội thoại tự nhiên.
- Giảm tải CSKH: Tự động xử lý FAQ, hướng dẫn đơn hàng, tra cứu thông tin.
- Tích hợp automation: Gửi dữ liệu lead, email hoặc cập nhật CRM thông qua API nội bộ.

Cấu trúc của một Chat Widget AI Agent
Một widget AI cơ bản được chia thành 3 lớp chính:
- Frontend (UI Chat): Bao gồm nút mở chat, vùng hội thoại, khung nhập tin nhắn.
- Adapter (JS API Handler): Gửi/nhận dữ liệu giữa client và server qua fetch/axios.
- Backend (Agent API): Xử lý hội thoại, gọi model AI, hoặc liên kết CRM/CDP.
Luồng hoạt động:
User → Chat Widget → API Agent → Response → Render UI
Triển khai nhanh – chỉ với một file HTML
Đây là chat widget tối giản viết bằng HTML/CSS/JS thuần.
Copy đoạn code này vào cuối file .html (trước thẻ </body>).
Nếu bạn dùng BizWebsite (dịch vụ thiết kế website từ Bizfly), chỉ cần dán đoạn code này vào khối “Custom HTML” trong CMS là widget sẽ tự hiển thị.
<!doctype html>
<html lang="vi">
<head>
  <meta charset="utf-8" />
  <meta name="viewport" content="width=device-width,initial-scale=1" />
  <title>AI Agent Widget</title>
  <style>
    :root {
      --chat-primary: #1f6feb;
      --chat-bg: #ffffff;
      --chat-border: #e5e7eb;
      --shadow: 0 10px 30px rgba(0,0,0,.12);
      --radius: 14px;
    }
    .ai-launcher {
      position: fixed; right: 20px; bottom: 20px;
      width: 56px; height: 56px; border-radius: 50%;
      background: var(--chat-primary); color: #fff;
      display: grid; place-items: center;
      font-size: 20px; cursor: pointer;
      box-shadow: var(--shadow);
    }
    .ai-chat {
      position: fixed; right: 20px; bottom: 90px;
      width: 360px; height: 520px; background: var(--chat-bg);
      border: 1px solid var(--chat-border);
      border-radius: var(--radius); display: none; flex-direction: column;
      overflow: hidden; box-shadow: var(--shadow);
    }
    .ai-chat.open { display: flex; }
    .ai-header {
      background: #f9fafb; padding: 10px 14px;
      font-weight: 600; display: flex; justify-content: space-between;
    }
    .ai-messages { flex: 1; overflow-y: auto; padding: 10px; }
    .ai-msg { margin: 8px 0; padding: 8px 12px; border-radius: 12px; max-width: 80%; }
    .from-user { background: #dbeafe; margin-left: auto; }
    .from-bot { background: #f3f4f6; margin-right: auto; }
    .ai-input { display: flex; border-top: 1px solid var(--chat-border); }
    .ai-textarea { flex: 1; padding: 8px; border: none; resize: none; }
    .ai-send { background: var(--chat-primary); color: #fff; border: none;
      padding: 10px 16px; cursor: pointer; border-radius: 0 0 14px 0; }
  </style>
</head>
<body>

  <button class="ai-launcher">💬</button>

  <div class="ai-chat" id="chatbox">
    <div class="ai-header">
      AI Assistant
      <button onclick="toggleChat()">✕</button>
    </div>
    <div class="ai-messages" id="messages"></div>
    <div class="ai-input">
      <textarea id="userInput" class="ai-textarea" rows="1" placeholder="Nhập tin nhắn..."></textarea>
      <button class="ai-send" onclick="sendMessage()">Gửi</button>
    </div>
  </div>

  <script>
    const launcher = document.querySelector('.ai-launcher');
    const chat = document.getElementById('chatbox');
    const messages = document.getElementById('messages');

    launcher.onclick = () => chat.classList.toggle('open');
    function toggleChat() { chat.classList.remove('open'); }

    async function sendMessage() {
      const input = document.getElementById('userInput');
      const text = input.value.trim();
      if (!text) return;
      appendMsg('user', text);
      input.value = '';

      const res = await fetch('https://api.your-agent.com/message', {
        method: 'POST',
        headers: { 'Content-Type': 'application/json' },
        body: JSON.stringify({ message: text })
      });
      const data = await res.json();
      appendMsg('bot', data.reply || '...');
    }

    function appendMsg(role, text) {
      const msg = document.createElement('div');
      msg.className = `ai-msg from-${role}`;
      msg.textContent = text;
      messages.appendChild(msg);
      messages.scrollTop = messages.scrollHeight;
    }
  </script>
</body>
</html>
Nguồn tham khảo: https://bizfly.vn/techblog/trien-khai-ai-agent-tren-website-va-landing-page-kem-code.html
All rights reserved