Tìm kiếm với vue.js laravel
Bài đăng này đã không được cập nhật trong 7 năm
1. Tạo môi trường.
Bắt đầu luôn nhé mọi người. Lưu ý lệnh gõ trong command với windown và terminal với unbutu.
Kéo một dự án laravel mới nhất về nào.
composer create-project --prefer-dist laravel/laravel search
Chạy tiếp cho mình lệnh sau mà phải cd vào dự án đã mới chạy nhé!.
npm instarll
vào phpmyadmin tạo một database mới tên tùy mọi người mình tạo tên search.
vào file .env cấu hình lại để kết nối đến cơ sở dữ liệu.
DB_CONNECTION=mysql
DB_HOST=127.0.0.1
DB_PORT=3306
DB_DATABASE=search
DB_USERNAME=root
DB_PASSWORD=
Tạo model, migrateion, bừa nhé mọi người.
php artisan make:model Admin --migration
Ok! các bạn vào migrations rồi vào migration admins mới tạo ra sửa một chút. mình sẽ tìm kiếm theo tên nên thêm trường name vào là được.
<?php

use Illuminate\Support\Facades\Schema;
use Illuminate\Database\Schema\Blueprint;
use Illuminate\Database\Migrations\Migration;

class CreateAdminsTable extends Migration
{
    /**
     * Run the migrations.
     *
     * @return void
     */
    public function up()
    {
        Schema::create('admins', function (Blueprint $table) {
            $table->bigIncrements('id');
            $table->string('name');
            $table->timestamps();
        });
    }

    /**
     * Reverse the migrations.
     *
     * @return void
     */
    public function down()
    {
        Schema::dropIfExists('admins');
    }
}
tạo seed để có dữ liệu mẫu nào.
ohp artisan make:seed AdminTableSeeder
các bạn vào file UserFactory.php nó nằm trong thư mục migrations/factories và viết lại xóa đi và để lại mỗi trường name hoặc bạn có thể thêm mới như sau.
<?php

use App\Admin;
use Illuminate\Support\Str;
use Faker\Generator as Faker;

/*
|--------------------------------------------------------------------------
| Model Factories
|--------------------------------------------------------------------------
|
| This directory should contain each of the model factory definitions for
| your application. Factories provide a convenient way to generate new
| model instances for testing / seeding your application's database.
|
*/

$factory->define(Admin::class, function (Faker $faker) {
    return [
        'name' => $faker->name,
    ];
});
OK! giờ mở file seed admin mình tạo lúc nãy lên và viết như mình nhé!
<?php

use Illuminate\Database\Seeder;

class AdminTableSeeder extends Seeder
{
    /**
     * Run the database seeds.
     *
     * @return void
     */
    public function run()
    {
        factory(App\Admin::class, 20)->create();
    }
}
Nhìn qua bạn có thể hiều mình dùng factory để tạo 20 name cho bảng của mình.
Bạn vào tiếp file DatabaseSeeder.php ở trong seeds. Bỏ comment và sửa cái UserTableSeeder thành AdminTableSeeder hoặc viết mới tùy ý. Bạn để ý file App/Providers/AppServiceProvider.php xem đã thêm Schema::defaultStringLength(191); chưa để chánh lỗi gio trường email của bảng user lỗi.
<?php

namespace App\Providers;

use Illuminate\Support\ServiceProvider;
use Illuminate\Support\Facades\Schema;

class AppServiceProvider extends ServiceProvider
{
    /**
     * Register any application services.
     *
     * @return void
     */
    public function register()
    {
        //
    }

    /**
     * Bootstrap any application services.
     *
     * @return void
     */
    public function boot()
    {
        Schema::defaultStringLength(191);
    }
}
Giờ bạn chạy lệnh sau để tạo bảng admins và dữ liệu mẫu, bạn nên config:cache trước.
php artisan config:cache
php artisan migrate
php artisan db:seed
2. Tìm kiếm với vue.js
Ok! Giờ bạn vào roites/web.php tạo cho mình một route mới như sau.
Route::post('/search', 'SearchController@postSearch');
Sau đó tạo một controller mới.
php artisan make:controller SearchController
Nào bạn vào resources/js/component/ExampleComponent.vue viết vue.js để gửi và nhận dữ liệu nào.
<template>
    <div class="container">
        <div class="row justify-content-center">
            <div class="col-md-8">
                <div class="card">
                    <input type="text" v-model="searchText" @keyup="search()">
                </div>
                <div>
                    <ul v-for="searchArr in searchArrs">
                        <li>{{ searchArr.name }}</li>
                    </ul>
                </div>
            </div>
        </div>
    </div>
</template>

<script>
    export default {
        data() {
            return {
                searchText: '',
                searchArrs: [],
            }
        },
        methods: {
            search() {
                axios.post('/search', {
                    name: this.searchText
                })
                .then((response) => {
                    this.searchArrs = response.data;
                });
            }
        }
    }
</script>
Tiếp theo vào SearchController viết như sau.
<?php

namespace App\Http\Controllers;

use Illuminate\Http\Request;
use App\Admin;

class SearchController extends Controller
{
    public function postSearch(Request $request)
    {
    	$search = $request->name;
    	$dataName = Admin::where('name', 'LIKE', "%$search%")->get();
    	return $dataName;
    }
}
Ok! Cuối cùng sẽ là welcome.blade.php sửa lại như sau.
<!doctype html>
<html lang="{{ str_replace('_', '-', app()->getLocale()) }}">
<head>
    <meta charset="utf-8">
    <meta name="viewport" content="width=device-width, initial-scale=1">

    <title>Laravel</title>
    <meta name="csrf-token" content="{{ csrf_token() }}">
    <!-- Fonts -->
    <link href="https://fonts.googleapis.com/css?family=Nunito:200,600" rel="stylesheet">
    <script src="{{ asset('js/app.js') }}" defer></script>
</head>
<body>
    <div id="app">
        <example-component></example-component>
    </div>
</body>
</html>
Bây giờ các bạn chạy một trong hai lệnh sau.
npm run dev
npm run watch
Và ra xem kết quả.
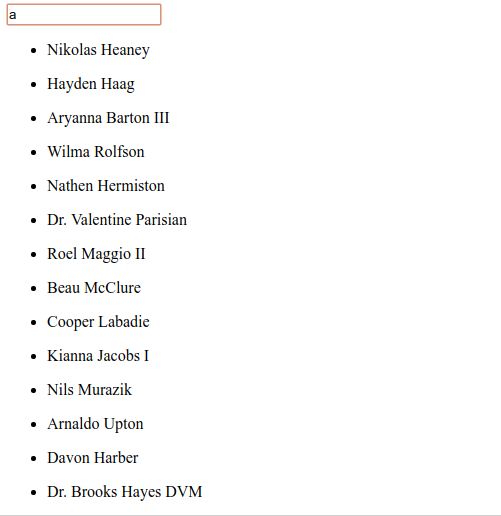 Quá đơn giản đúng không ạ. Viết dài thế để làm từ đầu cho những bạn chưa hiểu làm theo thôi chứ ai đã biết về vue.js thì mình nghĩ làm không đến 5 phút nếu bỏ cài đặt laravel ra nhé. Các bạn có thể áp dụng vào dự án của mình bằng việc bắt đầu từ đoạn tìm kiếm với vue.js mà bỏ qua đoạn cài đặt nhưng cũng nên để ý xem dự án mình đã cài npm chứ nhé nếu không là sẽ có lỗi.
Kết.
Bên trên là mình đã hướng dẫn các bạn cách search real time với vue.js một cách rất đơn giản.
các bạn có lỗi gì khi làm thì có thể comment trực tiếp ở đây, lúc mình làm cũng hơi vội nên có mấy lỗi mình fix rồi.
All rights reserved
