Tìm hiểu về React Redux Saga xây dựng ứng dụng đơn giản.
Bài đăng này đã không được cập nhật trong 7 năm
Trong bài này chúng ta sẽ cùng tìm hiểu về xây dựng một ứng dụng đơn giản với React Redux Saga.
Trước tiên về môi trường chúng ta cần có nodejs , npm. Khởi tạo ứng dụng, tại cửa sổ termiantor
npm install -g create-react-app
create-react-app app
cd app
npm install --save-dev redux react-redux redux-act redux-devtools-extension redux-form redux-saga
npm install
Trong ứng dụng cơ bản này. Chúng ta sẽ dùng 1 api để lấy dữ liệu của trang https://newsapi.org/ bạn có thể nên đây tạo để tạo 1 api lấy bài viết mới nhất cho ứng dụng. Lúc mình tạo hiện tại đang là link sau:
https://newsapi.org/v2/everything?q=bitcoin&from=2019-04-21&sortBy=publishedAt&apiKey=df861cbe5f0b466996fff1ac1b60072e
Vòng đời ứng dụng sẽ như sau:
STATE(before call) →STATE(during call) →STATE(answer received)
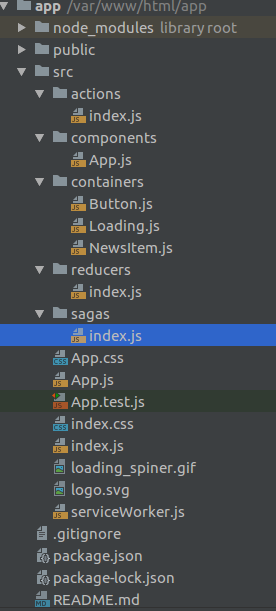
Chúng ta sẽ cần tạo cấu trúc thư mục như sau:
Nội dung trong file index.js
import React from 'react';
import createSagaMiddleware from 'redux-saga';
import { render } from 'react-dom';
import { createStore, applyMiddleware } from 'redux';
import { Provider } from 'react-redux';
import { logger } from 'redux-logger';
import reducer from './reducers';
import App from './components/App';
import rootSaga from './sagas';
const sagaMiddleware = createSagaMiddleware();

const store = createStore(
   reducer,
   applyMiddleware(sagaMiddleware, logger),
);
sagaMiddleware.run(rootSaga);
render(
   <Provider store={store}>
     <App />
   </Provider>,
document.getElementById('root'),
);
Trong tập tin này, tôi đã khởi tạo redux store . Store này sử dụng hai phần mềm trung gian logger và SAGA. Redux-logger để kiểm tra trong bảng điều khiển kích hoạt các hành động và trạng thái của Redux store. Nội dung trong file APP.js
import React from 'react';
import Button from '../containers/Button';
import NewsItem from '../containers/NewsItem'
import Loading from '../containers/Loading'
let App = () => (
  <div>
     <Button />
     <Loading />
     <NewsItem />
  </div>
);
export default App;
Tập tin này hiển thị ba thành phần. Ở trạng thái đầu tiên, nó chỉ hiển thị Button, trong khi gọi API, spinner xuất hiện và sau khi phản hồi nhận được <NewsItem /> sẽ được hiển thị.
Nội dung trong file Button.js
import React from 'react';
import { connect } from 'react-redux';
import { getNews } from '../actions';
let Button=({getNews})=>(
   <button onClick={getNews}>Press to see news</button>
)
const mapDispatchToProps = {
     getNews: getNews,
};
Button = connect(null,mapDispatchToProps)(Button);
export default Button;
Thành phần <Button /> để hiển button. Tôi sử dụng connect với Redux bằng chức năng connect từ Reac-redux. Phương thức onClick của thành phần này kích hoạt hành động getNews, mà tôi sẽ viết tiếp theo.
Nội dung trong file actions/index.js.
export const getNews = () => ({
      type: 'GET_NEWS',
});
Trình tạo hành động getNews . Nó trả về một đối tượng. Và cho reducer biết cách xử lý loại hành động này. Bây giờ trình reducer sẽ như thế sau:
Nội dung trong file reducers/index.js
const reducer = (state = {}, action) => {
  switch (action.type) {
     case 'GET_NEWS':
        return { ...state, loading: true };
     default:
        return state;
   }
};
export default reducer;
Khi hành động ‘GET_NEWS, đã được gửi thuộc tính state bằng với true và spinner xuất hiện trên màn hình. Tất nhiên, lệnh này sẽ được kích hoạt và sau khi phản hồi đã đến hành động NEWS_RECEIVED được gửi đi. Redux-Saga sẽ quan tâm đến tất cả những điều này. Tiếp theo, hãy cùng đến với tập tin chính của hướng dẫn SAGA này.
Nội dung trong file sagas/index.js
import { put, takeLatest, all } from 'redux-saga/effects';
function* fetchNews() {
  const json = yield fetch('https://newsapi.org/v2/everything?q=bitcoin&from=2019-04-21&sortBy=publishedAt&apiKey=df861cbe5f0b466996fff1ac1b60072e')
        .then(response => response.json(), );
  yield put({ type: "NEWS_RECEIVED", json: json.articles, });
}
function* actionWatcher() {
     yield takeLatest('GET_NEWS', fetchNews)
}
export default function* rootSaga() {
   yield all([
   actionWatcher(),
   ]);
}
Tập tin này khá phức tạp . Tôi đoán nó có vẻ khá khó khăn vì cú pháp bất thường của ES6 GENERATORS như ‘yield‘ and , tôi xuất chức năng này rootSaga, trong đó tôi gọi hàm actionWatcher.
function* actionWatcher() {
    yield takeLatest('GET_NEWS', fetchNews)
}
Nói một cách đơn giản, nó giống như tôi nói với SAGA hãy chờ đợi hành động ‘GET_NEWS, để được gửi đi. Và những ‘GET_NEWS, kh bị từ chối để gọi hàm fetchNews. Bên trong hàm fetchNews thực hiện lệnh gọi không đồng bộ tới API và khi yêu cầu đến hành động tiếp theo { type: “NEWS_RECEIVED”, json: json.articles, } được gửi đi. Như bạn có thể thấy, tôi không cần phải viết hành động, “NEWS_RECEIVED” in actions/index.js vì nó được mô tả đầy đủ ở đây.
Đến bây giờ, hãy để reducer biết cách đối phó với hành động này “NEWS_RECEIVED”.
Nội dung trong file reducers/index.js
const reducer = (state = {}, action) => {
 switch (action.type) {
   case 'GET_NEWS':
        return { ...state, loading: true };
   case 'NEWS_RECEIVED':
        return { ...state, news: action.json[0], loading: false }
   default:
        return state;
 }
};
export default reducer;
Cuối cùng nội dung của reducer. Khi phản hồi từ lệnh gọi API đã nhận được trạng thái Redux sẽ có tin tức thuộc tính chứa json của một tin tức.
Nội dung trong file NewsItem.js
import React from 'react';
import { connect } from 'react-redux'
const imgStyle = {
  hight: 'auto',
  width: '80%',
  border: '4px solid RebeccaPurple ',
  borderRadius: '5%'
};
const articleStyle = {
width: '50%',
margin: '0 auto',
color: 'olive'
}
let NewsItem = ({ article }) => (
article ?
<article style={articleStyle} >
  <div>
    <h1>{article.title}</h1>
    <img style={imgStyle} src={article.urlToImage} alt="" />
    <h4>{article.description}</h4>
    <a href={article.url} target="_blank">READ MORE</a>
  </div>
</article> :
null
);
const mapStateToProps = (state) => ({
article: state.news,
})
NewsItem = connect(mapStateToProps,null)(NewsItem)
export default NewsItem;
<NewsItem/> dùng để hiển thị thành phần news.
Nội dung file Loading.js
import React from 'react';
import { connect } from 'react-redux'
import img from '../loading_spinner.gif'
let Loading = ({ loading }) => (
loading ?
<div style={{ textAlign: 'center' }}>
   <img src={img} alt='loading' />
   <h1>LOADING</h1>
</div> :
null
);
const mapStateToProps = (state) => ({loading: state.loading})
Loading = connect(mapStateToProps,null)(Loading)
export default Loading;
<Loading/> sẽ hiển thị một ảnh gif spiner quay quay trong khi ứng dụng gọi api.
Và cuối cùng để xem kết chúng ta chạy lệnh sau:
npm start
Bạn có thể xem demo tại link sau:
https://sagatutorialapp.netlify.com/
Bạn có thể xem source tham khảo tại reposetory sau:
https://github.com/tamnx-1149/reacjs-redux-saga
Cảm ơn bạn đã theo dõi bài viết của mình đến đây là hết hẹn gặp lại các bạn trong các bài biết tiếp theo.
Tài liệu tham khảo:
https://medium.com/@geekrodion/redux-saga-create-react-app-b6484f704d68
https://medium.com/@lavitr01051977/make-your-first-call-to-api-using-redux-saga-15aa995df5b6
All rights reserved
