Tìm hiểu về Lifecycle Hooks trong Vuejs
Bài đăng này đã không được cập nhật trong 5 năm
Lifecycle hooks: cho phép bạn hiểu khi nào thì component được create, add to the DOM, updated, destroyed.
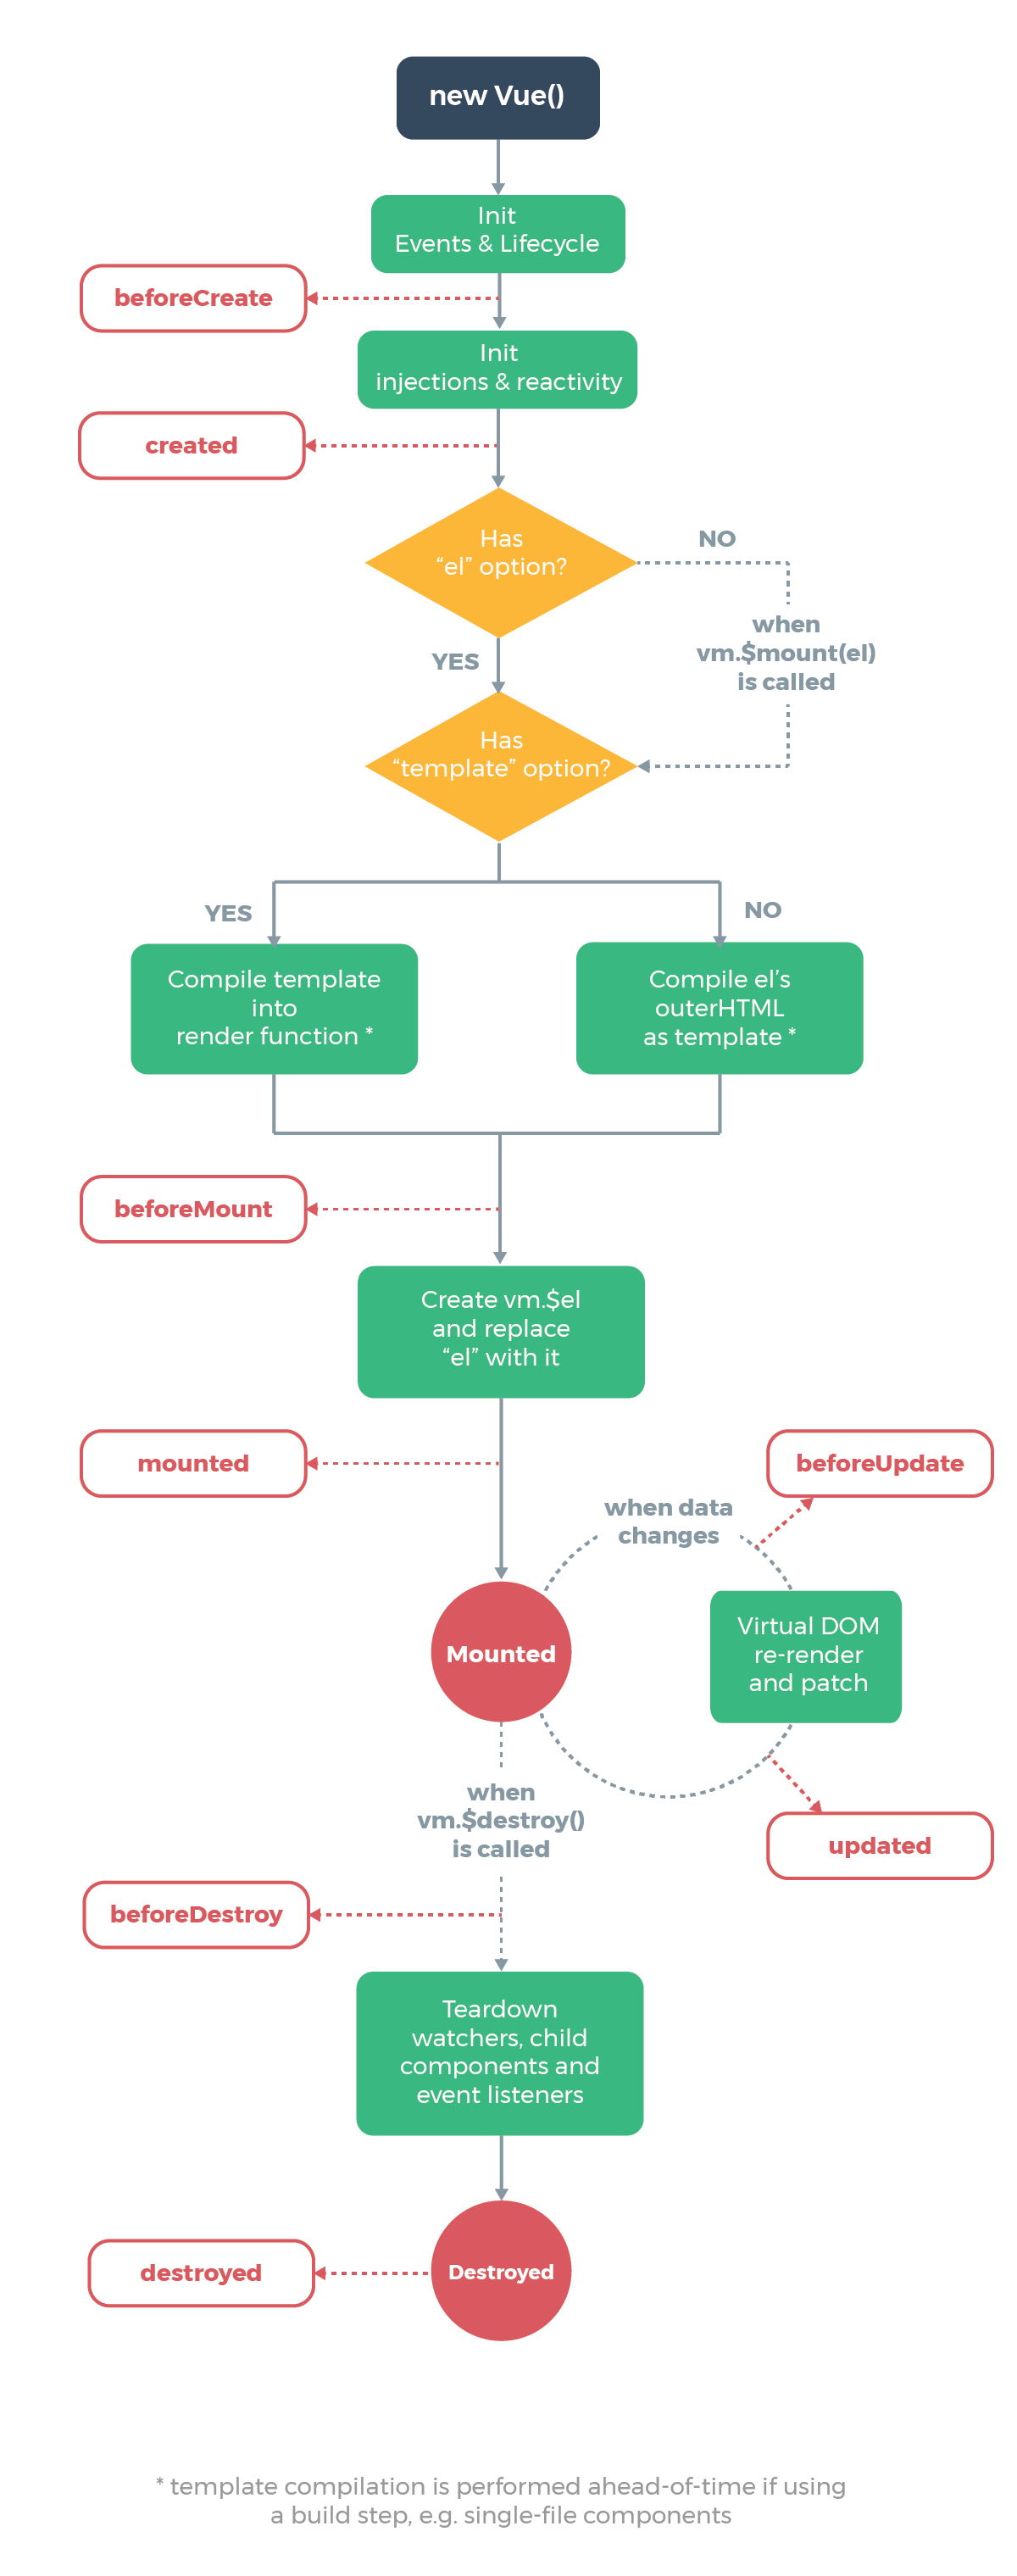
Đây là hình ảnh từ Vue.js documentation cho thấy được vòng đời của một Vue Instance.

Mình sẽ chia ra 4 cặp Hooks thông dụng để các bạn có thể ghi nhớ dễ dàng hơn:
beforeCreatevscreatedbeforeMountvsmountedbeforeUpdatevsupdatedbeforeDestroyvsdestroyed
Hay cùng mình đi qua từng cặp Hooks và những ví dụ để hiểu cách hoạt động của nó như thế nào.
1. beforeCreate vs created
beforeCreate:- chạy trước khi
render - được gọi
synchronously(đồng bộ) ngay sau khiinstanceđã được khởi tạo datavàmethodschưa khởi tạo nên không thể lấy được ở giai đoạn này.
- chạy trước khi
<template>
  <div>{{ text }}</div>
</template>

<script>
export default {
  components: {},
  beforeCreate() {
    console.log("Opion/LifeCycle -> beforeCreate", this.text);
    this.foo();
  },

  data() {
    return {
      text: "Lifecycle",
    };
  },

  methods: {
    foo() {
      console.log("methods -> foo");
    },
  },
};
</script>
Kết quả:

created:- chạy trước khi
render - Chạy sau khi
beforeCreatechạy xong. datavàmethodsđã được tạo nên có thể lấy được ở giai đoạn này.$el(root DOM elementmàVue instanceđang quản lý) chưa có vì chưa được mount
- chạy trước khi
<template>
  <div>{{ text }}</div>
</template>

<script>
export default {
  components: {},
  beforeCreate() {
    console.log("Opion/LifeCycle -> beforeCreate", this.text);
    // this.foo();
  },

  data() {
    return {
      text: "Lifecycle",
    };
  },

  methods: {
    foo() {
      console.log("methods -> foo");
    },
  },

  created() {
    console.log("Opion/LifeCycle -> created", this.text);
    console.log("$el", this.$el);
    this.foo();
  },
};
</script>
Kết quả:

2. beforeMount vs mounted
-
beforeMount- Chạy sau khi
createdchạy xong - Chuẩn bị việc
mounting
- Chạy sau khi
-
mounted- Chạy sau khi việc
mountingđã kết thúc. $el: thằng này ởcreatedchưa thể lấy được nhưng ởmountedthì đã có kết quả như hình.- Note: Ở giai đoạn này chưa hẳn tất cả component đã được
mounted. Nếu bạn muốn đợi cho tất cả đượcrenderthì có thể tìm hiểu thêm về thằng vm.$nextTick trongmounted.
- Chạy sau khi việc
Ví dụ:
<script>
export default {
  components: {},
  data() {
    return {
      text: "Lifecycle",
    };
  },
  beforeMount() {
    console.log("Option/Lifecycle beforeMount");
  },
  /*
    Bạn có thể xóa phần tag template phía trên và thay vào phần render function ở dưới sẽ thấy được
    quá trình render giữa 2 Hook.
  */
  render: function (createElement) {
    console.log("render");
    return createElement("div", this.text);
  },
  mounted() {
    console.log("Option/Lifecycle mounted");
    console.log("this.$el", this.$el);
  },
};
</script>
</script>
Kết quả:

3. beforeUpdate vs updated
Quay lại hình ở phía trên, chúng ta có thể thấy được khi có những sự thay đổi data thì cặp Hook này sẽ chạy:
beforeUpdate- Gọi khi data thay đổi và trước khi DOM được
patch. - Lấy dữ liệu DOM cũ trước khi thay đổi DOM mới
- Gọi khi data thay đổi và trước khi DOM được
updated- Được gọi sau khi dữ liệu thay đổi làm cho DOM được
re-renderandpatch. - Hạn chế change data ở Hook này, thay vì thế sử dụng
computedhoặcwatcherthay thế. - Giống như
mounted: giai đoạn này chưa hẳn tất cả component đã đượcre-render. Nếu bạn muốn đợi cho tất cả đượcre-renderthì có thể tìm hiểu thêm về thằng vm.$nextTick trongupdated
- Được gọi sau khi dữ liệu thay đổi làm cho DOM được
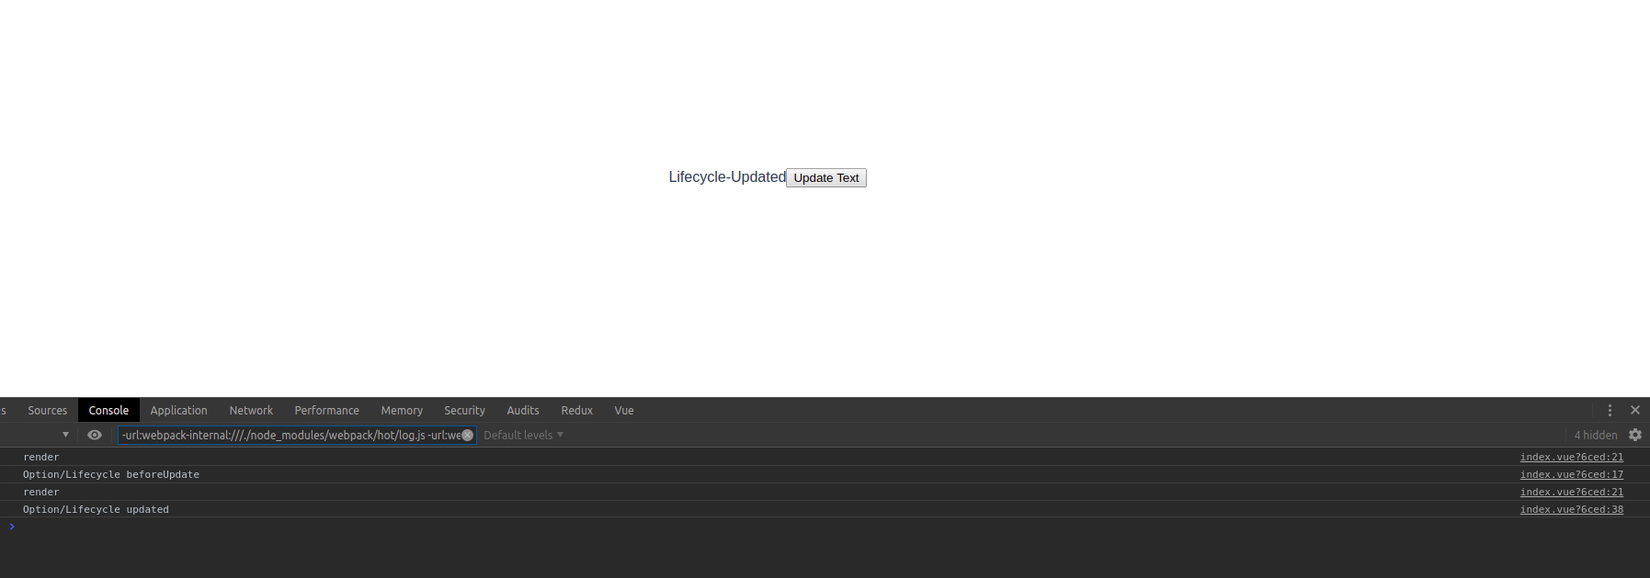
Ví dụ: Tạo một text và một button, sau khi render lần đầu thì click vào button
<script>
export default {
  components: {},
  data() {
    return {
      text: "Lifecycle",
    };
  },

  methods: {
    updateText() {
      this.text = "Lifecycle-Updated";
    },
  },

  beforeUpdate() {
    console.log("Option/Lifecycle beforeUpdate");
  },

  render: function (createElement) {
    console.log("render");

    return createElement("div", [
      this.text,
      createElement(
        "button",
        {
          on: {
            click: this.updateText,
          },
        },
        "Update Text"
      ),
    ]);
  },

  updated() {
    console.log("Option/Lifecycle updated");
  },
};
</script>
Kết quả:

4. beforeDestroy vs destroyed
-
beforeDestroy: Được gọi trước khi instance đượcdestroy. Ở giai đoạn này, instance vẫn có đủ các chức năng. -
destroyed: được gọi sau khi instance đã đượcdestroy. Khi hooks này được gọi, tất cảdirectivescủa instance đều đượcunbound, tất cảevent listernerđều đã đượcremoved, và tất cả con của cũng đượcdestroy.
Vi dụ:
// index.vue
<template>
  <div>
    <ComponentText v-if="isShow" />
    <button @click="toggleShow">isShow: {{ isShow }}</button>
  </div>
</template>

<script>
import ComponentText from "./ComponentText";

export default {
  components: { ComponentText },
  data() {
    return {
      text: "Lifecycle",
      isShow: true,
    };
  },

  methods: {
    toggleShow() {
      this.isShow = !this.isShow;
    },
  },
};
</script>
// ComponentText.vue
<template>
  <p>Text</p>
</template>

<script>
export default {
  beforeDestroy() {
    console.log("Option/Lifecycle beforeDestroy");
  },

  destroyed() {
    console.log("Option/Lifecycle destroyed");
  },
};
</script>

<style>
</style>
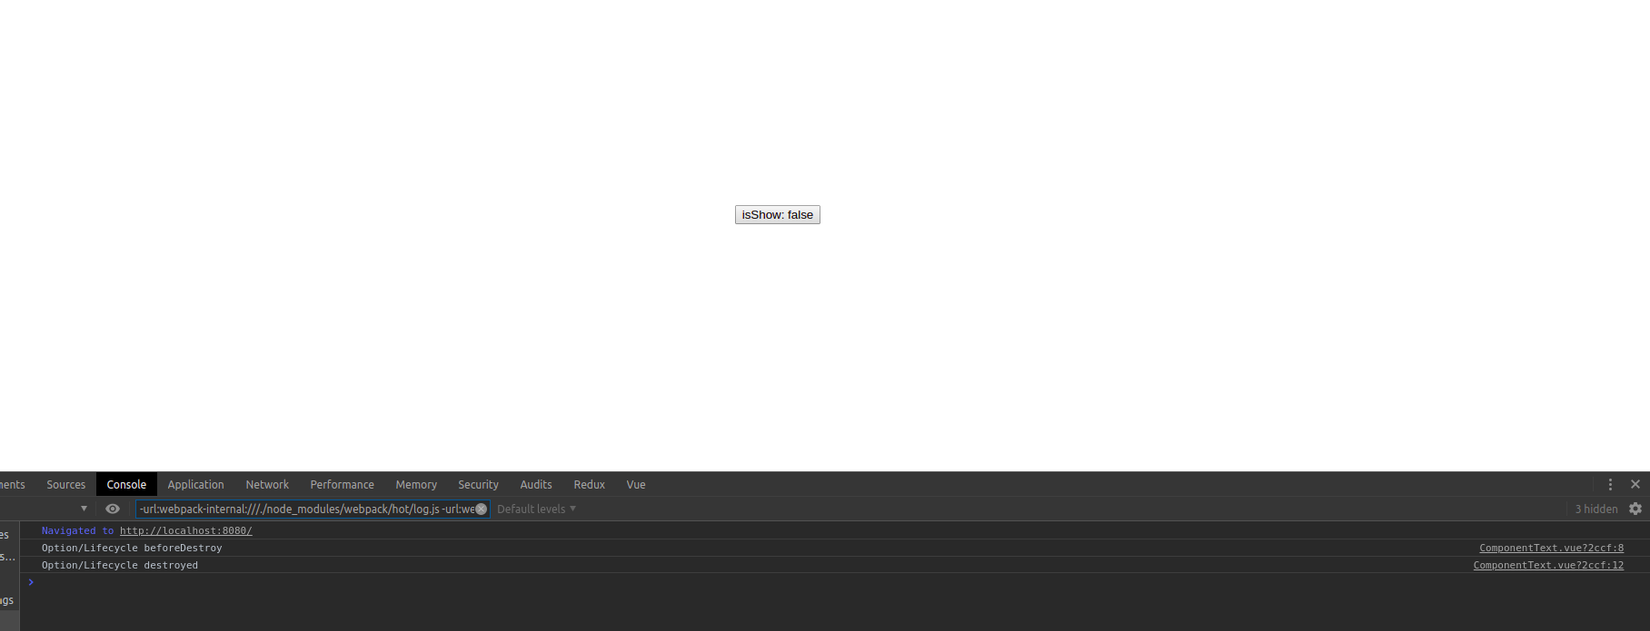
Kết quả: khi click vào button

Mong rằng sau khi đọc bài viết này, dựa vào những khái niệm cơ bản, các bạn có thể tự mình sáng tạo, linh hoạt hơn trong khi làm dự án của bạn.
Nếu thấy không hiểu hoặc có những góp ý cho bài viết thì mong các bạn để lại comment nhé !@#$%^&*
All rights reserved