Tìm hiểu về Action Cable - Tạo Realtime Notification trong rails 6
Bài đăng này đã không được cập nhật trong 6 năm
Mở đầu
Ngày nay, ứng dụng web thời gian thực không còn xa lạ gì với chúng ta nữa. Ta quan sát trên các ứng dụng mạng xã hội sẽ thấy: các bài viết, thông báo hay nhắn tin ta đều sẽ nhận được thông tin ngay lập tức. Đó chính là tính năng thời gian thực (realtime).
Có rất nhiều công nghệ để thực hiện chức năng thời gian thực như vậy, WebSocket protocol nổi lên như một công nghệ nổi bật từ khi được phát triển từ năm 2009. Đã có một khoảng thời gian trước đây, việc thực thi WebSocket protocol trong Rails rất khó. Chúng ta cần sử dụng các thư viện thứ 3 như Faye hay sử dụng thư viện Javascript. Và bây giờ đã dễ dàng hơn rất nhiều. Và chúng ta hãy cùng tìm hiểu về WebSocket và cách mà Rails 6 hỗ trợ real-time với Action Cable. Trước tiên chúng ta tìm hiểu về websocket.
1. WebSocket
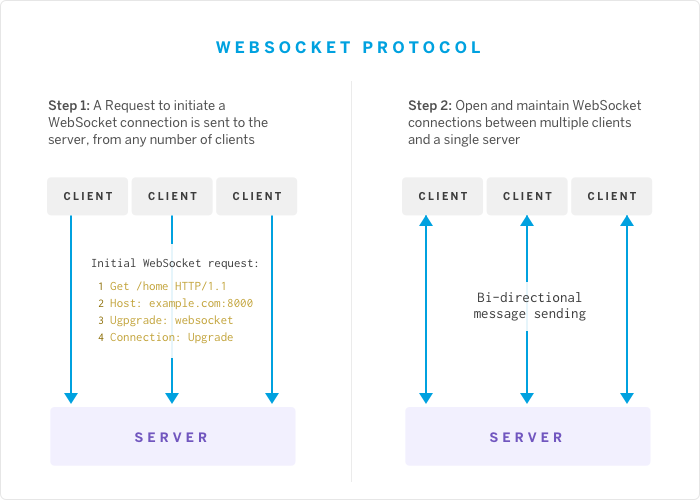
WebSoket là công nghệ hỗ trợ giao tiếp hai chiều giữa client và server bằng cách sử dụng một TCP socket để tạo một kết nối hiệu quả và ít tốn kém. Chúng duy trì kết nối tới máy chủ, nhờ đó mà máy chủ có thể gửi các thông tin tới máy khách, kể cả trong khi không có yêu cầu từ máy khách.
WebSockets cho phép các kênh giao tiếp song song hai chiều và hiện đã được hỗ trợ trong nhiều trình duyệt (Firefox, Google Chrome và Safari).
Dữ liệu truyền tải thông qua giao thức HTTP (thường dùng với kĩ thuật Ajax), phần Header chứa dữ liệu.
Với sự hỗ trợ của Action Cable trong Rails 6, chúng ta có thể thực thi WebSockets theo chuẩn thiết kể của Rails.
2. Action cable
2.1 Giới thiệu
Trong docs, nó được giới thiệu là "full-stack offering": Nó cung cấp cả client-side JavaScript framework, và Ruby server-side framework. Vì nó gắn liền với Rails, nên chúng ta sẽ phải truy cập tới các models từ trong các WebSocket workers
Action Cable có thể chạy độc lập với server, hoặc chúng ta có thể thiết lập để nó chạy trên bên trong server của ứng dụng Rails.

ActionCable sử dụng Rack Socket Hijacking API để tiếp quản việc điều khiển kết nối từ ứng dụng server. ActionCable sau đó sẽ quản lý việc kết nối một cách riếng rẽ, đa luồng, nhiều kênh.
Đối với mỗi instance của ứng dụng khi được 'spins up', instance của Action Cable được tạo sử dụng Rack để mở và duy trì việc kết nối, và sử dụng một kênh gắn kết trên một sub-URI trong ứng dụng để stream từ những phần nhất định trong ứng dụng và broadcaset tới những phần khác.
ActionCable cung cấp server-side code để broadcast nội dung nhất định ( new message hay notification) thông qua kênh "channel" tới một "subscriber". Subscriber này được khởi tạo từ phía clint-side với một hàm JS sử dụng JQuery để append nội dung vào DOM.
ActionCable sử dụng Redis để lưu trữ dữ liệu, đồng bộ nội dung thông qua các instances của ứng dụng.
2.2 Một số thuật ngữ
Một server có thể xử lý nhiều instances connection. Mỗi một instance connection sẽ tương ứng với WebSocket connection. Một người dùng có thể mở nhiều WebSockets. Mỗi một client của WebSockets connection được gọi là consumer.
Mỗi một consumer có thể đăng kí nhiều channels. Một channel được gói gọi trong một đơn vị logic, được setup giống như những controller thông thường trong mô hình MVC.
Khi một consumer đã đăng kí channels, nó họat động giống như một subscriber. Connection giữa consumer và channels là surprise-surprise, được gọi là một subscription.
Mỗi một chanels sau đó có thể streaming zero hoặc nhiều hơn một broadcastings. Broadcast là một link pub/sub ở đó tất cả mọi thứ truyền bởi một publisher định tuyến trực tiếp tới một những channel subscribers.
2.3 Pub/Sub
Đầy đủ là Publisher và Subscriber: Là việc dùng cơ chế hàng đợi gửi message từ một abstract class của subscriber mà không cần đến một bên nhận cụ thể. ActionCable dùng phương pháp này để giao tiếp giữa client và server.
2.4 Server side
2.4.1 Connection
Connection tạo thành nền tảng của mối quan hệ client và server. Mỗi khi server chấp nhận websocket thì một đối tượng connection sẽ được khởi tạo. Connection sẽ không thực hiện bất kỳ một logic nào khác ngoại trừ việc xác thực và ủy quyền. Client của Websocket connection được gọi là connection consumer.
Connection là một instance của ApplicationCable::Connection. Trong class này, ta sẽ phân quyền, tiến hành kết nối nếu user được xác định.
# app/channels/application_cable/connection.rb
module ApplicationCable
  class Connection < ActionCable::Connection::Base
    identified_by :current_user

    def connect
      self.current_user = find_verfied_user
    end

    protected

    def find_verfied_user
      user_id = cookies.signed[:user_id] || request.session[:user_id]
      User.find_by(id: user_id) || reject_unauthorized_connection
    end
  end
end
2.4.2 Channels
Một channel được gói gọi trong một đơn vị logic, Được setup giống như những controller thông thường trong mô hình MVC. Mặc định thì Rails sẽ tạo một class cha cho việc đóng gói chia sẻ logic giữa các channels ApplicationCable::Channel
Parent channels:
# app/channels/application_cable/channel.rb
module ApplicationCable
  class Channel < ActionCable::Channel::Base
  end
end
Ta có thể tự tạo channels cho mình bằng lệnh : rails g channel Notifications
# app/channels/notifications_channel.rb
class NotificationsChannel < ApplicationCable::Channel
  def subscribed
    stream_from "notifications:#{current_user.id}"
  end

  def unsubscribed
    stop_all_streams
  end
end
2.5 Client side
Consumers sẽ yêu cầu một instance của connection phía client, điều này có thể được thực hiện bằng cách sử dụng Javascript, nó sẽ mặc định được tạo ra bởi Rails.
// app/javascript/channels/consumer.js
import { createConsumer } from "@rails/actioncable"

export default createConsumer()
Connect với server dựa vào /cable, Việc kết nối sẽ không được thiết lập cho tới khi bạn có ít nhất một subscription.
#config/routes.rb
mount ActionCable.server => '/cable'
Một consumer trở thành một subscriber bằng cách đăng ký vào một channel, Một consumer có thể hành xử như một subscriber để đăng ký nhiều channel.
// app/javascript/channels/notifications_channel.js
import consumer from "./consumer"

consumer.subscriptions.create("NotificationsChannel", {
  connected() {
    // Called when the subscription is ready for use on the server
  },

  disconnected() {
    // Called when the subscription has been terminated by the server
  },

  received(data) {
  }
});
2.6 Tương tác giữa server side và client side
2.6.1 Stream
Stream cung cấp cơ chế định tuyến channel để pulished nội dung tới subscribers.
# app/channels/notifications_channel.rb
class NotificationsChannel < ApplicationCable::Channel
  def subscribed
    stream_from "notifications:#{current_user.id}"
  end
end
Nếu Stream liên quan đến model thì việc sử dụng broadcast có thể được tạo ra từ model và channel.
2.6.2 Broadcasting
Broadcast là một link pub/sub ở đó tất cả mọi thứ truyền bởi một publisher định tuyến trực tiếp tới một những channel subscribers. Một channel có thể không stream tới broadcast hoặc nhiều broadcast.
Broadcast hoàn toàn là một hàng đợi và phụ thuộc vào thời gian. Nếu một consumer không đăng ký một channel chúng sẽ không được broadcast.
#app/jobs/notification_broadcast_job.rb
class NotificationBroadcastJob < ApplicationJob
  queue_as :default

  def perform(notification)
    ActionCable.server.broadcast "notifications:#{notification.user_id}", notification: notification
  end
end
2.6.3 Subscriptions
Khi consumer đăng kí channel, trở thành subscriber, connection giữa subscriber và channel được gọi là subscription.
Những messages được định tuyến tới channel subscriptions này dựa vào định danh do cable consumer gửi.
// app/javascript/channels/notifications_channel.js
import consumer from "./consumer"

consumer.subscriptions.create("NotificationsChannel", {
  connected() {
    // Called when the subscription is ready for use on the server
  },

  disconnected() {
    // Called when the subscription has been terminated by the server
  },

  received(data) {
  }
});
2.6.4 Truyền parameter cho channels
Ta có thể truyền params từ phía client tới server khi tạo mới subsciptions:
# app/channels/notifications_channel.rb
class NotificationsChannel < ApplicationCable::Channel
  def subscribed
    stream_from "notifications:#{current_user.id}"
  end
end
Tham số đầu tiên truyền vào subscriptions.create trở thành params hash trong cable channel:
// app/javascript/channels/notifications_channel.js
import consumer from "./consumer"

consumer.subscriptions.create("NotificationsChannel", {
  connected() {
    // Called when the subscription is ready for use on the server
  },

  disconnected() {
    // Called when the subscription has been terminated by the server
  },

  received(data) {
  }
});
3. Realtime notification
Bước 1
Thêm gem vào file gemfile
gem "devise"
gem "redis", "~> 3.0"
Bước 2
Sửa lại config của file config/cable.yml
development:
  adapter: redis
  url: redis://localhost:6379/1
Thực thi lệnh bundle install để cài đặt và khởi động lại server.
Bước 3
Devise install User: rails g devise:install and rails g devise User
Tạo model notification:
rails g model Notification user:references recipient_id:integer action notifiable_type notifiable_id:integer
Và chạy lệnh rails db:migrate để tạo ra bảng tương ứng trong cơ sở dữ liệu
Bước 4
Thiết lập quan hệ cho các model
Model Users
#app/models/user.rb
has_many :notifications, as: :recipient
Model Notification
#app/models/notification.rb
belongs_to :user
belongs_to :recipient, class_name: "User"
belongs_to :notifiable, polymorphic: true
Bước 5
Tạo view
#app/views/main/index.html.erb
<div id="notifications">
</div>
Bước 6
ActionCable sẽ cho phép bạn mở chanel và duy trì chanel kết nối của chanel tới server mà ko cần phải refresh page. Đầu tiên chúng ta sẽ khởi tạo chanel cho project với cú pháp
rails g channel notifications
create  app/channels/notifications_channel.rb
identical  app/javascript/channels/index.js
identical  app/javascript/channels/consumer.js
create  app/javascript/channels/notifications_channel.js
Rails sẽ tự đông tạo thêm cho chúng ta 2 file app/channels/notifications_channel.rb và app/javascript/channels/notifications_channel.js
Bước 7
Thiết lập connetion ở phía server side
# app/channels/application_cable/connection.rb
module ApplicationCable
  class Connection < ActionCable::Connection::Base
    identified_by :current_user

    def connect
      self.current_user = find_verfied_user
    end

    protected

    def find_verfied_user
      if current_user = env['warden'].user
          current_user
       else
          reject_unauthorized_connection
      end
    end
end
Nếu bạn không dùng devise, mà dùng session, cookies thì hàm find_verfied_user sẽ như sau:
def find_verfied_user
  user_id = cookies.signed[:user_id] || request.session[:user_id]
  User.find_by(id: user_id) || reject_unauthorized_connection
end
Bước 8
Thiết lập channels ở phía server side như sau:
# app/channels/notifications_channel.rb
class NotificationsChannel < ApplicationCable::Channel
  def subscribed
    stream_from "notifications:#{current_user.id}"
  end

  def unsubscribed
    stop_all_streams
  end
end
Bước 9
Thiết lập kết nối ở phía client
#config/routes.rb
mount ActionCable.server => '/cable'
Bước 10
Thiết lập Subscribers ở phía client side
#app/assets/javascripts/channels/notifications.js
App.notifications = App.cable.subscriptions.create("NotificationsChannel", {
  connected: function() {
    // Called when the subscription is ready for use on the server
  },

  disconnected: function() {
    // Called when the subscription has been terminated by the server
  },

  received: function(data) {
    // Called when there's incoming data on the websocket for this channel
    $("#notifications").prepend(data.html);
  }
});
Bước 11
Tạo 1 con job để thực hiện việc response cho client.
rails g job NotificationRelay
#app/jobs/notification_relay_job.rb
class NotificationRelayJob < ApplicationJob
  queue_as :default

  def perform(notification)
    html = ApplicationController.render partial: "notifications/#{notification.notifiable_type.underscore.pluralize}/#{notification.action}", locals: {notification: notification}, formats: [:html]
    ActionCable.server.broadcast "notifications:#{notification.recipient_id}", html: html
  end
end
Bước 12
Cuối cùng, Ta sẽ sử dụng Callbacks của Active Record để gọi Jobs thực hiện response cho client.
#app/models/notification.rb
after_commit -> { NotificationRelayJob.perform_later(self) }
Tổng kết
Như vậy, chúng ta đã tìm hiểu xong về action cable và áp dụng thực hành vào một trường hợp đơn giản là tạo ra thông báo realtime. Chúng ta sẽ cần phải ôn tập và thực hành nhiều hơn để có hiểu và làm nhuần nhuyễn tính năng này hơn nữa và sau này có thể áp dụng vào những bài khác khó hơn.
Bài viết của mình đến đây là kết thúc. Hi vọng bài viết của mình có thể giúp bạn hiểu rõ hơn về action cable và sử dụng nó một cách tối và linh hoạt nhất. Bài viết cũng khó tránh khỏi những sai xót, mong mọi người thông cảm, và rất mong những ý kiến đóng góp của mọi người để bài viết được hoàn thiện hơn. Cảm ơn các bạn đã dành thời gian cho bài viết của mình !!!
Tài liệu tham khảo
https://edgeguides.rubyonrails.org/action_cable_overview.html#server-side-components https://gist.github.com/excid3/4ca7cbead79f06365424b98fa7f8ecf6 https://blog.heroku.com/real_time_rails_implementing_websockets_in_rails_5_with_action_cable
All rights reserved
