Tìm hiểu Restify Framework: Xây dựng CRUD api.
Bài đăng này đã không được cập nhật trong 5 năm
Introducion Restify
Là 1 service web trên nền nodejs được tối ưu hóa để xây dựng REST trên quy mô lớn. Restify tối ưu hóa performance và được sử dụng triển khai trên 1 số dự án lơn.
Creating the Project
Đầu tiên chúng ta xẽ tạo thư mục debtor-api sau đó sẽ truy cập vào thư mục và chạy commmand:
npm init -y
Sẽ thấy phản hồi sau xuất hiện trên cửa số cmd
Wrote to /var/www/html/debtor-api/package.json:

{
  "name": "debtor-api",
  "version": "1.0.0",
  "description": "",
  "main": "index.js",
  "scripts": {
    "test": "echo \"Error: no test specified\" && exit 1"
  },
  "keywords": [],
  "author": "",
  "license": "ISC"
}
Sau đó chúng ta sẽ mởi file package.json để run nodemon một package để theo dõi các thay đổi và chạy tự động.
{
  "name": "debtor-api",
  "version": "1.0.0",
  "description": "",
  "main": "index.js",
  "scripts": {
    "dev": "nodemon index.js"
  },
  "keywords": [],
  "author": "",
  "license": "ISC",
  "dependencies": {}
Tiếp theo chúng ta sẽ install nodemon, restify, mongoose, restify-errors, mongoose-timestamps bằng command sau:
npm i nodemon restify restify-errors mongoose mongoose-timestamp
Bây giờ chúng ta cân tạo 1 database trên mongoDB trên local hoặc cloud trên: MongoDB Atlas: https://www.mongodb.com/cloud
Setting up configuration
Thêm file config.js tại root của project.
module.exports = {
    ENV: process.env.NODE_ENV || 'development',
    PORT: process.env.PORT || 5000,
    URL: process.env.BASE_URL || 'http://localhost:5000',
    MONGODB_URI: 'mongodb//user:password@hosturl/databasename'

}
Hãy nhớ thay nối kết nối trên url của bạn.
Setting up the server
Thêm file index.js tại root của project.
const restify = require('restify');
const mongoose = require('mongoose');
const config = require('./config');
const rjwt = require('restify-jwt-community');
const server = restify.createServer();

//Middleware
server.use(restify.plugins.bodyParser())

//Protected Routes
/*
the line below helps protect all routes from unauthorized access
i.e You need a token to perform actions on all routes except those in the unless({{path:[]}) array
*/
server.use(rjwt({ secret: config.JWT_SECRET }).unless({ path: ['/api/auth', '/api/debtors/','/api/debtors:id'] }));
server.listen(config.PORT, () => {
    mongoose.set('useFindAndModify', false)
    mongoose.connect(
        config.MONGODB_URI, {
            useNewUrlParser: true,
            useUnifiedTopology: true,
    }
    );
});

const database = mongoose.connection;
database.on('error', (err) => {
    console.log(err)
})

database.once('open', () => {
    require('./routes/debtors')(server)
    require('./routes/users')(server)
    console.log(`Server running on Port: ${config.PORT}`);
})
Setting up the Debtor and User models
Tạo thư mục models và vào bên trong chúng ta thêm f Debtor.jsile
const mongoose = require('mongoose')
const timestamp = require('mongoose-timestamp')
const DebtorSchema = new mongoose.Schema({
    name: {
        type: String,
        required: true,
        trim: true
    },
    email: {
        type: String,
        required: true,
        trim: true
    },
    debt: {
        type: Number,
        required: false,
        default: 0
    },
    phone: {
        type: String,
        required: false,
        default: ''
    }
});
DebtorSchema.plugin(timestamp) //adds timestampsautomatically to the model in the database

const Debtor = mongoose.model('Debtor', DebtorSchema);
module.exports = Debtor; //exports the Debtor model for reuse
Đoạn code ở trên xác định một lược đồ mongoose được gọi là DebtorSchema, nó cũng chỉ định mô hình có các trường sau: ame, email, debt and phone và timestamps (created_at and updated_at) các trường mà việc tạo và bảo trì sẽ được mongoose xử lý tự động. Tương tự như vậy chúng ta sẽ tạo model User đường dẫn models/User.js
//models/User.js
const mongoose = require('mongoose');

const UserSchema = new mongoose.Schema({
    email: {
        type: String,
        required: true,
        trim: true
    },
    password: {
        type: String,
        required: true
    }
});

module.exports = mongoose.model('User', UserSchema); // exports the User model for reuse in other files
Adding Routes to the API
Tiếp theo chhungs ta sẽ add routes và configure các phương thức cho phép và các actions mà chúng ta muốn routes thực hiện Ở root của folder chúng ta sẽ tạo folder mới routes và thêm 2 file là: debtors.js & users.js. Sửa nội dung file debtors.js
const errors = require('restify-errors')

const Debtor = require('../models/Debtor');
module.exports = server => {
    // Fetch All Debtors
    server.get('/api/debtors/', async (req, res, next) => {
       try {
        const debtors = await Debtor.find({}) //query to look for all debtors
        res.send(debtors); // send the result from the query above back to the user
        next();
       } catch (error) {
           return next(new errors.InvalidContentError(error))
       }

    });

    // Add a new Debtor to list
    server.post('/api/debtors', async (req, res, next) => {
        // Check if what is being passed is in JSON
        if (!req.is('application/json')) {
            return next(new errors.InvalidContentError("This API expects: 'application/json'"))
        }
        const { name, email, phone, debt } = req.body;
        const debtor = new Debtor({
            name,
            email,
            phone,
            debt


        });

        try {
            const newDebtor = await debtor.save() //save  a debtor to the database
            res.send(201) //201 means created
            next();

        } catch (error) {
            return next(new errors.InternalError(error.message))
        }
    });

    //Fetch a Single Debtor
     server.get('/api/debtors:id', async (req, res, next) => {
       try {
        const debtor = await Debtor.findById(req.params.id)
        res.send(debtor);
        next();
       } catch (error) {
           return next(new errors.ResourceNotFound(`Hi, there seems to be no debtor with ID of: ${req.params.id}`))
       }

     });

    // Update The Details of an Exising Debtor
     server.put('/api/debtors:id', async (req, res, next) => {
        // Check if what is being passed is in JSON
        if (!req.is('application/json')) {
            return next(new errors.InvalidContentError("This API expects: 'application/json'")) // data must be in json format
        }

        try {
            const debtor = await Debtor.findOneAndUpdate({_id: req.params.id}, req.body)
            res.send(200)
            next();

        } catch (error) {
            return next(new errors.ResourceNotFound(`Hi, there seems to be no debtor with ID of: ${req.params.id}`)) // this is called when a debtor with the ID does not exist
        }
        }
    });
    //Delete an Already Existing Debtor

    server.del('/api/debtors:id', async (req, res, next) => {
    //restify uses 'server.del' instead of 'server.delete' for delete operations

        try {
            const debtor = await Debtor.findOneAndRemove({ _id: req.params.id }) // await a query to look for debtor with the given id
            res.send(204); // 204 response means no content
            next()
        } catch (error) {
             return next(new errors.ResourceNotFound(`Hi, there seems to be no debtor with ID of: ${req.params.id}`)) //this is called when a debtor with the ID does not exist
        }
    })

}
Adding Authentication with JWT
Chúng ta sẽ cần cài thêm các package bcryptjs, restify-jwt-community & jsonwebtoken theo comamnd sau:
npm install restify-jwt-community jsonwebtoken bcryptjs
Sau khi tất cả các pakage trên được cài đặt chungs ta sẽ thêm thuộc tính sau vào config.js
JWT_SECRET: process.env.JWT_SECRET || 'supersecretkey'
Tạo file auth.js trong f routesolder và thêm nội dung sau:
const bcrypt = require('bcryptjs');
const mongoose = require('mongoose');
const User = mongoose.model('User');

exports.authenticate = (email, password) => {
    return new Promise(async (resolve, reject) => {
        try {
            //try to fetch user
            const user = await User.findOne({ email })

            // Match User email with password
            bcrypt.compare(password, user.password, (err, isMatch) => {
                if (err) throw err;
                if (isMatch) {
                    resolve(user);
                } else {
                    // Password did not match
                    reject('Failed to authenicate user')
                }
            })
        } catch (err) {
            // Can't find user email
            reject('Sorry, Authentication failed')
        }
    });
}
Tiếp theo chúng ta sẽ thêm users.js trong folder routes và thêm nội dung:
const errors = require('restify-errors');
const bcrypt = require('bcryptjs');
const User = require('../models/User');
const auth = require('../routes/auth')
const jwt = require('jsonwebtoken');
const config = require('../config')

module.exports = server => {
    // Create a new User
    server.post('/auth/register', (req, res, next) => {
        const { email, password } = req.body;

        const user = new User({
            email,
            password
        });

        bcrypt.genSalt(10, (err, salt) => {
            bcrypt.hash(user.password, salt, async (err, hash) => {
                // Encrypt the password
                user.password = hash;

                //Save User to database
                try {
                    const newUser = await user.save();
                    res.send(201)
                    next()

                } catch (err) {
                    return next(new errors.InternalError(err.message))
                }
            });
        })

    });

    //Authenticate a User
    server.post('/api/auth', async (req, res, next)=> {
        const { email, password } = req.body;
        try {
            const user = await auth.authenticate(email, password);
           // Create JWT
            const token = jwt.sign(user.toJSON(), config.JWT_SECRET, { expiresIn: '10m' })

            const { iat, exp } = jwt.decode(token);

            // respond with token
            res.send({iat, exp, token})
            console.log(iat, exp, token)
            next();
        } catch(error) {
            //Unauthorized
            return next(new errors.UnauthorizedError(error))
        }
    })
}
Running the App
npm run dev
#or
nodemon index.js
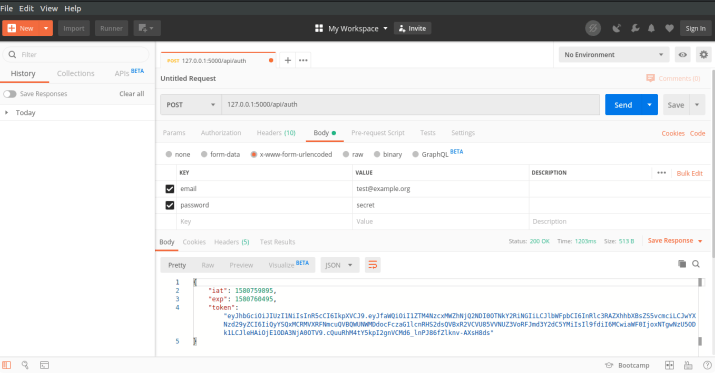
Sử dụng postman để test api:
Ví dụ api xác thực khi bạn đã đăng ký tài kh thành công:
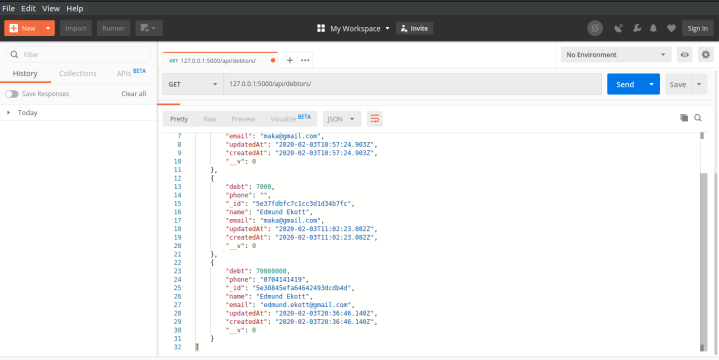
Ví dụ api get debtor
Tài liệu tham khảo
https://codesource.io/building-crud-api-using-restify-framework
All rights reserved
