Tìm hiểu cơ chế reuse cell trong lập trình IOS
Bài đăng này đã không được cập nhật trong 6 năm
Nếu bạn đã từng dùng qua TableView trong IOS chắc hẳn bạn đã quá quen thuộc với dòng code tableView.dequeueReusableCellWithIdentifier khi khởi tạo Cell cho TableView. Nhưng bạn có biết tại sao ta nên dùng nó và nó hoạt động như thế nào???
Trước khi trả lời câu hỏi trên tôi sẽ nêu ra một trường hợp. Nếu tableView của chúng ta có 10.000 cell và với mỗi cell có hình ảnh cùng một số đoạn text, sau khi ta scroll xuống khá xa thì liệu app của chúng ta có bị crash do hết bộ nhớ ???
1. Bad Table View
Câu trả lời là có, ứng dụng của chúng ta có thể bị crash do hết bộ nhớ khi có quá nhiều cell. Nhưng điều này thì thương không xảy ra, tại sao lại như vậy? Đầu tiên hãy cùng tìm hiểu hiểu tại sao chúng ta thường không tạo tableView theo cách mà tôi sẽ làm dưới đây.
import UIKit

class BadTableViewController: UIViewController {

    // MARK: - Instance Vars
    @IBOutlet weak var tableView: UITableView!

    // NOTE: - Creating a var to hold all cells is bad, takes up too much memory
    var cells: [UITableViewCell] = []

    // MARK: - View Lifecycle
    override func viewDidLoad() {
        super.viewDidLoad()

        cellsSetup()
        tableViewSetup()
    }

}

// MARK: - Setup
extension BadTableViewController {

    // NOTE: - Here we pre-create all the cells we need and add them to the cells array. Not good!
    func cellsSetup() {
        for _ in 0...1000 {
            let cell = UITableViewCell()
            cell.textLabel?.text = "Wow so bad"
            cells.append(cell)
        }
    }

    func tableViewSetup() {
        tableView.rowHeight = UITableViewAutomaticDimension
        tableView.estimatedRowHeight = 350
    }

}

// MARK: - Table View Delegate
extension BadTableViewController: UITableViewDelegate {

}

// MARK: - Table View Data Source
extension BadTableViewController: UITableViewDataSource {

    func numberOfSections(in tableView: UITableView) -> Int {
        return 1
    }

    func tableView(_ tableView: UITableView, numberOfRowsInSection section: Int) -> Int {
        return cells.count
    }

    func tableView(_ tableView: UITableView, cellForRowAt indexPath: IndexPath) -> UITableViewCell {

        // NOTE: - Now we only need to specify a cell from the array based on index, but not worth it
        let cell = cells[indexPath.row]
        return cell
    }

}
Chạy ứng dụng và kiểm tra Memory
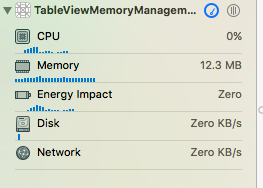
Với cách tạo tableView như trên ta đã khởi tạo và thêm 1000 cell vào tableView khi ứng dụng chạy xong hàm viewDidLoad() và đã chiếm hết 12.3 MB bộ nhớ ram. Nếu số cell nhiều hơn nữa thì sẽ càng chiếm rất nhiều bộ nhớ, khả năng crash app do hết bộ nhớ là có thể xày ra. DequeueReusableCellWithIdentifier sẽ giúp ta giải quyết vấn đề này.
2. Better Table View
Thay vì tạo ra từng cell và hiển thị tất cả cell trên TableView, dequeueReusableCellWithIdentifier giúp ta tạo ra một số cell với số lượng vừa đủ hiển thị trên TableView (hoặc thêm một vài cell). Khi chúng ta Scroll, chúng ta sẽ tải sử dụng lại số lượng cell đã được sroll khỏi tableView, giúp ta có thể tiết kiệm bộ nhớ hơn so với việc tạo ra rất nhiều cell.
import UIKit
import AlamofireImage

class BetterTableViewController: UIViewController {

    // MARK: - Instance Vars
    @IBOutlet weak var tableView: UITableView!

    // MARK: - View Lifecycle
    override func viewDidLoad() {
        super.viewDidLoad()

        tableViewSetup()
    }

}

// MARK: - Setup
extension BetterTableViewController {

    func tableViewSetup() {
        tableView.rowHeight = UITableViewAutomaticDimension
        tableView.estimatedRowHeight = 350

        // NOTE: - Registering the cell programmatically
        tableView.register(UITableViewCell.self, forCellReuseIdentifier: "BetterTableViewCell")
    }

}

// MARK: - Table View Delegate
extension BetterTableViewController: UITableViewDelegate {

}

// MARK: - Table View Data Source
extension BetterTableViewController: UITableViewDataSource {

    func numberOfSections(in tableView: UITableView) -> Int {
        return 1
    }

    func tableView(_ tableView: UITableView, numberOfRowsInSection section: Int) -> Int {
        return 1000
    }

    func tableView(_ tableView: UITableView, cellForRowAt indexPath: IndexPath) -> UITableViewCell {

        let cell = tableView.dequeueReusableCell(withIdentifier: "BetterTableViewCell")
        cell?.textLabel?.text = "Wow much better"
        return cell!
    }

}
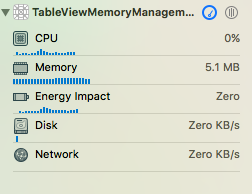
Với cách tạo TableView này bộ nhớ đã tiết kiệm hơn khá nhiều.
Issues with images in reuse
Tuy nhiên, nếu bạn đưa dữ liệu hình ảnh vào trong cell và bạn sroll với tốc độ nhanh cùng với kết nối internet lại không tốt, lúc này dữ liệu của bạn có thể sẽ bị sai so với thứ tự hiển thị trên TableView hoặc sẽ hiện thị các cell với dữ liệu cũ. Đó là vì khi ta tái sử dụng cell, các dữ liệu mới chưa kịp cập nhật lên cell nên các cell được tái sử dụng sẽ hiển thị lại dữ liệu cũ.

3. Best Table View
Để khắc phục trường hợp trên ta chỉ cần sử dụng hàm prepareForReuse(). Hàm này sẽ được gọi trước khi cell được tái sử dụng, ta có thể reset lại dữ liệu của các cell trước khi được tái sử dụng. Ta dùng hàm prepareForReuse() để reset các cell trong class BestTableViewCell
class BestTableViewCell: UITableViewCell {

    // MARK: - Instance Vars
    @IBOutlet weak var mainStackView: UIStackView!
    @IBOutlet weak var titleLabel: UILabel!
    @IBOutlet weak var mainImageView: UIImageView!
    @IBOutlet weak var bodyLabel: UILabel!

    // MARK: - View Lifecycle
    override func awakeFromNib() {
        super.awakeFromNib()

        styleSetup()
    }

    override func prepareForReuse() {
        super.prepareForReuse()

        mainImageView.af_cancelImageRequest() // NOTE: - Using AlamofireImage
        mainImageView.image = nil
    }
}

// MARK: - Setup
extension BestTableViewCell {

    func styleSetup() {
        mainImageView.layer.borderWidth = 0.5
        mainImageView.layer.borderColor = UIColor.lightGray.cgColor
    }

}
Ta viết code để huỷ request đưa các các dữ liệu lên cell hoặc đơn giản xoá bỏ các dữ liệu đang có trên cell trước khi tái sử dụng cell trong hàm prepareForReuse()
override func prepareForReuse() {
    mainImageView.af_cancelImageRequest()
    mainImageView.image = nil
}
Bây giờ tableView sẽ scroll mượt hơn, các dữ liệu sẽ hiển thị đúng thứ tự và hơn hết là tiết kiệm bộ nhớ hơn.
Qua bài viết này hy vọng đã giúp bạn hiểu hơn về cơ chế hoạt động reuse cell trong lập trình IOS
References: https://medium.com/ios-seminar/why-we-use-dequeuereusablecellwithidentifier-ce7fd97cde8e
All rights reserved
