Tìm hiểu Artisan trong Laravel
Bài đăng này đã không được cập nhật trong 8 năm
Xin chào anh em, hôm nay mình lại tiếp nới chuỗi bài trong series Laravel và những điều thú vị về nó. Như các bạn biết rồi đấy, khi mới tiếp cận với framework Laravel , mình cũng thấy khá ngạc nhiên khi framework này có một công cụ dòng lệnh Artisan. Khi nói đến các công cụ dòng lệnh thì các bạn nghĩ đến gì, ban đầu mình cũng nghĩ nó là một cái gì to tát khó hiểu lắm. Vậy thực chất nó là cái gì vậy, chúng mình cùng đi tìm hiểu nhé.
1.Laravel Artisan là cái gì ?
Theo mình tím hiểu thì Artisan là giao diện command-line được thêm vào Laravel. Nó cung cấp một số lệnh hữu ích mà có thể hỗ trợ bạn trong khi xây dựng ứng dụng của mình. Giảm thiểu thời gian viết code cũng như tự động hóa một số công việc. Bạn có thể sử dụng câu lệnh php artisan list để xem danh sách các câu lệnh hỗ trợ bởi Artisan.
 blog git:(master) ✗ php artisan list
Laravel Framework 5.6.26

Usage:
  command [options] [arguments]

Options:
  -h, --help            Display this help message
  -q, --quiet           Do not output any message
  -V, --version         Display this application version
      --ansi            Force ANSI output
      --no-ansi         Disable ANSI output
  -n, --no-interaction  Do not ask any interactive question
      --env[=ENV]       The environment the command should run under
  -v|vv|vvv, --verbose  Increase the verbosity of messages: 1 for normal output, 2 for more verbose output and 3 for debug

Available commands:
  clear-compiled       Remove the compiled class file
  down                 Put the application into maintenance mode
  env                  Display the current framework environment
  help                 Displays help for a command
  inspire              Display an inspiring quote
  list                 Lists commands
  migrate              Run the database migrations
  preset               Swap the front-end scaffolding for the application
  serve                Serve the application on the PHP development server
  tinker               Interact with your application
  up                   Bring the application out of maintenance mode
 app
  app:name             Set the application namespace
 auth
  auth:clear-resets    Flush expired password reset tokens
 cache
  cache:clear          Flush the application cache
  cache:forget         Remove an item from the cache
  cache:table          Create a migration for the cache database table
 command
  command:name         Command description
 config
  config:cache         Create a cache file for faster configuration loading
  config:clear         Remove the configuration cache file
 db
  db:seed              Seed the database with records
 event
  event:generate       Generate the missing events and listeners based on registration
 key
  key:generate         Set the application key
 make
  make:auth            Scaffold basic login and registration views and routes
  make:channel         Create a new channel class
  make:command         Create a new Artisan command
  make:controller      Create a new controller class
  make:event           Create a new event class
  make:exception       Create a new custom exception class
  make:factory         Create a new model factory
  make:job             Create a new job class
  make:listener        Create a new event listener class
  make:mail            Create a new email class
  make:middleware      Create a new middleware class
  make:migration       Create a new migration file
  make:model           Create a new Eloquent model class
  make:notification    Create a new notification class
  make:observer        Create a new observer class
  make:policy          Create a new policy class
  make:provider        Create a new service provider class
  make:request         Create a new form request class
  make:resource        Create a new resource
  make:rule            Create a new validation rule
  make:seeder          Create a new seeder class
  make:test            Create a new test class
 migrate
  migrate:fresh        Drop all tables and re-run all migrations
  migrate:install      Create the migration repository
  migrate:refresh      Reset and re-run all migrations
  migrate:reset        Rollback all database migrations
  migrate:rollback     Rollback the last database migration
  migrate:status       Show the status of each migration
 notifications
  notifications:table  Create a migration for the notifications table
 package
  package:discover     Rebuild the cached package manifest
 queue
  queue:failed         List all of the failed queue jobs
  queue:failed-table   Create a migration for the failed queue jobs database table
  queue:flush          Flush all of the failed queue jobs
  queue:forget         Delete a failed queue job
  queue:listen         Listen to a given queue
  queue:restart        Restart queue worker daemons after their current job
  queue:retry          Retry a failed queue job
  queue:table          Create a migration for the queue jobs database table
  queue:work           Start processing jobs on the queue as a daemon
 route
  route:cache          Create a route cache file for faster route registration
  route:clear          Remove the route cache file
  route:list           List all registered routes
 schedule
  schedule:run         Run the scheduled commands
 session
  session:table        Create a migration for the session database table
 storage
  storage:link         Create a symbolic link from "public/storage" to "storage/app/public"
 vendor
  vendor:publish       Publish any publishable assets from vendor packages
 view
  view:cache           Compile all of the application's Blade templates
  view:clear           Clear all compiled view files
Sau khi gõ câu lệnh trên vào command-line thì sẽ ra 1 list các hỗ trợ của artisan.
Mỗi câu lệnh đều có kèm theo tham số , để hiển thi và mô tả những đối số và tùy chọn có thể sử dụng, ta sử dụng câu lệnh php artisan help migrate
➜  blog git:(master) ✗ php artisan help migrate
Description:
  Run the database migrations

Usage:
  migrate [options]

Options:
      --database[=DATABASE]  The database connection to use.
      --force                Force the operation to run when in production.
      --path[=PATH]          The path to the migrations files to be executed.
      --realpath             Indicate any provided migration file paths are pre-resolved absolute paths.
      --pretend              Dump the SQL queries that would be run.
      --seed                 Indicates if the seed task should be re-run.
      --step                 Force the migrations to be run so they can be rolled back individually.
  -h, --help                 Display this help message
  -q, --quiet                Do not output any message
  -V, --version              Display this application version
      --ansi                 Force ANSI output
      --no-ansi              Disable ANSI output
  -n, --no-interaction       Do not ask any interactive question
      --env[=ENV]            The environment the command should run under
  -v|vv|vvv, --verbose       Increase the verbosity of messages: 1 for normal output, 2 for more verbose output and 3 for debug
Đến đây bạn cũng biết Laravel Artisan là cái gì và nó được dùng như thế nào rồi chứ. Còn rất nhiều điều để nói về nó, chúng mình tìm hiểu tiếp nhé !!!!!!
2. Tinker
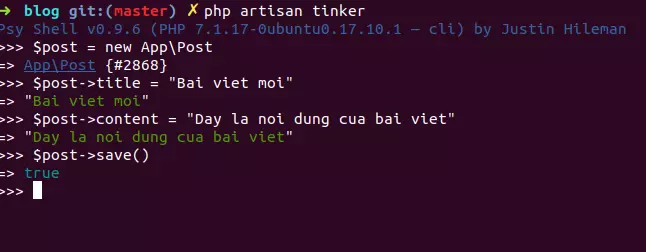
Tinker là một ngôn ngữ REPL được hỗ trợ bởi PsySH. Các bạn có biết REPL là gì không? REPL viết tắt của Read - Rval - Print Loop, còn được biết đến với tên language shell, đơn giản nó là một ngôn ngữ cho phép bạn lặp đi lặp lại các công việc đọc dữ liệu, tính toán dữ liệu và in ra màn hình. Laravel Tinker cho phép chúng ta tương tác với các thực thể trong ứng dụng như Eloquent ORM, job, event... Nó rất tiện lợi khi ta muốn kiêm ví dụ như các bạn tạo DB và tạo Model, các bạn sẽ sử dụng Laravel Tinker để kiêm tra xem khi ta khởi tạo Model này , có gán các thuộc tính cho chúng, sau đó nếu chúng trả về trư thì lưu bản ghi thành công, ngược lại thì nó thất bại.
Bây giờ chúng ta sẽ làm ví dụ đó nhé. Đầu tiên chúng ta tạo bảng posts bằng Migration: php artisan make:migration create_posts_table --create=posts. Nếu bạn nào chưa biết về Migration thì hãy tham khảo bài này của mình nhé Migration
<?php

use Illuminate\Support\Facades\Schema;
use Illuminate\Database\Schema\Blueprint;
use Illuminate\Database\Migrations\Migration;

class CreatePostsTable extends Migration
{
    /**
     * Run the migrations.
     *
     * @return void
     */
    public function up()
    {
        Schema::create('posts', function (Blueprint $table) {
            $table->increments('id');
            $table->string('title');
            $table->text('content');
            $table->timestamps();
        });
    }

    /**
     * Reverse the migrations.
     *
     * @return void
     */
    public function down()
    {
        Schema::dropIfExists('posts');
    }
}
Sau đó chúng ta chạy lệnh php artisan migrate để tạo bảng posts trong CSDL nhé. Bước tiếp theo chúng ta sẽ tạo Model: php artisan make:model Post. Và cuối cùng chúng ta test thử bằng Laravel Tinker
3.Tự tạo câu lệnh Artisan
Như các bạn biết đấy, nhiều khi chúng ta không muốn dùng các Laravel Artisan có sẵn trong Laravel mà chúng ta muốn tự tạo ra các câu lệnh Artisan cho các mục đich riêng. Trong ví dụ sau đây chúng ta sẽ tạo ra một câu lệnh mỗi khi thực hiện nó sẽ tạo ra một hoặc nhiều bài post được active hay không. Đầu tiên chúng ta tạo ra class PostCommand bằng artisan make:command : php artisan make:command PostCommand. file PostCommand.php sẽ được tạo ra trong folder
<?php

namespace App\Console\Commands;

use Illuminate\Console\Command;

class PostCommand extends Command
{
    /**
     * The name and signature of the console command.
     *
     * @var string
     */
    protected $signature = 'command:name';

    /**
     * The console command description.
     *
     * @var string
     */
    protected $description = 'Command description';

    /**
     * Create a new command instance.
     *
     * @return void
     */
    public function __construct()
    {
        parent::__construct();
    }

    /**
     * Execute the console command.
     *
     * @return mixed
     */
    public function handle()
    {
        //
    }
}
Lớp này là lớp kế thừa từ Command và có 2 thuộc tính mà chúng ta cần chú ý $signature và $description .Ví dụ khi chúng ta khai báo :
\$signature = "post:create {active=0} {numberOfPost=1}"
Khi đó, chúng ta muốn tạo ra 5 bài post chưa hiển thị vội active = 0 thì chúng ta sẽ gõ lệnh ở command-line như sau: php artisan post:create 0 5
Các tùy chọn trong câu lệnh Artisan cũng được định nghĩa trong $signature, cũng được đưa vào hai dấu ngoặc nhọn với tiền tố --, ví dụ như {--queue}
/**
     * The name and signature of the console command.
     *
     * @var string
     */
    protected $signature = "post:create {active=0} {numberOfPost=1} {--queue}"
Trong ví dụ trên --queue sẽ được xác định khi thực hiện câu lệnh artisan, khi đó giá trị này trong tùy chọn sẽ là true, ngược lại nếu không truyền --queue thì giá trị này trong tùy chọn sẽ là false. Giả sử câu lệnh php artisan post:create 1 5 --queue là sẽ tạo ra 5 bài post bằng cách đưa công việc này vào hàng đợi của hệ thống.
Các tùy chọn cũng có thể thể hiển ngắn gọn hơn , ví dụ như ta không muốn viết --queue mà muốn viết -Q thì ta sẽ viết như sau trong phần tùy chọn của $signature : `{-Q|queue}
Chú ý !!!
Cả tham số và tùy chọn ở trên đều có thể đưa vào câu lẹnh dưới dạng mảng, khi đó chúng ta sẽ sử dụng ký tự * để hàm ý các đầu vào là dạng mảng.
$protected $signature = 'post:delete {--id = *}
Câu lệnh artisan sẽ như sau : php artisan post:delete --id=1 --id=2
Với $signarture chúng ta cũng có thể đưa vào các text mô tả cho từng tham số hoặc tùy chọn. Để cho người khác khi dùng thì có thể biết các tham số và tùy chọn đó làm gì.
protected $signature = 'post:create
                        {active: Hiển thi bài viết hay không hiển thị bài viêt}
                        {numberOfPost: Số lượng bài viết muốn tạo}';
Đê lấy dữ liệu mà mình nhập ở command-line chúng ta sẽ sử dụng phương thức argument() và option() để lấy các giá trị nhập vào.
Ví du để lấy các tham số như active và số lượng bài viết muốn tạo numberOfPost , hoặc muốn lấy các tùy chọn. Tất cả những việc đó sẽ được
public function handle()
    {
        // Lấy tham số dạng người dùng
        $userType = $this->argument('active');
        // Lấy tất cả các tham số, biến lấy tham số sẽ là 1 mảng
        $arguments = $this->arguments();
        // Lấy tùy chọn
        $isQueue = $this->option('queue');
        // Lấy tất cả các tùy chọn, biến lấy tùy chọn sẽ là 1 mảng
        $options = $this->options();
    }
Phương thức handle() sẽ được gọi khi câu command của bạn được thực thi. Bạn có thể đặt các logic của bạn trong phương thức này.
Đăng ký câu lệnh Laravel Artisan
Để đăng ký câu lệnh php artisan post:create phía trên ta sẽ mở file app/Console/Kernel.php và khai báo trong biến $commands
protected $commands = [
    Commands\PostCommand::class
];
Closure Commands
Closure based commands cung cấp một cách định nghĩa khác của console commands như classes. Giống như route Closures là thay thế cho các controllers, Trong hàm commands của file app/Console/Kernel.php, Laravel loads file routes/console.php
/**
 * Register the Closure based commands for the application.
 *
 * @return  void
 */
protected function commands()
{
    require base_path('routes/console.php');
}
Mặc dù file này không được định nghĩa HTTP routes, nó định nghĩa console based entry points (routes) vào ứng dụng. Bên trong file này, bạn có thể định nghĩa tất cả Closure based routes sử dụng hàm Artisan::command. Hàm command chấp nhận hai tham số: command signature và một Closure nhận tham số và tùy chọn:
Artisan::command('post:create {active=0} {numberOfPost=1} {--queue}', function ($active, $numberOfPost) {
    $this->info('Create post successfully');
});
Ngoài ra để nhận tham số command và options, command Closures ngoài ra có thể type-hint thêm các dependencies bạn muốn để giải quyết khỏi service container
use DB;
use Faker;

Artisan::command('post:create {active=0} {numberOfPost=1}', function ($active, $numberOfPost) {
    $faker = Faker\Factory::create();
    try {
        for ($i = 0; $i < $numberOfPost; $i++) {
            DB::table('posts')->insert([
                'title' => $faker->name,
                'content' => $faker->text($maxNbChars = 500);
            ]);
        }
        $thís->info($numberOfPost . ' create successfully');
    } catch (Exception $e) {
        $this->error('Error' . $e . 'when create post');
    }
});
Miêu tả Closure Command
Khi bạn định nghĩa một Close based command, bạn có thể sử dụng hàm describe để thêm nhiều miêu tả cho command. Miêu tả này thể hiện khi bạn chạy lệnh php artisan list hoặc php artisan help
use DB;
use Faker;

Artisan::command('post:create {active=0} {numberOfPost=1}', function ($active, $numberOfPost) {
    $faker = Faker\Factory::create();
    try {
        for ($i = 0; $i < $numberOfPost; $i++) {
            DB::table('posts')->insert([
                'title' => $faker->name,
                'content' => $faker->text($maxNbChars = 500);
            ]);
        }
        $thís->info($numberOfPost . ' create successfully');
    } catch (Exception $e) {
        $this->error('Error' . $e . 'when create post');
    }
})->describe('Create new post');
4.Kết luận
Qua một số tìm hiểu của mình về Laravel Artisan thì các bạn cũng đã mường tượng và thấy cách sử dụng của nó như thế nào. Mọi thắc mắc gì các bạn hãy comment phía dưới nhé!!!!
5.Tài liệu tham khảo
All rights reserved
