Tích hợp thanh toán online vào ứng dụng Rails
Bài đăng này đã không được cập nhật trong 5 năm
Giới thiệu
Hiện nay hình thức thanh toán online rất là phổ biến ở mọi trang web thương mại điện tử như Tiki, Shopee,... bởi vì nó đem lại sự tiện lợi và tính bảo mật cao cho người dùng. Và vì thế cũng đã có rất nhiều cổng thanh toán ra đời như Stripe, Paypal, Amazon Payments, Square, SecurePay, WorldPay, Authorize, 2Checkout, Braintree, Amazon, hoặc BlueSnap,...
Giới thiệu nhiều vậy thôi chứ ở bài viết này mình chỉ hướng dẫn 2 cổng thanh toán phỗ biến đó là Stripe và Paypal vào ứng dụng Ruby on Rails.
Dưới đây là work flow chung của các payment method
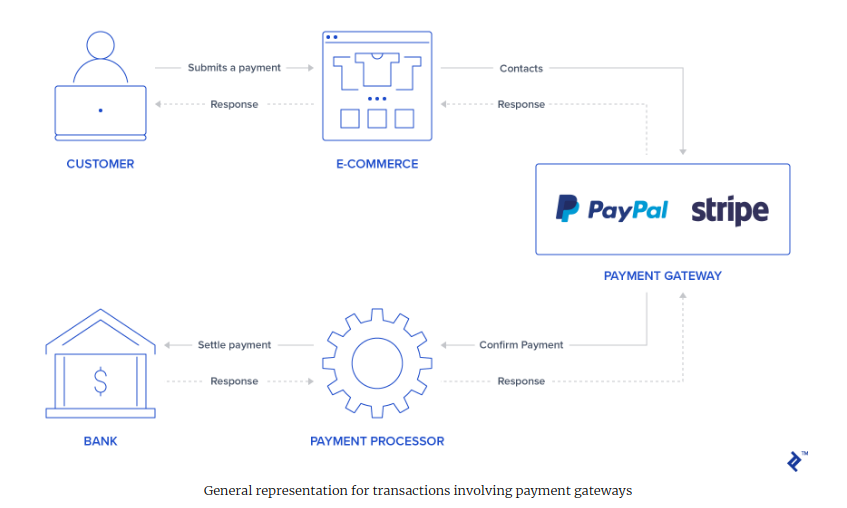
Hình dung đơn giản thì chúng ta sẽ có một button hoặc một popup để người dùng nhập thông tin tài khoản hoặc nhập thông tin credit card. Công việc này do Stripe hoặc Paypal thực thi đầu tiên và bảo mật bởi họ sử dụng iframe hoặc popup để tránh việc ứng dụng của bạn lưu lại những thông tin nhạy cảm của người dùng như số credit card, tài khoản, mật khẩu,...
Sau khi nhập thông tin xong thì sẽ gửi đến bên thứ ba là Stripe hoặc Paypal và một cổng thanh toán sẽ được mở ra nhằm kết nối với ngân hàng và thực thi thanh toán giữa bên thứ ba với ngân hàng.
Stripe sử dụng một form input bao gồm credit card number, csv và ngày hết hạn sử dụng của thẻ để người dùng nhập thông tin vào đó, sau đó Stripe lấy thông tin đó để tạo ra một token trả về cho phía backend tiếp tục quá trình thanh toán với token thay vì những thông tin vừa nhập vào của users.
Khác với Stripe, còn ở Paypal thì sau khi click vào button Paypal sẽ hiển thị một popup để người dùng đăng nhập tài khoản và chọn phương thức thanh toán thông qua Paypal sau khi user xác nhận thông tin thanh toán thì Paypal sẽ trả về một token cho backend tiếp tục xử lí.
Qua một ít mô tả ở trên thì chúng ta cũng nắm được một phần cách làm việc của 2 phương thức thanh toán Stripe và Paypal rồi, vậy để tích hợp các phương thức thanh toán trên vào Rails app thì phải làm như thế nào.  Bài viết này sẽ giúp bạn làm điều đó. Let's go
Setup
Init project
- Rails 6.0
- Ruby
rails new payment_viblo -d mysql
Thêm gems
Ở bài viết này ngoài mấy gems paypal, stripe mình sử dụng thêm những gem sau:
devise: dùng để xác thực và phân quyền người dùngmoney-rails: hỗ trợ trong việc định dạng tiền tệslim: sử dụng để làm view template
Mở Gemfile và thêm đoạn code phía dưới vào và sau đó chạy lệnh bundel install:
gem "devise", ">= 4.7.1"
gem "money-rails", "~> 1.7"
gem "slim", "~> 3.0", ">= 3.0.6"
Cấu hình và cài đặt gem
- Install devise:
rails g devise:install
- Install money-rails:
rails g money_rails:initializer
- Thêm jquery: Ở rails 6 đã áp dụng webpacker làm asset complier nên cách thêm thư viện cho js cũng đã thay đổi.
- Chạy lệnh
yarn add jquerychoyarnhoặcnpm install jquerychonpm - Mở file
config/webpack/environment.js:const { environment } = require('@rails/webpacker') const webpack = require('webpack') environment.plugins.prepend('Provide', new webpack.ProvidePlugin({ $: 'jquery/src/jquery', jQuery: 'jquery/src/jquery', jquery: 'jquery', 'window.jQuery': 'jquery', Popper: ['popper.js', 'default'] })) module.exports = environment - Thêm
require("jquery")vào fileapp/javascript/packs/application.js
- Chạy lệnh
Tạo bảng
Ở bài viết này chúng ta cần có 3 bảng:
-
User: Dùng để chưa thông tin user và đăng nhập app -
Product:nameprice_centsstripe_plan_name: Dùng để xác định được sản phẩm có thuộc loại trả góp hay không và dùng cho cổng thanh toánStripepaypay_plan_name: Cũng tương tự như trườngstripe_plan_namenhưng dùng cho cổng thanh toánPaypal
-
Order:customer_iduser_idproduct_idstatusprice_centstoken: Dùng để lưu lại token từ bên thứ 3 trả về(ở đây là Paypal hoặc Stripe) và sử dụng cho việc xử lí ở backendcharge_id: Lưu lại id của lần thanh toán, cái này do bên thứ 3 (Paypal hoặc Stripe) trả về, phục vụ cho việc hoàn hoá đơn, điều tra sau nàypayment_gateway: Tên loại cổng thanh toán như Paypal, Stripe
-
Chúng ta tiến hành tạo bảng:
- model
user:rails g devise User - model
productrails rails g model Product name stripe_plan_name paypal_plan_name price:monetize- Các bạn mở file migrate của
productvà sửa một tí ở chỗpricelại nhé:class CreateProducts < ActiveRecord::Migration[6.0] def change create_table :products do |t| t.string :name t.string :stripe_plan_name t.string :paypal_plan_name t.monetize :price, currency: { present: true } # sửa lại ở đây t.timestamps end end end - Để cho phép sử dụng object money cho thuộc tính
price_centsta mở filemodel/product.rb:# product.rb monetize :price_cents
- model
order:rails g model Order user:references product:references price:monetize charge_id:string customer_id status:integer token error_message payment_gateway- Sửa lại thuộc tính
pricetrong file migrate tương tự như bảngproductclass CreateOrders < ActiveRecord::Migration[6.0] def change create_table :orders do |t| t.references :user, null: false, foreign_key: true t.references :product, null: false, foreign_key: true t.monetize :price, currency: { present: true } t.string :charge_id t.string :customer_id t.integer :status t.string :token t.string :error_message t.string :payment_gateway t.timestamps end end end - Thêm một vài hàm sử dụng cho phía dưới vào file
app/models/order.rbclass Order < ApplicationRecord enum status: { pending: 0, failed: 1, paid: 2, paypal_executed: 3} enum payment_gateway: { stripe: 0, paypal: 1 } belongs_to :product belongs_to :user def set_paid self.status = Order.statuses[:paid] end def set_failed self.status = Order.statuses[:failed] end def set_paypal_executed self.status = Order.statuses[:paypal_executed] end end
- model
-
Cuối cùng chúng ta chạy lệnh
bundle exec rake db:migrateđể tiến hành migrate nhé -
Tiếp theo chúng ta thêm mới một số product để phục vụ việc demo, chạy
rails cđể mở consoleProduct.create! name: "T-Shirt", price: 30 Product.create! name: "Jean", price: 40 -
Tạo controller để thực hiện mua hàng và thanh toán:
rails g controller Orders index- Chỉnh sửa lại file
route.rbRails.application.routes.draw do root 'orders#index' devise_for :users end orders_controller.rb:class OrdersController < ApplicationController before_action :authenticate_user! def index products = Product.all @products_purchase = products.where(stripe_plan_name:nil, paypal_plan_name:nil) @products_subscription = products - @products_purchase end def submit end end- File view
views/orders/index.html.slimsẽ có nội dung như dưới:orders[payment_gateway]dùng để lưu payment_gatewayorders[product_id]dùng để lưu product_id
div
 h1 List of products
 = form_tag({:controller => "orders", :action => "submit" }, {:id => 'order-details'})
   input id='order-type' type="hidden" value="stripe" name='orders[payment_gateway]'
   .form_row
     h4 Charges/Payments
     - @products_purchase.each do |product|
       div data-charges-and-payments-section="true"
         = radio_button_tag 'orders[product_id]', product.id, @products_purchase.first == product
         span id="radioButtonName#{product.id}" #{product.name}
         span id="radioButtonPrice#{product.id}" data-price="#{product.price_cents}" #{humanized_money_with_symbol product.price}
       br
     h4 Subscriptions
     - @products_subscription.each do |product|
       div
         = radio_button_tag 'orders[product_id]', product.id, false
         span id="radioButtonName#{product.id}" #{product.name}
         span id="radioButtonPrice#{product.id}" data-price="#{product.price_cents}" #{humanized_money_with_symbol product.price}
       br
   hr
   h1 Payment Method
   .form_row
     div
       = radio_button_tag 'payment-selection', 'stripe', true, onclick: "changeTab();"
       span Stripe
     br
     div
       = radio_button_tag 'payment-selection', 'paypal', false, onclick: "changeTab();"
       span Paypal
   br
   br
   div#tab-stripe class='paymentSelectionTab active'
     div#card-element
     div#card-errors role="alert"
     br
     br
     = submit_tag "Buy it!", id: "submit-stripe"
   div#tab-paypal class='paymentSelectionTab'
     div#submit-paypal
   br
   br
   hr
javascript:
 function changeTab() {
   var newActiveTabID = $('input[name="payment-selection"]:checked').val();
   $('.paymentSelectionTab').removeClass('active');
   $('#tab-' + newActiveTabID).addClass('active');
 }

css:
 #card-element {
   width: 500px;
 }
 .paymentSelectionTab {
   display: none;
 }
 .paymentSelectionTab.active {
   display: block !important;
 }
-
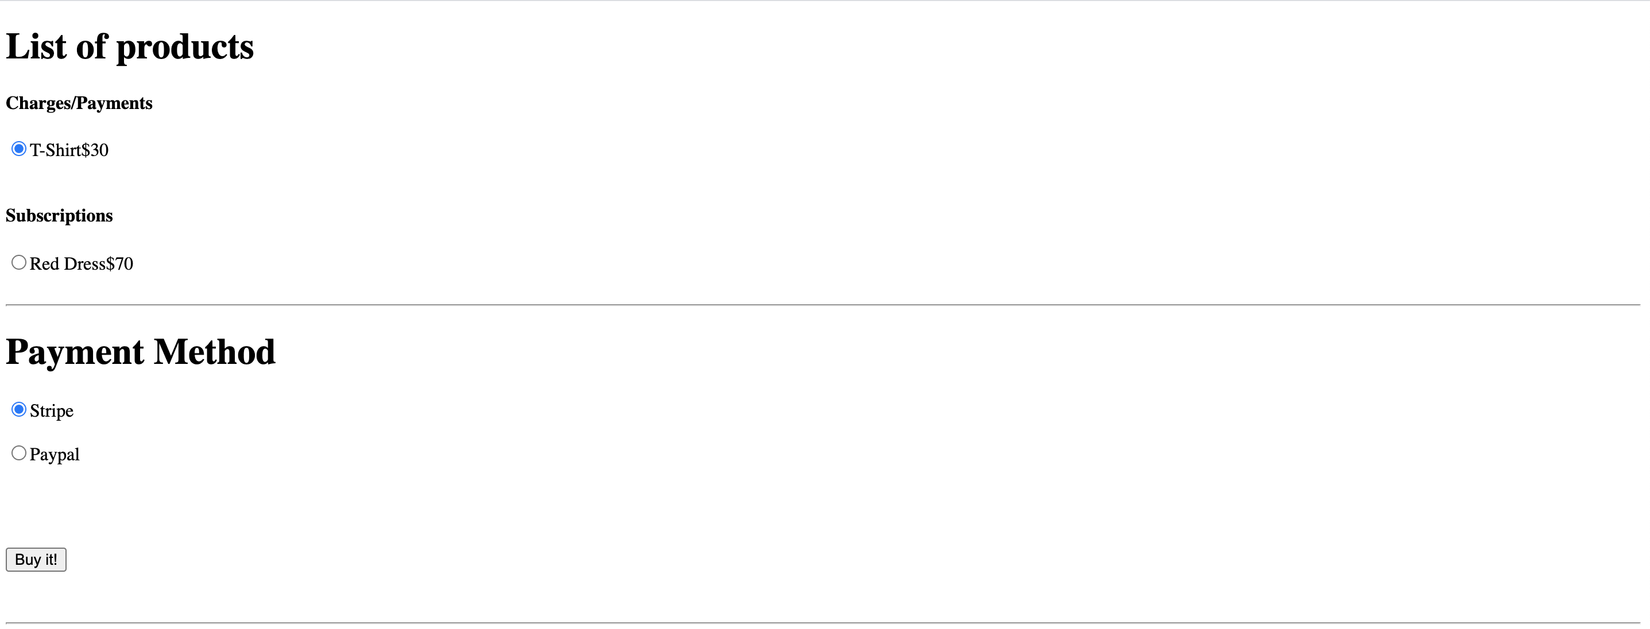
Đến đây mọi người chạy
rails svà truy cập vàolocalhost://3000để xem thành quả nhé:![]()
Payment configure
Ở bước này chúng ta config các key của các service thứ 3 nhé
-
Step 1: Tạo file
config/application.ymlnhư dưới nhé:default: &default PAYPAL_ENV: sandbox STRIPE_PUBLISHABLE_KEY: STRIPE_PUBLISHABLE_KEY STRIPE_SECRET_KEY: STRIPE_SECRET_KEY PAYPAL_CLIENT_ID: PAYPAL_CLIENT_ID PAYPAL_SECRET_KEY: PAYPAL_SECRET_KEY test: <<: *default development: <<: *default -
Step 2: Ignore file
config/application.ymltrong file.gitignore# .gitignore ... /config/application.yml -
Step 3: Config ENV từ file
config/application.yml, các bạn mở fileconfig/application.rbvà thêm đoạn config phía dưới vào:config_file = Rails.application.config_for(:application) config_file.each do |key, value| ENV[key.to_s] = value end
Stripe
Configure
Để có thể tương tác với api của Stripe trong chúng ta sử dụng gem stripe-rails, mọi người có thể xem chi tiết doc api của Stripe ở đây
-
Step 1: Cài đặt gem
stripe-rails- Thêm vào Gemfile:
gem 'stripe-rails' - Chạy lại
bundle install
- Thêm vào Gemfile:
-
Step 2: Tạo API key
- Để ứng dụng của bạn có thể tương tác được với
Stripethì chúng ta cần phải có 2 key doStripecung cấp giống như chìa khoá để mở cổng trao đổi giữa ứng dụng vớiStripe - Đầu tiên nêú bạn chưa có một tài khoản
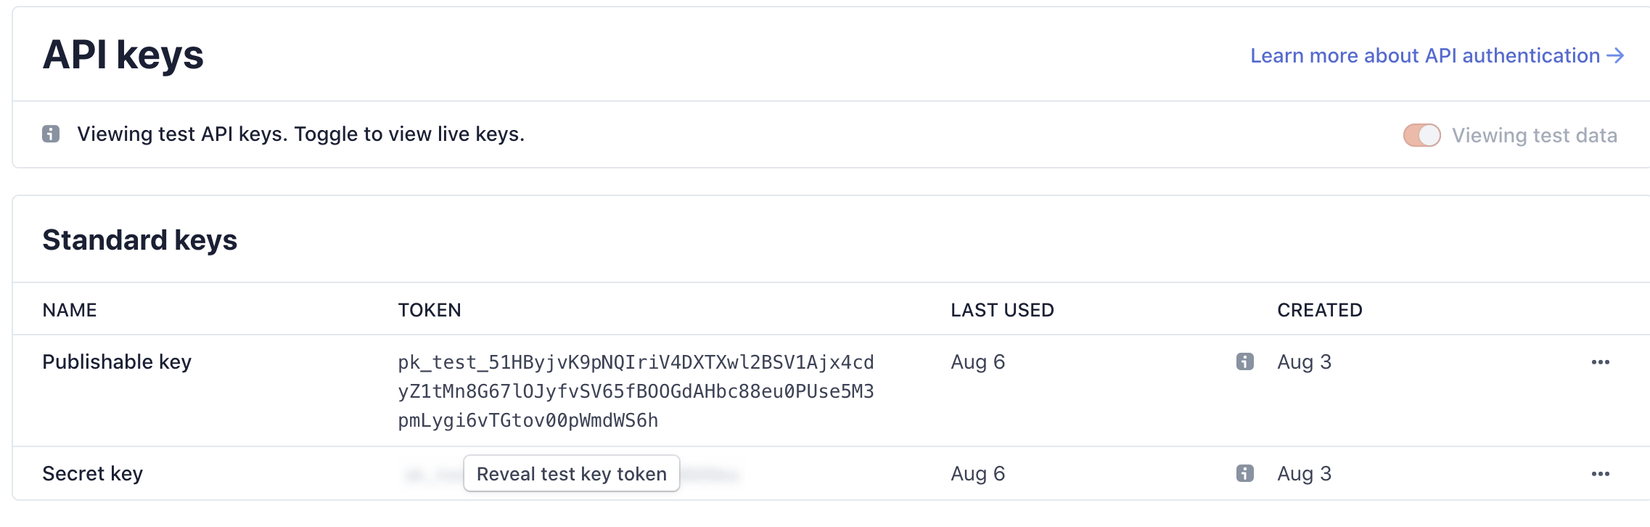
stripethì bạn truy cập vào https://dashboard.stripe.com/ và tạo một tài khoản - Sau khi đăng nhập xong thì truy cập vào https://dashboard.stripe.com/test/apikeys để lấy
PUBLIC KEYvàSECRET_KEYnhư hình của mình bên dưới nhé![]()
- Sau đó các bạn thay thế các key vừa có được với
STRIPE_PUBLISHABLE_KEYvàSTRIPE_SECRET_KEYtrong fileconfig/application.ymlchúng ta vừa tạo ở trên nhé.
- Để ứng dụng của bạn có thể tương tác được với
-
Step 3: Configure stripe module
- Chúng ta tạo file
config/initializers/stripe.rb:Rails.application.configure do config.stripe.secret_key = ENV["STRIPE_SECRET_KEY"] config.stripe.publishable_key = ENV["STRIPE_PUBLISHABLE_KEY"] end
- Chúng ta tạo file
-
Step 4: Tích hợp Stripe JS vào view, mục đích để hỗ trợ trong việc tạo
formcho người dùng nhập thông tin thẻ tín dụng, và tương tác với vớiStripe- Include thư viện vào đầu file
index.html.slim= stripe_javascript_tag - Chúng ta sẽ Stripe JS tạo một form cho người dùng nhập thông tin credit card, sau đó sẽ gửi những thông tin user vừa nhập đó cho
Stripethông quaStripe APIxử lí và trả về cho app mộttoken, mục đích là để bảo mật thông tin người dùng. - Đầu tiên chúng ta tạo một
cardđược hỗ trợ bằngstripe.jsvới cú phápstripe.elements().create('card'), và đểcardvừa tạo có thể hiển thị ở trên view thì chúng ta dùngmountvới cú phápcard.mount('#id-element)', và để tạo một token ta sử dụng hàmcreateTokennhưstripe.createToken(card).then(function(result). Ngoài ra còn có một số hàm khác, để hiểu rõ hơn các bạn truy cập https://stripe.com/docs/js/ nhé - Bây giờ chúng ta thêm đoạn code phía dưới vào file
index.html.hamlnhé:(function setupStripe() { var stripe = Stripe("#{ENV["STRIPE_PUBLISHABLE_KEY"]}"); var elements = stripe.elements(); var card = elements.create('card'); card.on('change', function(event) { $('#submit-stripe').prop('disabled', false); const cardErrors = $('#card-errors'); if (event.error) { cardErrors.text(event.error.message) } else { cardErrors.text(''); } }); card.mount('#card-element'); var form = document.getElementById('order-details'); // This will be called when the #submit-stripe button is clicked by the user. form.addEventListener('submit', function(event) { $('#submit-stripe').prop('disabled', true); event.preventDefault(); stripe.createToken(card).then(function(result) { if (result.error) { // Inform that there was an error. var errorElement = document.getElementById('card-errors'); errorElement.textContent = result.error.message; } else { // Now we submit the form. We also add a hidden input storing // the token. So our back-end can consume it. var $form = $("#order-details"); // Add a hidden input orders[token] $form.append($('<input type="hidden" name="orders[token]"/>').val(result.token.id)); // Set order type $('#order-type').val('stripe'); $form.submit(); } }); return false; }); })();
- Include thư viện vào đầu file
-
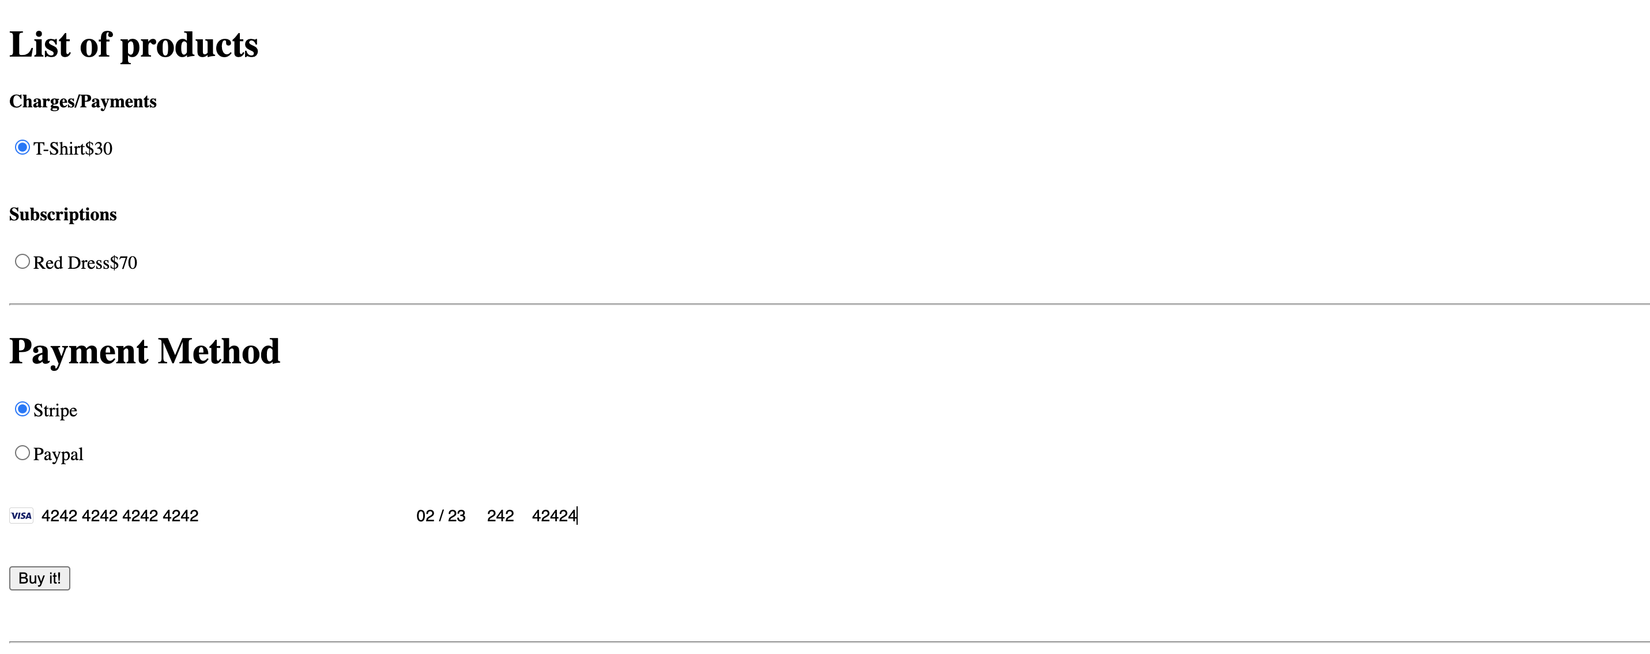
Và bây giờ thử nhập card number và test xem chạy được chưa nhé.
Stripecó hỗ trợ một số card number phục vụ cho việc test ở đây nhé https://stripe.com/docs/testing.![]()
Stripe Charge
Sau khi đã có được token từ phía Stripe thì bây giờ chúng ta tiếp tục vào phần quan trọng nhất đó là xử lí và thanh toán nhé.
Step 1: Tạo stripe service
- Chúng ta tạo folder
app/services/orders, và tạo fileapp/services/orders/stripe.rb, trong file này chúng ta định nghĩa 1class methodđể xử lí việc thanh toán order nhé.
class Orders::Stripe
  def self.execute(order:, user:)
    product = order.product
    # Check if the order is a plan
    if product.stripe_plan_name.blank?
      charge = self.execute_charge(price_cents: product.price_cents,
                                   description: product.name,
                                   card_token:  order.token)
    else
  	 #SUBSCRIPTIONS WILL BE HANDLED HERE
    end

    unless charge&.id.blank?
      # If there is a charge with id, set order paid.
      order.charge_id = charge.id
      order.set_paid
    end
  rescue Stripe::StripeError => e
    # If a Stripe error is raised from the API,
    # set status failed and an error message
    order.error_message = e.message
    order.set_failed
  end

  private

    def self.execute_charge(price_cents:, description:, card_token:)
      Stripe::Charge.create({
        amount: price_cents.to_s,
        currency: "usd",
        description: description,
        source: card_token
      })
    end
end
Step 2: Xử lí ở controller
- Chúng ta có action
submittrong fileapp/controllers/orders_controller.rbnhư sau:
def submit
  @order = nil
  #Check which type of order it is
  if order_params[:payment_gateway] == "stripe"
    prepare_new_order
    Orders::Stripe.execute(order: @order, user: current_user)
  elsif order_params[:payment_gateway] == "paypal"
    #PAYPAL WILL BE HANDLED HERE
  end
ensure
  if @order&.save
    if @order.paid?
      # Success is rendered when order is paid and saved
      return render html: "Payed successfully"
    elsif @order.failed? && !@order.error_message.blank?
      # Render error only if order failed and there is an error_message
      return render html: @order.error_message
    end
  end

  render html: "Something went wrong!"
end

private

  # Initialize a new order and and set its user, product and price.
  def prepare_new_order
    @order = Order.new(order_params)
    @order.user_id = current_user.id
    @product = Product.find(@order.product_id)
    @order.price_cents = @product.price_cents
  end

  def order_params
    params.require(:orders).permit(:product_id, :token, :payment_gateway, :charge_id)
  end
Step 3: Oke giờ đến lúc test thành quả thôi nào, các bạn điền card number và submit, sau đó vào https://dashboard.stripe.com/test/payments để check xem.
Hôm nay mình dừng lại ở đây nhé. Phần sau mình sẽ viết tiếp về stripe subscription, paypal charge và paypal subscription.
Cảm ơn các bạn đã đọc
Happy Coding! 
Tham khảo
- Source code của mình ở đây nhé payment_app
- Stripe document: https://stripe.com/docs/api
- Offical Post: https://www.toptal.com/ruby-on-rails/ruby-on-rails-ecommerce-tutorial
All rights reserved
