Thực hiện Sign in with Apple trên iOS
Bài đăng này đã không được cập nhật trong 5 năm
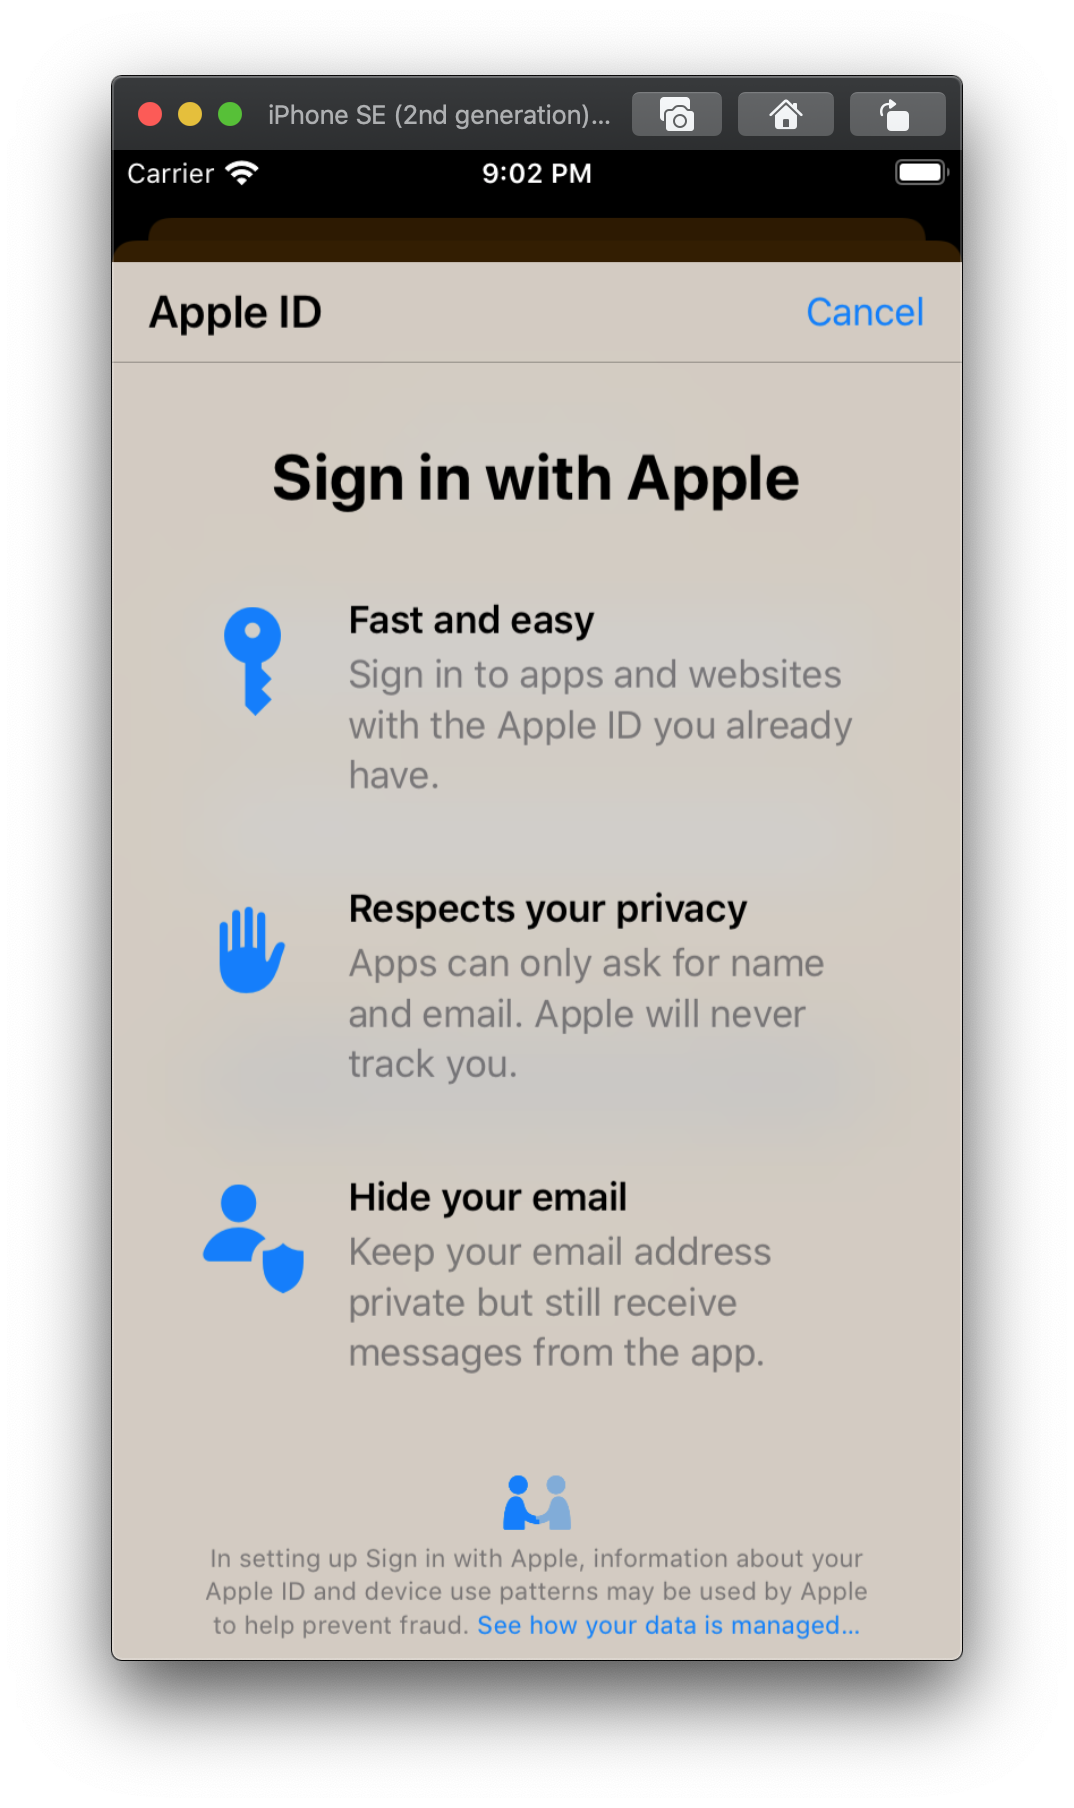
Sign in with apple là gì?
Tại WWDC 2019, apple đã cho ra mắt tính năng Sign in with apple, hiểu nôm na là chúng ta sẽ có thể dùng tài khoản apple ID đã có để đăng nhập vào các ứng dụng, hay cả web site. Để dễ hình dung hơn, bạn hãy tưởng tưởng 1 trang web có nút Đăng nhập với Google hoặc đăng nhập với FaceBook, thì cũng giống như vậy, apple đã phát triển 1 thứ tương tự cho riêng họ, để từ đó chúng ta có thể đăng nhập nhanh dựa trên tài khoản apple ID đã có mà không cần phải fill các thông tin đăng ký rườm rà. Và với độ bảo mật được apple nói rằng "Đảm bảo".
Trớ trêu thay là đối với các app đã implement chức năng đăng nhập từ bên thứ 3 như là đăng nhập với goolgle, facebook, line, .... thì sẽ bắt buộc phải có thêm Sign In with apple. Thông báo đưa ra khiến có nhiều ý kiến rằng Apple hơi quá đáng. Tuy nhiên thì vẫn phải thực hiện vì theo nhiều ý kiến thì đó là chiến lược cạnh tranh của họ với các bên khác. Và anh em iOS lại có một phen maintain, update hay thậm chí là tip trick để đối phó. Còn những dự án không muốn inplement chức năng này thì có thể .... bỏ luôn cả các chức năng đăng nhập với bên thứ 3 khác :v.
Sign in with apple trên iOS
Quyền riêng tư và bảo mật
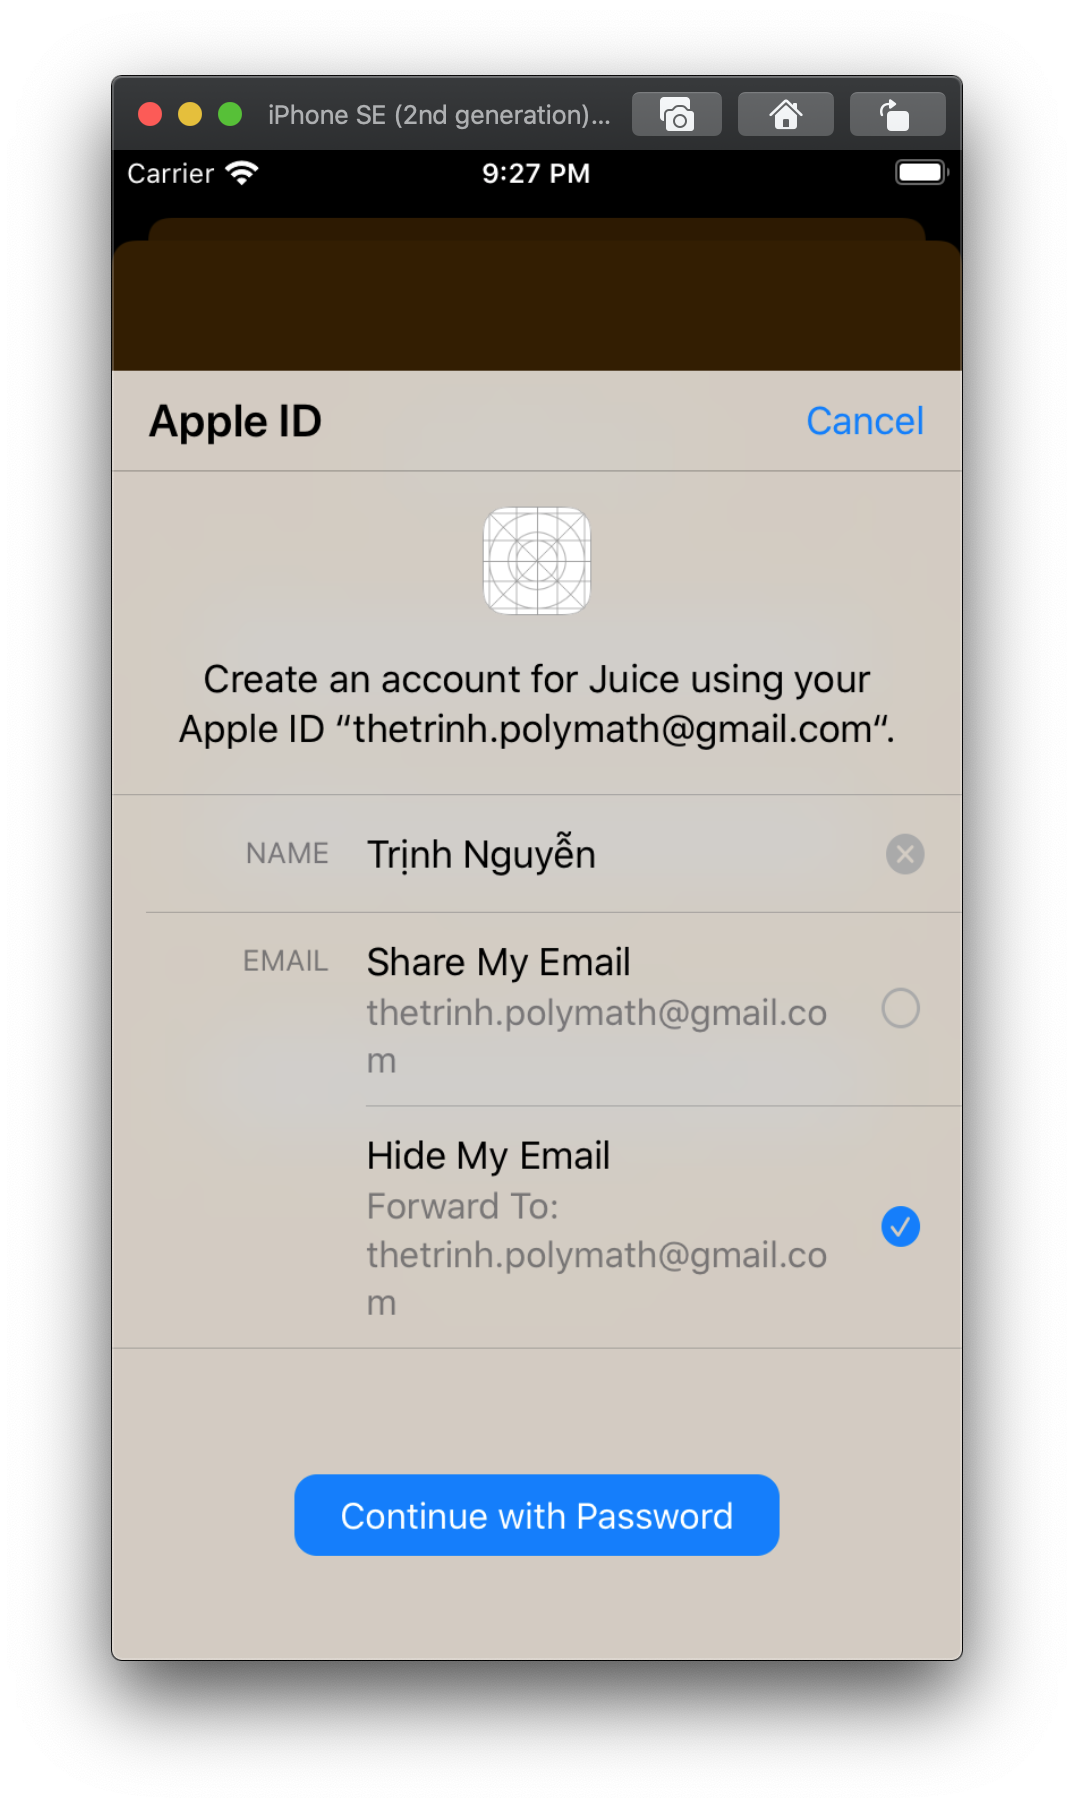
- Với lần đầu đăng nhập thì app chỉ yêu cầu tên và địa chỉ email để thiết lập tài khoản cho bạn
- Có thể dùng chức năng ẩn email, có nghĩa là đăng kí với 1 email apple tự tạo ra, sau đó mọi thông tin gửi đến mail này sẽ được foward đến mail thật của bạn
- Không theo dõi, thu thập các thông tin không cần thiết như trang web yêu thích, app yêu thích,....
- Cho phép bật xác thực 2 yếu tố
CHúng ta có thể down Sample code hướng dẫn của apple tại đây
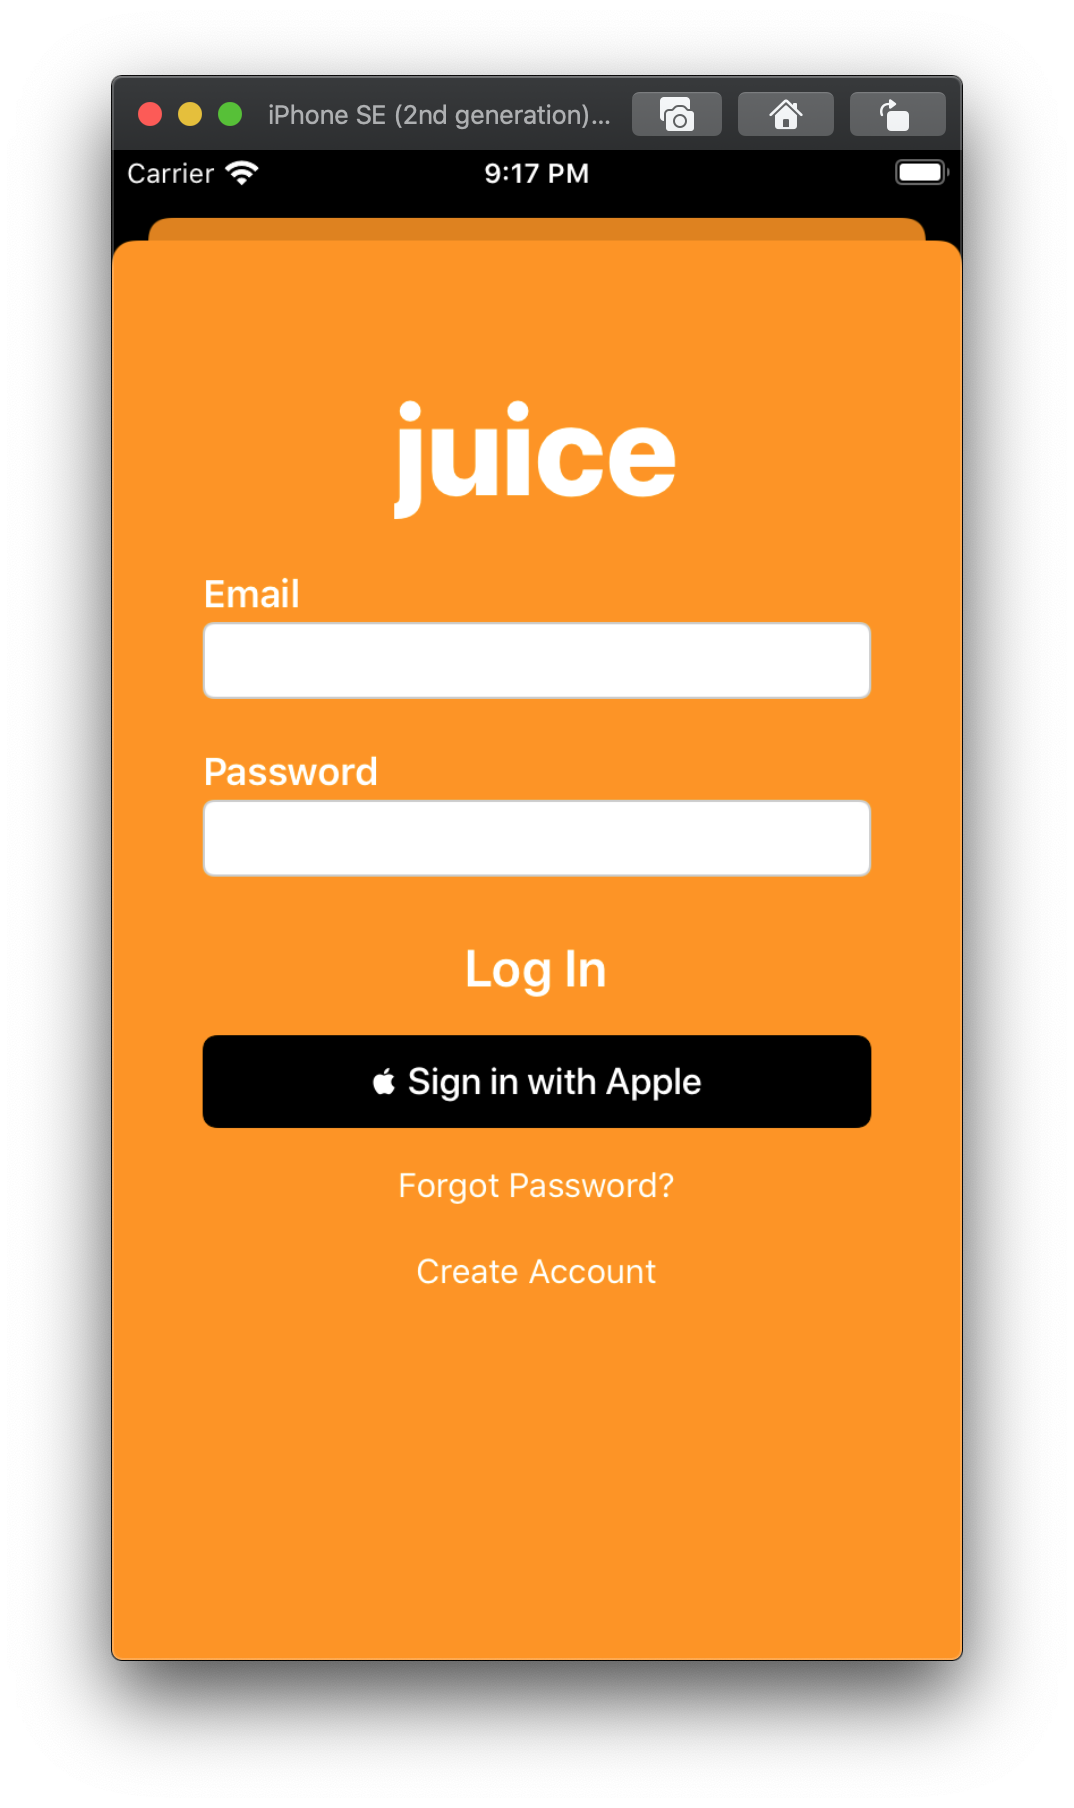
Thêm nút Sign in with Apple
Apple đã cung cấp 1 class Button riêng cho nút này, với chỉ 3 màu là black, white và white outline
func setupProviderLoginView() {
    let authorizationButton = ASAuthorizationAppleIDButton()
    authorizationButton.addTarget(self, action: #selector(handleAuthorizationAppleIDButtonPress), for: .touchUpInside)
    self.loginProviderStackView.addArrangedSubview(authorizationButton)
}
Nếu bạn muốn đổi màu, hãy thay đổi thêm thuộc tính]
ASAuthorizationAppleIDButton( type: .signIn, style: .whiteOutline)


Request Authorization with Apple ID
Bước này là handle khi bấm vào nút Sign in with apple
@objc
func handleAuthorizationAppleIDButtonPress() {
    let appleIDProvider = ASAuthorizationAppleIDProvider(
    let request = appleIDProvider.createRequest()
    request.requestedScopes = [.fullName, .email]

    let authorizationController = ASAuthorizationController(authorizationRequests: [request])
    authorizationController.delegate = self
    authorizationController.presentationContextProvider = self
    authorizationController.performRequests()
}
Handle User Credentials
Sau khi đăng nhập thành công thì sẽ có hàm delegate(ASAuthorizationControllerDelegate) để chúng ta lấy thông tin đã request được trả về
func authorizationController(controller: ASAuthorizationController, didCompleteWithAuthorization authorization: ASAuthorization) {
        switch authorization.credential {
        case let appleIDCredential as ASAuthorizationAppleIDCredential:

            // Create an account in your system.
            let userIdentifier = appleIDCredential.user
            let fullName = appleIDCredential.fullName
            let email = appleIDCredential.email

            // For the purpose of this demo app, store the `userIdentifier` in the keychain.
            self.saveUserInKeychain(userIdentifier)

            // For the purpose of this demo app, show the Apple ID credential information in the `ResultViewController`.
            self.showResultViewController(userIdentifier: userIdentifier, fullName: fullName, email: email)

        case let passwordCredential as ASPasswordCredential:

            // Sign in using an existing iCloud Keychain credential.
            let username = passwordCredential.user
            let password = passwordCredential.password

            // For the purpose of this demo app, show the password credential as an alert.
            DispatchQueue.main.async {
                self.showPasswordCredentialAlert(username: username, password: password)
            }

        default:
            break
        }
    }
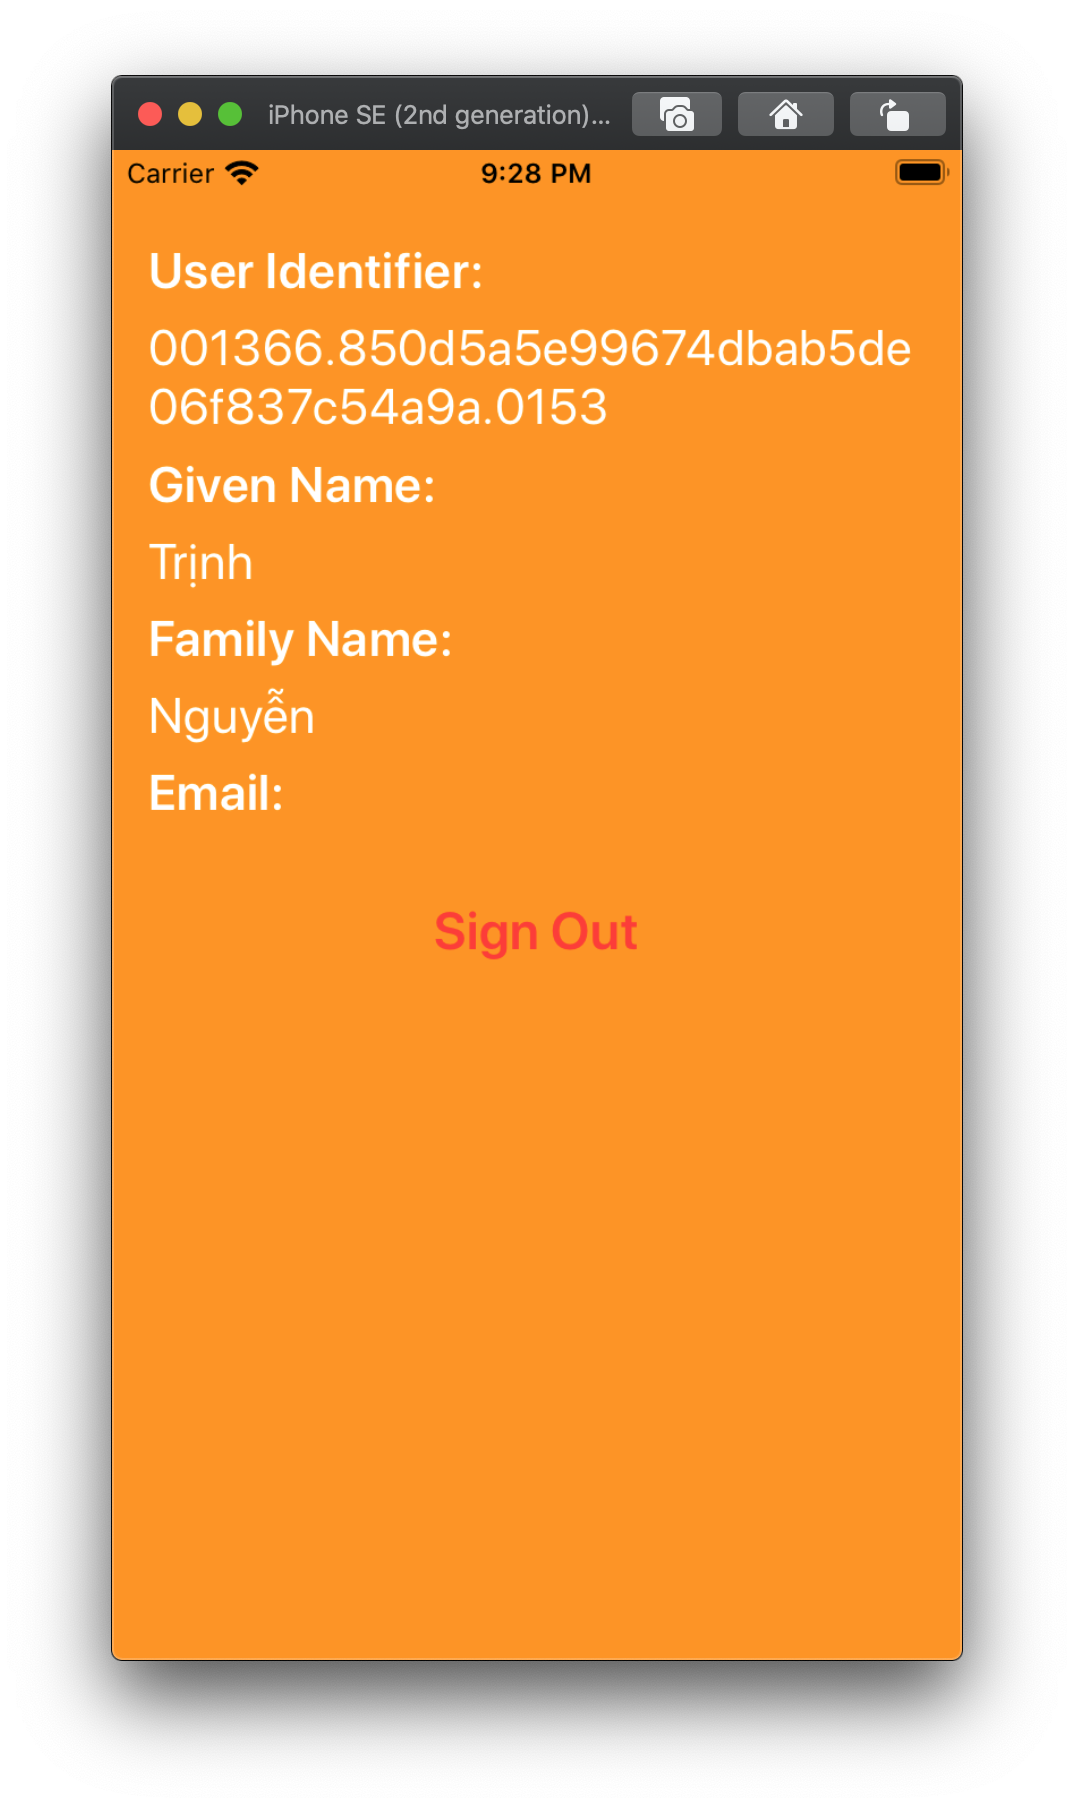
Nếu như chúng ta chọn ẩn email thì email sẽ được private, và các thông báo sẽ được foward đến mail thật. Còn nếu pulish mail thì sẽ có thể lấy được từ dữ liệu trả về trong delegate
Request Existing Credentials
Không cần thiết phải bấm nút thì mới request được thông tin, chúng ta hoàn toàn có thể refresh, gọi lại mỗi lần load lại view Khi view load xong thì hãy cho gọi hàm sau
func performExistingAccountSetupFlows() {
       // Prepare requests for both Apple ID and password providers.
       let requests = [ASAuthorizationAppleIDProvider().createRequest(),
                       ASAuthorizationPasswordProvider().createRequest()]

       // Create an authorization controller with the given requests.
       let authorizationController = ASAuthorizationController(authorizationRequests: requests)
       authorizationController.delegate = self
       authorizationController.presentationContextProvider = self
       authorizationController.performRequests()
   }
Check User Credentials at Launch
Việc xử lý auto login với tài khoản lần trước đó. Chỉ cần lưu lại thông tin UserIdentifier khi request được thông tin, và gọi hàm sau trong Appdelegate, là có thể xử lý một cách dễ dàng
func application(_ application: UIApplication, didFinishLaunchingWithOptions launchOptions: [UIApplication.LaunchOptionsKey: Any]?) -> Bool {
        let appleIDProvider = ASAuthorizationAppleIDProvider()
        appleIDProvider.getCredentialState(forUserID: KeychainItem.currentUserIdentifier) { (credentialState, error) in
            switch credentialState {
            case .authorized:
                break // The Apple ID credential is valid.
            case .revoked, .notFound:
                // The Apple ID credential is either revoked or was not found, so show the sign-in UI.
                DispatchQueue.main.async {
                    self.window?.rootViewController?.showLoginViewController()
                }
            default:
                break
            }
        }
        return true
    }
Cám ơn các bạn đã đọc bài viết của mình, hi vọng sẽ giúp ích cho các bạn!
All rights reserved
