Thử lấy data từ api bằng Angular làm trang danh sách sản phẩm
Bài đăng này đã không được cập nhật trong 5 năm
Mở Đầu
Hí anh em  , chắc hẳn anh em Dev thì không còn xa lạ gì với API nữa rồi . Nhân tiện mình đang học về
 Angular nên hôm nay mình sẽ thử dùng Angular gọi data từ api về, mục đích là để có cái sau quên còn có cái xem lại . Vì chưa có phần web serve để tạo ra api nên mình sẽ dùng mockapi để tạo api nhé. Thế cần chuẩn bị những gì nhể .
Chuẩn bị
Như ở đề bài đã nói là dùng Angular để lấy data từ api thì tất nhiên là phải cần api và project Angular rồi.
Api
Mình sẽ dùng mockpi để tạo api nhé mọi người vào đây tạo projects mới ấn New resource đặt tên cho resource rồi thêm các trường, kiểu dữ liệu, cuối cùng ấn Create, rồi ấn vào tên resource đó nó sẽ hiển thị ra như thế này
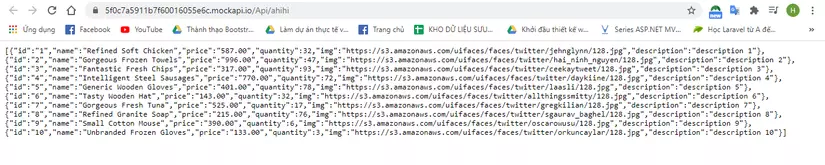 Vậy là chúng ta đã tạo được data, Nhưng các bạn chỉ cần quan tâm đến địa chỉ trên URL để tí còn dùng đến.
Angular
Thế là đã xử lý xong bên api bây giờ chuyển sang angular. Để cài đặt angular trước hết chúng ta phải cài Node.js. Các bạn có thể lên trang chủ để cài Node.js tại đây. Sau khi cài xong Node.js thì đến lúc cài Angular bằng lệnh
npm install -g @angular/cli
Tiếp theo là tạo một project mới
ng new my-app
với my-app là tên project mà bạn muốn đặt
tiếp theo cd đến project vừa tạo chạy lệnh
ng serve --open
Thêm --open để có thể tự động mở trình duyệt của bạn đến http://localhost:4200/. Nó sẽ trông như thế này
 Ok như vậy là các bước chuẩn bị gần như đã hoàn tất. MÌnh sẽ tạo ra thêm một số
 component để có thể thực hiện được việc lấy data từ api đổ ra trang danh sách sản phẩm và xem chi tiết một sản phẩm. Vì múc đích của bài này là thực hiện lấy data từ api nên phần giao diện mình không chú trọng lắm, các bạn thông cảm nhé,
Tiến Hành
Đầu tiên mình sẽ tạo một folder model và tạo một file product.model.ts để tạo một class product với các trường tương ứng với bên data từ api trả về.
export class Product{
    id:number;
    name:string;
    price: number;
    quantity: number;
    img: string;
    description: string;
}
Tiếp theo là tạo một service với câu lệnh
ng generate service product
với product là tên service bạn muốn đặt. Ở file product.service.ts mình có như sau:
import { Injectable } from '@angular/core';
import {HttpClient, HttpHeaders} from '@angular/common/http';
import {Observable,of} from 'rxjs';
import {Product} from '../models/product.model';

const httpOptions ={
  headers:new HttpHeaders({'Content-Type':'Application/json'})
}
const apiUrl = 'https://5f0c7a5911b7f60016055e6c.mockapi.io/Api/ahihi';

@Injectable({
  providedIn: 'root'
})
export class ProductService {

  constructor(private httpClient:HttpClient) { }

  getAll():Observable<Product[]>{
    return this.httpClient.get<Product[]>(apiUrl).pipe(
    )
  }
}
Mình import thêm HttpClient, HttpHeaders để có thể lấy được data từ api ở địa chỉ https://....., À các bạn phải nhớ khai báo ở bên app.module.ts nữa nhé . Observable,oftheo dõi sự thay đổi của data để thực hiện một hàm gì đó
và cuối cùng là import class Product từ bên models
const httpOptions ={
    headers:new HttpHeaders({'Content-Type':'Application/json'})
}
quy định kiểu trả về của data ở đây là kiểu json
const apiUrl = 'https://5f0c7a5911b7f60016055e6c.mockapi.io/Api/ahihi';
tạo 1 biến là apiUrl chính là đường dẫn lúc nãy khi chúng ta tạo api trên mockapi
Tiếp theo là
export class ProductService {

  constructor(private httpClient:HttpClient) { }

  getAll():Observable<Product[]>{
    return this.httpClient.get<Product[]>(apiUrl).pipe(
    )
  }
}
class ProductService với phương thức khỏi tạo và hàm getAll() với phương thức httpClient.get để lấy data từ đường dẫn apiUrl. Như đã nói ở trên mình đã tạo thêm component để thực hiện chức năng load danh sách sản phẩm và xem chi tiết, bây giờ chúng ta cùng vào thư mục list-product.component.ts của component list-product
import { Component, OnInit } from '@angular/core';
import { ProductService } from '../../service/product-service.service';
import { Product } from '../../models/product.model'

@Component({
  selector: 'app-list-product',
  templateUrl: './list-product.component.html',
  styleUrls: ['./list-product.component.css']
})
export class ListProductComponent implements OnInit {
  datas:Product[]=[];

  constructor(private productService: ProductService) { }

  ngOnInit(): void {
    this.getAll();
  }

  getAll(){
    this.productService.getAll().subscribe((res:any)=>{
      this.datas = res
    })
  }
}
Ở đây mình cũng import ProductService ở bên service mình vừa tạo ở trên và Product bên models, tiếp theo là gán datas bằng một mảng product rỗng. Hàm khởi tạo productService. Tạo một phương thức getAll()gọi đến phương thức getAll() bên productService và datas sẽ được gán bằng dữ liệu trả về của hàm getAll().
Tiếp theo sẽ là phần hiển thị data lấy được lên view, Chúng ta sẽ vào file list-product.component.html để tiến hành render data ra. Chúng ta sẽ dùng ngFor để load ra danh sách sản phẩm
  <div id="1" class="item new col-md-4" *ngFor="let item of datas">
    <a href="single-product.html">
      <div class="featured-item">
        <img src="{{item.img}}">
        <h4>{{item.name}}</h4>
        <h6>${{item.price}}</h6>
      </div>
    </a>
  </div>
khai báo một biến item thuộc mảng datas chúng ta đã lấy được ở bên file list-product.component.ts, chỉ cần item.(tên thuộc tính) muốn hiển thị là được, nhớ là phải đặt trong dấu {{}}. Như vậy là đã xong, hơi xấu mong mọi người thông cảm nhé.

Tiếp theo mình sẽ làm thêm chức năng xem chi tiết sản phẩm:
Để xem được chi tiết sản phầm thì mình cần phải lấy được id của nó vì thế phần routing sẽ khác một chút so với phần routing của danh sách sản phẩm.
const routes: Routes = [
  {path:'',component:ListProductComponent},
  {path:'detail/:id',component:DetailComponent},
];
dòng trên là routing của danh sách sản phẩm còn phần dưới là của chi tiết sản phẩm. các bạn nhớ là phải import 2 component ListProductComponent và DetailComponent vào nhé. Ở bên service cũng xây dựng một hàm find() để lấy id tương tự như hàm getAll() bên trên
  find(id:number):Observable<Product>{
    return this.httpClient.get<Product>(`${apiUrl}/${id}`).pipe(
    )
  }
Tiếp theo sẽ là vào file detail.component.ts của component detail :
import { Component, OnInit } from '@angular/core';
import {ProductService} from '../../service/product-service.service';
import {Product} from '../../models/product.model';
import {ActivatedRoute} from '@angular/router';

@Component({
  selector: 'app-detail',
  templateUrl: './detail.component.html',
  styleUrls: ['./detail.component.css']
})
export class DetailComponent implements OnInit {
  product = new Product;
  constructor(private route:ActivatedRoute,private productService:ProductService) { }

  ngOnInit(): void {
    this.getRoute(this.route.snapshot.params['id']);
  }
  getRoute(id:any){
    this.productService.find(id).subscribe((res:any)=>{
      this.product = res;
    });
  }
}
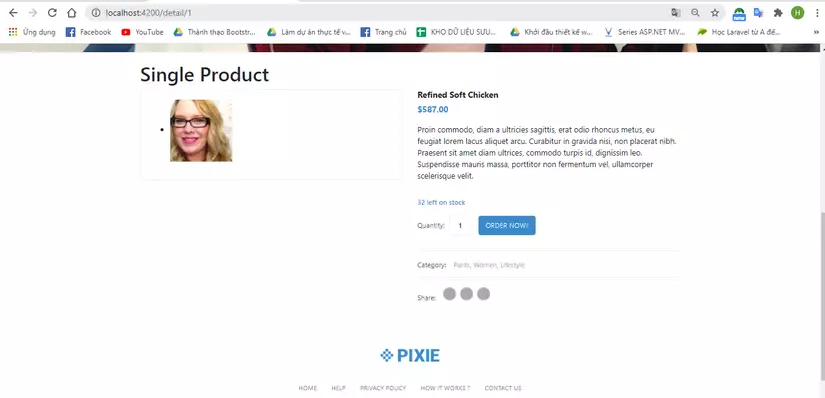
Cũng tương tự như bên list-product.component.ts nhưng thay vì gọi đến getAll() và trả về một mảng data thì detail.component.ts gọi đến find() và data trả về là một Obj. Bây giờ chúng ta chỉ cần sang file detail.component.html để hiện thị thông tin sản phầm vừa lấy được.Thay vì phải tạo một biến itemthuộc mảng datas như bên danh sách sản phẩm thì chúng ta chỉ cần product.(tên thuộc tính) muốn hiển thị là được. À các bạn nhớ thêm routerLink="/detail/{{item.id}}" vào thẻ a ở bên file list-product.component.html nữa nhé để khi bấm vào 1 sản phẩm thì n sẽ vào được trang chi tiết của sản phẩm đó. Đây là kết quả trang chi tiết sản phẩm
Kết Luận
Như vậy là mình đã giới thiệu đến các bạn cách lấy data từ api bằng angular hiện thị ra trang danh sách sản phẩm và trang chi tiết sản phẩm. Còn phần thêm, sửa, xóa sản phẩm nếu các bạn quan tâm thì hãy comment cho mình biết để mình có thể làm ở bài tiếp theo. Các bạn có thắc mắc hay bổ sung gì thì comment xuống bên dưới để mình được biết nhé. Cảm ơn các bạn
All rights reserved
