Thiết kế hướng đối tượng trong Ruby on Rails
Bài đăng này đã không được cập nhật trong 4 năm
Nếu hình dung phần mềm của bạn là một căn nhà thì Design patterns chính là bản thiết kế của căn nhà đó. Hay có thể nói Design patterns là một giải pháp tối ưu trong thiết kế cấu trúc phần mềm có nguồn gốc từ lập trình hướng đối tượng (OPP). Design patterns không phụ thuộc vào bất kỳ ngôn ngữ lập trình hay công nghệ mà bạn sử dụng. Trong các dự án về Web thì design patterns đơn giản nhất mà các bạn nhìn thấy là mô hình MVC. Có 3 nhóm Design patterns chính là: Creational
- Abstract Factory
- Builder
- Factory Method
- Prototype
- Singleton
Structural
- Adapter
- Bridge
- Composite
- Decorator
- Facade
- Flyweight
- Proxy
Behavioral
- Chain of responsibility
- Command
- Interpreter
- Iterator
- Mediator
- Memento
- Observer
- State
- Strategy
- Template Method
- Visitor
Sau đây mình xin giới thiệu về một số design patterns tiêu biểu nhất. Bài viết mình có tham khảo từ các nguồn https://bogdanvlviv.github.io/posts/ruby/patterns/design-patterns-in-ruby.html https://dalibornasevic.com/posts/9-ruby-singleton-pattern
Abstract Factory
Đây là kỹ thuật nhằm tạo ra một AbstractFactory(lớp trừu tượng) cho các ConcreteFactory(lớp con hay còn gọi là lớp kế thừa), mà giữa các ConcreteFactory sẽ có một điểm chung hoặc sự phụ thuộc nào đó. AbstractFactory sẽ định nghĩa ra các phương thức và các phương thức này sẽ được cài đặt tại các ConcreteFactory. Bản chất của kỹ thuật này chính là tính kế thừa trong lập trình hướng đối tượng.

Ví dụ:
class Animal
  attr_accessor :name

  def initialize name
    @name = name
  end

  def eat
  end

  def speak
  end

  def sleep
  end
end
class Tiger < Animal
  def eat
    puts "Tiger #{name} is eating anything it wants."
  end

  def speak
    puts "Tiger #{name} Roars!"
  end

  def sleep
    puts "Tiger #{name} sleeps anywhere it wants."
  end
end
class Frog  < Animal
  def eat
    puts "Frog #{name} is eating anything it wants."
  end

  def speak
    puts "Frog #{name} Roars!"
  end

  def sleep
    puts "Frog #{name} sleeps anywhere it wants."
  end
end
class Plant
  attr_accessor :name

  def initialize name
    @name = name
  end

  def grow
  end
end
class Tree < Plant
  def grow
    puts "The tree #{name} grows tall."
  end
end
class Algae < Plant
  def grow
    puts "The tree #{name} grows tall."
  end
end
class Habitat
  def initialize(organism_factory, number_animals: 0, number_plants: 0)
    @organism_factory = organism_factory

    @animals = []
    number_animals.times do |i|
      animal = @organism_factory.new_animal("Animal#{i}")
      @animals << animal
    end

    @plants = []
    number_plants.times do |i|
      plant  = @organism_factory.new_plant("Plant#{i}")
      @plants << plant
    end
  end

  def simulate_one_day
    @plants.each { |plant| plant.grow }
    @animals.each { |animal| animal.speak }
    @animals.each { |animal| animal.eat }
    @animals.each { |animal| animal.sleep }
  end
end
class JungleOrganismFactory
  def new_animal name
    Tiger.new name
  end

  def new_plant name
    Tree.new name
  end
end
class PondOrganismFactory
  def new_animal name
    Frog.new name
  end

  def new_plant name
    Algae.new name
  end
end
jungle = Habitat.new JungleOrganismFactory.new, number_animals: 1, number_plants: 4
jungle.simulate_one_day

pond = Habitat.new PondOrganismFactory.new, number_animals: 2, number_plants: 4
pond.simulate_one_day
Trong ví dụ trên thì mình có 2 AbstractFactory là Animal và Plant.
- Animal định nghĩa nghĩa ra 3 phương thức: eat, speak, sleep
- Plant định nghĩa ra một phương thức là grow
Và có 2 ConcreteFactory là Tiger và Tree. Tiger sẽ cài đặt phương thức eat, speak và sleep. Tree sẽ cài đặt phương thức grow.
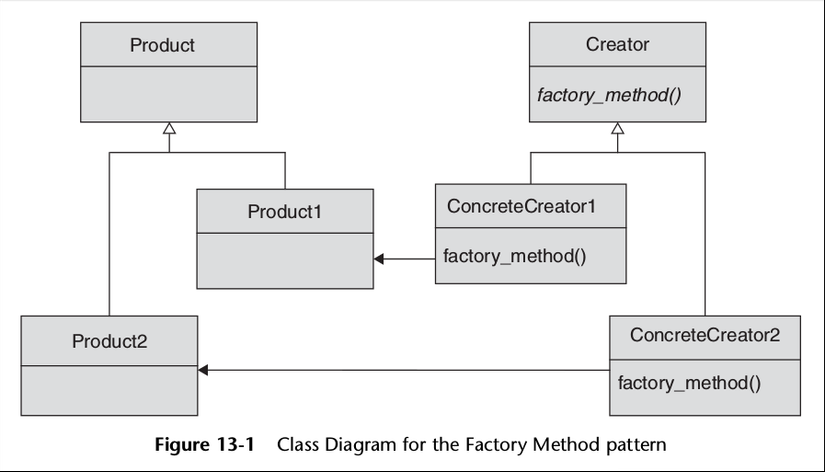
Factory Method
Là các phương thức được khai báo tại AbstractFactory nhưng không được cài đặt. Ở ví dụ trên chính là các phương thức eat, speak, sleep của lớp Animal và grow của lớp Plant
Builder
Đây là kỹ thuật nhằm đơn giản hóa một đối tượng phức tạp bằng cách chia ra thành các đối tượng nhỏ hơn. Và sau đấy chúng ta lại ghép các đối tượng nhỏ này thông qua Builder để tạo thành một Product mà chúng ta mong muốn ban đầu.
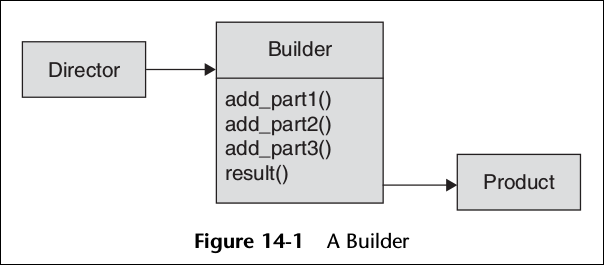
Giả sử chúng ta muốn lắp ghép một chiếc máy tính Computer, Computer được cấu tạo từ Motherboard, Drive và Display(màn hình). Motherboard gồm có cpu và memory_size. Cpu lại gồm 2 loại là BasicCPU và TurboCPU. Lớp ComputerBuilder chính là Builder cung cấp những hàm lắp ghép các thành phần trong một Computer để trả ra một product thông qua hàm result. Director là một class quản lý việc lắp ghép và đưa ra sản phẩm.
Ví dụ:
class CPU
end

class BasicCPU < CPU
end

class TurboCPU < CPU
end
class Motherboard
  attr_accessor :cpu
  attr_accessor :memory_size

  def initialize(cpu=BasicCPU.new, memory_size=1024)
    @cpu = cpu
    @memory_size = memory_size
  end
end
class Drive
  attr_reader :type # either :cd, :dvd or :hard_disk
  attr_reader :size # in Mb
  attr_reader :writable # true if this drive is writable

  def initialize(type, size, writable)
    @type = type
    @size = size
    @writable = writable
  end
end
class Computer
  attr_accessor :display
  attr_accessor :motherboard
  attr_reader   :drives

  def initialize(display=:crt, motherboard=Motherboard.new, drives=[])
    @motherboard = motherboard
    @drives = drives
    @display = display
  end
end
class ComputerBuilder
  attr_reader :computer

  def initialize
    @computer = Computer.new
  end

  def basic_cpu
    computer.motherboard.cpu = BasicCPU.new
  end

  def turbo_cpu
    computer.motherboard.cpu = TurboCPU.new
  end

  def display=(display)
    computer.display = display
  end

  def memory_size=(size_in_mb)
    computer.motherboard.memory_size = size_in_mb
  end

  def add_cd(writer=false)
    computer.drives << Drive.new(:cd, 760, writer)
  end

  def add_dvd(writer=false)
    computer.drives << Drive.new(:dvd, 4000, writer)
  end

  def add_hard_disk size_in_mb
    computer.drives << Drive.new(:hard_disk, size_in_mb, true)
  end

  def result
    @computer
  end
end
class Director
   def initialize builder
    @builder = builder
  end

   def create_company
     builder.turbo_cpu
     builder.add_hard_disk 1_000_000
     builder.memory_size = 16000
     builder.add_cd true
     builder.add_dvd
     computer = builder.result
   end
end
Singleton
Là một design pattern giới hạn sự khởi tạo một biến instance và biến instance phải là biến toàn cục. Nó rất hữu hiệu khi bạn muốn truy cập vào các phần khác nhau của ứng dụng, thường là các chức năng đăng nhập, giao tiếp với hệ thống bên ngoài hay truy cập cơ sở dữ liệu.
Có hai cách để cài đặt singleton pattern trong Ruby:
Single Instance của một class
class Logger
  def initialize
    @log = File.open("log.txt", "a")
  end

  @@instance = Logger.new

  def self.instance
    return @@instance
  end

  def log(msg)
    @log.puts(msg)
  end

  private_class_method :new
end

Logger.instance.log "message 1"
Trong ví dụ này, bên trong lớp Logger chúng ta tạo ra một biến instance của lớp Logger và chúng ta có thể truy cập vào biến instance này với phương thức Logger.instance. Bất kỳ khi nào chúng ta cần viết một thứ gì đó vào file log sử dụng phương thức log. Trong phương thức khởi tạo initialize chúng ta chỉ cần mở file log để thêm bất kỳ thứ gì. Ở phần cuối lớp Logger, chúng ta tạo một phương thức private new để chúng ta không thể tạo các instance mới của lớp Logger. Đó là Singleton pattern: chỉ có 1 instance và là biến toàn cục.
Ruby Singleton module
Ruby Standard Library có một module singleton để cài đặt mô hình Singleton. Cũng như ví dụ trước nếu sử dụng module singleton. Ở đây chúng ta require và include module Singleton bên trong lớp Logger, định nghĩa phương thức khởi tạo initialize, mở file log để ghi vào file log. Module singleton tạo ra sự khởi tạo lười biếng (tạo ra instance từ lớp Logger vào thời điểm chúng ta gọi phương thức Logger.instance) mà không phải trong thời gian load (giống như ví dụ trước). Ngoài ra, trong module singleton cũng tạo ra phương thức private new, do đó chúng ta không phải gọi private_class_method
require "singleton"

class Logger
  include Singleton

  def initialize
    @log = File.open("log.txt", "a")
  end

  def log(msg)
    @log.puts(msg)
  end
end

Logger.instance.log "message 2"
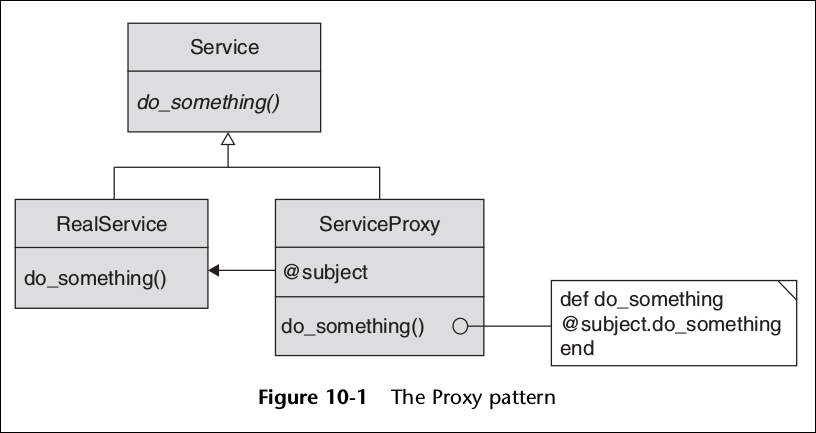
Proxy
Một đối tượng đại diện cho một đối tượng khác. Tạo ra một đại diện hoặc thay vào chỗ của đối tượng khác để kiếm soát việc truy cập vào đối tượng đó. Trong ruby có gem pundit hỗ trợ việc này
 Ví dụ:
class Account
  attr_reader :balance

  def initialize(starting_balance=0)
    @balance = starting_balance
  end

  def deposit amount
    @balance += amount
  end

  def withdraw(amount)
    @balance -= amount
  end
end
require "etc"

class AccountProtectionProxy
  def initialize(real_account, owner_name)
    @subject = real_account
    @owner_name = owner_name
  end

  def deposit amount
    check_access
    return @subject.deposit(amount)
  end

  def withdraw amount
    check_access
    return @subject.withdraw(amount)
  end

  def balance
    check_access
    return @subject.balance
  end

  def check_access
    if Etc.getlogin != @owner_name
      raise "Illegal access: #{Etc.getlogin} cannot access account."
    end
  end
end
account = Account.new(100)
account.deposit(50)
account.withdraw(10)

proxy = AccountProtectionProxy.new(account, 'russolsen')
proxy.deposit(50)
proxy.withdraw(10)
Trong ví dụ trên thì đối tượng cần thay thế (đối tượng thật) là Account và đối tượng đại diện (proxy) là AccountProtectionProxy. Ở lớp AccountProtectionProxy ta thấy có 2 phương thức withdraw và deposit tương tự như lớp Account. Nhưng với mỗi phương thức của lớp AccountProtectionProxy có thêm việc kiểm tra quyền truy cập thông qua phương thức check_access
All rights reserved
