Thêm quảng cáo biểu ngữ và quảng cáo gốc vào ứng dụng Flutter
Bài đăng này đã không được cập nhật trong 2 năm
1. Giới thiệu
Trong hướng dẫn này, bạn triển khai quảng cáo biểu ngữ AdMob và quảng cáo gốc AdMob trong ứng dụng Flutter.
Những gì bạn sẽ xây dựng
Hướng dẫn này sẽ hướng dẫn bạn triển khai quảng cáo biểu ngữ AdMob và quảng cáo gốc AdMob trong ứng dụng Flutter sử dụng plugin Google Mobile Ads dành cho Flutter.
| ⠀ | ⠀ |
|---|---|
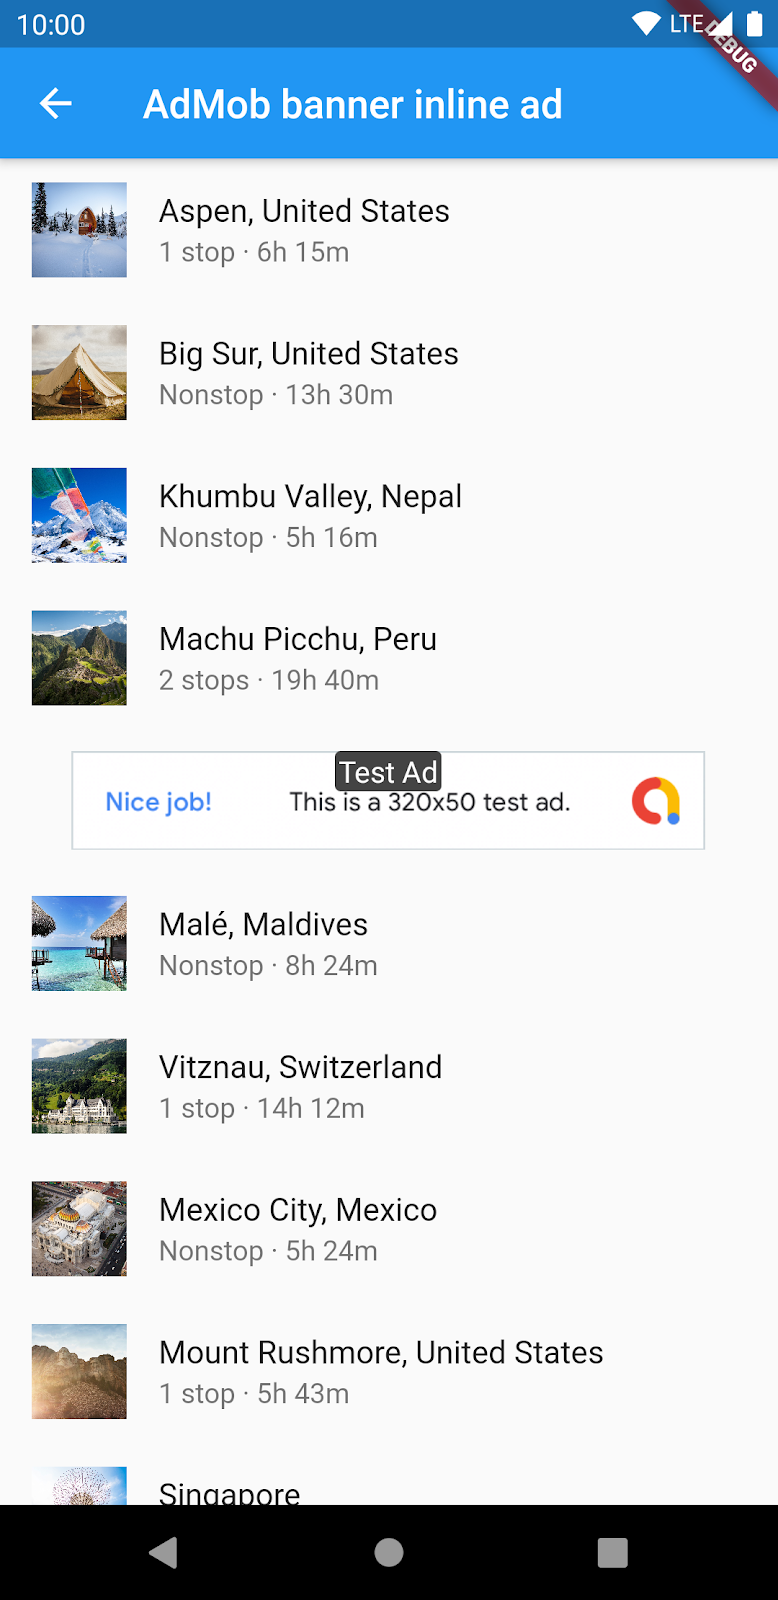 |
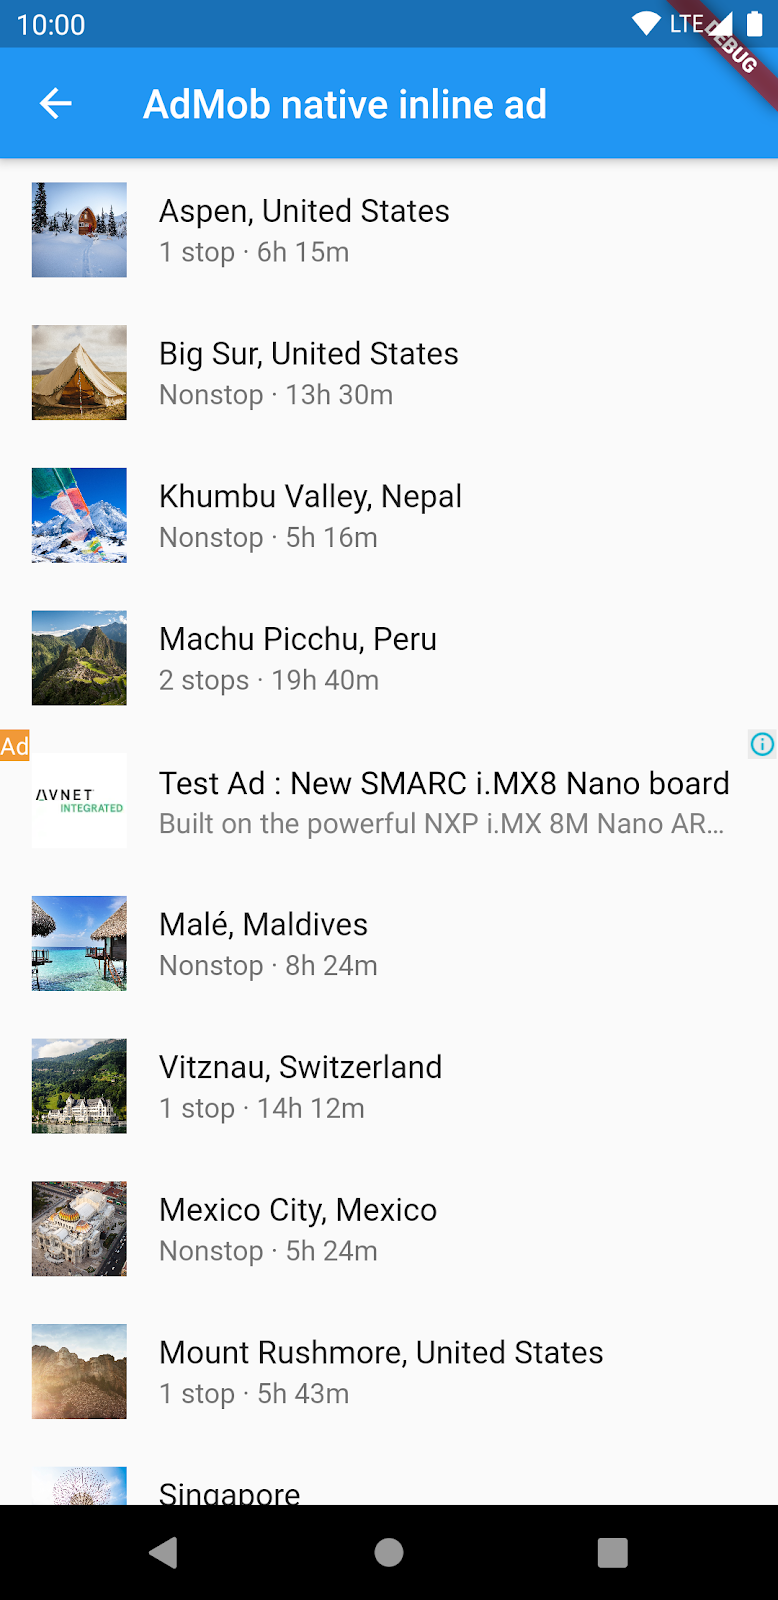 |
Những gì bạn sẽ học
✔️Cách cấu hình plugin Google Mobile Ads Flutter
✔️Cách triển khai quảng cáo biểu ngữ và quảng cáo gốc trong ứng dụng Flutter
Những gì bạn cần
- Android Studio 4.1 trở lên
- Xcode 12 trở lên (dành cho phát triển trên iOS)
2. Cài đặt môi trường phát triển Flutter của bạn
Để hoàn thành hướng dẫn này, bạn cần hai phần mềm—Flutter SDK và một trình soạn thảo mã.
Bạn có thể chạy hướng dẫn này trên bất kỳ thiết bị nào sau đây:
- Một thiết bị Android hoặc iOS vật lý kết nối với máy tính của bạn và được thiết lập ở chế độ Nhà phát triển.
- Bộ mô phỏng iOS (yêu cầu cài đặt công cụ Xcode).
- Trình giả lập Android (yêu cầu thiết lập trong Android Studio).
- Một trình duyệt (Chrome được yêu cầu cho việc gỡ lỗi).
- Như một ứng dụng máy tính dành cho Windows, Linux hoặc macOS. Bạn phải phát triển trên nền tảng mà bạn dự định triển khai. Ví dụ, nếu bạn muốn phát triển một ứng dụng máy tính Windows, bạn phải phát triển trên Windows để truy cập chuỗi xây dựng phù hợp. Có các yêu cầu cụ thể cho từng hệ điều hành được mô tả chi tiết trên trang docs.flutter.dev/desktop.
Tải mã nguồn
Bạn có thể sao chép repo trên GitHub bằng câu lệnh sau:
$ git clone https://github.com/googlecodelabs/admob-inline-ads-in-flutter
Repo chứa ba thư mục:
- 📁starter: Code khởi đầu mà bạn sẽ sử dụng trong hướng dẫn này.
- 📁complete: Code hoàn chỉnh của hướng dẫn này. (Java & Objective-C cho code native)
- 📁complete_kotlin_swift: Code hoàn chỉnh của hướng dẫn này. (Kotlin & Swift cho code native)
3. Cài đặt ứng dụng AdMob và các đơn vị quảng cáo
Vì Flutter là một SDK đa nền tảng, bạn cần thêm một ứng dụng và các đơn vị quảng cáo cho cả Android và iOS trong AdMob.
Cài đặt cho Android
Để cài đặt cho Android, bạn cần thêm một ứng dụng Android và tạo các đơn vị quảng cáo.
Thêm một ứng dụng Android
- Trên AdMob console, nhấp vào ADD APP từ menu Apps.
- Khi bạn được hỏi Have you published your app on Google Play or the App Store?, nhấp vào NO.
- Nhập
AdMob inline adsvào ô tên ứng dụng, và chọn Android làm nền tảng.

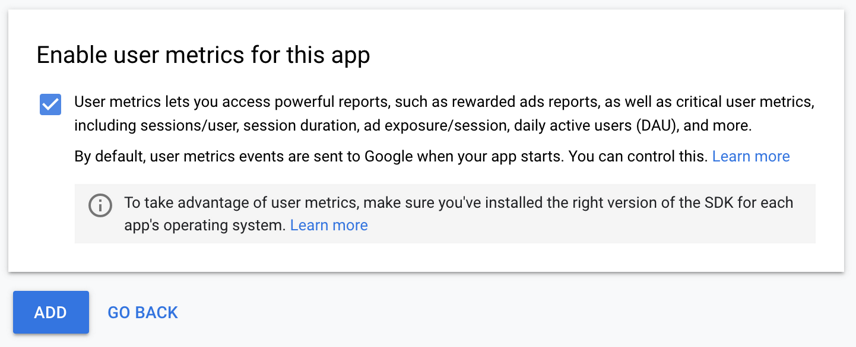
- Bật các chỉ số người dùng không cần thiết để hoàn thành hướng dẫn này. Tuy nhiên, mình khuyên bạn nên làm điều này vì nó giúp bạn hiểu rõ hơn về hành vi người dùng. Nhấp vào ADD để hoàn tất quá trình.
Tạo các đơn vị quảng cáo
Để thêm đơn vị quảng cáo:
- Chọn AdMob inline ads từ menu Apps trong AdMob console.
- Nhấp vào menu Ad units.
Quảng cáo biểu ngữ (Banner ads)
| ⠀ | ⠀ |
|---|---|
 |
1. Nhấp vào ADD AD UNIT. 2. Chọn Banner làm định dạng. 3. Nhập android-inline-banner vào ô Ad unit name.4. Nhấp vào CREATE AD UNIT để hoàn tất quá trình. |
Quảng cáo gốc (Native ads)
| ⠀ | ⠀ |
|---|---|
 |
1. Nhấp vào ADD AD UNIT. 2. Chọn Native advanced làm định dạng. 3. Nhập android-inline-native vào ô Ad unit name.4. Nhấp vào CREATE AD UNIT để hoàn tất quá trình. |
Quan trọng: Khi xây dựng và kiểm tra ứng dụng của bạn, hãy chắc chắn rằng bạn sử dụng quảng cáo kiểm thử, chứ không phải là quảng cáo thực tế. Việc không làm như vậy có thể dẫn đến việc đình chỉ tài khoản của bạn. Để biết thêm thông tin về cách quảng cáo kiểm thử của Mobile Ads SDK hoạt động, xem Quảng cáo Kiểm thử.
Thường mất vài giờ để đơn vị quảng cáo mới có thể phục vụ quảng cáo.
Nếu bạn muốn kiểm tra ngay hành vi của quảng cáo, hãy sử dụng ID ứng dụng và ID đơn vị quảng cáo thử nghiệm được liệt kê ở bảng bên dưới.
Cài đặt cho iOS
Để cài đặt cho iOS, bạn cần thêm một ứng dụng iOS và tạo các đơn vị quảng cáo.
Thêm một ứng dụng iOS
- Trên AdMob console, nhấp vào ADD APP từ menu Apps.
- Khi bạn được hỏi Have you published your app on Google Play or the App Store?, nhấp vào NO.
- Nhập
AdMob inline adsvào ô tên ứng dụng, và chọn iOS làm nền tảng.

- Bật các chỉ số người dùng không cần thiết để hoàn thành hướng dẫn này. Tuy nhiên, mình khuyên bạn nên làm điều này vì nó giúp bạn hiểu rõ hơn về hành vi người dùng. Nhấp vào ADD để hoàn tất quá trình.

Tạo các đơn vị quảng cáo
Để thêm các đơn vị quảng cáo:
- Chọn AdMob inline ads từ menu Apps trong AdMob console.
- Nhấp vào menu Ad units.
Quảng cáo biểu ngữ (Banner ads)
| ⠀ | ⠀ |
|---|---|
 |
1. Nhấp vào ADD AD UNIT. 2. Chọn Banner làm định dạng. 3. Nhập ios-inline-banner vào ô Ad unit name.4. Nhấp vào CREATE AD UNIT để hoàn tất quá trình. |
Quảng cáo gốc (Native ads)
| ⠀ | ⠀ |
|---|---|
 |
1. Nhấp vào ADD AD UNIT. 2. Chọn Native advanced làm định dạng. 3. Nhập ios-inline-native vào ô Ad unit name.4. Nhấp vào CREATE AD UNIT để hoàn tất quá trình. |
Quan trọng: Khi xây dựng và kiểm tra ứng dụng của bạn, hãy chắc chắn rằng bạn sử dụng quảng cáo kiểm thử, chứ không phải là quảng cáo thực tế. Việc không làm như vậy có thể dẫn đến việc đình chỉ tài khoản của bạn. Để biết thêm thông tin về cách quảng cáo kiểm thử của Mobile Ads SDK hoạt động, xem Quảng cáo Kiểm thử.
Thường mất vài giờ để đơn vị quảng cáo mới có thể phục vụ quảng cáo.
Nếu bạn muốn kiểm tra ngay hành vi của quảng cáo, hãy sử dụng ID ứng dụng và ID đơn vị quảng cáo thử nghiệm được liệt kê ở bảng bên dưới.
Tùy chọn: Sử dụng ứng dụng AdMob và đơn vị quảng cáo thử nghiệm
Nếu muốn làm theo hướng dẫn thay vì tự tạo ứng dụng và đơn vị quảng cáo mới, bạn có thể sử dụng ID ứng dụng AdMob và ID đơn vị quảng cáo thử nghiệm được liệt kê trong các bảng sau.
Android app ID/ad unit ID
| Item | app ID/ad unit ID |
|---|---|
| AdMob app ID | ca-app-pub-3940256099942544~3347511713 |
| Banner | ca-app-pub-3940256099942544/6300978111 |
| Native | ca-app-pub-3940256099942544/2247696110 |
iOS app ID/ad unit ID
| Item | app ID/ad unit ID |
|---|---|
| AdMob app ID | ca-app-pub-3940256099942544~1458002511 |
| Banner | ca-app-pub-3940256099942544/2934735716 |
| Native | ca-app-pub-3940256099942544/3986624511 |
4. Thêm plugin Google Mobile Ads Flutter
Flutter sử dụng plugin để cung cấp quyền truy cập vào nhiều dịch vụ dành riêng cho nền tảng. Plugin cho phép bạn truy cập các dịch vụ và API trên mỗi nền tảng.
Plugin google_mobile_ads hỗ trợ tải và hiển thị quảng cáo biểu ngữ, quảng cáo chuyển tiếp, quảng cáo có tặng thưởng và quảng cáo gốc bằng cách sử dụng API AdMob.
Vì Flutter là SDK đa nền tảng nên plugin google_mobile_ads có thể áp dụng cho cả iOS và Android. Vì vậy, nếu bạn thêm plugin vào ứng dụng Flutter của mình thì plugin này sẽ được cả phiên bản Android và iOS của ứng dụng quảng cáo AdMob sử dụng.
Thêm plugin Google Mobile Ads làm dependency
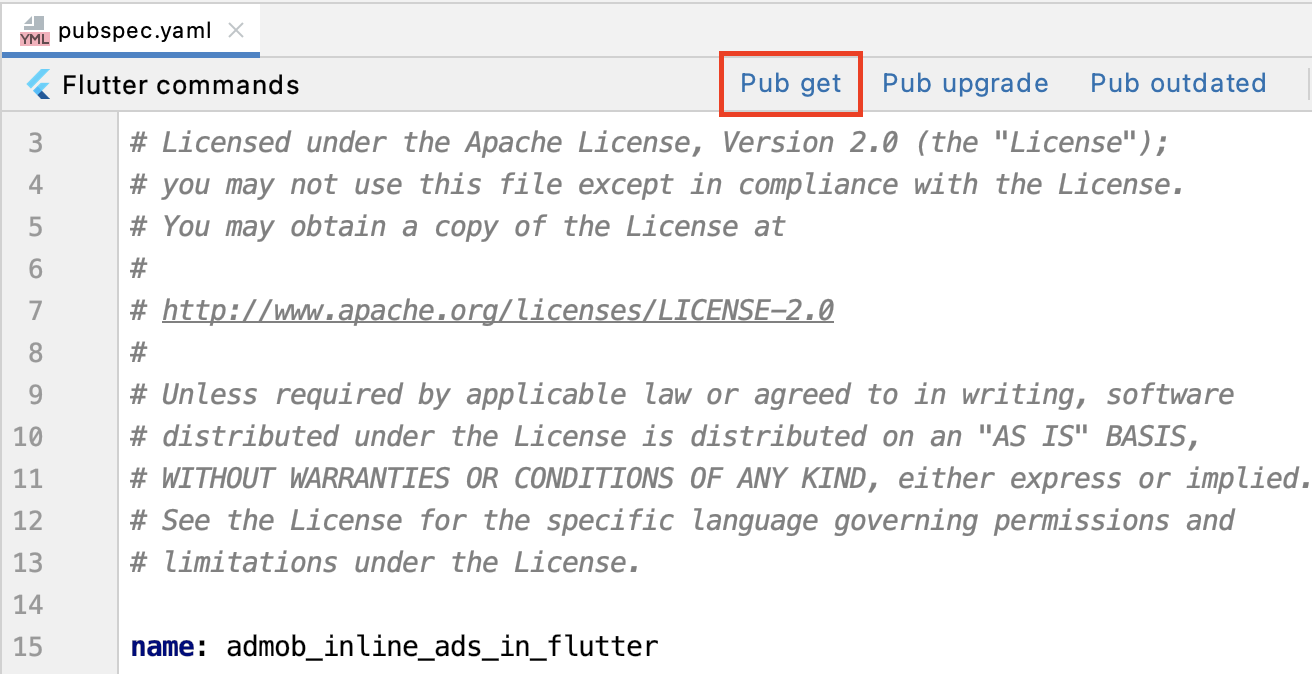
Để truy cập API AdMob từ dự án AdMob inline ads, hãy thêm google_mobile_ads làm dependency vào tệp pubspec.yaml nằm ở thư mục gốc của dự án.
pubspec.yaml
...
dependencies:
  flutter:
    sdk: flutter
  google_fonts: ^0.3.9

  # TODO: Add google_mobile_ads as a dependency
  google_mobile_ads: ^1.2.0

...
Nhấp vào Pub get để cài đặt plugin trong dự án AdMob inline ads.
Cập nhật AndroidManifest.xml (Android)
- Mở tệp
android/app/src/main/AndroidManifest.xmltrong Android Studio. - Thêm ID ứng dụng AdMob của bạn bằng cách thêm thẻ
<meta-data>có têncom.google.android.gms.ads.APPLICATION_ID. Ví dụ: nếu ID ứng dụng AdMob của bạn làca-app-pub-3940256099942544~3347511713thì bạn cần thêm các dòng sau vào tệpAndroidManifest.xml.
AndroidManifest.xml
<manifest>
    ...
    <application>
       ...
        <meta-data
            android:name="com.google.android.gms.ads.APPLICATION_ID"
            android:value="ca-app-pub-3940256099942544~3347511713"/>
    </application>

</manifest>
Cập nhật Info.plist (iOS)
- Mở tệp
ios/Runner/Info.plisttrong Android Studio. - Thêm khóa
GADApplicationIdentifiercùng với giá trị chuỗi ID ứng dụng AdMob của bạn. Ví dụ: nếu ID ứng dụng AdMob của bạn làca-app-pub-3940256099942544~1458002511thì bạn cần thêm các dòng sau vào tệpInfo.plist.
ios/Runner/Info.plist
...
<key>GADApplicationIdentifier</key>
<string>ca-app-pub-3940256099942544~1458002511</string>
...
5. Thêm lớp trợ giúp cho quảng cáo
Tạo một tệp mới có tên ad_helper.dart trong thư mục lib. Sau đó, hãy triển khai lớp AdHelper để cung cấp ID ứng dụng AdMob và ID đơn vị quảng cáo cho Android và iOS.
Đảm bảo rằng bạn thay thế ID ứng dụng AdMob (ca-app-pub-xxxxxx~yyyyy) và ID đơn vị quảng cáo (ca-app-pub-xxxxxxx/yyyyyyyy) bằng ID bạn đã tạo ở bước trước.
ad_helper.dart
import 'dart:io';

class AdHelper {

  static String get bannerAdUnitId {
    if (Platform.isAndroid) {
      return "<YOUR_ANDROID_BANNER_AD_UNIT_ID";
    } else if (Platform.isIOS) {
      return "<YOUR_IOS_BANNER_AD_UNIT_ID>";
    } else {
      throw UnsupportedError("Unsupported platform");
    }
  }

  static String get nativeAdUnitId {
    if (Platform.isAndroid) {
      return "<YOUR_ANDROID_NATIVE_AD_UNIT_ID>";
    } else if (Platform.isIOS) {
      return "<YOUR_IOS_NATIVE_AD_UNIT_ID>";
    } else {
      throw UnsupportedError("Unsupported platform");
    }
  }
}
Hãy sử dụng đoạn code sau nếu bạn muốn sử dụng ID ứng dụng AdMob thử nghiệm và ID đơn vị quảng cáo thử nghiệm.
ad_helper.dart
import 'dart:io';

class AdHelper {

  static String get bannerAdUnitId {
    if (Platform.isAndroid) {
      return 'ca-app-pub-3940256099942544/6300978111';
    } else if (Platform.isIOS) {
      return 'ca-app-pub-3940256099942544/2934735716';
    }
    throw UnsupportedError("Unsupported platform");
  }

  static String get nativeAdUnitId {
    if (Platform.isAndroid) {
      return 'ca-app-pub-3940256099942544/2247696110';
    } else if (Platform.isIOS) {
      return 'ca-app-pub-3940256099942544/3986624511';
    }
    throw UnsupportedError("Unsupported platform");
  }
}
6. Khởi chạy Google Mobile Ads SDK
Trước khi tải quảng cáo, bạn cần khởi chạy Google Mobile Ads SDK. Mở tệp lib/home_page.dart và sửa đổi _initGoogleMobileAds() để khởi chạy SDK trước khi trang chủ được tải.
Xin lưu ý rằng bạn cần thay đổi kiểu trả về của phương thức _initGoogleMobileAds() từ Future<dynamic> thành Future<InitializationStatus> để nhận kết quả khởi tạo SDK sau khi quá trình hoàn tất.
home_page.dart
// TODO: Import google_mobile_ads.dart
import 'package:google_mobile_ads/google_mobile_ads.dart';

import 'package:flutter/material.dart';

...

class HomePage extends StatelessWidget {

  ...

  Future<InitializationStatus> _initGoogleMobileAds() {
    // TODO: Initialize Google Mobile Ads SDK
    return MobileAds.instance.initialize();
  }
}
7. Thêm quảng cáo biểu ngữ
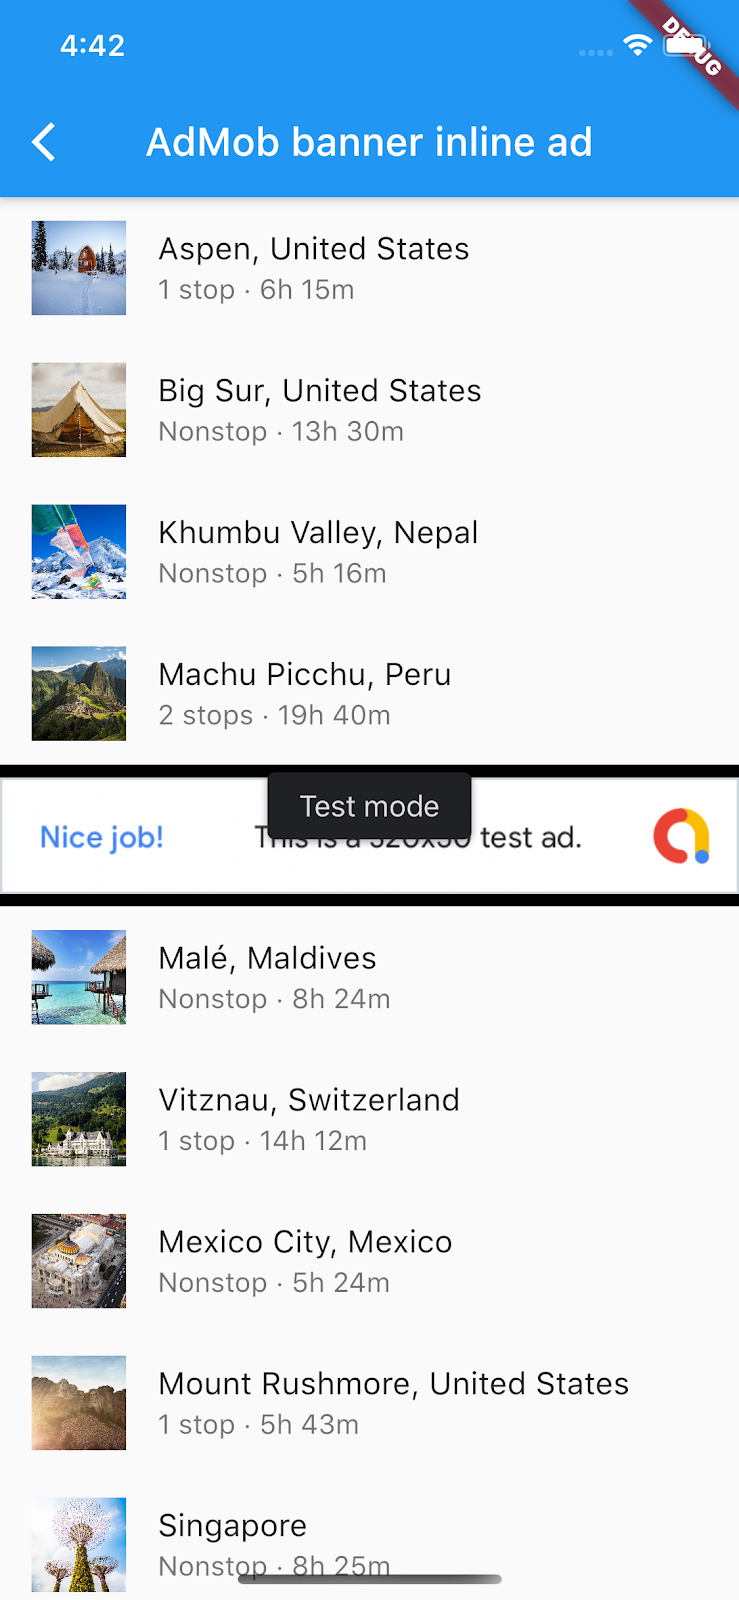
Trong phần này, bạn hiển thị quảng cáo biểu ngữ ở giữa danh sách, như trong ảnh chụp màn hình sau.

- Mở tệp
lib/banner_inline_page.dart. - Import
ad_helper.dartvàgoogle_mobile_ads.dartbằng cách thêm các dòng sau:
banner_inline_page.dart
...

// TODO: Import ad_helper.dart
import 'package:admob_inline_ads_in_flutter/ad_helper.dart';

// TODO: Import google_mobile_ads.dart
import 'package:google_mobile_ads/google_mobile_ads.dart';

class BannerInlinePage extends StatefulWidget {
  ...
}
- Trong lớp
_BannerInlinePageState, thêm các thành viên và phương thức sau cho quảng cáo biểu ngữ.
Lưu ý rằng _kAdIndex cho biết chỉ mục nơi quảng cáo biểu ngữ sẽ được hiển thị và nó được dùng để tính toán chỉ mục của item từ phương thức _getDestinationItemIndex().
banner_inline_page.dart
class _BannerInlinePageState extends State<BannerInlinePage> {

  // TODO: Add _kAdIndex
  static final _kAdIndex = 4;

  // TODO: Add a banner ad instance
  BannerAd? _ad;

  ...

  // TODO: Add _getDestinationItemIndex()
  int _getDestinationItemIndex(int rawIndex) {
    if (rawIndex >= _kAdIndex && _ad != null) {
      return rawIndex - 1;
    }
    return rawIndex;
  }

  ...
}
- Trong phương thức
initState(), tạo và tảiBannerAdcho biểu ngữ 320x50 (AdSize.banner). Lưu ý rằng trình lắng nghe sự kiện quảng cáo được cấu hình để cập nhật giao diện người dùng (setState()) khi quảng cáo được tải.
banner_inline_page.dart
@override
void initState() {
  super.initState();

  // TODO: Load a banner ad
  BannerAd(
    adUnitId: AdHelper.bannerAdUnitId,
    size: AdSize.banner,
    request: AdRequest(),
    listener: BannerAdListener(
      onAdLoaded: (ad) {
        setState(() {
          _ad = ad as BannerAd;
        });
      },
      onAdFailedToLoad: (ad, error) {
        // Releases an ad resource when it fails to load
        ad.dispose();
        print('Ad load failed (code=${error.code} message=${error.message})');
      },
    ),
  ).load();
}
- Sửa đổi phương thức
build()để hiển thị quảng cáo biểu ngữ khi có sẵn. - Cập nhật
itemCountđể đếm mục nhập quảng cáo biểu ngữ và cập nhậtitemBuilderđể hiển thị quảng cáo biểu ngữ tại chỉ mục quảng cáo (_kAdIndex) khi quảng cáo được tải. - Cập nhật code để sử dụng phương thức
_getDestinationItemIndex()nhằm truy xuất chỉ mục cho nội dung item.
banner_inline_page.dart
@override
Widget build(BuildContext context) {
  return Scaffold(
    ...
    body: ListView.builder(
      // TODO: Adjust itemCount based on the ad load state
      itemCount: widget.entries.length + (_ad != null ? 1 : 0),
      itemBuilder: (context, index) {
        // TODO: Render a banner ad
        if (_ad != null && index == _kAdIndex) {
          return Container(
            width: _ad!.size.width.toDouble(),
            height: 72.0,
            alignment: Alignment.center,
            child: AdWidget(ad: _ad!),
          );
        } else {
          // TODO: Get adjusted item index from _getDestinationItemIndex()
          final item = widget.entries[_getDestinationItemIndex(index)];

          return ListTile(
            ...
          );
        }
      },
    ),
  );
}
- Giải phóng tài nguyên được liên kết với đối tượng
BannerAdbằng cách gọi phương thứcBannerAd.dispose()trong phương thức gọi lạidispose().
banner_inline_page.dart
@override
void dispose() {
  // TODO: Dispose a BannerAd object
  _ad?.dispose();

  super.dispose();
}
Vậy là xong! Chạy dự án và nhấp vào nút Banner inline ad từ trang chủ. Sau khi quảng cáo được tải, bạn sẽ thấy quảng cáo biểu ngữ ở giữa danh sách.
| ⠀ | ⠀ |
|---|---|
 |
 |
8. Thêm quảng cáo gốc
Trong phần này, bạn hiển thị quảng cáo gốc ở giữa danh sách, như trong ảnh chụp màn hình sau.

Quảng cáo gốc được hiển thị cho người dùng bằng cách sử dụng các thành phần UI có nguồn gốc từ nền tảng (ví dụ: View trên Android hoặc UIView trên iOS).
Tuy nhiên, không thể trực tiếp tạo các thành phần UI gốc bằng cách sử dụng các Flutter widget. Vì vậy, bạn phải triển khai NativeAdFactory cho từng nền tảng, được dùng để tạo giao diện quảng cáo gốc dành riêng cho nền tảng (NativeAdView trên Android và GADNativeAdView trên iOS) từ đối tượng quảng cáo gốc (NativeAd trên Android và GADNativeAd trên iOS).
Triển khai NativeAdFactory cho Android (Java)
- Mở tệp
android/build.gradle(hoặc bất kỳ tệp nào trong thư mục android) và nhấp vào Open for Editing in Android Studio để mở dự án Android.

- Nếu bạn được yêu cầu chọn một cửa sổ để mở dự án mới, hãy nhấp vào New Window để dự án Flutter vẫn mở trong khi bạn đang làm việc với dự án Android.

Tạo bố cục quảng cáo gốc
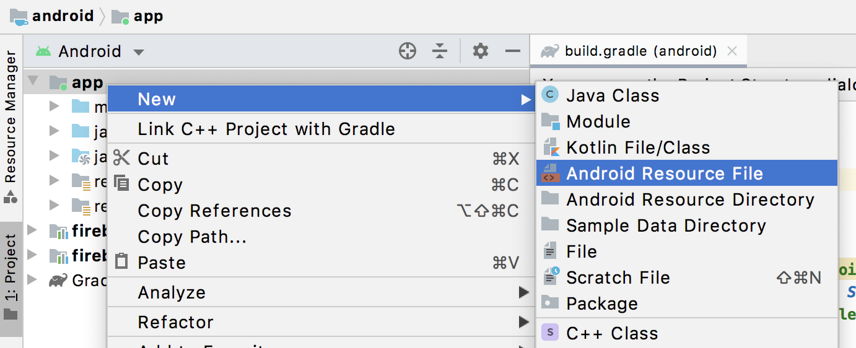
- Khi dự án Android đã mở, hãy nhấp chuột phải vào app từ menu Project trong Android Studio và chọn New > Android Resource File từ menu ngữ cảnh.
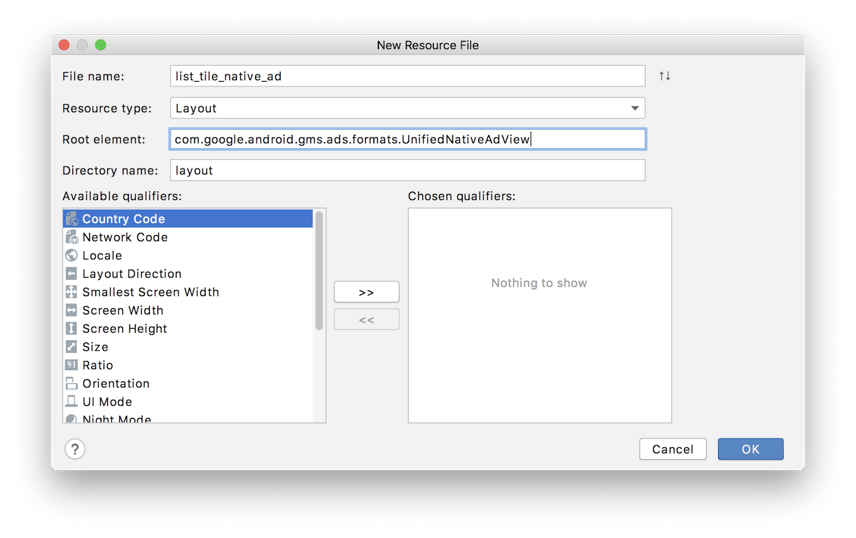
- Trong hộp thoại New Resource File, hãy nhập
list_tile_native_ad.xmllàm tên tệp. - Chọn Layout làm loại tài nguyên và nhập
com.google.android.gms.ads.nativead.NativeAdViewlàm phần tử gốc. - Nhấp vào OK để tạo tệp bố cục mới.
- Triển khai bố cục quảng cáo như sau. Lưu ý rằng bố cục phải phù hợp với thiết kế trực quan về trải nghiệm người dùng đối với nền tảng mà nó hướng tới.
list_tile_native_ad.xml
<?xml version="1.0" encoding="utf-8"?>
<com.google.android.gms.ads.nativead.NativeAdView
    xmlns:android="http://schemas.android.com/apk/res/android"
    xmlns:tools="http://schemas.android.com/tools"
    android:layout_width="match_parent"
    android:layout_height="match_parent">

    <FrameLayout
        android:layout_width="match_parent"
        android:layout_height="match_parent">

        <TextView
            android:id="@+id/tv_list_tile_native_ad_attribution_small"
            android:layout_width="wrap_content"
            android:layout_height="wrap_content"
            android:background="#F19938"
            android:text="Ad"
            android:textColor="#FFFFFF"
            android:textSize="12sp" />

        <ImageView
            android:id="@+id/iv_list_tile_native_ad_icon"
            android:layout_width="48dp"
            android:layout_height="48dp"
            android:layout_gravity="center_vertical"
            android:layout_marginStart="16dp"
            android:layout_marginLeft="16dp"
            android:scaleType="fitXY"
            tools:background="#EDEDED" />

        <TextView
            android:id="@+id/tv_list_tile_native_ad_attribution_large"
            android:layout_width="48dp"
            android:layout_height="48dp"
            android:layout_gravity="center_vertical"
            android:layout_marginStart="16dp"
            android:layout_marginLeft="16dp"
            android:background="#F19938"
            android:gravity="center"
            android:text="Ad"
            android:textColor="#FFFFFF"
            android:visibility="invisible" />

        <LinearLayout
            android:layout_width="match_parent"
            android:layout_height="wrap_content"
            android:layout_gravity="center_vertical"
            android:layout_marginStart="80dp"
            android:layout_marginLeft="80dp"
            android:layout_marginEnd="16dp"
            android:layout_marginRight="16dp"
            android:orientation="vertical">

            <TextView
                android:id="@+id/tv_list_tile_native_ad_headline"
                android:layout_width="wrap_content"
                android:layout_height="wrap_content"
                android:ellipsize="end"
                android:lines="1"
                android:maxLines="1"
                android:textColor="#000000"
                android:textSize="16sp"
                tools:text="Headline" />

            <TextView
                android:id="@+id/tv_list_tile_native_ad_body"
                android:layout_width="wrap_content"
                android:layout_height="wrap_content"
                android:ellipsize="end"
                android:lines="1"
                android:maxLines="1"
                android:textColor="#828282"
                android:textSize="14sp"
                tools:text="body" />

        </LinearLayout>

    </FrameLayout>

</com.google.android.gms.ads.nativead.NativeAdView>
Tạo lớp ListTileNativeAdFactory
- Trong menu Project, nhấp chuột phải vào package com.codelab.flutter.admobinlineads và chọn New > Java Class.

- Nhập
ListTileNativeAdFactorylàm tên và chọn Class từ danh sách.

- Sau khi hộp thoại New Class xuất hiện, hãy để trống mọi thứ và nhấp vào OK.
Bạn sẽ thấy lớp ListTileNativeAdFactory được tạo trong package com.codelab.flutter.admobinlineads.

- Triển khai lớp
ListTileNativeAdFactorynhư sau. Lưu ý rằng lớp này triển khai phương thứccreateNativeAd()trong interfaceGoogleMobileAdsPlugin.NativeAdFactory.
Lớp factory chịu trách nhiệm tạo đối tượng view để hiển thị quảng cáo gốc. Như bạn có thể thấy từ code, lớp factory sẽ tạo một UnifiedNativeAdView và gán vào đó một đối tượng NativeAd.
ListTileNativeAdFactory.java
// TODO: Implement ListTileNativeAdFactory class

package com.codelab.flutter.admobinlineads;

import com.google.android.gms.ads.nativead.NativeAd;
import com.google.android.gms.ads.nativead.NativeAdView;

import android.content.Context;
import android.view.LayoutInflater;
import android.view.View;
import android.widget.ImageView;
import android.widget.TextView;

import java.util.Map;

import io.flutter.plugins.googlemobileads.GoogleMobileAdsPlugin;

class ListTileNativeAdFactory implements GoogleMobileAdsPlugin.NativeAdFactory {

    private final Context context;

    ListTileNativeAdFactory(Context context) {
        this.context = context;
    }

    @Override
    public NativeAdView createNativeAd(
            NativeAd nativeAd, Map<String, Object> customOptions) {
        NativeAdView nativeAdView = (NativeAdView) LayoutInflater.from(context)
                .inflate(R.layout.list_tile_native_ad, null);

        TextView attributionViewSmall = nativeAdView
                .findViewById(R.id.tv_list_tile_native_ad_attribution_small);
        TextView attributionViewLarge = nativeAdView
                .findViewById(R.id.tv_list_tile_native_ad_attribution_large);

        ImageView iconView = nativeAdView.findViewById(R.id.iv_list_tile_native_ad_icon);
        NativeAd.Image icon = nativeAd.getIcon();
        if (icon != null) {
            attributionViewSmall.setVisibility(View.VISIBLE);
            attributionViewLarge.setVisibility(View.INVISIBLE);
            iconView.setImageDrawable(icon.getDrawable());
        } else {
            attributionViewSmall.setVisibility(View.INVISIBLE);
            attributionViewLarge.setVisibility(View.VISIBLE);
        }
        nativeAdView.setIconView(iconView);

        TextView headlineView = nativeAdView.findViewById(R.id.tv_list_tile_native_ad_headline);
        headlineView.setText(nativeAd.getHeadline());
        nativeAdView.setHeadlineView(headlineView);

        TextView bodyView = nativeAdView.findViewById(R.id.tv_list_tile_native_ad_body);
        bodyView.setText(nativeAd.getBody());
        bodyView.setVisibility(nativeAd.getBody() != null ? View.VISIBLE : View.INVISIBLE);
        nativeAdView.setBodyView(bodyView);

        nativeAdView.setNativeAd(nativeAd);

        return nativeAdView;
    }
}
Đăng ký lớp ListTileNativeAdFactory
Một thực thể của NativeAdFactory cần được đăng ký tới GoogleMobileAdsPlugin trước khi nó có thể được sử dụng từ phía Flutter.
- Mở tệp
MainActivity.javavà ghi đè 2 phương thức làconfigureFlutterEngine()vàcleanUpFlutterEngine(). - Đăng ký lớp
ListTileNativeAdFactorybằng chuỗi ID duy nhất (listTile) trong phương thứcconfigureFlutterEngine().
MainActivity.java
public class MainActivity extends FlutterActivity {

    @Override
    public void configureFlutterEngine(@NonNull FlutterEngine flutterEngine) {
        super.configureFlutterEngine(flutterEngine);

        // TODO: Register the ListTileNativeAdFactory
        GoogleMobileAdsPlugin.registerNativeAdFactory(flutterEngine, "listTile",
                new ListTileNativeAdFactory(getContext()));
    }

    ...
}
- Mọi thực thể
NativeAdFactoryđều phải được hủy đăng ký trong quá trình dọn dẹp. Hủy đăng ký lớpListTileNativeAdFactorytrong phương thứccleanUpFlutterEngine().
MainActivity.java
public class MainActivity extends FlutterActivity {

    ...

    @Override
    public void cleanUpFlutterEngine(@NonNull FlutterEngine flutterEngine) {
        super.cleanUpFlutterEngine(flutterEngine);

        // TODO: Unregister the ListTileNativeAdFactory
        GoogleMobileAdsPlugin.unregisterNativeAdFactory(flutterEngine, "listTile");
    }
}
Bây giờ bạn đã sẵn sàng sử dụng lớp ListTileNativeAdFactory để hiển thị quảng cáo gốc trên Android.
Triển khai NativeAdFactory cho Android (Kotlin)
- Mở tệp
android/build.gradle(hoặc bất kỳ tệp nào trong thư mục android) và nhấp vào Open for Editing in Android Studio để mở dự án Android.

- Nếu bạn được yêu cầu chọn một cửa sổ để mở dự án mới, hãy nhấp vào New Window để dự án Flutter vẫn mở trong khi bạn đang làm việc với dự án Android.

Tạo bố cục quảng cáo gốc
- Khi dự án Android đã mở, hãy nhấp chuột phải vào app từ menu Project trong Android Studio và chọn New > Android Resource File từ menu ngữ cảnh.

- Trong hộp thoại New Resource File, hãy nhập
list_tile_native_ad.xmllàm tên tệp. - Chọn Layout làm loại tài nguyên và nhập
com.google.android.gms.ads.nativead.NativeAdViewlàm phần tử gốc. - Nhấp vào OK để tạo tệp bố cục mới.

- Triển khai bố cục quảng cáo như sau. Lưu ý rằng bố cục phải phù hợp với thiết kế trực quan về trải nghiệm người dùng đối với nền tảng mà nó hướng tới.
list_tile_native_ad.xml
<?xml version="1.0" encoding="utf-8"?>
<com.google.android.gms.ads.nativead.NativeAdView
    xmlns:android="http://schemas.android.com/apk/res/android"
    xmlns:tools="http://schemas.android.com/tools"
    android:layout_width="match_parent"
    android:layout_height="match_parent">

    <FrameLayout
        android:layout_width="match_parent"
        android:layout_height="match_parent">

        <TextView
            android:id="@+id/tv_list_tile_native_ad_attribution_small"
            android:layout_width="wrap_content"
            android:layout_height="wrap_content"
            android:background="#F19938"
            android:text="Ad"
            android:textColor="#FFFFFF"
            android:textSize="12sp" />

        <ImageView
            android:id="@+id/iv_list_tile_native_ad_icon"
            android:layout_width="48dp"
            android:layout_height="48dp"
            android:layout_gravity="center_vertical"
            android:layout_marginStart="16dp"
            android:layout_marginLeft="16dp"
            android:scaleType="fitXY"
            tools:background="#EDEDED" />

        <TextView
            android:id="@+id/tv_list_tile_native_ad_attribution_large"
            android:layout_width="48dp"
            android:layout_height="48dp"
            android:layout_gravity="center_vertical"
            android:layout_marginStart="16dp"
            android:layout_marginLeft="16dp"
            android:background="#F19938"
            android:gravity="center"
            android:text="Ad"
            android:textColor="#FFFFFF"
            android:visibility="invisible" />

        <LinearLayout
            android:layout_width="match_parent"
            android:layout_height="wrap_content"
            android:layout_gravity="center_vertical"
            android:layout_marginStart="80dp"
            android:layout_marginLeft="80dp"
            android:layout_marginEnd="16dp"
            android:layout_marginRight="16dp"
            android:orientation="vertical">

            <TextView
                android:id="@+id/tv_list_tile_native_ad_headline"
                android:layout_width="wrap_content"
                android:layout_height="wrap_content"
                android:ellipsize="end"
                android:lines="1"
                android:maxLines="1"
                android:textColor="#000000"
                android:textSize="16sp"
                tools:text="Headline" />

            <TextView
                android:id="@+id/tv_list_tile_native_ad_body"
                android:layout_width="wrap_content"
                android:layout_height="wrap_content"
                android:ellipsize="end"
                android:lines="1"
                android:maxLines="1"
                android:textColor="#828282"
                android:textSize="14sp"
                tools:text="body" />

        </LinearLayout>

    </FrameLayout>

</com.google.android.gms.ads.nativead.NativeAdView>
Tạo lớp ListTileNativeAdFactory
- Trong menu Project, nhấp chuột phải vào package com.codelab.flutter.admobinlineads và chọn New > Kotlin File/Class.

- Nhập
ListTileNativeAdFactorylàm tên và chọn Class từ danh sách.

- Bạn sẽ thấy lớp
ListTileNativeAdFactoryđược tạo trong packagecom.codelab.flutter.admobinlineads. - Triển khai lớp
ListTileNativeAdFactorynhư sau. Lưu ý rằng lớp này triển khai phương thứccreateNativeAd()trong interfaceGoogleMobileAdsPlugin.NativeAdFactory.
Lớp factory chịu trách nhiệm tạo đối tượng view để hiển thị quảng cáo gốc. Như bạn có thể thấy từ code, lớp factory sẽ tạo một NativeAdView và gán vào đó một đối tượng NativeAd.
ListTileNativeAdFactory.kt
// TODO: Implement ListTileNativeAdFactory class

package com.codelab.flutter.admobinlineads

import android.content.Context
import android.view.LayoutInflater
import android.view.View
import android.widget.ImageView
import android.widget.TextView
import com.google.android.gms.ads.nativead.NativeAd
import com.google.android.gms.ads.nativead.NativeAdView
import io.flutter.plugins.googlemobileads.GoogleMobileAdsPlugin

class ListTileNativeAdFactory(val context: Context) : GoogleMobileAdsPlugin.NativeAdFactory {

    override fun createNativeAd(
            nativeAd: NativeAd,
            customOptions: MutableMap<String, Any>?
    ): NativeAdView {
        val nativeAdView = LayoutInflater.from(context)
                .inflate(R.layout.list_tile_native_ad, null) as NativeAdView

        with(nativeAdView) {
            val attributionViewSmall =
                    findViewById<TextView>(R.id.tv_list_tile_native_ad_attribution_small)
            val attributionViewLarge =
                    findViewById<TextView>(R.id.tv_list_tile_native_ad_attribution_large)

            val iconView = findViewById<ImageView>(R.id.iv_list_tile_native_ad_icon)
            val icon = nativeAd.icon
            if (icon != null) {
                attributionViewSmall.visibility = View.VISIBLE
                attributionViewLarge.visibility = View.INVISIBLE
                iconView.setImageDrawable(icon.drawable)
            } else {
                attributionViewSmall.visibility = View.INVISIBLE
                attributionViewLarge.visibility = View.VISIBLE
            }
            this.iconView = iconView

            val headlineView = findViewById<TextView>(R.id.tv_list_tile_native_ad_headline)
            headlineView.text = nativeAd.headline
            this.headlineView = headlineView

            val bodyView = findViewById<TextView>(R.id.tv_list_tile_native_ad_body)
            with(bodyView) {
                text = nativeAd.body
                visibility = if (nativeAd.body.isNotEmpty()) View.VISIBLE else View.INVISIBLE
            }
            this.bodyView = bodyView

            setNativeAd(nativeAd)
        }

        return nativeAdView
    }
}
Đăng ký lớp ListTileNativeAdFactory
Một thực thể của NativeAdFactory cần được đăng ký với GoogleMobileAdsPlugin trước khi nó có thể được sử dụng từ phía Flutter.
- Mở tệp
MainActivity.ktvà ghi đè 2 phương thức làconfigureFlutterEngine()vàcleanUpFlutterEngine(). - Đăng ký lớp
ListTileNativeAdFactoryvới chuỗi ID duy nhất (listTile) trong phương thứcconfigureFlutterEngine().
MainActivity.kt
class MainActivity: FlutterActivity() {

    override fun configureFlutterEngine(flutterEngine: FlutterEngine) {
        super.configureFlutterEngine(flutterEngine)

        // TODO: Register the ListTileNativeAdFactory
        GoogleMobileAdsPlugin.registerNativeAdFactory(
                flutterEngine, "listTile", ListTileNativeAdFactory(context))
    }

    ...
}
- Mọi thực thể
NativeAdFactoryđều phải được hủy đăng ký trong quá trình dọn dẹp. Hủy đăng ký lớpListTileNativeAdFactorytrong phương thứccleanUpFlutterEngine().
MainActivity.kt
class MainActivity: FlutterActivity() {
    ...

    override fun cleanUpFlutterEngine(flutterEngine: FlutterEngine) {
        super.cleanUpFlutterEngine(flutterEngine)

        // TODO: Unregister the ListTileNativeAdFactory
        GoogleMobileAdsPlugin.unregisterNativeAdFactory(flutterEngine, "listTile")
    }
}
Bây giờ bạn đã sẵn sàng sử dụng lớp ListTileNativeAdFactory để hiển thị quảng cáo gốc trên Android.
Triển khai NativeAdFactory cho iOS (Objective-C)
Mở tệp ios/Podfile (hoặc bất kỳ tệp nào trong thư mục ios) và nhấp vào Open iOS module in Xcode để mở dự án iOS.

Chuẩn bị bố cục quảng cáo gốc
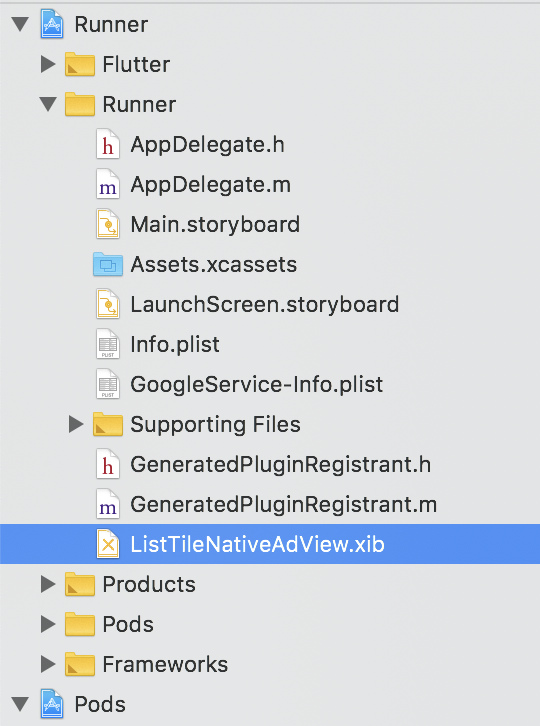
Bạn sẽ cần có một custom view (*.xib) để bố trí nội dung quảng cáo gốc. Trong hướng dẫn này, view được định cấu hình sẵn được dùng để giảm thiểu effort của bạn.
Với dự án iOS được mở bằng Xcode, hãy xác nhận rằng ListTileNativeAdView.xib tồn tại trong dự án Runner.
Tạo lớp ListTileNativeAdFactory
- Từ trình điều hướng dự án, nhấp chuột phải vào nhóm Runner và chọn New File để tạo tệp tiêu đề cho lớp mới.

- Trong hộp thoại mẫu, hãy chọn Header File và đặt tên là
ListTileNativeAdFactory. - Sau khi tệp
ListTileNativeAdFactory.hđược tạo, hãy định nghĩa lớpListNativeAdFactorynhư sau:
ListTileNativeAdFactory.h
#ifndef ListTileNativeAdFactory_h
#define ListTileNativeAdFactory_h

// TODO: Import FLTGoogleMobileAdsPlugin.h
#import "FLTGoogleMobileAdsPlugin.h"

// TODO: Declare ListTileNativeAdFactory
@interface ListTileNativeAdFactory : NSObject<FLTNativeAdFactory>

@end


#endif /* ListTileNativeAdFactory_h */
- Tạo tệp Objective-C bằng cách chọn New File từ nhóm Runner.
- Trong hộp thoại tiếp theo, hãy nhập
ListTileNativeAdFactoryvào trường File và chọn Empty File làm loại tệp.

- Sau khi nhấp vào Next, bạn sẽ được yêu cầu chọn thư mục để tạo tệp mới. Giữ nguyên mọi thứ và nhấp vào Create.

- Triển khai lớp
ListTileNativeFactorynhư sau. Lưu ý rằng lớp này triển khai phương thứccreateNativeAd()trong giao thứcFLTNativeAdFactory.
Lớp factory chịu trách nhiệm tạo đối tượng view để hiển thị quảng cáo gốc. Như bạn có thể thấy từ code, lớp factory tạo một GADNativeAdView và gán vào đó một đối tượng GADNativeAd.
ListTileNativeAdFactory.m
// TODO: Import ListTileNativeAdFactory.h
#import "ListTileNativeAdFactory.h"

// TODO: Implement ListTileNativeAdFactory
@implementation ListTileNativeAdFactory

- (GADNativeAdView *)createNativeAd:(GADNativeAd *)nativeAd
                             customOptions:(NSDictionary *)customOptions {
  GADNativeAdView *nativeAdView =
    [[NSBundle mainBundle] loadNibNamed:@"ListTileNativeAdView" owner:nil options:nil].firstObject;

  ((UILabel *)nativeAdView.headlineView).text = nativeAd.headline;

  ((UILabel *)nativeAdView.bodyView).text = nativeAd.body;
  nativeAdView.bodyView.hidden = nativeAd.body ? NO : YES;

  ((UIImageView *)nativeAdView.iconView).image = nativeAd.icon.image;
  nativeAdView.iconView.hidden = nativeAd.icon ? NO : YES;

  nativeAdView.callToActionView.userInteractionEnabled = NO;

  nativeAdView.nativeAd = nativeAd;

  return nativeAdView;
}

@end
Đăng ký lớp ListTileNativeAdFactory
Việc triển khai FLTNativeAdFactory phải được đăng ký với FLTGoogleMobileAdsPlugin trước khi nó có thể được sử dụng từ phía Flutter.
Mở tệp AppDelegate.m và đăng ký ListTileNativeAdFactory với chuỗi ID duy nhất (listTile) bằng cách gọi phương thức FLTGoogleMobileAdsPlugin.registerNativeAdFactory().
AppDelegate.m
#import "AppDelegate.h"
#import "GeneratedPluginRegistrant.h"

// TODO: Import ListTileNativeAdFactory.h
#import "ListTileNativeAdFactory.h"

@implementation AppDelegate

- (BOOL)application:(UIApplication *)application
    didFinishLaunchingWithOptions:(NSDictionary *)launchOptions {
  [GeneratedPluginRegistrant registerWithRegistry:self];

  // TODO: Register ListTileNativeAdFactory
  ListTileNativeAdFactory *listTileFactory = [[ListTileNativeAdFactory alloc] init];
  [FLTGoogleMobileAdsPlugin registerNativeAdFactory:self
                                        factoryId:@"listTile"
                                  nativeAdFactory:listTileFactory];

  // Override point for customization after application launch.
  return [super application:application didFinishLaunchingWithOptions:launchOptions];
}

@end
Bây giờ bạn đã sẵn sàng sử dụng ListTileNativeAdFactory để hiển thị quảng cáo gốc trên iOS.
Triển khai NativeAdFactory cho iOS (Swift)
Mở tệp ios/Podfile (hoặc bất kỳ tệp nào trong thư mục ios) và nhấp vào Open iOS module in Xcode để mở dự án iOS.

Chuẩn bị bố cục quảng cáo gốc
Bạn sẽ cần có một custom view (*.xib) để bố trí nội dung quảng cáo gốc. Trong hướng dẫn này, view được định cấu hình sẵn được dùng để giảm thiểu effort của bạn.
Với dự án iOS được mở bằng Xcode, hãy xác nhận rằng ListTileNativeAdView.xib tồn tại trong dự án Runner.

Tạo lớp ListTileNativeAdFactory
- Từ trình điều hướng dự án, nhấp chuột phải vào nhóm Runner và chọn New File để tạo tệp tiêu đề cho lớp mới.

- Trong hộp thoại mẫu, hãy chọn Swift File và đặt tên là
ListTileNativeAdFactory. - Sau khi tệp
ListNativeAdFactory.swiftđược tạo, hãy triển khai lớpListNativeAdFactory.
Lưu ý rằng lớp này triển khai phương thức createNativeAd() trong giao thức FLTNativeAdFactory.
Lớp factory chịu trách nhiệm tạo đối tượng view để hiển thị quảng cáo gốc. Như bạn có thể thấy từ code, lớp factory tạo một GADNativeAdView và gán vào đó một đối tượng GADNativeAd.
ListTileNativeAdFactory.swift
// TODO: Import google_mobile_ads
import google_mobile_ads

// TODO: Implement ListTileNativeAdFactory
class ListTileNativeAdFactory : FLTNativeAdFactory {

    func createNativeAd(_ nativeAd: GADNativeAd,
                        customOptions: [AnyHashable : Any]? = nil) -> GADNativeAdView? {
        let nibView = Bundle.main.loadNibNamed("ListTileNativeAdView", owner: nil, options: nil)!.first
        let nativeAdView = nibView as! GADNativeAdView

        (nativeAdView.headlineView as! UILabel).text = nativeAd.headline

        (nativeAdView.bodyView as! UILabel).text = nativeAd.body
        nativeAdView.bodyView!.isHidden = nativeAd.body == nil

        (nativeAdView.iconView as! UIImageView).image = nativeAd.icon?.image
        nativeAdView.iconView!.isHidden = nativeAd.icon == nil

        nativeAdView.callToActionView?.isUserInteractionEnabled = false

        nativeAdView.nativeAd = nativeAd

        return nativeAdView
    }
}
Đăng ký lớp ListTileNativeAdFactory
Việc triển khai FLTNativeAdFactory phải được đăng ký với FLTGoogleMobileAdsPlugin trước khi nó có thể được sử dụng từ phía Flutter.
Mở tệp AppDelegate.m và đăng ký ListTileNativeAdFactory với chuỗi ID duy nhất (listTile) bằng cách gọi phương thức FLTGoogleMobileAdsPlugin.registerNativeAdFactory().
AppDelegate.swift
import UIKit
import Flutter

// TODO: Import google_mobile_ads
import google_mobile_ads

@UIApplicationMain
@objc class AppDelegate: FlutterAppDelegate {
  override func application(
    _ application: UIApplication,
    didFinishLaunchingWithOptions launchOptions: [UIApplication.LaunchOptionsKey: Any]?
  ) -> Bool {
    GeneratedPluginRegistrant.register(with: self)

    // TODO: Register ListTileNativeAdFactory
    let listTileFactory = ListTileNativeAdFactory()
    FLTGoogleMobileAdsPlugin.registerNativeAdFactory(
        self, factoryId: "listTile", nativeAdFactory: listTileFactory)

    return super.application(application, didFinishLaunchingWithOptions: launchOptions)
  }
}
Bây giờ bạn đã sẵn sàng sử dụng ListTileNativeAdFactory để hiển thị quảng cáo gốc trên iOS.
Tích hợp quảng cáo gốc với Flutter widget
- Mở tệp
lib/native_inline_page.dart. Sau đó, importad_helper.dartvàgoogle_mobile_ads.dartbằng cách thêm các dòng sau:
native_inline_page.dart
...

// TODO: Import ad_helper.dart
import 'package:admob_inline_ads_in_flutter/ad_helper.dart';

// TODO: Import google_mobile_ads.dart
import 'package:google_mobile_ads/google_mobile_ads.dart';

class NativeInlinePage extends StatefulWidget {
  ...
}
- Trong lớp
_NativeInlinePageState, hãy thêm các thành phần và phương thức sau cho quảng cáo gốc.
Lưu ý rằng _kAdIndex cho biết chỉ mục nơi quảng cáo gốc sẽ được hiển thị và nó được dùng để tính toán chỉ mục của item từ phương thức _getDestinationItemIndex().
native_inline_page.dart
class _NativeInlinePageState extends State<NativeInlinePage> {

  // TODO: Add _kAdIndex
  static final _kAdIndex = 4;

  // TODO: Add a native ad instance
  NativeAd? _ad;

  ...

  // TODO: Add _getDestinationItemIndex()
  int _getDestinationItemIndex(int rawIndex) {
    if (rawIndex >= _kAdIndex && _ad != null) {
      return rawIndex - 1;
    }
    return rawIndex;
  }

  ...
}
- Trong phương thức
initState(), hãy tạo và tảiNativeAdsử dụngListTileNativeAdFactoryđể tạo giao diện quảng cáo gốc.
Lưu ý rằng cùng một ID factory (listTile) được sử dụng để đăng ký factory với plugin.
native_inline_page.dart
@override
void initState() {
  super.initState();

  // TODO: Create a NativeAd instance
  _ad = NativeAd(
    adUnitId: AdHelper.nativeAdUnitId,
    factoryId: 'listTile',
    request: AdRequest(),
    listener: NativeAdListener(
      onAdLoaded: (ad) {
        setState(() {
          _ad = ad as NativeAd;
        });
      },
      onAdFailedToLoad: (ad, error) {
        // Releases an ad resource when it fails to load
        ad.dispose();
        print('Ad load failed (code=${error.code} message=${error.message})');       },
    ),
  );

  _ad.load();
}
- Sửa đổi phương thức
build()để hiển thị quảng cáo gốc khi có sẵn. - Cập nhật
itemCountđể đếm mục nhập quảng cáo gốc và cập nhậtitemBuilderđể hiển thị quảng cáo gốc tại chỉ mục quảng cáo (_kAdIndex) khi quảng cáo được tải. - Cập nhật code sử dụng phương thức
_getDestinationItemIndex()để truy xuất chỉ mục cho nội dung item.
native_inline_page.dart
@override
Widget build(BuildContext context) {
  return Scaffold(
    ...
    body: ListView.builder(
      // TODO: Adjust itemCount based on the ad load state
      itemCount: widget.entries.length + (_ad != null ? 1 : 0),
      itemBuilder: (context, index) {
        // TODO: Render a banner ad
        if (_ad != null && index == _kAdIndex) {
          return Container(
            height: 72.0,
            alignment: Alignment.center,
            child: AdWidget(ad: _ad!),
          );
        } else {
          // TODO: Get adjusted item index from _getDestinationItemIndex()
          final item = widget.entries[_getDestinationItemIndex(index)];

          return ListTile(
            ...
          );
        }
      },
    ),
  );
}
- Giải phóng tài nguyên được liên kết với đối tượng
NativeAdbằng cách gọi phương thứcNativeAd.dispose()trong phương thức gọi lạidispose().
native_inline_page.dart
@override
void dispose() {
  // TODO: Dispose a NativeAd object
  _ad?.dispose();

  super.dispose();
}
Vậy là xong! Chạy dự án và nhấp vào nút Native inline ad từ trang chủ. Sau khi quảng cáo được tải, bạn sẽ thấy quảng cáo gốc ở giữa danh sách.
| ⠀ | ⠀ |
|---|---|
 |
 |
9. Hoàn tất!
Bạn đã hoàn thành hướng dẫn. Bạn có thể tìm thấy code hoàn chỉnh cho hướng dẫn này trong thư mục 📁complete hoặc 📁complete_kotlin_swift.
Nguồn: https://codelabs.developers.google.com/codelabs/admob-inline-ads-in-flutter
All rights reserved