Tất tần tật về UIWebView
Bài đăng này đã không được cập nhật trong 4 năm
Hiểu rõ từ cơ bản
Để cho dễ hiểu ban đầu, bạn hãy tải source code demo trước: https://github.com/oNguyenVanThieu/UIWebView
Chạy thử, rồi xem kỹ lại log xem 
extension ViewController: UIWebViewDelegate {
    // các type tương ứng của navigationType
    /*
     public enum UIWebViewNavigationType : Int {
     case linkClicked // từ trong webView bạn click mở link tiếp
     case formSubmitted
     case backForward // khi bạn gọi webView.goBack() hay webView.goForward() sẽ vào case này
     case reload // khi bạn gọi webView.reload()
     case formResubmitted
     case other // khi bạn tự gọi webView.loadRequest
     }
    */
    // request: là request hiện tại mà webView chuẩn bị thực hiện
    // webView sẽ chứa request của lần trước, ban đầu sẽ nil
    // return true sẽ thực hiện request, false thì không
    func webView(_ webView: UIWebView, shouldStartLoadWith request: URLRequest, navigationType: UIWebViewNavigationType) -> Bool {
        print("1.1. shouldStartLoadWith navigationType ", navigationType.rawValue)
        print("1.2. shouldStartLoadWith request ", request.url?.absoluteString)
        print("1.3. shouldStartLoadWith webView ", webView.request?.url?.absoluteString)
        return true
    }
    // giống biến webView ở hàm shouldStartLoadWith
    func webViewDidStartLoad(_ webView: UIWebView) {
        print("2. webViewDidStartLoad webView ", webView.request?.url?.absoluteString)
        indicator.startAnimating()
    }
    // webView chứa request ở shouldStartLoadWith sau khi thực hiện thành công
    func webViewDidFinishLoad(_ webView: UIWebView) {
        print("3. webViewDidFinishLoad webView ", webView.request?.url?.absoluteString)
        indicator.stopAnimating()
    }

    func webView(_ webView: UIWebView, didFailLoadWithError error: Error) {
        print("4. didFailLoadWithError webView ", webView.request?.url?.absoluteString)
        indicator.stopAnimating()
    }
}
Dù khi mất mạng, bạn vẫn hoàn toàn có thể thể dùng webView.goBack() và webView.goForward() Nhưng khi mất mạng thì hàm webViewDidStartLoad sẽ không được thực hiện.
Thêm 1 đoạn code làm màu tý =)) Mục đích không cho nó scroll quá khi ở top với botttom, để lừa tình cho người dùng không biết mình đang ở WebView hay Native :v
    private func prepareWebView() {
        webView.scrollView.bounces = false
        webView.scalesPageToFit = false
        webView.scrollView.decelerationRate = UIScrollViewDecelerationRateNormal
    }
Các debug với Safari
Bạn có thể debug với UIWebView bằng Safari đó.
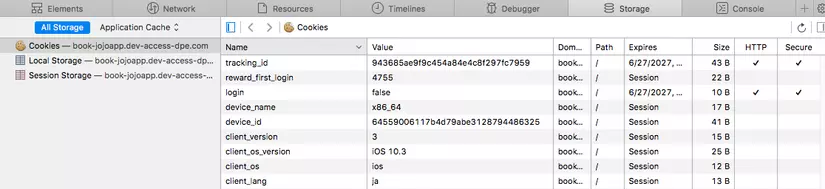
 Vào Develop của Safari rồi chọn thiết bị rồi chọn link muốn xem
Với chế độ này bạn có thể xem được rất nhiều thứ: như link hiện tại là link nào, các giá trị cookie bằng bao nhiêu...
Vào Develop của Safari rồi chọn thiết bị rồi chọn link muốn xem
Với chế độ này bạn có thể xem được rất nhiều thứ: như link hiện tại là link nào, các giá trị cookie bằng bao nhiêu...
Click vào tab Storage bác sẽ xem chi tiết được Cookies, Local Storage, Session Storeage
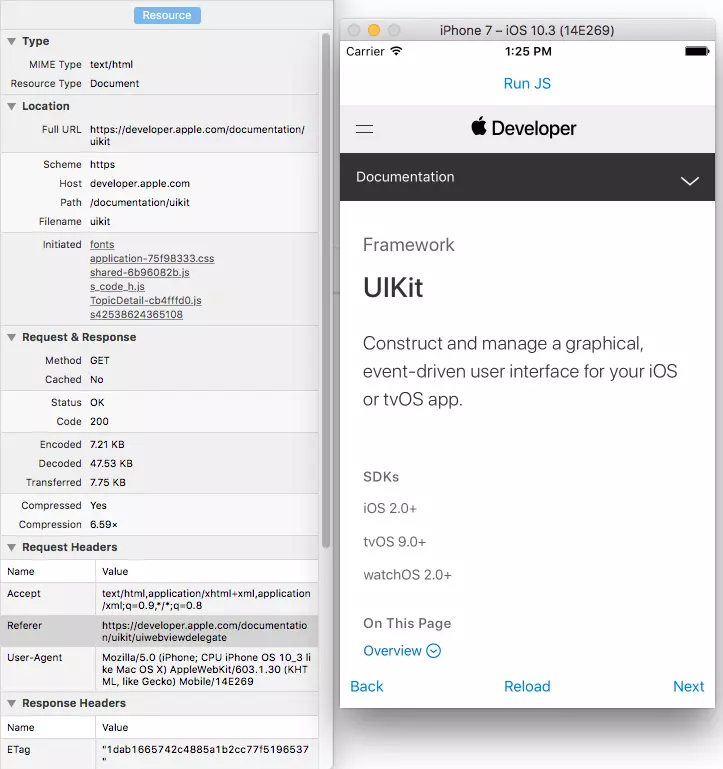
Click vào tab Resource để xem thông tin chi tiết 1 link
Cách thực thi lệnh JavaScript
let js = "document.title;";
let value = webView.stringByEvaluatingJavaScript(from: js)
print(value)
biến js trên là câu lệnh JavaScript bạn muốn thực hiện qua hàm stringByEvaluatingJavaScript. Kết quả là kiểu optional string
Chặn bắt, Thay đổi URLRequest
Ví dụ đoạn code sau check xem có phải là link https://developer.apple.com/documentation/uikit/views_and_controls không, sẽ chặn request đó lại, mà mở request mở link https://www.google.com.vn/ thay thế.
func webView(_ webView: UIWebView, shouldStartLoadWith request: URLRequest, navigationType: UIWebViewNavigationType) -> Bool {
    if let currentUrl = request.url?.absoluteString,
        currentUrl == "https://developer.apple.com/documentation/uikit/views_and_controls" {
        loadURL("https://www.google.com.vn/")
        return false
    }
    return true
}
Còn đoạn code dưới này, là tạo 1 URLRequest từ 1 dường dẫn. Sau đó thực hiện request đó với webView.loadRequest
func loadURL(_ urlString: String) {
        if let url = URL(string: urlString) {
            let req = URLRequest(url: url)
            webView.loadRequest(req)
        }
   }
Như vậy qua ví dụ đơn giản đó, với tác vụ để click vào UIWebView sau đó thực hiện 1 hành động nào đó trong native là hoàn toàn có thể. (Ví dụ bạn click vào button Share của UIWebView, sau đó bạn chặn request đó lại, và thực hiện hành động đó ở native)
Ngoài ra bạn có thể giữ lại được cả URLRequest đó lại. Sau 1 thời điểm nào đó bạn mới dùng webView.loadRequest là hoàn toàn có thể. Ví dụ như trường hợp người dùng đang login trên UIWebView nhưng bị mất mạng chẳng hạn, bạn có thể giữ lại URLRequest đó và để lúc nào có mạng lại thì thực hiện webView.loadRequest (Cái này khá hay bên iOS Dù method kiểu post/get đều chặn giữ được hết. Bạn thử đó người bạn dev Android xem có làm được tương tự không? :v )
Còn 1 cái khá hay nữa khi bạn đã hiểu rõ chặn bắt URLRequest này. Bạn có thể tự xử lý lưu trữ history của webView luôn, không cần phải dùng webView.goBack(), webView.goForward() hay webView.reload() nữa. Bạn tự xử lý với webView.loadRequest của bạn, và có 1 mảng lưu trữ lại các URLRequest của WebView. Nhưng chú ý, sẽ có trường hợp mở 1 link mà sẽ open rất nhiều URLRequest.
All rights reserved
