Tạo và sử dụng một attribute directive trong angular 13
Bài đăng này đã không được cập nhật trong 3 năm
Trong bài viết này mình sẽ chia sẻ các tạo và sử dụng 2 attribute directive với tên là appLink và appCapitalize trong angular 13.
Directive appLink: có nhiệm vụ hiện thị màu background tương ứng của từng thẻ và check xem giá trị trong thẻ có phải là một link hay không, nếu hợp lệ thì mở link sang tab mới, không hợp lệ thì alert thông báo lỗi.
Directive appCapitalize: có nhiệm vụ tự động viết hoa chữ cái đầu tiên của mỗi từ khi người dụng nhập text vào from input hoặc textarea.
- Tạo directive appLink
Chạy command bên dưới để tạo directive appLink
ng generate directive link/link
Sau chi chạy command trên, CLI sẽ tạo 2 file src/app/link/link.directive.ts và src/app/link/link.directive.spec.ts và khai báo class LinkDirective trong AppModule.
Code src/app/link/link.directive.ts mặc định như sau:
import { Directive } from '@angular/core';

@Directive({
  selector: '[appLink]'
})
export class LinkDirective {
  constructor() { }
}
Tiếp tục, cập nhật logic code vào src /app/link/link.directive.ts như dưới:
import { Directive, ElementRef, HostListener, Input } from '@angular/core';

@Directive({
  selector: '[appLink]'
})
export class LinkDirective {
    @Input() appLink = '';
    constructor(private el: ElementRef) { }

    @HostListener('mouseenter') onMouseEnter() {
        this.highlight(this.appLink || this.appLink || 'red');
    }

    @HostListener('mouseleave') onMouseLeave() {
        this.highlight('');
    }

    private highlight(color: string) {
        this.el.nativeElement.style.backgroundColor = color;
        this.el.nativeElement.style.cursor = 'pointer';
    }

    @HostListener('click', ['$event']) toogle(elem){
        if (this.isValidURL(elem.target.innerText)) {
            window.open(elem.target.innerText, "_blank");
        }
    }

    isValidURL(str) {
        var regex = /(?:https?):\/\/(\w+:?\w*)?(\S+)(:\d+)?(\/|\/([\w#!:.?+=&%!\-\/]))?/;
        if(!regex .test(str)) {
            alert("Please enter valid URL.");
            return false;
        } else {
            return true;
        }
    }

}
- ElementRef cấp quyền truy cập trực tiếp vào phần tử DOM thông qua thuộc tính nativeElement của nó.
- Thêm ElementRef trong constructor() để tham chiếu đến phần tử DOM , phần tử mà bạn áp dụng trong appLink.
Tiếp theo cập nhật code trong src/app/app.component.html
Directive appLink được truyền vào các thẻ tương ứng bao gồm có tham số và không có tham số màu tương ứng.
<div class="container">
<div class="card">
<div class="card-header">
Item check link
</div>
<div class="card-body">
<p appLink>https://www.facebook.com/</p>
<h3 [appLink]="'red'">angular.iss</h3>
<a href="#" [appLink]="'yellow'">https://www.google.com/</a>
<span [appLink]="'blue'">https://www.youtube.com</span>
</div>
</div>
</div>
Ouput:
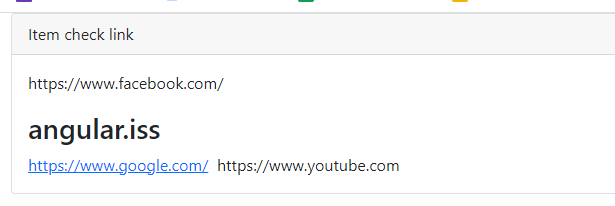
Bây giờ các bạn hãy dê chuột và click vào từng thẻ để xem kết quả nhé
2.Tạo directive appCapitalize
- Chạy command sau để tạo directive appCapitalize:
ng generate directive capitalize/capitalize
Sau chi chạy comman trên, CLI sẽ tạo 2 file src/app/capitalize/capitalize.directive.ts và src/app/capitalize/capitalize.directive.spec.ts và khai báo class CapitalizeDirective trong AppModule.
Code src/app/capitalize/capitalize.directive.ts mặc định như sau:
import { Directive } from '@angular/core';

@Directive({
  selector: '[appCapitalize]'
})
export class CapitalizeDirective {
  constructor() { }
}
Tiếp tục, cập nhật logic code vào src/app/capitalize/capitalize.directive.ts như dưới:
import { Directive, ElementRef, HostListener, Renderer2 } from '@angular/core';

@Directive({
    selector: '[appCapitalize]',
    host: {
        '(input)' : 'onInputChange($event)'
    }
})
export class CapitalizeDirective {

    constructor(private el: ElementRef, private render: Renderer2) { }

    onInputChange(event: any) {
        let result: string = event.target.value;

        this.el.nativeElement.value = result.replace(/\w\S*/g, function(txt){
            return txt.charAt(0).toUpperCase() + txt.substring(1).toLowerCase();
        })
    }

}
Tiếp theo cập nhật code trong src/app/app.component.html
<div class="container">
    <div class="card">
        <div class="card-header">
          Item capitalize
        </div>
        <div class="card-body">
            <p></p>
            <div class="form-group">
                <input type="text" class="form-control" appCapitalize>
            </div>

            <p></p>
            <div class="form-group">
                <textarea name="" id="" cols="30" rows="10" appCapitalize></textarea>
            </div>
        </div>
    </div>
</div>
Ouput:
 Như các bạn thấy, từ đầu tiên của mỗi từ trong input sẽ tự động viết hoa khi chúng ta nhập giá trị vào input hoặc textarea vào nhé!
All rights reserved
