Tạo ứng dụng VueJS với bản đồ Google Map
Bài đăng này đã không được cập nhật trong 6 năm
Trong bài viết này, chúng ta sẽ cùng tìm hiểu các bước làm 1 ứng dụng VueJS có sử dụng 1 vài tính năng của bản đồ Google Map như tìm kiếm địa chỉ, hiển thị danh sách 1 cửa hàng trong khu vực trên bản đồ, hiển thị thông tin chi tiết cửa hàng trên bản đồ.
Frontend sẽ sử dụng VueJS, và API sẽ dùng Ruby on Rails.
1. Cài đặt API Rails
Bắt đầu khởi tạo Rails project:
mkdir map_shop && cd map_shop
rails new backend --api -d mysql
Bởi vì Rails app và VueJs app sẽ được lưu trữ trên 2 server riêng biệt nên điều đầu tiên chúng ta cần xử lý là CORS (Cross-Origin Resource Sharing). Trong Rails, chúng ta tìm file theo đường dẫn sau config/initialzers/cors.rb và sửa file như sau:
Rails.application.config.middleware.insert_before 0, Rack::Cors do
  allow do
    origins '*'

    resource '*',
      headers: :any,
      methods: [:get, :post, :put, :patch, :delete, :options, :head]
  end
end
Tiếp theo là thêm gem gem “rack-cors” và chạy bundle install
Tạo model Shop chứa thông tin cơ bản là name, kinh độ, vĩ độ
rails generate scaffold Shops name:string address:string 'latitude:decimal{11,8}' 'longitude:decimal{11,8}'

# tạo database
rake db:create
rake db:migrate
Như vậy, ta có model Shop, và file routes.rb đã tự tạo sẽ resourse
Rails.application.routes.draw do
  resources :shops
end
Trong controller của shop, ta định nghĩa action index cơ bản
def index
  @shops = Shop.all

  render json: @shops
end
Kiểm tra api đã hoạt động chưa, ta tạo 1 dữ liệu shop
Shop.create!(name: 'big C', latitude: '21.0133334', longitude: '105.7778877', address: 'Ho Guom')
Chạy rails s để khởi động server rồi vào link localhost:3000/shops thì sẽ hiện thông tin tất cả các shop. Như vậy là API đã OK.
2. Cài đặt VueJS
Chúng ta sẽ tạo 1 folder frontend riêng để chứa code VueJS, dùng tool vue-cli để tạo.
cd map_shop


# nếu bạn chưa cài vue-cli
npm install -g vue-cli

# khởi tạo project frontend
vue init webpack frontend

# chạy frontend
cd frontend && npm run dev
Truy cập vào link localhost:8080 để vào giao diện ban đầu của Vue
Cài router nếu bạn chưa thêm khi khởi tạo
npm install vue-router
3. Cài đặt Google Map API
Muốn sử dụng Google Map, thì bạn cần có API key được tạo bởi Google. Bạn vào trang hướng dẫn để lấy key. Với API key, chúng ta có thể sử dụng được tất cả các dịch vụ của Google, miễn là trả phí cho dịch vụ cần dùng. Hiện tại đang có chương trình Google tặng 300$ cho mỗi tài khoản dùng trong 1 năm, nên đây là cơ hội để chúng ta tìm hiểu các dịch vụ của Google.
Ở đây, chúng ta cần giải quyết các vấn đề là tìm kiếm địa chỉ trong Google Map, vì vậy cần phải active dịch vụ Maps JavaScript API và Places API trong danh sách dịch vụ mà Google cung cấp, như vậy thì ta mới có thể sử dụng Google Map để giải quyết các vấn đề trên.
Thêm thư viện vue2-google-maps để sử dụng google map trong VueJS
npm install vue2-google-maps
Trong file src/main.js bên frontend, ta thêm config:
import * as VueGoogleMaps from "vue2-google-maps"

Vue.use(VueGoogleMaps, {
  load: {
    key: GOOGLE-API-KEY,
    libraries: "places"
  }
});
Như vậy, đã xong phần tích hợp google map vào trong VueJS.
4. Tạo Shop
Tạo API tạo shop trong backend:
# API create shop: POST /shops
def create
  shop = Shop.new shop_params

 if shop.save
    render json: {success: true}
 else
     render json: {errors: shop.errors.full_messages}, status: :unprocessable_entity
 end
end

private

def shop_params
  params.permit :name, :latitude, :longitude, :address
end
Form tạo shop bên Vue, tạo file /src/CreateShop.vue
<template>
  <div class="--shop">
      <selected-address-google-map-modal
      :selectedAddress="selectedAddress"
      @onSelectedAddress="onSelectedAddress"
    />

      <form @submit.prevent="handleSubmit">
        <div class="form-group">
          <input type="text" v-model="name" name="name" placeholder="Name"
            class="form-control" :class="{ 'is-invalid': submitted && !name }" />
          <div v-show="submitted && !name" class="invalid-feedback">Name is required</div>
        </div>

        <div class="form-group form-group--address">
          <input type="text" v-bind:value="selectedPlace.address"
            placeholder="Please select a place"
            v-on:click="openSelectedAddressModal"
            class="form-control"
          >
        </div>

        <div class="form-group float-right">
          <button class="btn btn-primary">Create</button>
        </div>
      </form>
  </div>
</template>

<script>
  import axios from 'axios'
  import SelectedAddressGoogleMapModal from './SelectedAddressGoogleMapModal'

  export default {
    data () {
      return {
        submitted: false,
        name: '',
        selectedAddress: {
          lat: null,
          lng: null,
          address: ''
        }
      }
    },
    components: { SelectedAddressGoogleMapModal },
    methods: {
      handleSubmit () {
        this.submitted = true;
        const {
          name, selectedAddress
        } = this;

        # request lên API để tạo Shop
        axios.post('http://localhost:3000/shops', {
          name: name,
          latitude: selectedAddress.lat,
          longitude: selectedAddress.lng,
          address: selectedAddress.address
        })
          .then(response => {
            # Khôi phục lại form và có thể thêm alert nếu cần
            this.name = ''
            this.selectedAddress = {}
          })
          .catch(e => {
            this.error.push(e)
          })
      },
      openSelectedAddressModal() {
        this.$modal.show('selected-address-google-map-modal');
      },
      onSelectedAddress(address) {
        this.selectedAddress = address;
      },
  };
</script>
Chúng ta có sử dụng Modal để hiển thị Map chọn địa chỉ, để dùng Modal trong VueJS, bạn thêm thư viện vue-js-modal bằng npm install và thêm config trong file main.js
import VModal from 'vue-js-modal'

Vue.use(VModal)
Tạo Modal hiển thị Map để chon địa chỉ, ta tạo file /src/SelectedAddressGoogleMapModal.vue
<template>
  <modal name="selected-address-google-map-modal" transition="pop-out" :width="900" :height="600" :reset="true">
    <div class="search-place-map">
      <h2>Search address</h2>
      <div class="d-flex">
        <gmap-autocomplete
          class="form-control"
          @place_changed="setAddress">
        </gmap-autocomplete>
        <button class="btn btn-primary" @click="addAddress">Set Address</button>
      </div>
    </div>
    <br>
    <gmap-map
      :center="center"
      :zoom="12"
      style="width:100%;  height: 400px;"
    >
      <gmap-marker
        :key="index"
        v-for="(m, index) in markers"
        :position="m.position"
        @click="center=m.position"
      ></gmap-marker>
    </gmap-map>
  </modal>
</template>

<script>
export default {
  name: "SelectedAddressGoogleMapModal",
  data() {
    return {
      center: { lat: 45.508, lng: -73.587 },
      markers: [],
      selectedAddress: null
    };
  },

  mounted() {
    this.geolocate();
  },

  methods: {
    setAddress(address) {
      this.selectedAddress = address;
    },
    addAddress() {
      if (this.selectedAddress) {
        const marker = {
          lat: this.selectedAddress.geometry.location.lat(),
          lng: this.selectedAddress.geometry.location.lng()
        };
        this.markers.push({ position: marker });
        this.center = marker;
        this.$emit('onSelectedAddress', {
          lat: marker.lat,
          lng: marker.lng,
          address: this.selectedAddress.formatted_address
        })
        this.onSelectedAddress = null;
      }
    },
    geolocate: function() {
      navigator.geolocation.getCurrentPosition(position => {
        this.center = {
          lat: position.coords.latitude,
          lng: position.coords.longitude
        };
      });
    }
  }
};
</script>
Trên modal có sử dụng component
gmap-autocomplete: cho phép hiển thị danh sách gợi ý địa chỉ khi nhậpgmap-map: hiển thị bản đồgmap-marker: hiển thị các vị trí đã được chọn
Lệnh this.$emit('onSelectedAddress', data) là cách gọi lại method parent component, ở đây là update lại địa chỉ được chọn.
Như vậy, ta đã tạo được shop với lat, lng được chọn từ map.
5. Hiển thị danh sách shop trong Map
Giả sử, user muốn hiển thị danh sách các shop trong khu vực nào đó, kiểu như
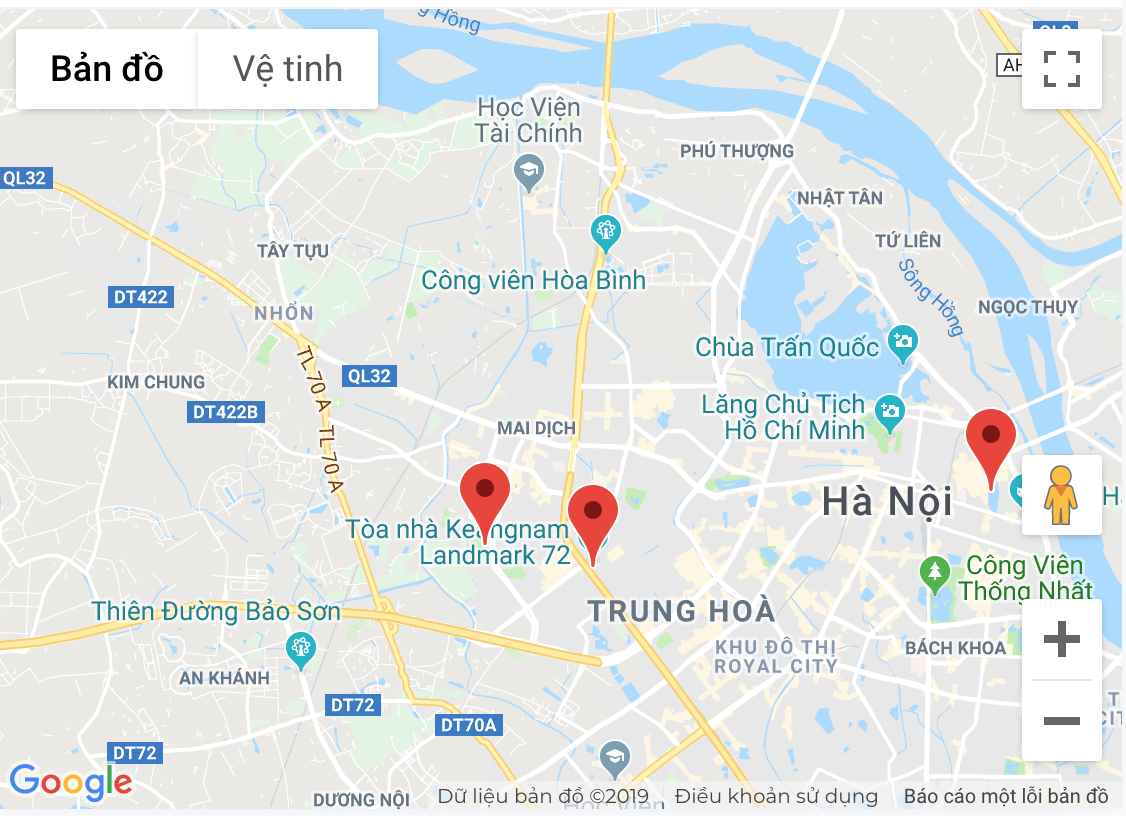
thì chúng ta làm như sau:
Đầu tiên, cần tạo API để trả về danh sách shop trong 1 khu vực, để có thể filter shop trong khu vực, ta sẽ dựa vào tìm theo latitude, longitude. Ý tưởng là sẽ query trong DB lấy tất cả shop nằm trong 1 ô chữ nhật của 1 phần bản đồ đang hiển thị, mỗi góc của chữ nhật sẽ là tạo độ latitude, longitude.
# API trả danh sách shop theo khu vực: GET /shops
def index
  shops = Shop.all.where(
    "latitude >= ? AND latitude <= ? AND longitude >= ? AND longitude <= ?",
      params[:bottom_x], params[:top_x], params[:bottom_y], params[:top_y]
  )

 render json: shops
end
trong đó các tham số bottom_x, top_x, bottom_y, top_y là các giá trị latitude, longitude của 4 góc chữ nhât của bản đồ theo chiều toạ độ xy
Ta tạo Component để hiển thị danh sách shop trong bản đồ: /src/MapShops
<template>
  <div class="section-box map-search">
     <h4 class="section-box__heading">MAP</h4>
    <gmap-map
      ref="mapRef"
      :center="center"
      :zoom="12"
      style="width:100%;  height: 400px;"
      @idle="searchShopsInMap"
    >
      <gmap-marker
        :key="index"
        v-for="(shop, index) in shops"
        :position="shop.position"
      ></gmap-marker>
  </div>
</template>

<script>
  import axios from 'axios'

  export default {
    name: 'MapShops',
    data() {
      return {
        center: { lat: 35.652832, lng: 139.839478 },
        boundMap: {},
        shops: []
      };
    },
    components: { SimpleStatementDetail },
    mounted() {
      this.geolocate();
    },
    methods: {
      geolocate() {
        navigator.geolocation.getCurrentPosition(position => {
          this.center = {
            lat: position.coords.latitude,
            lng: position.coords.longitude
          };
        });
      },
      searchShopsInMap() {
        const map = this.$refs.mapRef;

        # lấy toạ độ 4 góc của bản đồ hiện tại
        const boundCoordinate = this.$refs.mapRef.$mapObject.getBounds();

        if(!boundCoordinate){return}
        const northEast = boundCoordinate.getNorthEast();
        const southWest = boundCoordinate.getSouthWest();
        const lats = [northEast.lat(), southWest.lat()];
        const lngs = [northEast.lng(), southWest.lng()];

        this.boundMap = {
          top_x: _.max(lats),
          bottom_x: _.min(lats),
          top_y: _.max(lngs),
          bottom_y: _.min(lngs)
        }

        axios.get('http://localhost:3000/shops')
          .then(response => {
            this.shops = response.data.map(shop => {
              return {
                 ...shop, position: {
                   lat: shop.latitude, lng: shop.longitude
                 }
              }
            })
          })
          .catch(e => {
            this.error.push(e)
          })
      }
    }
  };
</script>
trong đó event idle của gmap-map được gọi sau khi ta di chuyển xong bản đồ sang khu vực khác, khi đó, ta sẽ tính toán lấy các toạ độ của khung hình và gọi lên API để trả về các shop thuộc khu vực mới đó.
6. Kết hợp component vào App
Ta thêm component tạo shop và hiển thị shop trong bản đồ vào file /src/App.vue để hiển thị
<template>
  <div id="app">
    <div class="create-shop">
       <create-shop />
    </div>

    <div class="list-shop-in-map">
       <map-shops />
    </div>
  </div>
</template>

<script>

import MapShops from './MapShops'
import CreateShop from './CreateShop'

export default {
  name: 'app',
  components: {
    MapShops, CreateShop
  }
}
</script>
Kết luận
Trên đây là các bước để xây dựng 1 app VueJS sử dụng Rails làm API, và kết hợp với Google map, cho phép dễ dàng tích hợp thông tin vào bản đồ.
Chúng ta có thể cải tiến thêm bằng cách sử dụng vuex để quản lý state, giúp giải quyết trường hợp là khi tạo shop xong, sẽ có thể hiện ngay lập tức shop đấy trong bản đồ chứa danh sách shop. Và thêm cả hiển thị thông tin shop khi click vào marker trong bản đồ bằng cách sử dụng gmap-info-window.
Cảm ơn mọi người đã theo dõi.
All rights reserved
