Tạo ứng dụng CRUD với Angular 5 và Laravel 5.6
Bài đăng này đã không được cập nhật trong 8 năm
Trong bài này tôi sẽ trình bày quá trình tạo ra ứng dụng sử dụng angular và laravel để tạo ra một CRUD app hoàn chỉnh. Trong đó angular sẽ đảm nhiệm frontend và laravel sẽ tạo ra rest api. Trong các ví dụ dưới đây tôi sẽ sử dụng MAMP làm môi trường server. Bắt đầu nào.
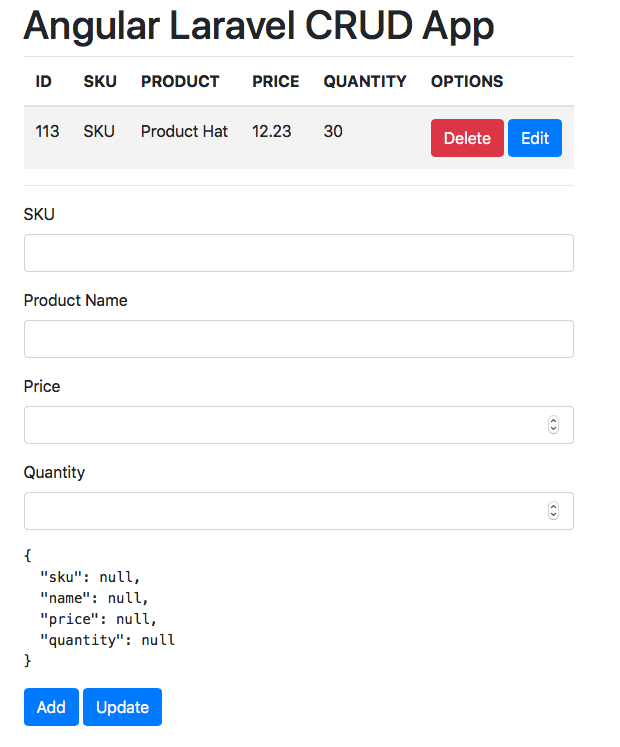
Đây là 1 screen của ứng dụng mà chúng ta cần làm ra.
Install homebrew and xcode
Đầu tiên, chúng ta sẽ sử dụng homebrew giúp quá trình cài đặt dễ dàng hơn nhiều so với xcode của apple, nó bổ sung thêm các công cụ bạn cần để biên dịch phần mềm miễn phí và có thể được cài đặt thông qua App Store. Mở terminal gõ lệnh sau để cài homebrew.
ruby -e "$(curl -fsSL https://raw.githubusercontent.com/Homebrew/install/master/install)"
Upgrade để homebrew cập nhât và sửa lỗi:
brew upgrade
** Install node and npm** Install nodejs bằng brew.
brew install node.
Kiểm tra version node.
node -v
5.6.0
Và npm cũng đã được cài, check version npm:
npm -v
5.6.0
Khi ban muốn update tất cả chỉ cần dùng lệnh:
brew upgrade
Hoặc chỉ muốn update 1 thành phần:
brew upgrade node
Riêng npm nhiều khi sẽ không tự nâng cấp nên cần làm thông qua chính nó.
npm i -g npm
Install and setup the angular environment Cài đặt angular CI
npm install -g @angular/cli
Để update angular.
npm install -g upgrade-angular
Chọn địa chỉ thư mục. Tạo mới ứng dụng angular.
cd /Applications/MAMP/htdocs

ng new angular-web
Check angular version:
cd /Applications/MAMP/htdocs/angular-web

ng -v
Đây là những gì bạn thấy, app được chạy trên Angular 5.2.10.
   _                      _                 ____ _     ___
   / \   _ __   __ _ _   _| | __ _ _ __     / ___| |   |_ _|
  / △ \ | '_ \ / _` | | | | |/ _` | '__|   | |   | |    | |
 / ___ \| | | | (_| | |_| | | (_| | |      | |___| |___ | |
/_/   \_\_| |_|\__, |\__,_|_|\__,_|_|       \____|_____|___|
               |___/

Angular CLI: 1.7.4
Node: 10.0.0
OS: darwin x64
Angular: 5.2.10
... animations, common, compiler, compiler-cli, core, forms
... http, language-service, platform-browser
... platform-browser-dynamic, router

@angular/cli: 1.7.4
@angular-devkit/build-optimizer: 0.3.2
@angular-devkit/core: 0.3.2
@angular-devkit/schematics: 0.3.2
@ngtools/json-schema: 1.2.0
@ngtools/webpack: 1.10.2
@schematics/angular: 0.3.2
@schematics/package-update: 0.3.2
typescript: 2.5.3
webpack: 3.11.0
- Install laravel Bây giờ là lúc cài đặt Laravel nhưng chỉ trong trường hợp bạn không có thiết lập phím tắt 'composer' và được cài đặt tốt nhất để đọc bài viết này trước tiên. Vì vậy, hãy tạo api còn lại bằng cách sử dụng 'laravel-api' làm thư mục.
cd /Applications/MAMP/htdocs

composer create-project laravel/laravel laravel-api --prefer-dist
Setup both app and api test domains Bây giờ theo mặc định, bạn có thể thiết lập và chạy ứng dụng góc bằng cách sử dụng các thao tác sau ...
ng serve --open
nhưng theo mặc định, nó sử dụng http: // localhost: 4200 làm url xem trước, nhưng chúng tôi muốn tự đặt tên miền để phát triển. Vì vậy, thay vào đó hãy nhập thông tin sau và nó sẽ tạo thư mục '/ dist /'.
cd /Applications/MAMP/htdocs/angular-web

// Keep a note of this since we will be using it everytime we want to generate a preview.
ng build --prod
Next setup the two localhost domains by editing the 'httpd.conf' file.
cd /Applications/MAMP/conf/apache/

open -e httpd.conf
Đối với điều này, tôi sẽ sử dụng 2 server 'web.testing' và 'laravel-api.testing' tương ứng với angular và laravel.
NameVirtualHost *:80

<VirtualHost *:80>
    ServerName angular-web.testing
    DocumentRoot /Applications/MAMP/htdocs/angular-web/dist
    <Directory /Applications/MAMP/htdocs/angular-web/dist/>
        Options Indexes FollowSymLinks MultiViews
        AllowOverride All
        Order allow,deny
        allow from all
    </Directory>
</VirtualHost>

<VirtualHost *:80>
    ServerName laravel-api.testing
    DocumentRoot /Applications/MAMP/htdocs/laravel-api/public
    <Directory /Applications/MAMP/htdocs/laravel-api/public/>
        Options Indexes FollowSymLinks MultiViews
        AllowOverride All
        Order allow,deny
        allow from all
    </Directory>
</VirtualHost>
Sửa file host để tạo domain ảo.
cd /private/etc/

open -e hosts
Thêm những dòng sau:
127.0.0.1 angular-web.testing
127.0.0.1 laravel-api.testing
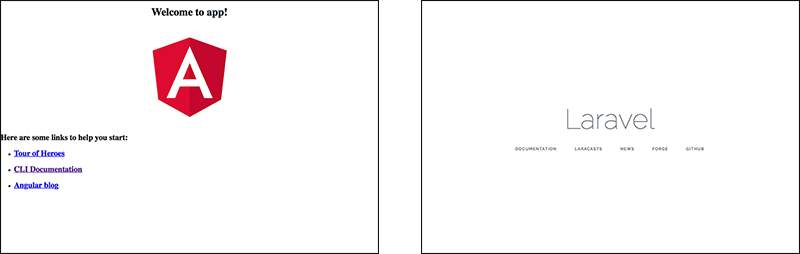
Bây giờ khởi động MAMP và kiểm tra 2 domain bạn sẽ thấy kết quả như sau.
Create CRUD app layout Bây giờ chúng ta đang tìm đến những thứ thú vị và tạo ra một ứng dụng crud ví dụ. Vì vậy, đầu tiên mở tệp sau trong trình soạn thảo mã của bạn '/Applications/MAMP/htdocs/angular-web/src/index.html' cho điều này tôi đang sử dụng Bootstrap 4 cho bố cục.
<!doctype html>
<html lang="en">
    <head>
        <!-- Required meta tags -->
        <meta charset="utf-8">
        <title>Angular and Laravel CRUD web app</title>
        <meta name="viewport" content="width=device-width, initial-scale=1.0, maximum-scale=1.0, user-scalable=no">

        <!-- Bootstrap CSS -->
        <link rel="stylesheet" href="https://maxcdn.bootstrapcdn.com/bootstrap/4.0.0/css/bootstrap.min.css" integrity="sha384-Gn5384xqQ1aoWXA+058RXPxPg6fy4IWvTNh0E263XmFcJlSAwiGgFAW/dAiS6JXm" crossorigin="anonymous">
    </head>
    <body>
        <app-root></app-root>
    </body>
</html>
Tiếp theo, hãy chỉnh sửa tệp sau đây '/Applications/MAMP/htdocs/angular-web/src/app/app.component.html' và thêm phần sau có chứa một bảng để xuất ra Lari api json và một biểu mẫu để chỉnh sửa chi tiết.
<!--The whole content below can be removed with the new code.-->
<div class="container">
    <div class="row">
        <div class="col-xs-12">

            <h1>{{title}}</h1>

            <!-- Table to output data -->
            <table class="table table-striped">
                <thead>
                    <tr>
                        <th>ID</th>
                        <th>SKU</th>
                        <th>PRODUCT</th>
                        <th>PRICE</th>
                        <th>QUANTITY</th>
                        <th>OPTIONS</th>
                    </tr>
                </thead>
                <tbody>
                    <tr *ngFor="let product of products">
                        <td>{{ product.id }}</td>
                        <td>{{ product.sku }}</td>
                        <td>{{ product.name }}</td>
                        <td>{{ product.price }}</td>
                        <td>{{ product.quantity }}</td>
                        <td>
                            <button (click)="deleteProduct(product.id)" class="btn btn-danger">Delete</button>
                            <button (click)="showProduct(product.id)" class="btn btn-primary">Edit</button>
                        </td>
                    </tr>
                </tbody>
            </table>

            <hr />

            <!-- Form to add data -->
            <form [formGroup]="productForm" (ngSubmit)="storeProduct(productForm)">
                <div class="form-group">
                    <label for="sku">SKU</label>
                    <input type="text" class="form-control" name="sku" formControlName="sku">
                </div>
                <div class="form-group">
                    <label for="name">Product Name</label>
                    <input type="text" class="form-control" name="name" formControlName="name">
                </div>
                <div class="form-group">
                    <label for="price">Price</label>
                    <input type="number" class="form-control" name="price" min="0" max="99999" step=".01" formControlName="price">
                </div>
                <div class="form-group">
                    <label for="quantity">Quantity</label>
                    <input type="number" class="form-control" name="quantity" min="1" max="10" formControlName="quantity">
                </div>

                <!-- Output the data on input -->
                <pre>{{productForm.value | json}}</pre>

                <button type="submit" class="btn btn-primary">Add</button>
                <button type="button" (click)="putProduct(product.id)" class="btn btn-primary">Update</button>

            </form>

        </div>
    </div>
</div>
Mở file '/Applications/MAMP/htdocs/angular-web/src/app/app.component.ts'.
import { Component } from '@angular/core';

@Component({
    selector: 'app-root',
    templateUrl: './app.component.html',
    styleUrls: ['./app.component.css']
})
export class AppComponent {
    title = 'Angular Laravel CRUD App';
}
Build angular thành production.
ng build --prod
And preview in the browser 'http://angular-web.testing'.
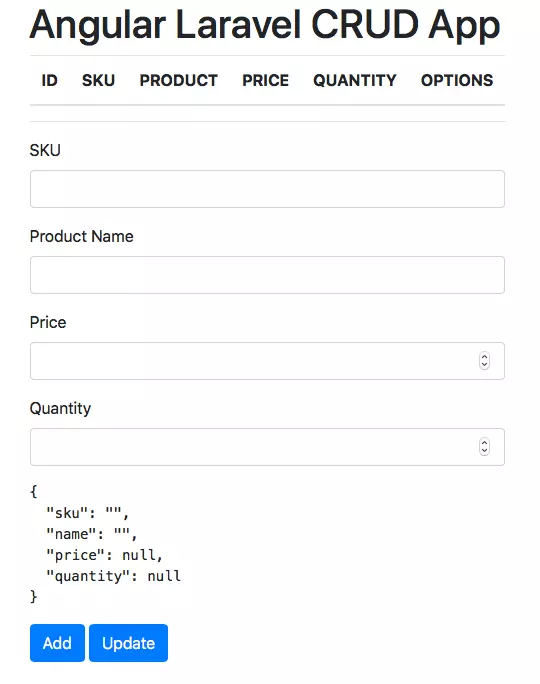
Handle the api json data Trước khi migrate database có thể sẽ gặp phải lỗi "Specified key was too long error'". Hãy chỉnh sửa file này để an toàn .
cd /Applications/MAMP/htdocs/laravel-api/app/Providers/

open -e AppServiceProvider.php
Thêm dòng này vào.' Schema::defaultStringLength(191); '.
<?php

namespace App\Providers;

use Illuminate\Support\ServiceProvider;
use Illuminate\Support\Facades\Schema;

class AppServiceProvider extends ServiceProvider
{
    /**
     * Bootstrap any application services.
     *
     * @return void
     */
    public function boot()
    {
        // This is the important bit
        Schema::defaultStringLength(191);
    }

    /**
     * Register any application services.
     *
     * @return void
     */
    public function register()
    {
        //
    }
}
Chính sửa file enviroment cho databsse.
cd /Applications/MAMP/htdocs/laravel-api/

open -e .env
Tạo các biens môi trường. Bạn có thể dùng mặc định của MAMP.
DB_CONNECTION=mysql
DB_HOST=127.0.0.1
DB_PORT=3306
DB_DATABASE=angular_laravel_api
DB_USERNAME=root
DB_PASSWORD=root
Tạo model và sample data.
php artisan make:model Product -m
Vào thư mục databse mở file '/Applications/MAMP/htdocs/laravel-api/database/migrations ..._create_products_table' vừa mới được tạo.
<?php

use Illuminate\Support\Facades\Schema;
use Illuminate\Database\Schema\Blueprint;
use Illuminate\Database\Migrations\Migration;

class CreateProductsTable extends Migration
{
    /**
     * Run the migrations.
     *
     * @return void
     */
    public function up()
    {
        Schema::create('products', function (Blueprint $table) {
            $table->increments('id');
            $table->string('sku');
            $table->string('name');
            $table->float('price');
            $table->integer('quantity');
            $table->timestamps();
        });
    }

    /**
     * Reverse the migrations.
     *
     * @return void
     */
    public function down()
    {
        Schema::dropIfExists('products');
    }
}
Thực hiện migrate database.
php artisan migrate
Edit file model '/Applications/MAMP/htdocs/laravel-api/app/Product.php'
<?php

namespace App;

use Illuminate\Database\Eloquent\Model;

class Product extends Model
{
    protected $fillable = ['sku', 'name', 'price', 'quantity'];
}
Tạo controller bằng lệnh sau.
// -- resource adds the default methods we will be using in the controller
php artisan make:controller ProductController --resource
Mở file controler vừa được tạo '/Applications/MAMP/htdocs/laravel-api/app/Http/Controllers/ProductController.php'.
<?php

namespace App\Http\Controllers;

use App\Product;
use Illuminate\Http\Request;

class ProductController extends Controller
{

    public function index()
    {
        // List all the products
        return Product::get();
    }

    public function store(Request $request)
    {
        // Create new product
        $product = new Product();
        $product->sku = $request->sku;
        $product->name = $request->name;
        $product->price = $request->price;
        $product->quantity = $request->quantity;
        $product->save();
    }

    public function show($id)
    {
        // Show single product
        return Product::find($id);
    }

    public function update(Request $request, $id)
    {
        // Update the Product
        if ($id != null) {
            Product::where('id', $id)->update($request->all());
        }
    }

    public function destroy($id)
    {
        // Delete the Product
        if ($id != null) {
            $product = Product::find($id);
            $product->delete();
        }
    }
}
Và bây giờ chúng ta cần thêm các routes cho api trong file '/Applications/MAMP/htdocs/laravel-api/routes/api.php'.
<?php

use Illuminate\Http\Request;

// Get list of Products
Route::get('products','ProductController@index');

// Get specific Product
Route::get('product/{id}','ProductController@show');

// Delete a Product
Route::delete('product/{id}','ProductController@destroy');

// Update existing Product
Route::put('product/{id}','ProductController@update');

// Create new Product
Route::post('product','ProductController@store');
** Solved 'no access control allow origin header' when testing api calls locally** There was an issue when I started testing locally when all my rest api calls were being blocked with the dreaded 'no access control allow origin header is present on the requested resource' so here is the solution I found. If you are testing via staging then you can skip this bit.
Nếu bạn gặp lỗi ''no access control allow origin header'. Có nghĩa là request tới rest api bị chặn . Để sửa lỗi này có thể làm như sau.
Tạo file sau đây '/Applications/MAMP/htdocs/laravel-api/app/Http/Middleware/Cors.php'.
<?php

namespace App\Http\Middleware;

use Closure;

class Cors {

    /**
     * Handle an incoming request.
     *
     * @param  \Illuminate\Http\Request  $request
     * @param  \Closure  $next
     * @return mixed
     */
    public function handle($request, Closure $next) {

        return $next($request)
          ->header('Access-Control-Allow-Origin', '*')
          ->header('Access-Control-Allow-Methods', 'GET, POST, PUT, DELETE, OPTIONS')
          ->header('Access-Control-Allow-Headers',' Origin, Content-Type, Accept, Authorization, X-Request-With')
          ->header('Access-Control-Allow-Credentials',' true');
    }
}
Mở file ' /Applications/MAMP/htdocs/laravel-api/app/Http/Kernel.php ' add the following '\App\Http\Middleware\Cors::class,'.
protected $middleware = [
        \Illuminate\Foundation\Http\Middleware\CheckForMaintenanceMode::class,
        \Illuminate\Foundation\Http\Middleware\ValidatePostSize::class,
        \App\Http\Middleware\TrimStrings::class,
        \Illuminate\Foundation\Http\Middleware\ConvertEmptyStringsToNull::class,
        \App\Http\Middleware\TrustProxies::class,
        \App\Http\Middleware\Cors::class,//cors added here
    ];
** Call REST api from Angular** Mở file ' /Applications/MAMP/htdocs/angular-web/src/app/app.module.ts ' và thêm code sau;
import { BrowserModule } from '@angular/platform-browser';
import { NgModule } from '@angular/core';
import { ReactiveFormsModule } from "@angular/forms";
import { HttpClientModule } from '@angular/common/http';
import { Observable } from "rxjs/Observable";
import { AppComponent } from './app.component';

@NgModule({
   declarations: [
       AppComponent
   ],
   imports: [
       BrowserModule,
       ReactiveFormsModule,
       HttpClientModule
   ],
   providers: [AppComponent],
   bootstrap: [AppComponent]
})

export class AppModule {
}
Chỉnh sửa file '/Applications/MAMP/htdocs/angular-web/src/app/app.component.ts'.
import { Component, OnInit, Injectable } from '@angular/core';
import { HttpClient } from '@angular/common/http';
import { FormGroup, FormControl, FormArray, NgForm } from '@angular/forms';

@Component({
    selector: 'app-root',
    templateUrl: './app.component.html',
    styleUrls: ['./app.component.css']
})

@Injectable()
export class AppComponent implements OnInit {
    title = 'Angular Laravel CRUD App';

    private productForm: FormGroup;
    product: any;
    products: any;

    constructor(private http: HttpClient) {
        this.getProducts();
    }

    ngOnInit() {
        this.productForm = new FormGroup({
            'sku': new FormControl(),
            'name': new FormControl(),
            'price': new FormControl(),
            'quantity': new FormControl()
        });
    }

    // Add a New Product
    storeProduct(productForm: NgForm) {
        // console.log('Form successful submit.');
        // console.log(productForm.value);

        this.http.post('http://laravel-api.testing/api/product', productForm.value).subscribe(res => {
            this.getProducts();
            productForm.reset();
        }, err => {
            console.log('Error occured');
        });
    }

    getProducts() {
        // console.log('Get Products and Update Table');
        return this.http.get('http://laravel-api.testing/api/products').subscribe(products => {
            this.products = products;
        });
    }

    showProduct(id) {
        console.log('Get Product ' + id);
        return this.http.get('http://laravel-api.testing/api/product/' + id).subscribe(product => {
            this.product = product;
            this.productForm.patchValue({
                id: this.product.id,
                sku: this.product.sku,
                name: this.product.name,
                price: this.product.price,
                quantity: this.product.quantity
            });
        });
    }

    deleteProduct(id) {
        console.log('Delete Product id ' + id);

        this.http.delete('http://laravel-api.testing/api/product/' + id).subscribe(res => {
            console.log('Product Deleted and refresh Table');
            this.getProducts();
        }, err => {
            console.log('Error occured');
        });
    }

    putProduct(id) {
        console.log('Update Product id ' + id);

        this.http.put('http://laravel-api.testing/api/product/' + id, this.productForm.value).subscribe(res => {
            console.log('Product Updated and refresh table');
            this.getProducts();
        }, err => {
            console.log('Error occured');
        });

    }
}
Và bây giờ refresh địa chỉ sau trên trình duyệt và cảm nhận http://angular-web.testing:
ng build --prod
Tôi mong là bài viết này sẽ giúp bạn được một phần nào đó. Có góp ý nào xin hãy comment bên dưới.Thank.
All rights reserved
