Tạo Single Page Application với ReactJS
Bài đăng này đã không được cập nhật trong 4 năm
Để làm một ứng dụng Single Page -SPA thì có nhiều cách triển khai và trong bài viết này tôi sẽ hướng tới cách dùng ReactJS để tạo ra một chương trình như thế. Nếu bạn đã biết qua một chút về ReactJS thì bài viết này có thể hữu ích cho bạn trong quá trình tìm hiểu về ReactJS. Để tạo ra một SPA thì tôi sẽ cần dùng những Module dưới đây :
- ReactJS(component、JSX、rendering)
- React-Router(di chuyển page)
- Redux(quản lý trạng thái)
- MaterialUI(UI component)
- babel(transformer compiler)
- webpack(compile resource file làm 1)
Chuẩn bị môi trường
Editor thì dùng gì cũng được nhưng mà ý kiến cá nhân của tôi recommend VSCode mặc định su bóp JSX.
ESLint thì sẽ check cú pháp trước ki build nên cho vào sẽ ngon hơn.
React Developer Tools là một addon dùng cho dev React trên Chrome.
Tôi sẽ cần dùng yarn để quản lý package.
$ npm install -g yarn
Ứng dụng ReactJS tối thiểu
Để mà rendering DOM bằng ReactJS thì sẽ cần :
- ReactJS
- React DOM
- Babel
Để cho dễ dàng thì sẽ đọc nhưng file trên thông qua CDN.
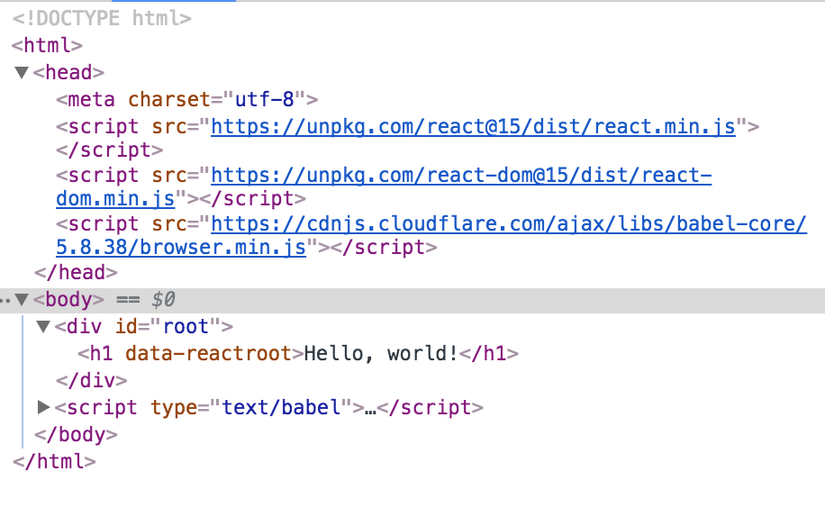
// File index.html
<!DOCTYPE html>
<html>
<head>
  <meta charset="utf-8">
  <script src="https://unpkg.com/react@15/dist/react.min.js"></script>
  <script src="https://unpkg.com/react-dom@15/dist/react-dom.min.js"></script>
  <script src="https://cdnjs.cloudflare.com/ajax/libs/babel-core/5.8.38/browser.min.js"></script>
</head>
<body>
  <div id="root"></div>
  <script type="text/babel">
    ReactDOM.render(
      <h1>Hello, world!</h1>,
      document.getElementById('root')
    )
  </script>
</body>
</html>
Rendering trong thực tế là phần ReactDOM.render, điều mà bạn để ý sẽ thấy là dù ngay trong thẻ script mà lại có thẻ <h1> được viết. Khi mà được chạy thực tế thì nó sẽ được biến đổi thành JS như sau bằng Babel. Và việc viết lẫn lộn DOM kiểu như thế gọi là JSX :
// File compile.js
ReactDOM.render(React.createElement(
    'h1',
    null,
    'Hello, world!'
), document.getElementById('root'));
Ở method React.CreateElement thì DOM sẽ được sinh ra ngay dưới root.
Để mà xác định xem là nó có đang được biến đổi thành dạng compile.js hay không thì tôi sẽ dùng Babel transform compiler của JSX.
// Cài đặt Babel command
yarn global add babel-cli
// Tạo package.json
yarn init -y
// Download JSX transform compiler của Babel
yarn add --dev babel-plugin-transform-react-jsx
Tạo file test.jsx trích ra phần JS bên dưới :
// file test.jsx
ReactDOM.render(
    <h1>Hello, world!</h1>,
    document.getElementById('root')
  )
Bằng command dưới sẽ thực hiện transform compile của Babel trực tiếp đối với test.jsx thì compile.js sẽ được export ra.
$ babel --plugins transform-react-jsx test.js
Tạo component bằng webpack + Babel
Khi mà sử dụng webpack thì ta có thể tổng hợp nhiều files thành một. Và hơn thế khi mà kết hợp với Babel thì ngoài biến đổi JSX thì trên trình duyệt những import mà chưa được thực hiện cũng có thể sử dụng được. Nên có thể gọi được module của file JS từ file JS. Để mà build bằng webpack thì tôi sẽ thêm package
$ yarn add --dev webpack babel-core babel-loader babel-plugin-transform-react-jsx babel-preset-react react react-dom
File package.json sau khi install sẽ như bên dưới ( nếu mà không chỉ định version thì nó sẽ là mới nhất ).
// file package.json
{
  "devDependencies": {
    "babel-core": "^6.26.0",
    "babel-loader": "^7.1.2",
    "babel-plugin-transform-react-jsx": "^6.24.1",
    "babel-preset-react": "^6.24.1",
    "react": "^16.0.0",
    "react-dom": "^16.0.0",
    "webpack": "^3.6.0"
  }
}
Nó sẽ có cấu trúc tree như dưới :
├── App.js
├── index.html
├── index.js
├── node_modules
├── package.json
└── webpack.config.js
Tôi sẽ đi tạo component của React bằng việc kế thừa React.Component.
Bằng method render sẽ trả về DOM.
Tôi có thể import class từ JS bên ngoài bằng export default.
// File App.js
import React from 'react'

export default class App extends React.Component {

    render () {
        return <h1>Hello, world!</h1>
    }

}
Trong index.js tôi sẽ import React compoent đã tạo và rendering DOM.
Bạn để ý sẽ thấy là có thể chỉ định DOM là <App /> trên JSX. Tức là có thể chỉ định React component đã tạo bằng React DOM như là một DOM mới
// file index.js
import React  from 'react'
import ReactDOM from 'react-dom'
import App from './App'

ReactDOM.render(
    <App />,
    document.getElementById('root')
)
Tôi sẽ đổi cách viết index.html để chỉ đọc file bundle.js ( bundle.js là file sẽ được sinh ra sau khi build bằng webpack).
index.html
<!DOCTYPE html>
<html>
<head>
  <meta charset="utf-8">
</head>
<body>
  <div id="root"></div>
  <script type='text/javascript' src="bundle.js" ></script>
</body>
</html>
Để mà build bằng webpack thì tôi cần tạo file setting webpack.config.js :
// file webpack.config.js
module.exports = {
    entry: './index.js', // file jsx của entry point
    output: {
      filename: 'bundle.js' // file sẽ xuất ra
    },
    module: {
      loaders: [{
        test: /\.js?$/, // đuôi mở rộng là js
        exclude: /node_modules/, // loại trừ bên dưới thư mục node_modules
        loader: 'babel-loader', // sử dụng babel-loader
        query: {
          plugins: ["transform-react-jsx"] // sử dụng plugin transform-react-jsx của babel
        }
      }]
    }
  }
Và cuối cùng bằng lệnh dưới thì có thể tổng hợp những file JS liên quan đến index.js để expport ra file bundle.js duy nhất.
$ node_modules/webpack/bin/webpack.js
Hash: 7a16807494494a5823f6
Version: webpack 3.6.0
Time: 6049ms
    Asset    Size  Chunks                    Chunk Names
bundle.js  835 kB       0  [emitted]  [big]  main
  [15] ./index.js 168 bytes {0} [built]
  [32] ./App.js 258 bytes {0} [built]
    + 31 hidden modules
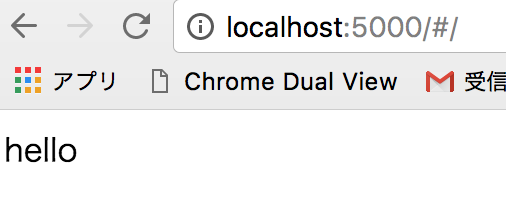
Giờ bạn hãy thử mở file index.html, chắc chắn là sẽ được hiển thị.

Nếu mà đang trong quá trình phát triển để rảnh tay tiện lợi hơn thì lệnh dưới sẽ giúp ta giám sát và tự thực hiện build khi mà có sự thay đổi của file JS được lưu lại.
$ webpack --watch
React cơ bản
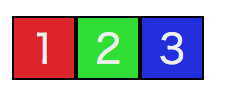
Để mà nhớ rule cơ bản của React tôi sẽ tạo một ứng dụng đơn giản. Tôi sẽ tạo ra compoent box :
 https://images.viblo.asia/0bc1e611-117a-431f-b7a7-070f5fddcde7.png
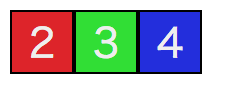
Khi click vào vào mỗi box thì số sẽ tự động count up lên.
Đầu tiên tôi sẽ tạo component của box.
// file Rect.js
import React from 'react'

export default class Rect extends React.Component {

  constructor (props) {
    super(props)
    // state object
    this.state = { number : this.props.num }
  }

  componentWillMount () {
    // giá trị thuộc tính  trong props
    const { num, bgcolor } = this.props

    // CSS style viết thuộc tính bằng camle case
    this.rectStyle = {
      background: bgcolor,
      display: 'table-cell',
      border: '1px #000 solid',
      fontSize: 20,
      width: 30,
      height: 30,
      textAlign: 'center',
      verticalAlign: 'center',
    }

  }

  // count up
  countUp (num) {
    // cập nhật tham số của state object → render method được gọi và vẽ lại
    this.setState({ number : num + 1 })
  }

  render () {

    // trường hợp mà nhiều dòng sẽ bao bọc bởi cặp ()
    // chỉ một DOM trên cùng sẽ trả về
    return (
      <div style={ this.rectStyle } onClick={(e)=> this.countUp(this.state.number)}>
        <span style={{ color : '#eeeeee' }}>{this.state.number}</span>
      </div>
    )
  }
}
Trên App.js sẽ đọc React component và hiển thị ra.
// file App.js
import React from 'react'
import Rect from './Rect'

export default class App extends React.Component {

  render () {
    return (
      <div>
        <Rect num={1} bgcolor='#e02020' />
        <Rect num={2} bgcolor='#20e020' />
        <Rect num={3} bgcolor='#2020e0' />
      </div>
    )
  }
}
Về vòng đời của React component
Bên dưới là bức tranh tổng quát bạn có thể xem ảnh sau :
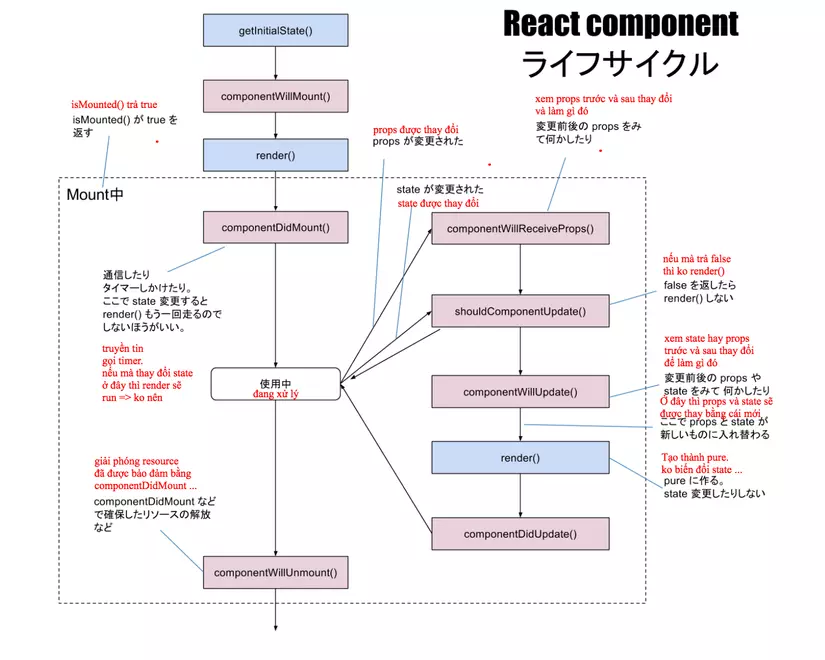
Để mà giải thích các loại method thì tôi sẽ có bài chi tiết sau.
Khi mà bắt đầu và khi giá trị thuộc tính thay đổi thì componentWillMount sẽ được gọi và khi mà được vẽ ra thì render sẽ được gọi là 2 cái hay dùng nhất nên bạn cần nhớ chúng.
Trường hợp mà muốn xem thay đổi của props sau khi truyền tin để làm gì đó thì sẽ sử dụng componentWillReceiveProps method, còn khi mà muốn thao tác trực tiếp DOM thì sẽ thêm event của DOM vào componentDidMount method, rồi xoá event bằng componentWillUnmount method.
Về giá trị thuộc tính
Trong React compoent mới tạo thì có thể đinh nghĩa DOM bình thường và giá trị thuộc tính cùng nhau.
// file App.js
<Rect num={1} bgcolor='#e02020' />
Thuộc tính định nghĩa độc lập sẽ được lưu trong props object và truyền sang cho React component.
// file React.js
componentWillMount () {
    // giá trị thuộc tính được truyền từ props
    const { num, bgcolor } = this.props
Về CSS Style
Khi mà truyền style bên trong JSX thì cần viết bằng camel case, nó sẽ biến đổi cho ta thành CSS bằng babel.
Ví dụ như font-size thì sẽ cần ghi là fontSize.
// file React.js
    // CSS style viết dạng camel case
    this.rectStyle = {
      background: bgcolor,
      display: 'table-cell',
      border: '1px #000 solid',
      fontSize: 20,
      width: 30,
      height: 30,
      textAlign: 'center',
      verticalAlign: 'center',
    }
Có thể viết JS trong {} của JSX. Lần này sẽ truyền style objec của JS.
// file React.js
   <div style={ this.rectStyle } >
Về state của component
Bên trong compoent nếu bạn muốn lưu giữ trạng thái thì sẽ cần định nghĩa object đặc thù là state object. Về tham số bên trong thì có thể đưa vào thoải mái. Lần này tôi sẽ làm để click vào số sẽ được thực hiện count up lên. Và lưu giữ tham số number.
// file React.js
  // state object
  this.state = { number : this.props.num }
Chỗ mà mô tả về Event handling và cập nhật number object là chỗ bên dưới.
Để mà cập nhật tham số của state object trong React thì có method setState được chuẩn bị.
Khi được click thì nó sẽ được gọi và thực hiện cập nhật lại tham số của state object, rồi gọi tới render method để vẽ lại.
// file React.js

  // count up
  countUp (num) {
    // cập nhật tham số của state object → render sẽ được gọi để vẽ lại
    this.setState({ number : num + 1 })
  }

  render () {
     return (
      <div onClick={(e)=> this.countUp(this.state.number)}>
Không được trực tiếp gọi setState bên trong render vì nó gây ra vòng lặp vô hạn render→setState→render.
Redux - control trạng thái
Bằng việc dùng Redux thì ta có thể quản lý đượcc trạng thái tổng thể của ứng dụng,
việc dùng event callback đên cập nhật tham số của store được quản lý rồi phản ánh vẽ lại sẽ rất nhàn hạ.
Redux được thiết kế ra với ý tưởng sau :
- nếu có nhiều store sẽ có thể nảy sinh sự không khớp nhau nên sẽ tách từ component sử dụng trong view lưu vào một store.
- để mà cập nhật store sẽ tiến hành bởi action đã được định trước
- Reducer tiến hành thay đổi state cho thành hàm đơn giản (Pure)
Để mà cho React và Redux cùng nhau hoạt động thì sẽ sử dụng package npm của react-redux nhưng sẽ có nhiều cách viết của connect.
Tôi sẽ thử pattern connect về react-redux kết nối React và Redux, dùng decorators. Bằng lênh dưới là có thể install package liên quan Redux
$ yarn add --dev babel-plugin-transform-decorators-legacy redux redux-devtools redux-thunk react-redux react-router-redux
package.json sẽ như bên dưới :
package.json
{
  "name": "meetdep",
  "version": "1.0.0",
  "description": "",
  "main": "test.js",
  "scripts": {
    "test": "echo \"Error: no test specified\" && exit 1"
  },
  "keywords": [],
  "author": "",
  "license": "ISC",
  "devDependencies": {
    "axios": "^0.16.2",
    "babel-core": "^6.26.0",
    "babel-loader": "^7.1.2",
    "babel-plugin-transform-decorators-legacy": "^1.3.4",
    "babel-plugin-transform-react-jsx": "^6.24.1",
    "babel-preset-react": "^6.24.1",
    "react": "^16.0.0",
    "react-dom": "^16.0.0",
    "react-router-dom": "^4.2.2",
    "redux": "^3.7.2",
    "redux-devtools": "^3.4.0",
    "redux-thunk": "^2.2.0",
    "react-redux": "^5.0.6",
    "react-router-redux": "^4.0.8",
    "webpack": "^3.6.0"
  },
  "dependencies": {}
}
Vì sẽ sử dụng cú pháp của decorator nên tôi sẽ thêm plugin babel-plugin-transform-decorators-legacy vào webpack.config.js.
// file webpack.config.js
module.exports = {
    entry: './index.js', // file jsx entry point
    output: {
      filename: 'bundle.js' // file xuất ra
    },
    module: {
      loaders: [{
        test: /\.js?$/, // đuôi là js
        exclude: /node_modules/, // loại trừ thư mục node_modules
        loader: 'babel-loader', // sử dụng babel-loader
        query: {
          plugins: ["transform-react-jsx","babel-plugin-transform-decorators-legacy"] // dùng transform-react-jsx của babel biến đổi jsx
        }
      }]
    }
  }
Tôi sẽ viết lại index.js :
// file index.js
import React  from 'react'
import ReactDOM from 'react-dom'
// thêm applyMiddleware
import { createStore, applyMiddleware } from 'redux'
// thêm Provider component của react-redux
import { Provider } from 'react-redux'
import App from './App'
// đọc reducer
import reducer from './reducer'

// tạo store
const store = createStore(reducer)

// Nếu bọc bằng thẻ Provider thì có thể sử dụng store trong App
ReactDOM.render(
    <Provider store={store}>
      <App />
    </Provider>,
    document.getElementById('root')
)
Tôi sẽ cần viết reducer để đọc vào reducer.js
// file reducer.js
import { combineReducers } from 'redux'
// reducer lấy comment
import comment from './comment'

// thêm reducer đã tạo vào object
// Bằng combineReducers sẽ được tổng hợp lại làm 1
export default combineReducers({
  comment
})
Rồi tôi cũng cần tạo reducer dùng cho comment, viết vào comment.js :
// file comment.js
// định nghĩa tên actione sẽ nhận lấy bằng reducer
const LOAD = 'comment/LOAD'

// object khởi tạo
const initialState = {
  comments: null,
}

// định nghĩa của reducer(khi mà dispatch sẽ được callback)
export default function reducer(state = initialState, action = {}){
  // tuỳ theo loại action sẽ cập nhật state
  switch (action.type) {
    case LOAD:
      return {
        comments:action.comments,
      }
    default:
      // mặc định khi khởi tạo sẽ rơi vào đây(object của initialState sẽ được trả về)
      return state
  }
}

// định nghĩa của  action
export function load() {
  const comments = 'hello'
  // trả về loại action và state cập nhật (được dispatch)
  return { type: LOAD, comments }
}
Khi mà kick action của comment bằng App.js thì sẽ tiến hành cập nhật state qua reducer.
// file App.js
import React from 'react'
import { connect } from 'react-redux';
// lấy ra action của reducer comment
import { load } from './comment'

// connectのdecorator
@connect(
  state => ({
    // trả về kết quả đã nhận bằng reducer vào props
    comments: state.comment.comments
  }),
  // chỉ định action
  { load }
)
export default class App extends React.Component {

  componentWillMount() {
    // kick action của comment
    this.props.load()
  }

  render () {
    // state đã lất được bằng connect sẽ ở trong props
    const { comments } = this.props
    // lând đầu null được trả về, sau khi xử lý thì kết quả sẽ được trả về
    console.log(comments)
    return (
      <div>{comments}</div>
    )
  }
}
Và kết quả sẽ như bên dưới :
Thực hiện action bất đồng bộ
Tôi sẽ làm để action được bất đồng bộ, khi mà sử dụng react-redux thực tế thì tôi nghĩ nó sẽ xoay quanh truyền tin và di chuyển màn hình. Còn nếu sử dụng redux-thunk thì có thể xử lý action một cách bất động bộ.
Tôi cần cài đặt thư viện dùng cho việc truyền tin là axios.
$ yarn add --dev axios
/// file index.js
import React  from 'react'
import ReactDOM from 'react-dom'
import { createStore, applyMiddleware } from 'redux'
import { Provider } from 'react-redux'
import client from 'axios'
import thunk from 'redux-thunk'

import App from './App'
import reducer from './reducer'

// thêm axios vào đối số của thunk
const thunkWithClient = thunk.withExtraArgument(client)
// áp dụng redux-thunk vào middleware
const store = createStore(reducer, applyMiddleware(thunkWithClient))

ReactDOM.render(
    <Provider store={store}>
      <App />
    </Provider>,
    document.getElementById('root')
)
Tôi sẽ đi sửa lại file reducer.js, lần này sẽ là tạo reducer dùng cho user.
// file reducer.js
import { combineReducers } from 'redux'

import user from './user'

export default combineReducers({
  user,
})
Tôi sẽ tạo reducer lấy thông tin user đã sinh ra bởi Random User Generator bằng API trong user.js.
// file user.js
const LOAD = 'user/LOAD'

const initialState = {
  users: null,
}

export default function reducer(state = initialState, action = {}){
  switch (action.type) {
    case LOAD:
      return {
        users:action.results,
      }
    default:
      return state
  }
}

export function load() {
  // client là tham số client đã gán của axios
  // có thể viết xử lý bất đồng bộ bằng dạng Promise
  return (dispatch, getState, client) => {
    return client
      .get('https://randomuser.me/api/')
      .then(res => res.data)
      .then(data => {
        const results = data.results
        // dispatch và gọi reducer
        dispatch({ type: LOAD, results })
      })
  }
}
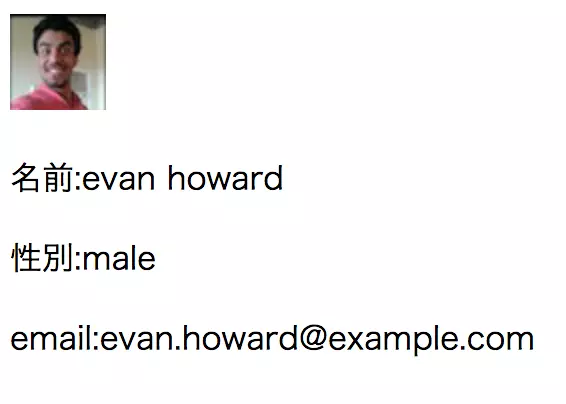
Hiển thị thông tin user đã lấy được :
// file App.js
import React from 'react'
import { connect } from 'react-redux';
import { load } from './user'

@connect(
  state => ({
    users: state.user.users
  }),
  { load }
)
export default class App extends React.Component {

  componentWillMount() {
    this.props.load()
  }

  render () {
    const { users } = this.props
    return (
      <div>
          {/* triển khai bằng map do được trả về dạng mảng */}
          {users && users.map((user) => {
            return (
                // trong vòng lặp sẽ gắn key unique vào(ReactJS quy định)
                <div key={user.email}>
                  <img src={user.picture.thumbnail} />
                  <p>名前:{user.name.first + ' ' + user.name.last}</p>
                  <p>性別:{user.gender}</p>
                  <p>email:{user.email}</p>
                </div>
            )
          })}
      </div>
    )
  }
}
Và tôi có được kết quả như thế này :
Tạo màn hình bằng Material-UI
Đây là design format do Google đề xướng, một phong cách kiểu hướng flat design.Bạn có thể tham khảo thêm tại Material Design. Với ReactJS thì nó có thư viện Material-UI theo Material Design.
$ yarn add --dev material-ui@next material-ui-icons
package.json sẽ thay đổi :
package.json
{
  "name": "meetdep",
  "version": "1.0.0",
  "description": "",
  "main": "test.js",
  "scripts": {
    "test": "echo \"Error: no test specified\" && exit 1"
  },
  "keywords": [],
  "author": "",
  "license": "ISC",
  "devDependencies": {
    "axios": "^0.16.2",
    "babel-core": "^6.26.0",
    "babel-loader": "^7.1.2",
    "babel-plugin-transform-decorators-legacy": "^1.3.4",
    "babel-plugin-transform-react-jsx": "^6.24.1",
    "babel-preset-react": "^6.24.1",
    "material-ui": "^1.0.0-beta.16",
    "material-ui-icons": "^1.0.0-beta.15",
    "react": "^16.0.0",
    "react-dom": "^16.0.0",
    "react-redux": "^5.0.6",
    "redux": "^3.7.2",
    "redux-devtools": "^3.4.0",
    "redux-thunk": "^2.2.0",
    "webpack": "^3.6.0"
  },
  "dependencies": {}
}
Tôi sẽ sửa lại để App.js đã lấy thông tin user bằng material-ui.
// file App.js
import React from 'react'
import { connect } from 'react-redux'
import { load } from './user'

import { withStyles } from 'material-ui/styles'
import { AppBar,Toolbar, Avatar, Card, CardContent, Button, Dialog, DialogTitle, DialogContent } from 'material-ui'
import Typography from 'material-ui/Typography'
import { Email } from 'material-ui-icons'

@connect(
  state => ({
    users: state.user.users
  }),
  { load }
)
export default class App extends React.Component {

  constructor (props) {
    super(props)
    this.state = {
      open:false,
      user:null,
    }
  }

  componentWillMount () {
    this.props.load()
  }

  handleClickOpen (user) {
    this.setState({
      open: true,
      user: user,
    })
  }

  handleRequestClose () {
    this.setState({ open: false })
  };

  render () {
    const { users } = this.props
    return (
      <div>
        <AppBar position="static" color="primary">
          <Toolbar>
            <Typography type="title" color="inherit">
              タイトル
            </Typography>
          </Toolbar>
        </AppBar>
          {/* dùng map vì dạng mảng */}
          {users && users.map((user) => {
            return (
                <Card key={user.email} style={{marginTop:'10px'}}>
                  <CardContent style={{color:'#408040'}}>
                    <Avatar src={user.picture.thumbnail} />
                    <p style={{margin:10}}>{'名前:' + user.name.first + ' ' + user.name.last} </p>
                    <p style={{margin:10}}>{'性別:' + (user.gender == 'male' ? '男性' : '女性')}</p>
                    <div style={{textAlign: 'right'}} >
                      <Button onClick={() => this.handleClickOpen(user)}><Email/>メールする</Button>
                    </div>
                  </CardContent>
                </Card>
            )
          })}
          {
            this.state.open &&
            <Dialog open={this.state.open} onRequestClose={() => this.handleRequestClose()}>
              <DialogTitle>メールアドレス</DialogTitle>
              <DialogContent>{this.state.user.email}</DialogContent>
            </Dialog>
          }
      </div>
    )
  }
}
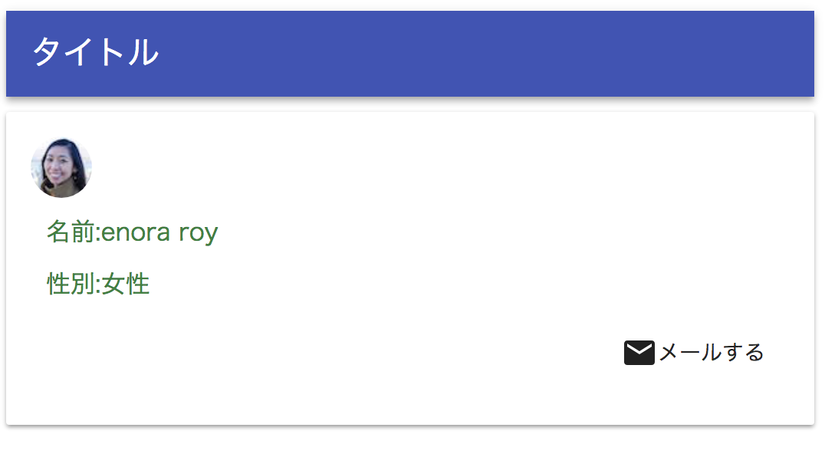
kết quả có vẻ đã ok hơn nhiều :
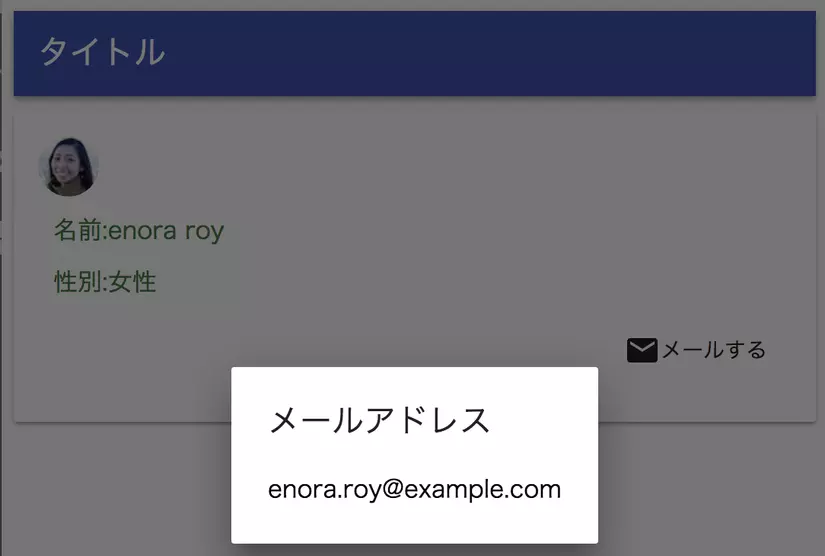
Nếu như click vào メールする thì diaglog sẽ hiển thị ra :
Về các component của Material-UI thì bạn có thể xem demo các loại component trong Material-UI của Components Demo sẽ dễ hiểu hơn. Còn về các icon của Material UI thì bạn có thể sử dụng Material Icons.
Như bạn thấy thì lần này tôi có sử dụng icon mail nên nó có tên là email, và bằng cách sau thì tôi đã có thể dùng nó bằng cách viết hoa chữ cái đầu tiên :
// file App.js
import { Email } from 'material-ui-icons'
Tự động load browser khi thay đổi bằng Webpack Dev Server và React Hot Loader
Khi mà có sự thay đổi source code bạn sẽ được build bằng webpack --watch nhưng nếu tiến hành thiết lập Webpack Dev Server và React Hot Loader thì mỗi khi có thay đổi source code webpack được build lại thì sau khi xog chúng sẽ tự động load browser cho bạn.
$ yarn add --dev webpack-dev-server react-hot-loader
Thêm thiết lập react-hot-loader vào webpack.config.js :
// file webpack.config.js
const config = require('config')
const webpack = require('webpack')

module.exports = {
  devtool: 'inline-source-map', // thêm source map file
  entry: [
    'babel-polyfill',
    'react-hot-loader/patch',
    __dirname + '/client/index',
  ],
  // thiết lập của debug server dùng cho React Hot Loader (webpack-dev-server)
  devServer: {
    contentBase: __dirname + '/client/static', // nơi lưu giữ index.html
    inline: true, // bật mode reload khi thay đổi source
    hot: true, // bật mode HMR(Hot Module Reload)
    port: config.port + 1, // port
    // chống lỗi CORS(vì host debug khác)
    proxy: {
      // path cho phép CORS và server
      '/api/**': {
        target: 'http://localhost:' + config.port,
        secure: false,
        changeOrigin: true
      }
    }
  },
  output: {
    publicPath: '/', // nếu mà ko phải là root thì HMR ko hoạt động
    filename: 'bundle.js'
  },
  plugins: [
    new webpack.NamedModulesPlugin(), // sử dụng plugin disable thay đổi tên
    new webpack.HotModuleReplacementPlugin() // sử dụng plugin HMR(Hot Module Reload)
  ],
  module: {
    rules: [{
      test: /\.js?$/,
      exclude: /node_modules/,
      include: __dirname + '/client',// file JS bên dưới thư mục client sẽ là đối tượng include
      use: {
        loader: 'babel-loader',
        options: {
          plugins: ["transform-react-jsx","babel-plugin-transform-decorators-legacy","react-hot-loader/babel"]
        }
      }
    }]
  }
}
Thêm thiết lập React Hot Loader của vào index.js.
Tôi sẽ wrap tổng thể component lại bằng AppContainer và thêm xử lý của module.hot.
/// file index.js
import React  from 'react'
import ReactDOM from 'react-dom'
import { createStore, applyMiddleware } from 'redux'
import { Provider } from 'react-redux'
import client from 'axios'
import thunk from 'redux-thunk'
import { AppContainer } from 'react-hot-loader'

import App from './App'
import reducer from './reducer'

const thunkWithClient = thunk.withExtraArgument(client)
const store = createStore(reducer, applyMiddleware(thunkWithClient))

const render = Component => {
  ReactDOM.render(
    <AppContainer warnings={false}>
      <Provider store={store}>
        <Component />
      </Provider>
    </AppContainer>,
    document.getElementById('root'),
  )
}

render(App)

// Webpack Hot Module Replacement API
if (module.hot) {
  module.hot.accept('./App', () => { render(App) })
}
Khởi động bằng lệnh là xong :
$ webpack-dev-server
Di chuyển trang bằng React Router Redux
Thực tế thì cái này có chức năng switch hiển thị/không hiển thị rendering của ReactComponent của path chỉ định.
Và nếu dùng React Router Redux thì có thể quản lý được việc di chuyển trang qua history object.
Tôi dùng lệnh dưới để thực hiện cài đặt react-router-dom, react-router-redux và history nhưng do React Router sẽ có sự khác nhau giữa các version nên tôi sử dụng v4.
$ yarn add --dev react-router-dom@4.2.2 history react-router-redux@next
vì sẽ đọc path của import từ tương đối sang tuyệt đối nên tôi sẽ chỉ định resolve trong webpack.config.json sẽ tiện lợi hơn.
Ngoài ra thì tôi sẽ cho historyApiFallback là true. Sau đó là xử lý khi mà browser reload.
webpack.config.js
  // sẽ đọc path của import từ tương đối sang tuyệt đối nên tôi sẽ chỉ định resolve
  resolve: {
    modules: ['client', 'node_modules'], // folder đối tượng
    extensions: ['.js', '.json'] // file đối tượng
  },
  devServer: {
    historyApiFallback: true, // khi mà history API trả về 404 sẽ cho về index.html
Tạo history object trong index.js, mapping vào store của redux truyền đối tượng history vào props của Compoent.
// file index.js
import React  from 'react'
import ReactDOM from 'react-dom'
import createHistory from 'history/createBrowserHistory'
import { createStore, applyMiddleware } from 'redux'
import { Provider } from 'react-redux'
import client from 'axios'
import thunk from 'redux-thunk'
import { AppContainer } from 'react-hot-loader'
import { routerMiddleware } from 'react-router-redux'

import App from './App'
import reducer from './reducer/reducer'

// tạo storage dùng cho việc lưuu giữ lịch sử trình duyệt
const history = createHistory()
const thunkWithClient = thunk.withExtraArgument(client)
const store = createStore(reducer, applyMiddleware(routerMiddleware(history),thunkWithClient))

const render = Component => {
  ReactDOM.render(
    <AppContainer warnings={false}>
      <Provider store={store}>
        <Component history={history} />
      </Provider>
    </AppContainer>,
    document.getElementById('root'),
  )
}

render(App)

// Webpack Hot Module Replacement API
if (module.hot) {
  module.hot.accept('./App', () => { render(App) })
}
Tôi sẽ thêm routerReducer vào reducer.js.
// file reducer.js
import { combineReducers } from 'redux'
import { routerReducer } from 'react-router-redux'

import user from 'reducer/user'

export default combineReducers({
  routing: routerReducer,
  user
})
Chỉ định routing treong App.js. Lần này sẽ là tạo :
- Trang user
- Trang TODO
- Trang NotFound
Dù là trang nào thì cũng sẽ cho dùng được history object nên tôi sẽ truyền history vào props của Router component.
// file App.js
import React from 'react'
import { ConnectedRouter as Router } from 'react-router-redux'
import { Route, Redirect, Switch } from 'react-router-dom'

// lưu dưới thư mục client/components
// có thể đọc patch tuyệt đối do đã resolve trong webpack.config.js
import NotFound from 'components/NotFound'
import UserPage from 'components/UserPage'
import TodoPage from 'components/TodoPage'

export default class App extends React.Component {
  render() {
    const { history } = this.props
    return (
      <Router history={history}>
        <Route component={AppRoute} />
      </Router>
    )
  }
}

const AppRoute = (props) => (
  <Switch>
    <Route exact path="/" component={UserPage} />
    <Route path="/todo" component={TodoPage} />
    {/* ngoài các trang trên ra */}
    <Route component={NotFound} />
  </Switch>
)
Tôi sẽ thực hiện routing path của đối tượng bằng Switch component.
exact là chỉ định path phải match hoàn toàn. nếu mà ko có nó thì /todo cũng có thể bị rendering thành UserPage.
Nếu ngoài / và /todo ra thì sẽ cho path chưa chỉ định của NotFound.js được gọi.
// file NotFound.js
import React from 'react'

export default class NotFound extends React.Component {
  render() {
    return  <div>NotFound</div>
  }
}
UserPage.js thì ko khác mấy chỉ là cho thêm method để di chuyển đến trang Todo list vào header.
// file UserPage.js
import React from 'react'
import { connect } from 'react-redux';
import { load } from 'reducer/user'

import { withStyles } from 'material-ui/styles'
import { AppBar,Toolbar, Avatar, Card, CardContent, Button, Dialog, DialogTitle, DialogContent } from 'material-ui'
import Typography from 'material-ui/Typography'
import { Email } from 'material-ui-icons'


// connectのdecorator
@connect(
  // state của reducer sẽ nhận trong props
  state => ({
    users: state.user.users
  }),
  // actions gắn trong props
  { load }
)
export default class UserPage extends React.Component {

  constructor (props) {
    super(props)
    this.state = {
      open:false,
      user:null,
    }
  }

  componentWillMount() {
    this.props.load()
  }

  handleClickOpen (user) {
    this.setState({
      open: true,
      user: user,
    })
  }

  handleRequestClose () {
    this.setState({ open: false })
  }

  handlePageMove(path) {
    this.props.history.push(path)
  }

  render () {
    const { users } = this.props
    // console.log(users)
    return (
      <div>
          <AppBar position="static" color="primary">
            <Toolbar>
              <Typography type="title" color="inherit">
                ユーザページ
              </Typography>
              <Button style={{color:'#fff',position:'absolute',top:15,right:0}} onClick={()=> this.handlePageMove('/todo')}>TODOページへ</Button>
            </Toolbar>
          </AppBar>
          {users && users.map((obj) => {
            const user = obj.results[0]
            return (
                <Card key={user.email} style={{marginTop:'10px'}}>
                  <CardContent style={{color:'#408040'}}>
                    <Avatar src={user.picture.thumbnail} />
                    <p style={{margin:10}}>{'名前:' + user.name.first + ' ' + user.name.last} </p>
                    <p style={{margin:10}}>{'性別:' + (user.gender == 'male' ? '男性' : '女性')}</p>
                    <div style={{textAlign: 'right'}} >
                      <Button onClick={() => this.handleClickOpen(user)}><Email/>メールする</Button>
                    </div>
                  </CardContent>
                </Card>
            )
          })}
          {
            this.state.open &&
            <Dialog open={this.state.open} onRequestClose={() => this.handleRequestClose()}>
              <DialogTitle>メールアドレス</DialogTitle>
              <DialogContent>{this.state.user.email}</DialogContent>
            </Dialog>
          }
      </div>
    )
  }
}
Giờ đã có thể di chuyển trang bằng push method của history object. Và lịch sử di chuyển cũng được quản lý bằng history object nên việc back trình duyệt cũng ok.
handlePageMove(path) {
  this.props.history.push(path)
}
Như bạn thấy là có link back về trang user trên header.
// file TodoPage.js
import React from 'react'
import { connect } from 'react-redux';
import { load, add } from 'reducer/user'

import { withStyles } from 'material-ui/styles'
import { AppBar,Toolbar, Avatar, Card, CardContent, Button, Dialog, DialogTitle, DialogContent } from 'material-ui'
import Typography from 'material-ui/Typography'
import { Email } from 'material-ui-icons'


export default class TodoPage extends React.Component {

  handlePageMove(path) {
    this.props.history.push(path)
  }

  render () {
    const { todos } = this.props

    return (
      <div>
          <AppBar position="static" color="primary">
            <Toolbar>
              <Typography type="title" color="inherit">
                TODOページ
              </Typography>
              <Button style={{color:'#fff',position:'absolute',top:15,right:0}} onClick={()=> this.handlePageMove('/')}>ユーザページへ</Button>
            </Toolbar>
          </AppBar>
      </div>
    )
  }
}
Trang user

Trang TODO

ReduxForm - validate và thực hiện post
Nếu mà sử dụng ReduxForm thì có thể thực hiện validate form rồi post lên ngon lành.
$ yarn add --dev redux-form
Tôi sẽ cần thêm reducer của ReduxForm vào reducer.js.
// file reducer.js
import { combineReducers } from 'redux'
import { routerReducer } from 'react-router-redux'
import { reducer as formReducer } from 'redux-form' // as dùng để ko trùng tên khi mà import, đưa nó sag tên khác

import user from 'reducer/user'

export default combineReducers({
  routing: routerReducer,
  form: formReducer, // thêm
  user
})
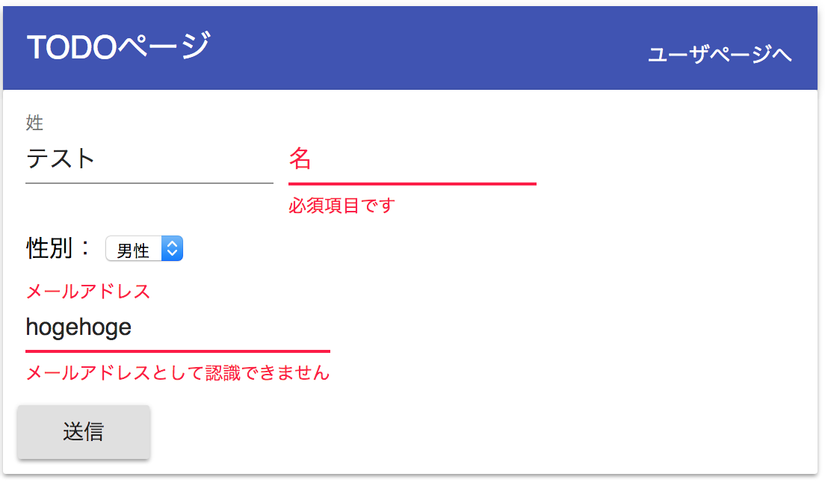
Rồi đi tạo form trong TodoPage.js bằng ReduxForm. Nó cũng sẽ thực hiện check validate khi mà có thay đổi input bằng @reduxForm.
Item của đối tượng sẽ gửi sẽ định nghĩa bằng Field component. Và chỉ định DOM đối tượng trong component.
lần này tôi có sử dụng TextField compoent và select tag của Material-ui.
Khi mà submit sẽ chỉ định method sendItems trong handleSubmit.
// file TodoPage.js
import React from 'react'

import { withStyles } from 'material-ui/styles'
import { AppBar,Toolbar, Avatar, Card, CardContent, Button, TextField } from 'material-ui'
import Typography from 'material-ui/Typography'
import { Email } from 'material-ui-icons'
import { Field, reduxForm } from 'redux-form'
import { error } from 'util';

const FormTextField = ({
  input,
  label,
  type,
  meta: { touched, error, warning }
}) => {
  const isError = !!(touched && error)
  return (
    <TextField style={{margin:5}} error={isError} label={label} helperText={isError ? error : null} {...input} type={type} />
  )
}

@reduxForm({
  form: 'syncValidation',
  validate: values => {

    // khi thay đổi tham số sẽ được trả về cho
    const errors = {}
    if (!values.firstname) {
      errors.firstname = '必須項目です'
    }
    if (!values.lastname) {
      errors.lastname = '必須項目です'
    }
    if (!values.email) {
      errors.email = '必須項目です'
    } else if (!/^[A-Z0-9._%+-]+@[A-Z0-9.-]+\.[A-Z]{2,4}$/i.test(values.email)) {
      errors.email = 'メールアドレスとして認識できません'
    }

    return errors
  }
})
export default class TodoPage extends React.Component {

  constructor(props) {
    super(props)
    this.sendItems = this.sendItems.bind(this) // sẽ bind để có thể dung this trong method sendItems
  }

  handlePageMove(path) {
    this.props.history.push(path)
  }

  sendItems(values) {
    const user = {
      firstname: values.firstname,
      lastname: values.lastname,
      gender: values.gender || 'male',
      email: values.email
    }
    // gửi xử lý redux-connect chẳng hạn
    //this.props.add(user).then( () => alert('送信完了'))
  }

  render () {
    const { handleSubmit, submitting } = this.props

    return (
      <div>
        <AppBar position="static" color="primary">
          <Toolbar>
            <Typography type="title" color="inherit">
              TODOページ
            </Typography>
            <Button style={{color:'#fff',position:'absolute',top:15,right:0}} onClick={()=> this.handlePageMove('/')}>ユーザページへ</Button>
          </Toolbar>
        </AppBar>
        <Card style={{padding:10}}>
          <form onSubmit={handleSubmit(this.sendItems)}>
            <Field name="firstname" type="text" component={FormTextField} label="姓" />
            <Field name="lastname" type="text" component={FormTextField} label="名" />
            <div style={{margin:5}}>
              <label style={{marginRight: 5}}>性別:</label>
              <span>
                <Field name="gender" component="select">
                  <option value="male">男性</option>
                  <option value="female">女性</option>
                </Field>
              </span>
            </div>
            <Field name="email" type="email" component={FormTextField} label="メールアドレス" />
            <br/>
            <Button style={{marginTop:10}} raised type="submit" disabled={submitting}>送信</Button>
          </form>
        </Card>
      </div>
    )
  }
}
Preview sẽ như thế này :
Bản release
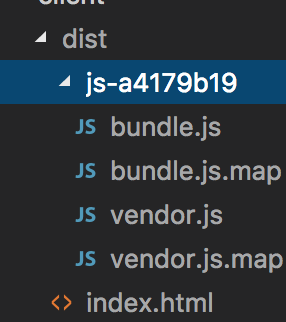
Để release tôi sẽ thay đổi cấu trúc thư mục thành dạng bên dưới. Vì chỉ build cho release bằng Babel chỉ phần client nên cấu trúc lại tổng thể toàn project, client, server vào package.json. Tôi sẽ thực hiện xuất kết quả build của Babel vào thư mục dist, rồi tư local có thể deploy bằng rsync lên AWS EC2. Trong thư mục config lưu giữ file thiết lập dùng chung cho server lẫn client.
├── README.md
├── client
│   ├── dist
│   ├── package.json
│   ├── src
│   │   ├── App.js
│   │   ├── components
│   │   │   ├── NotFound.js
│   │   │   ├── TodoPage.js
│   │   │   └── UserPage.js
│   │   ├── index.js
│   │   ├── reducer
│   │   │   ├── reducer.js
│   │   │   └── user.js
│   │   └── static
│   │       └── index.html
│   ├── webpack.build.js
│   └── webpack.config.js
├── config
│   ├── default.js
│   ├── default-0.js
│   └── production.js
├── package.json
├── script
│   ├── connect.sh
│   ├── deploy.sh
│   └── env.sh
└── server
    ├── package.json
    ├── pm2_prod.json
    └── src
        └── server.js
Bên dưới là file package.json của tổng thể project. Tôi đang tạo dev command dùng cho phát triển dùng cho client và server, còn deploy command dùng cho deploy.
// file package.json
{
  "scripts": {
    "dev:client": "cd client && npm run dev",
    "dev:server": "cd server && npm run dev",
    "dev": "run-p dev:*",
    "build:client": "cd client && npm run build",
    "rsync": "./script/deploy.sh",
    "deploy": "NODE_ENV=production run-s build:* rsync"
  },
  "devDependencies": {
    "npm-run-all": "^4.1.1"
  }
}
Còn đây là package.json phía server. Tôi đã tách package chuyên dùng cho NodeJS server.
// file server/package.json
{
  "scripts": {
    "dev": "NODE_CONFIG_DIR=../config node-dev --inspect src/server.js",
    "prod": "pm2 delete learnReactJS;pm2 start pm2_prod.json"
  },
  "dependencies": {
    "axios": "^0.17.1",
    "body-parser": "^1.18.2",
    "config": "^1.28.1",
    "express": "^4.16.2",
    "nedb": "^1.8.0"
  },
  "devDependencies": {
    "node-dev": "^3.1.3"
  }
}
configフォルダのdefault.jsです。
サーバの起動ポート番号を指定してあります。

config/default.js
module.exports = {
  port: 8080
}
default-0.js dù có trống cũng ok, nó dùng cho lúc khởi động production.
// file config/default-0.js
module.exports = {
}
production.js sẽ override tham số của default.js. Do lần này ko đổi chỉ định port phía public server nên bên trong rỗng cũng ok. Tuần tự các file sẽ được đọc theo default.js > default-0.js > production.js.
// file config/production.js
module.exports = {
}
Còn dưới sẽ là package.json phía client. Về cơ bản thư việc sẽ được install bằng devDependencies.
$ yarn add --dev npm-run-all autoprefixer precss html-webpack-plugin copy-webpack-plugin babel-preset-stage-0 babel-preset-env parallel-webpack
Bằng lệnh build sẽ thực hiện release build. Ở đây tôi đang chỉ định path của thư mục config trong NODE_CONFIG_DIR.
/// file client/package.json
{
  "scripts": {
    "dev": "NODE_CONFIG_DIR=../config webpack-dev-server",
    "rm": "rm -rf dist/*",
    "build-webpack": "NODE_CONFIG_DIR=../config parallel-webpack -p --config webpack.build.js",
    "build": "run-s rm build-webpack"
  },
  "devDependencies": {
    "autoprefixer": "^7.1.6",
    "axios": "^0.17.1",
    "babel-core": "^6.26.0",
    "babel-loader": "^7.1.2",
    "babel-plugin-transform-decorators-legacy": "^1.3.4",
    "babel-plugin-transform-react-jsx": "^6.24.1",
    "babel-polyfill": "^6.26.0",
    "babel-preset-env": "^1.6.1",
    "babel-preset-react": "^6.24.1",
    "babel-preset-stage-0": "^6.24.1",
    "config": "^1.28.1",
    "copy-webpack-plugin": "^4.2.1",
    "history": "^4.7.2",
    "html-webpack-plugin": "^2.30.1",
    "material-ui": "^1.0.0-beta.21",
    "material-ui-icons": "^1.0.0-beta.17",
    "npm-run-all": "^4.1.2",
    "parallel-webpack": "^2.2.0",
    "precss": "^2.0.0",
    "react": "^16.1.1",
    "react-dom": "^16.1.1",
    "react-hot-loader": "^3.1.3",
    "react-redux": "^5.0.6",
    "react-router-dom": "^4.2.2",
    "react-router-redux": "^5.0.0-alpha.8",
    "redux": "^3.7.2",
    "redux-devtools": "^3.4.1",
    "redux-form": "7.1.2",
    "redux-thunk": "^2.2.0",
    "webpack": "^3.8.1",
    "webpack-dev-server": "^2.9.4"
  }
}
Và webpack.config.js tôi đã thêm plugin của HtmlWebpackPlugin và autoprefixer. HtmlWebpackPlugin sẽ tiến hành chủ động đọc thằng bundle.js của index.html. autoprefixer sẽ giúp gán prefix khi build Babel. Và tôi cũng đã thêm lựa chọn env vào trong presets. Đối tượng trình duyệt thì sẽ là 2 bản trước cái mới nhất.
// file webpack.config.js
const config = require('config')
const webpack = require('webpack')
const precss = require('precss')
const autoprefixer = require('autoprefixer')
const path = require('path')
const HtmlWebpackPlugin = require('html-webpack-plugin')

module.exports = {
  devtool: 'inline-source-map', // thêm source map file
  entry: [
    'babel-polyfill',
    'react-hot-loader/patch',
    path.join(__dirname,'/src/index'),
  ],
  resolve: {
    modules: ['src', 'node_modules'], // đói tượng thư mục
    extensions: ['.js', '.json'] // đối tượng file
  },
  devServer: {
    contentBase: path.join(__dirname,'/src/static'),
    historyApiFallback: true,
    inline: true,
    hot: true,
    port: config.port + 1,
    host: '0.0.0.0',

    proxy: {
      '/api/**': {
        target: 'http://localhost:' + config.port,
        secure: false,
        changeOrigin: true
      }
    }
  },
  output: {
    publicPath: '/',
    filename: 'bundle.js'
  },
  plugins: [
    new HtmlWebpackPlugin({
      template: 'src/static/index.html',
      filename: 'index.html'
    }),
    new webpack.HotModuleReplacementPlugin(),
    // dùng plugin autoprefixer
    new webpack.LoaderOptionsPlugin({options: {
      postcss: [precss, autoprefixer({browsers: ['last 2 versions']})]
    }})
  ],
  module: {
    rules: [{
      test: /\.js?$/,
      exclude: /node_modules/,
      include: [path.join(__dirname , '/src')],
      use: {
        loader: 'babel-loader',
        options: {
          // babel build presets
          presets: [
            [
              'env', {
                targets: {
                  browsers: ['last 2 versions', '> 1%']
                },
                modules: false,
                useBuiltIns: true
              }
            ],
            'stage-0',
            'react'
          ],
          // babel transform plugin
          plugins: [
            "babel-plugin-transform-decorators-legacy", // dùng cho decorator
            "react-hot-loader/babel" // dùng cho react-hot-loader
          ]
        }
      }
    }]
  }
}
Xoá đọc của bundle.js khỏi index.html.
// file index.html
<!DOCTYPE html>
<html>
<head>
  <meta charset="utf-8">
  <title>learnReactJS</title>
</head>
<body>
  <div id="root"></div>
  <!-- <script src='bundle.js'></script>-->
</body>
</html>
webpack.build.js khi release build sẽ ghi đè thiết lập của webpack.config.js rồi build. Plugin sẽ thực hiện nén source code rồi đọc biến môi trường.
// webpack.build.js
const webpack = require('webpack')
const webpackConfig = require('./webpack.config.js')
const CopyWebpackPlugin = require('copy-webpack-plugin')
const HtmlWebpackPlugin = require('html-webpack-plugin')

const revision = require('child_process').execSync('git rev-parse HEAD').toString().trim()


const entries = [
  {path: 'src', out: ''},
]

const configs = entries.map(entry => {

  const config = Object.assign({}, webpackConfig)

  delete config.devtool
  config.entry = {
    'bundle': [
      'babel-polyfill',
      `${__dirname}/${entry.path}/index`,
    ]
  }
  // xuất ra  thư mục dist, rename động tên file bundle.js
  config.output = {
    path: `${__dirname}/dist/${entry.out}`,
    filename: 'js-[hash:8]/[name].js',
    chunkFilename: 'js-[hash:8]/[name].js',
    publicPath: `/${entry.out}`,
  }

  config.plugins = [
    // Scope Hoisting
    new webpack.optimize.ModuleConcatenationPlugin(),
    // tổng hợp common module
    new webpack.optimize.CommonsChunkPlugin({
      name: 'vendor',
      filename: 'js-[hash:8]/vendor.js',
      minChunks: (module) => {
        return module.context && module.context.indexOf('node_modules') !== -1
      }
    }),
    // export biến môi trường
    new webpack.DefinePlugin({
      'process.env': {
        'NODE_ENV': JSON.stringify(process.env.NODE_ENV),
        'GIT_REVISION': JSON.stringify(revision),
      },
    }),
    // JS minify
    new webpack.optimize.UglifyJsPlugin({
      sourceMap: true,
      minimize: true,
      compress: {
        drop_debugger: true,
        drop_console: true,
        warnings: false
      }
    }),
    // đưa JS đã sinh ra vào HTML template
    new HtmlWebpackPlugin({
      template: `src/static/${entry.out}index.html`,
      filename: 'index.html',
    }),
  ]

  return config
})

// ghi đè format output của source map
configs[0].devtool = 'source-map'
configs[0].plugins.push(
  // copy các file ngoài index.html từ entry directory vào dist
  new CopyWebpackPlugin([{ from: 'src/static', ignore: 'index.html' }]),
)

module.exports = configs
Thực hiện lệnh sau để release build.
$ npm run build-webpack
Nếu mà thành công thì sau khi hoàn thành release build các file source sẽ có trong thư mục dist và ta sẽ thực hiện deploy nó.
Deploy
Dưới đây là file deploy.sh, nó sẽ thực hiện deploy lên EC2 đã chỉ định trong env.sh.
// file deploy.sh
#!/bin/sh

dir=`echo $(cd $(dirname $0) && pwd)`

source $dir/env.sh

set -eu

# deploy
rsync -av $dir/../config/ ec2-user@$domain:/var/www/learnReactJS/config
rsync --exclude-from $dir/.rsyncignore -av $dir/../client/dist/* ec2-user@$domain:/var/www/learnReactJS/public
rsync -av $dir/../server/ ec2-user@$domain:/var/www/learnReactJS/server
Cấu trúc thư mục bên deploy sẽ như sau :
└── var
    └── www
        └── learnReactJS
            ├── config
            ├── public
            └── server
Chỉ định public IP của đối tượng EC2 tên domain của deploy target đã thiết lập trong A record của Route53.
// file env.sh
#!/bin/sh

ip='{xx.xx.xx.xx}'
domain='{domain}'
Tôi sẽ chỉ định những file loại trừ khi mà chuyển đi ở trong .rsyncignore.
Do là môi trường prodcution nên là source map file sẽ trog số đó.
*.map
*.db
Bên phía EC2 sẽ cần cài pm2 trước. Nó sẽ giúp tiếp tục process của nodeJS.
$ npm install -g pm2
Sau khi deploy thì sẽ khởi động server process bằng pm2.
$ cd /var/www/learnReactJS/server
$ npm run prod
npm run prod là lệnh bên dưới. Nó sẽ xoá process learnReactJS của pm2 đi, tham chiếu đến pm2_prod.json và khởi động process.
$ pm2 delete learnReactJS;pm2 start pm2_prod.json
Còn pm2_prod.json sẽ như dưới. Trong name tôi chỉ định process name khởi động. watch là chỉ định file folder sẽ tái khởi động process khi có sự thay đổi. ignore_watch là ngược lại với watch, nó sẽ bỏ qua những cái được chỉ định. script là file path của đối tượng process sẽ khởi động. Trong env tôi chỉ định biến môi trường.
// file pm2_prod.json
{
  "apps":[
    {
      "name": "learnReactJS",
      "watch":["/var/www/learnReactJS/server/src/**/*"],
      "ignore_watch":["/var/www/learnReactJS/server/user.db"],
      "script": "/var/www/learnReactJS/server/src/server.js",
      "env": {
        "NODE_ENV":"production",
        "NODE_CONFIG_STRICT_MODE": 0,
        "NODE_CONFIG_DIR":"../config"
      }
    }
  ]
}
Bằng lệnh dưới thì có thể xác nhận được trạng thái khởi động và log của pm2 process.
$ pm2 list
$ pm2 log
Vậy là tôi đã trình bày xong việc xây dựng một ứng dụng SPA cơ bản gồm những bước như thế nào và các bước để build và deploy lên EC2. Hy vọng đã giúp ích được cho các bạn mới tìm hiểu về ReactJS.
Nguồn tài liệu : Qiita.com
All rights reserved
