Tạo REST API trên Nodejs với Express và Prisma sử dụng Typescript
Bài đăng này đã không được cập nhật trong 3 năm
Lời mở đầu
Thế giới của lập trình viên web đang hết sức quen thuộc với những "containerized application", hay nói cách khác bây giờ đang là thời đại của microservice, và vì thế mỗi service chúng ta có thể chọn dùng dotNET, java, hay Nodejs tuỳ vào mục đích và nhu cầu của từng service.
Ngoại trừ vợ chính dotNET, mình thi thoảng chơi vợ 2 PHP, hôm nay công việc yêu cầu build 1 Nodejs REST API để làm việc với vài thư viện web3, nên mình build luôn 1 boilerplate Nodejs đơn giản để sẵn sau này đỡ phải dựng lại.
Template này mình sẽ sử dụng Express làm backend framework, thêm vào đó sẽ sử dụng Prisma làm ORM để thao tác với dữ liệu PostgresQL, code bằng Typescript, dùng docker để deploy. Ok, let's get started.
Update: Mình đã up code lên git, các bạn có thể xem output cuối cùng ở đây: express-prisma-typescript-boilerplate
Bắt tay vào dựng Nodejs Service
Setup project
Tạo folder có tên "express-prisma-typescript-boilerplate", dùng vscode mở nó lên, mấy pha tạo folder hay file này mình thấy dùng windows hơi bất tiện, nếu dùng linux thì vài dòng bash là xong rồi, (tham khảo bài viết thiết lập Ubuntu cho dev của mình nhé ).
Đầu tiên mình có vài config cần thêm vào, đó chính là prettier config để format code theo đúng chuẩn, tránh trường hợp conflict code giữa anh em trong team.
Trong folder "express-prisma-typescript-boilerplate", tạo file .prettierrc.json, folder .vscode, trong đó tạo settings.json
Cấu trúc như sau:
├── .vscode
│   └── settings.json
└── .prettierrc.json
Sửa nội dung file settings.json để dùng prettier làm trình formatter mặc định:
{
  "editor.defaultFormatter": "esbenp.prettier-vscode"
}
File .prettierrc.json (Đây là những thứ mình config, các bạn có thể tìm docs và config theo ý mình ở https://prettier.io/)
{
  "trailingComma": "all",
  "tabWidth": 2,
  "semi": true,
  "singleQuote": false
}
Khởi tạo Nodejs project
Tất nhiên rồi, trước khi chúng ta có thể code, thì phải khởi tạo package.json để config info cho project cũng như cho phép chúng ta cài đặt các dependencies. Ở đây mình dùng npm, ai xài yarn có thể chạy lệnh tương tự.
Trong vsCode, mở terminal bằng tổ hợp Ctrl + ~ Chạy command:
npm init
Terminal sẽ nhảy yêu cầu nhập thông tin, ta điền các thông tin phù hợp, các field khác có thể bỏ qua, tuy nhiên hãy để main là "src/index.ts". Đây là file của mình sau khi nhập xong:
{
  "name": "express-prisma-typescript-boilerplate",
  "version": "1.0.0",
  "description": "",
  "main": "src/index.ts",
  "scripts": {
    "test": "echo \"Error: no test specified\" && exit 1"
  },
  "author": "kienmatu",
  "license": "ISC",
  "repository": {
    "type": "git",
    "url": "git+https://github.com/kienmatu/express-prisma-typescript-boilerplate.git"
  }
}
Cài Typescript
Chạy lệnh sau để cài dependency typescript cho project:
npm i typescript
Chạy xong thì bạn sẽ thấy typescript được thêm vào package.json:
//...
"dependencies": {
    "typescript": "^4.6.2"
  }
Khởi tạo tsconfig.json
Chạy command sau để khởi tạo tsconfig.json:
npx tsc --init
(Ở đây mình dùng thêm npx bởi vì chúng ta cài typescript cục bộ, nếu muốn bỏ cái npx mà dùng trực tiếp tsc, bạn cần thêm -g vào command trước đó: npm i -g typescript)
Chạy xong lệnh trên thì chúng ta đã có file tsconfig.json với hầu hết config đều được comment lại, chúng ta để ý option sau:
// "outDir": "./",
Bỏ comment option này và sửa nó thành:
"outDir": "./dist",
dist ở đây là thư mục chứa các file đã được biên dịch sang Javascript, Nodejs sẽ chạy code ở thư mục này. Hiển nhiên rồi, chúng ta code Typescript và sẽ phải biên dịch nó qua JS.
Nếu bạn ghét rườm rà và thích sự tinh gọn, hãy xoá hết các dòng comment trong đó, chúng ta sẽ có file tsconfig như sau:
{
  "compilerOptions": {
    "target": "es2019",
    "module": "commonjs",
    "outDir": "dist",
    "strict": true,
    "esModuleInterop": true,
    "skipLibCheck": true,
    "forceConsistentCasingInFileNames": true
  }
}
Cài thêm các thư viện
Command:
npm i cross-env dotenv express rimraf
Thông tin về các package trên:
- cross-env: Support cross platform.
- dot-env: Giúp chúng ta có thể config environment variable trong file .env và đưa vào process.env và file ts.
- express: Là backend framework như mình đề cập trước đó, hỗ trợ tạo REST API (GET, PUT, POST, PATCH, DELETE).
- rimraf: Thư viện hỗ trợ rm -rf cross-platform để xoá các file trong mục dist khi build lại app. (anh em windows mà xoá file thì đúng là cực hình, dùng em này tiện hehe)
Các package phía trên hầu hết hỗ trợ Typescript, cho nên chúng ta có thể dùng trực tiếp luôn, tuy nhiên có thể 1 số package chúng ta cài vào sẽ không support Typescript, vậy nên chúng ta phải cài thêm:
npm i @types/express @types/node
Development tool dependencies
Yeah, với việc phát triển 1 app nodejs bằng typescript thì chúng ta sẽ cần 1 vài thư viện khác. nodemon để theo dõi (watch) thay đổi trong lúc code và preview, còn concurrently để support việc chạy nhiều command cùng 1 lúc.
npm i --save-dev concurrently nodemon
Lệnh trên chúng ta thêm tag --save-dev, tức là những package trên chỉ xuất hiện trong devDependencies, với mục đích phục vụ cho quá trình development, không ảnh hưởng tới code production.
NPM Scripts
Okay, xong phần dependencies thì chúng ta cũng sẽ cần setup các script cho dự án.
"scripts": {
  "build": "rimraf dist && tsc",
  "predev": "npm run build",
  "dev": "cross-env NODE_ENV=development concurrently \"tsc --watch\" \"nodemon -q dist/index.js\"",
  "prestart": "npm run build",
  "start": "cross-env NODE_ENV=production node dist/index.js",
  "test": "echo \"Error: no test specified\" && exit 1"
},
Yoo, hãy điểm qua 1 lượt các command trên xem chúng sẽ làm gì nào:
-
build sẽ được gọi lại ở vài command khác. Mục đích chính của command này là compile (đóng gói/ biên dịch) app của chúng ta. Lệnh rimraf sẽ xoá hết các file của bản build cũ trong thư mục dist (ở trên chúng ta config thư mục này trong file tsconfig.json).
-
predev sẽ gọi qua command build để clean lại thư mục dist, compile lại project bằng lệnh tsc. Lệnh này sẽ tự động được gọi trước khi command "dev" được gọi (npm run serve / yarn server trên localhost).
-
dev dùng package cross-env để thiết lập NODE_ENV thành development. Bên cạnh đó sử dụng tsc --watch (TypeScript Compiler in “watch mode”), chế độ này sẽ build lại mỗi khi ta sửa code, output trong thư mục dist sẽ được compile lại, nodemon sẽ reload dist/index.js.
-
prestart giống với predev, chuẩn bị output cho production.
-
start lệnh này chạy app lên giống dev, nhưng không có theo dõi thay đổi, môi trường là production.
-
test Chạy unit test, alright, mình nghĩ mình sẽ làm riêng 1 bài về nó sau nếu có thời gian, còn hiện tại có thể bỏ qua.
Yooo, cài xong khá nhiều thứ rồi nhỉ, đây là file package.json của chúng ta sau khi cài mấy thứ trên. Về cơ bản sau khi cài những thứ trên chúng ta có thể bắt đầu code được rồi.
{
  "name": "express-prisma-typescript-boilerplate",
  "version": "1.0.0",
  "description": "",
  "main": "src/index.ts",
  "scripts": {
    "build": "rimraf dist && tsc",
    "predev": "npm run build",
    "dev": "cross-env NODE_ENV=development concurrently \"tsc --watch\" \"nodemon -q dist/index.js\"",
    "prestart": "npm run build",
    "start": "cross-env NODE_ENV=production node dist/index.js",
    "test": "echo \"Error: no test specified\" && exit 1"
  },
  "author": "kienmatu",
  "license": "ISC",
  "repository": {
    "type": "git",
    "url": "git+https://github.com/kienmatu/express-prisma-typescript-boilerplate.git"
  },
  "dependencies": {
    "@types/express": "^4.17.13",
    "@types/node": "^17.0.21",
    "cross-env": "^7.0.3",
    "dotenv": "^16.0.0",
    "express": "^4.17.3",
    "rimraf": "^3.0.2",
    "typescript": "^4.6.2"
  },
  "devDependencies": {
    "concurrently": "^7.0.0",
    "nodemon": "^2.0.15"
  }
}
index.ts
Giờ chúng ta tạo 1 file bên trong /src có tên là index.ts, file này đóng vai trò là cửa ngõ của app, giống như program.cs trong dotnet vậy. (Lúc nãy chúng ta đã config nó trong package.json).
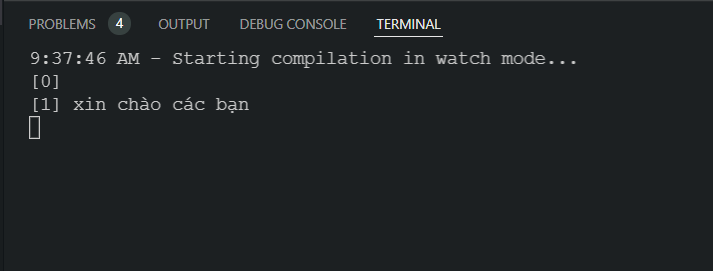
console.log("xin chào các bạn");
Okay, hãy chạy thử nào
npm run dev
Output:
Cài đặt Express
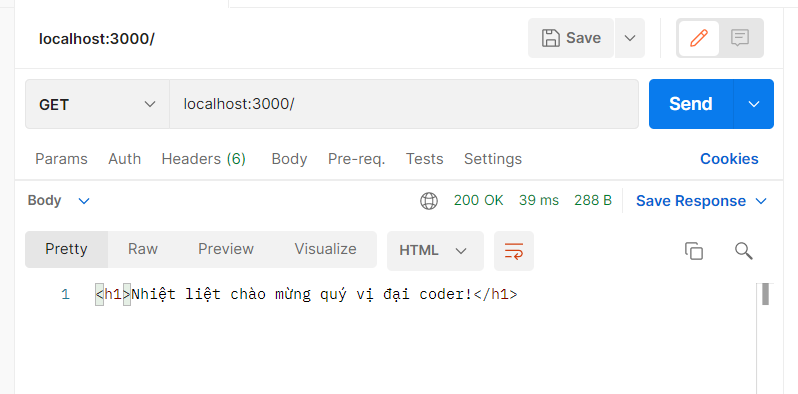
Sửa lại file index.ts như sau để test thử express:
import express, { Express, Request, Response } from "express";
import dotenv from "dotenv";

dotenv.config();

const PORT = process.env.PORT || 3000;
const app: Express = express();

app.use(express.json());

app.get("/", (req: Request, res: Response) => {
  res.send("<h1>Nhiệt liệt chào mừng quý vị đại coder!</h1>");
});

app.listen(PORT, () => console.log(`Running on ${PORT} ⚡`));
-
dotenv.config() sẽ lấy config từ file .env vào process.env
-
PORT ở đây là cổng của app, tạo file .env ngang hàng với src để config, còn code sẽ mặc định port 3000 nếu không thấy config:
PORT=3000 -
app là 1 instance của Express, chúng ta sử dụng middleware express.json() để parse json từ request để app có thể đọc được.
-
app.get() là phương thức đăng ký REST method cho 1 route nào đó, ở đây chúng ta đăng ký cho đường dẫn index và trả về
"<h1>Nhiệt liệt chào mừng quý vị đại coder!</h1>" -
app.listen(): Listen request từ client theo 1 cổng đã được config trước đó.
Chạy lần nữa lệnh npm run dev, rồi mở trình duyệt vào http://localhost:3000, bạn sẽ thấy điều kỳ diệu 
Đây là file dist/index.js, là output của file main.ts được compile theo chuẩn es5 như trong tsconfig.
"use strict";
var __importDefault =
  (this && this.__importDefault) ||
  function (mod) {
    return mod && mod.__esModule ? mod : { default: mod };
  };
Object.defineProperty(exports, "__esModule", { value: true });
var express_1 = __importDefault(require("express"));
var dotenv_1 = __importDefault(require("dotenv"));
dotenv_1.default.config();
var PORT = process.env.PORT || 3000;
var app = (0, express_1.default)();
app.use(express_1.default.json());
app.get("/", function (req, res) {
  res.send("<h1>Nhiệt liệt chào mừng quý vị đại coder!</h1>");
});
app.listen(PORT, function () {
  return console.log("Running on ".concat(PORT, " \u26A1"));
});
Lưu ý: Các bạn có thể đổi target es5 thành chuẩn khác, nhớ check trước availability bằng link này https://kangax.github.io/compat-table/es5/ để chọn chuẩn ECMAScript phù hợp.
Thêm Controllers
MVC là 1 mô hình rất phổ biến để cấu trúc 1 web app, được apply ở nhiều framework như Spring, dotNET core..., 1 thành phần chính của nó là Controller. Chúng ta có thể để logic xử lý request ở trong này, vì sử dụng typescript nên chúng ta sẽ áp dụng vài thứ về OOP.
Tạo tiếp những class sau: src/controllers/abstractions/base-controller.ts:
import * as express from "express";
export abstract class BaseController {
  public router: express.Router;

  constructor() {
    this.router = express.Router();
  }
  public abstract initializeRoutes(): void;
}
src/controllers/hero-controller.ts
import express from "express";
import { BaseController } from "./abstractions/base-controller";

export default class HeroController extends BaseController {
  public path = "/heroes";

  constructor() {
    super();
    this.initializeRoutes();
  }

  public initializeRoutes() {
    this.router.get(this.path, this.getAllHero);
    this.router.post(this.path, this.addHero);
    // Bạn có thể thêm put, patch, delete sau.
  }
  getAllHero = async (request: express.Request, response: express.Response) => {
    response.json(request.body);
  };
  addHero = async (request: express.Request, response: express.Response) => {
    response.json(request.body);
  };
}
Tạo thêm 1 file src/app.ts
import express from "express";
import { BaseController } from "./controllers/abstractions/base-controller";

class App {
  public app: express.Application;
  public port: number | string;

  constructor(controllers: BaseController[], port: number | string) {
    this.app = express();
    this.port = port;

    this.initializeMiddlewares();
    this.initializeControllers(controllers);
  }

  private initializeMiddlewares() {
    this.app.use(express.json());
  }

  private initializeControllers(controllers: BaseController[]) {
    this.app.get("/", (request, response) => {
      response.send("Application is running");
    });
    controllers.forEach((controller) => {
      this.app.use("/", controller.router);
    });
  }

  public listen() {
    this.app.listen(this.port, () => {
      console.log(`App listening on the port ${this.port}`);
    });
  }
}

export default App;
Quay lại index.ts:
import dotenv from "dotenv";
import App from "./app";
import HeroController from "./controllers/hero-controller";

dotenv.config();

const port = process.env.PORT || 3000;
const app = new App([new HeroController()], port);

app.listen();
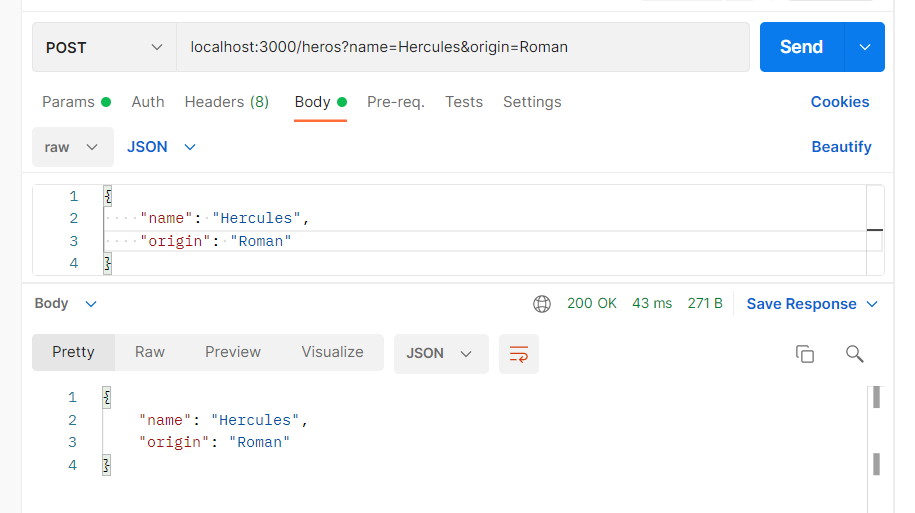
Okay, chạy app lên bằng lệnh npm run dev hoặc yarn dev, test thử method post:
Khởi tạo database bằng docker
Bây giờ chúng ta đã có 1 web api, tuy nhiên vẫn sẽ cần database để lưu/truy xuất thông tin. DB mình chọn là Postgresql, và sử dụng prisma làm ORM.
Tạo file docker-compose.yml ngang hàng với src:
services:
  postgres:
    image: postgres
    container_name: postgres_db_container
    environment:
      - POSTGRES_DB=${POSTGRES_DB:-postgres}
      - POSTGRES_USER=${POSTGRES_USER:-postgres}
      - POSTGRES_PASSWORD=${POSTGRES_PASSWORD:-password1}
    ports:
      - "5432:5432"
    restart: unless-stopped
Ở đây mình đặt các value mặc định, các bạn có thể thay đổi.
Okay, mở command chạy lệnh sau để compose và khởi chạy postgres trên docker.
docker-compose up -d postgres
Khi chạy xong chúng ta chạy lệnh sau để kiểm tra xem container đã chạy chưa (hoặc bạn có thể mở docker desktop lên xem):
docker ps
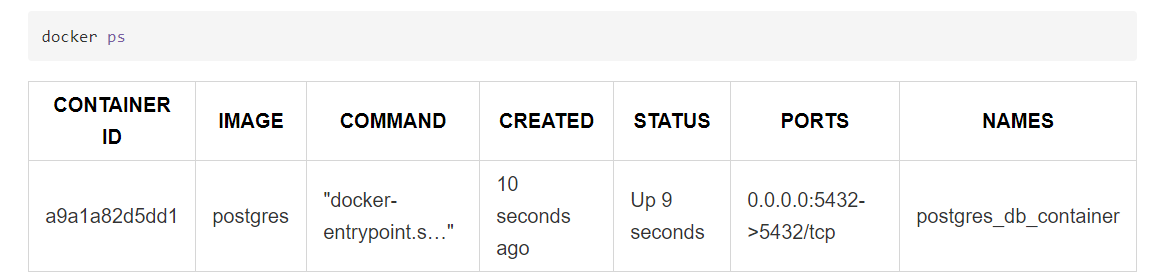
Đã có DB, bây giờ chúng ta sẽ cài đặt prisma và prisma client để làm ORM.
npm install prisma @prisma/client
Cài xong prisma chúng ta sẽ có thể khởi tạo schema prisma.
npx prisma init
1 file mới sẽ xuất hiện dưới đường dẫn prisma/schema.prisma:
// This is your Prisma schema file,
// learn more about it in the docs: https://pris.ly/d/prisma-schema

generator client {
  provider = "prisma-client-js"
}

datasource db {
  provider = "postgresql"
  url      = env("DATABASE_URL")
}
Lệnh init trên cũng sẽ thêm 1 config vào file .env:
PORT=3000

# This was inserted by `prisma init`:

# Environment variables declared in this file are automatically made available to Prisma.

# See the documentation for more detail: https://pris.ly/d/prisma-schema#accessing-environment-variables-from-the-schema

# Prisma supports the native connection string format for PostgreSQL, MySQL, SQLite, SQL Server, MongoDB (Preview) and CockroachDB (Preview).

# See the documentation for all the connection string options: https://pris.ly/d/connection-strings

DATABASE_URL="postgresql://johndoe:randompassword@localhost:5432/mydb?schema=public"
Chúng ta cần sửa lại DATABASE_URL theo như config postgresdb của file docker compose phía trên, xoá đi các comment:
DB_HOST=localhost
DB_PORT=5432
DB_SCHEMA=public
POSTGRES_USER=postgres
POSTGRES_PASSWORD=password1
POSTGRES_DB=hero_db

# See the documentation for all the connection string options: https://pris.ly/d/connection-strings

DATABASE_URL=postgresql://${POSTGRES_USER}:${POSTGRES_PASSWORD}@${DB_HOST}:${DB_PORT}/${POSTGRES_DB}?schema=${DB_SCHEMA}&sslmode=prefer
- Lưu ý to bự: DB_HOST hiện tại là localhost, tuy nhiên ở bước sau chúng ta sẽ cần sửa lại DB_HOST cho trùng với ID của service trong docker-compose (postgres) trong trường hợp chúng ta cần deploy docker container.
Hiện tại đã có DB, việc chúng ta cần làm là khởi tạo 1 DB mới theo file schema bằng lệnh migrate, hoặc sẽ tạo schema từ DB có sẵn, trong trường hợp này chúng ta sẽ tạo DB từ schema.
Sửa lại file schema, thêm vào model:
// This is your Prisma schema file,
// learn more about it in the docs: https://pris.ly/d/prisma-schema

generator client {
  provider = "prisma-client-js"
}

datasource db {
  provider = "postgresql"
  url      = env("DATABASE_URL")
}

model Hero {
  id            Int      @id @default(autoincrement())
  createdAt     DateTime @default(now())
  updatedAt     DateTime @updatedAt
  name          String   @db.VarChar(255)
  origin        String?  @db.VarChar(255)
  description   String?
}
Migrate database:
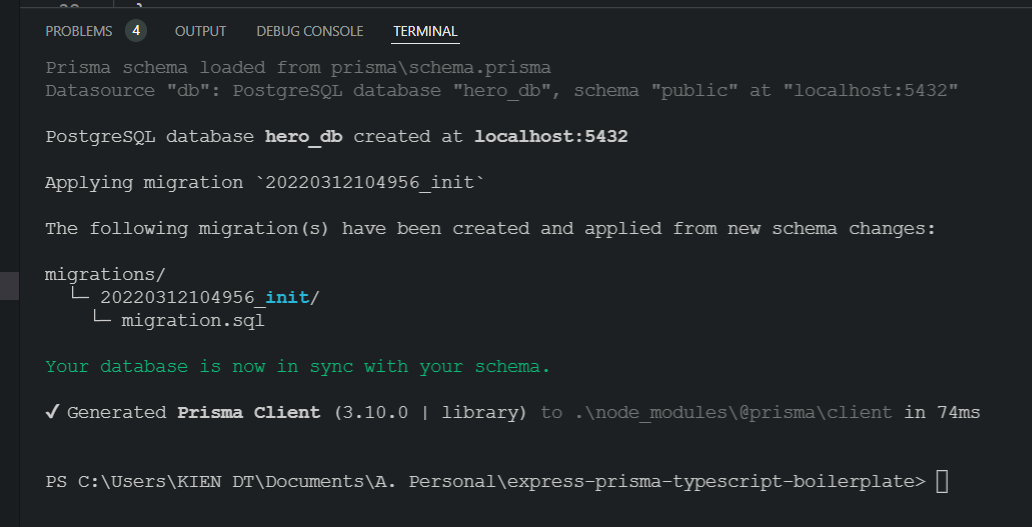
npx prisma migrate dev --name init
Lệnh trên sẽ làm 2 việc:
- Tạo file migration sql theo schema
- Migrate db theo file migration
- Output:
![prisma-init-migration]()
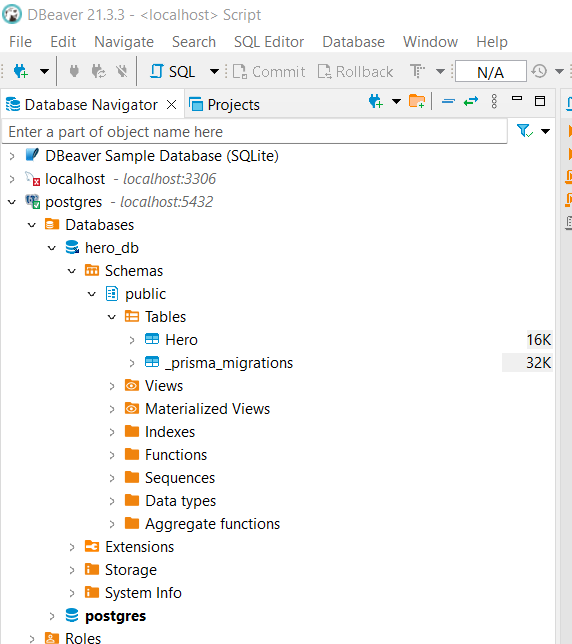
Lúc này nếu bạn dùng trình quản lý db nào đó, chẳng hạn như dbeaver và connect vào thì sẽ thấy db đã xuất hiện:
CRUD cùng Prisma
Cài xong prisma, bây giờ chúng ta đã có đủ nguyên liệu cần thiết cho món chính là xào xáo dữ liệu.
Sửa lại file base-controller.ts để thêm prisma vào:
import { PrismaClient } from "@prisma/client";
import * as express from "express";
export abstract class BaseController {
  public router: express.Router;
  public prisma: PrismaClient;

  constructor() {
    this.prisma = new PrismaClient();
    this.router = express.Router();
  }
  public abstract initializeRoutes(): void;
}
Sửa lại 2 method getAllHero, addHero trong hero-controller.ts:
getAllHero = async (request: express.Request, response: express.Response) => {
  const heroes = await this.prisma.hero.findMany();
  response.json(heroes);
};

addHero = async (request: express.Request, response: express.Response) => {
  const reqBody = request.body;
  const hero = await this.prisma.hero.create({
    data: {
      name: reqBody.name,
      origin: reqBody.origin,
      description: reqBody.description,
    },
  });
  response.json(hero);
};
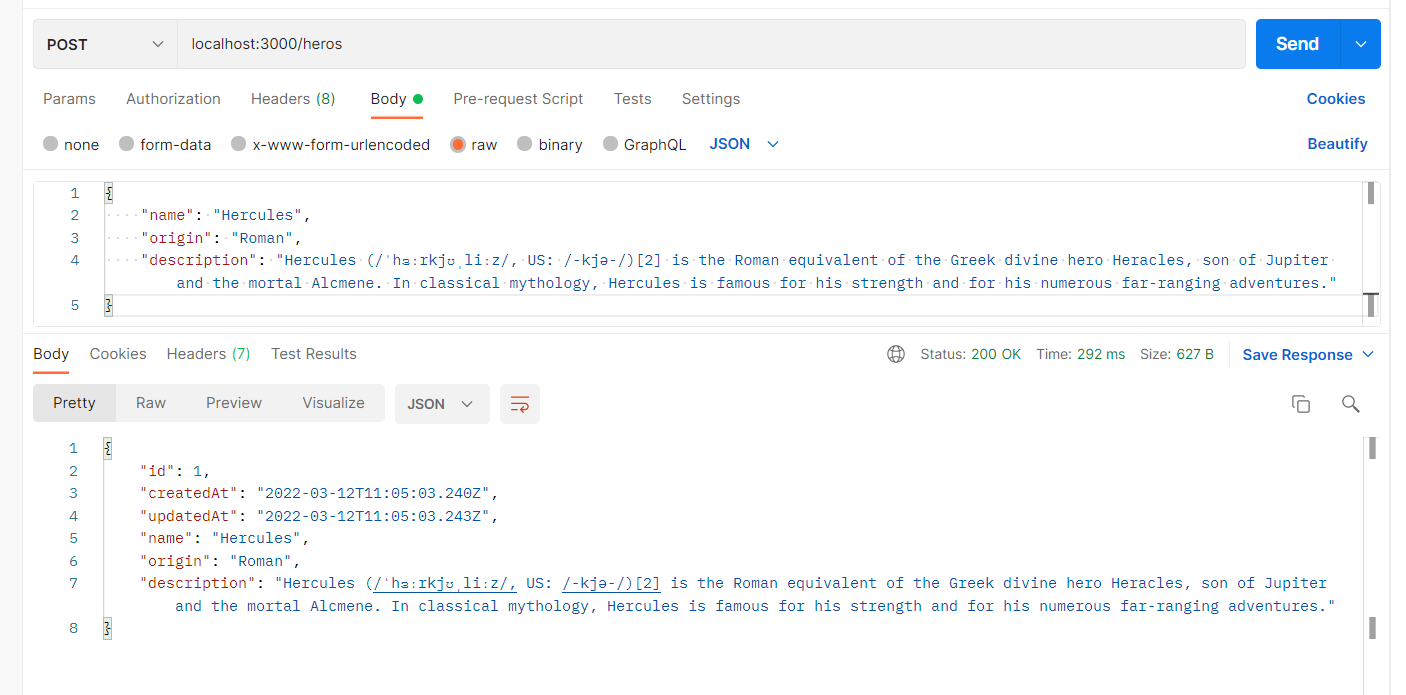
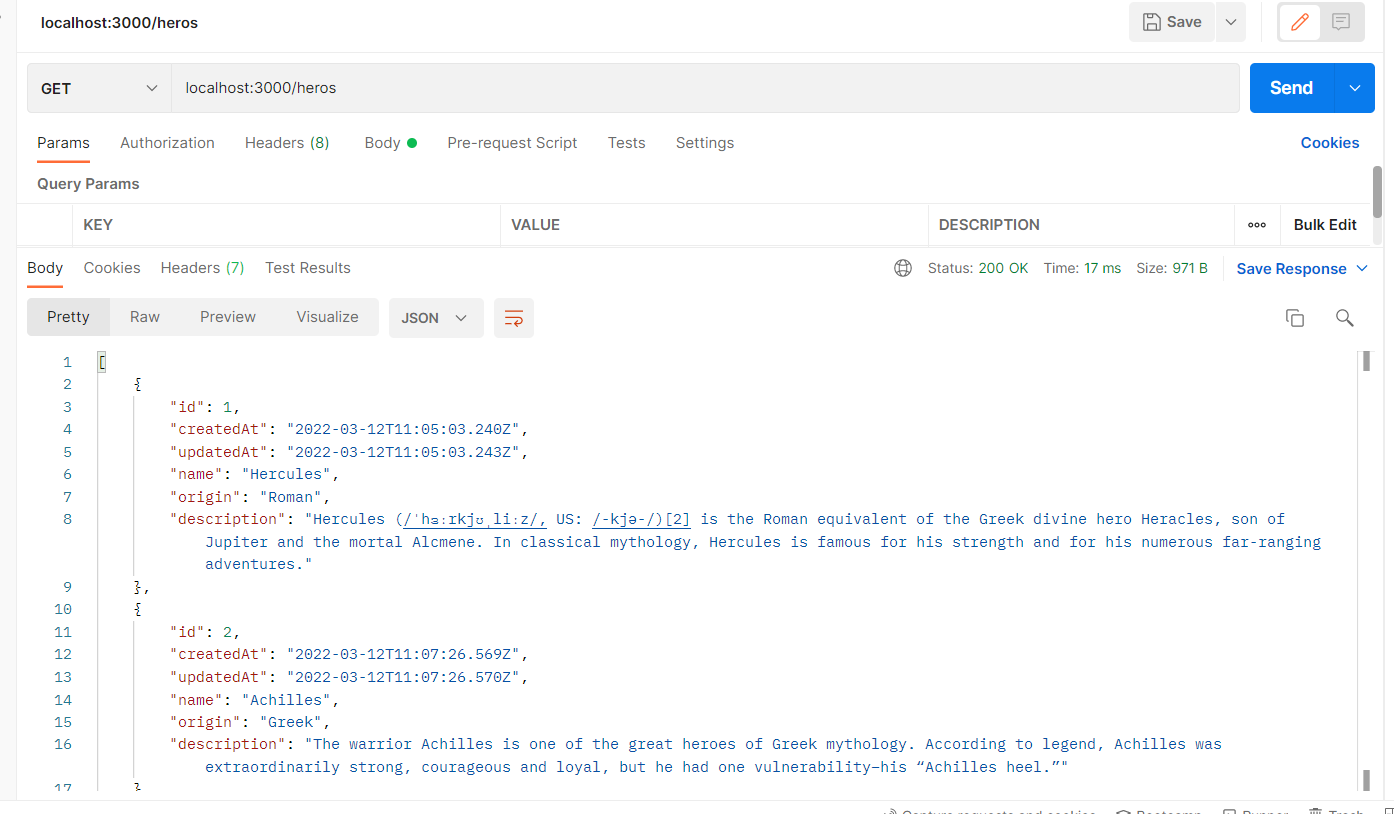
Mở terminal chạy npm run dev, dùng postman test thử:
Thêm hero:
Get tất cả:
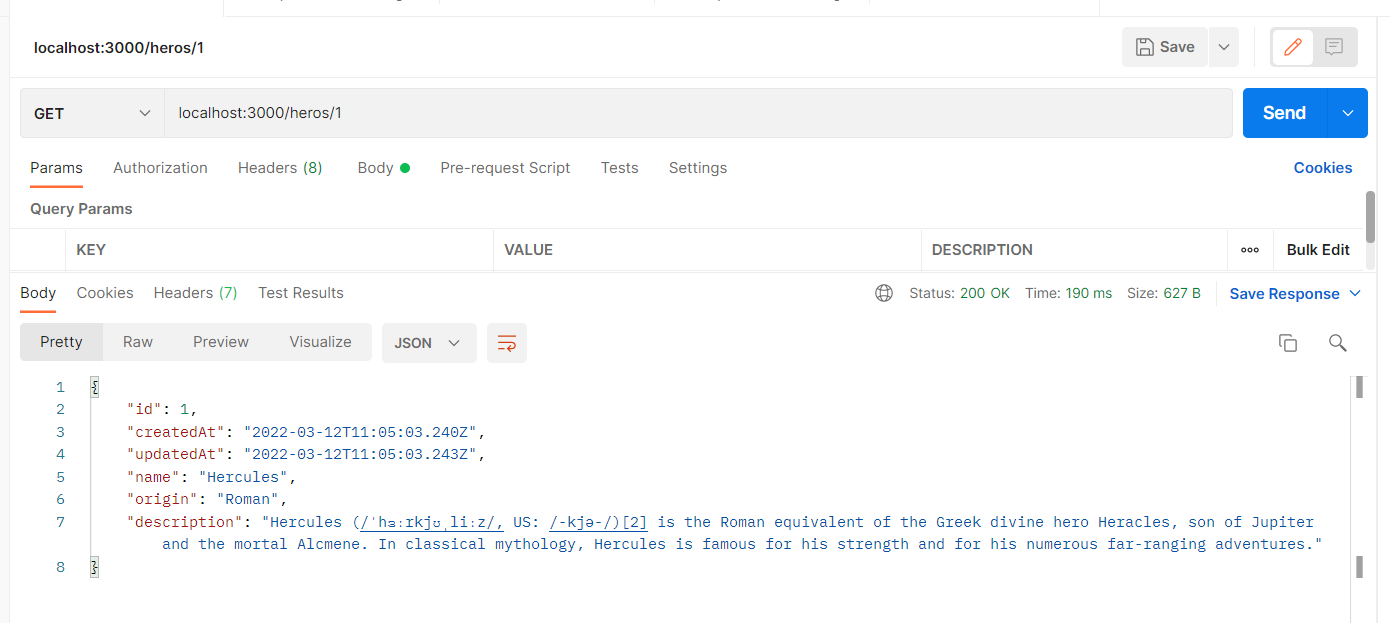
Bonus, express có support router param để follow đúng best practices của REST API, implement luôn nhé. hero-controller.ts
  public initializeRoutes() {
    this.router.get(this.path, this.getAllHero);
    this.router.post(this.path, this.addHero);
    this.router.get(this.path + "/:heroId", this.getHeroById);
    // Bạn có thể thêm put, patch, delete sau.
  }

  getHeroById = async (
    request: express.Request,
    response: express.Response,
  ) => {
    const hero = await this.prisma.hero.findUnique({
      where: {
        id: Number.parseInt(request.params.heroId),
      },
    });
    response.json(hero);
  };
Test thử:
Error Handling
1 phần cực kì thiết yếu trong app chính là error handling, chúng ta sẽ áp dụng 1 middleware để xử lý vụ này.
src/exceptions/http-exception.ts:
export default class HttpException extends Error {
  status: number;
  message: string;
  constructor(status: number, message: string) {
    super(message);
    this.status = status;
    this.message = message;
  }
}
src/middlewares/error.middleware.ts:
import { NextFunction, Request, Response } from "express";
import HttpException from "../exceptions/http-exception";

export default function errorMiddleware(
  error: HttpException,
  request: Request,
  response: Response,
  next: NextFunction
) {
  const status = error.status || 500;
  const message = error.message || "Something went wrong";
  response.status(status).json({
    status,
    message,
  });
}
src/app.ts:
import express from "express";
import { BaseController } from "./controllers/abstractions/base-controller";
import errorMiddleware from "./middlewares/error.middleware";

class App {
  public app: express.Application;
  public port: number | string;

  constructor(controllers: BaseController[], port: number | string) {
    this.app = express();
    this.port = port;

    this.initializeMiddlewares();
    this.initializeControllers(controllers);
    this.initializeErrorHandling();
  }

  private initializeMiddlewares() {
    this.app.use(express.json());
  }

  private initializeErrorHandling() {
    this.app.use(errorMiddleware);
  }

  private initializeControllers(controllers: BaseController[]) {
    this.app.get("/", (request, response) => {
      response.send("Application is running");
    });
    controllers.forEach((controller) => {
      this.app.use("/", controller.router);
    });
  }

  public listen() {
    this.app.listen(this.port, () => {
      console.log(`App listening on the port ${this.port}`);
    });
  }
}

export default App;
Lưu ý: Vì express chạy các middleware theo chain từ đầu đến cuối, bạn phải gọi hàm initializeErrorHandling sau cùng.
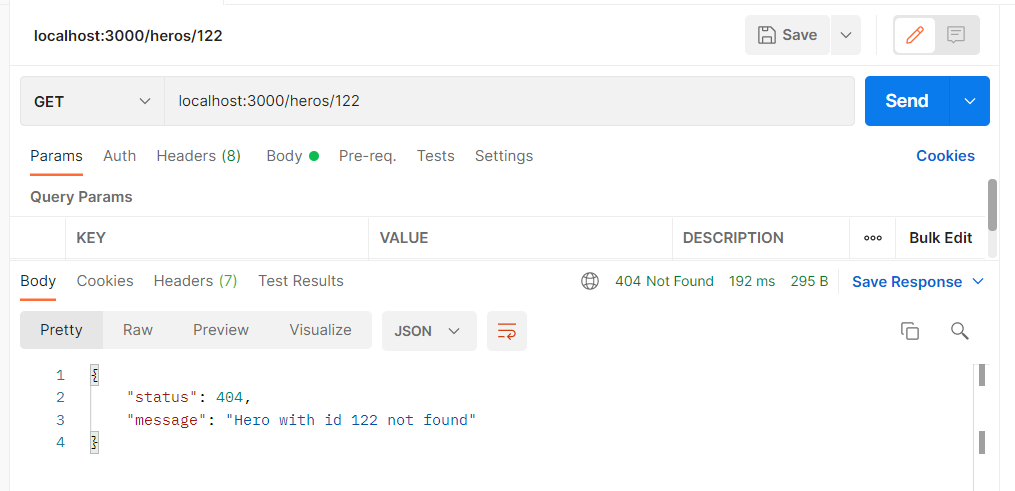
Config xong cho các exception, bây giờ chúng ta áp dụng cho hero controller, khi get hero by id nhưng không tìm thấy sẽ trả về 1 exception tên là HeroNotFoundException.
src/exceptions/hero-not-found-exception.ts:
import HttpException from "./http-exception";

class HeroNotFoundException extends HttpException {
  constructor(id: number) {
    super(404, `Hero with id ${id} not found`);
  }
}

export default HeroNotFoundException;
hero-controller.ts:
//...
getHeroById = async (
  request: express.Request,
  response: express.Response,
  next: express.NextFunction
) => {
  const heroId = Number.parseInt(request.params.heroId);
  this.prisma.hero
    .findUnique({
      where: {
        id: heroId,
      },
    })
    .then((hero) => {
      if (hero) {
        response.json(hero);
      } else {
        next(new HeroNotFoundException(heroId));
      }
    });
};
Test thử với 1 id bất kỳ không có trong db:
Deploy app với Docker
Phần code đã xong, hiện tại chúng ta có thể viết Dockerfile để build được app trên docker. Đầu tiên chúng ta phải đảm bảo rằng mỗi khi app chạy lên, chúng ta sẽ migrate database để đảm bảo db luôn khớp với schema (code first).
package.json:
"scripts": {
    //..
    "deploy": "npx prisma migrate deploy && npm run start",
  },
Command deploy sẽ chạy prisma migrate để apply các migration còn thiếu vào db, sau đó mới chạy app bằng lệnh start (production), ở đây mình chuyển qua xài yarn cho tiện, vì nó có flag --pure-lockfile, nôm na sẽ cài dependencies theo file lock, tránh trường hợp lib bị update gây crash app.
./Dockerfile:
FROM node:16-alpine3.14

EXPOSE 3000

ARG NODE_ENV
ENV NODE_ENV $NODE_ENV

RUN mkdir /app
WORKDIR /app
ADD package.json yarn.lock .env /app/
ADD . /app
RUN yarn --pure-lockfile

CMD ["yarn", "deploy"]
Sửa lại file docker-compose.yml:
services:
  postgres:
    image: postgres
    container_name: postgres_db_container
    environment:
      - POSTGRES_DB=${POSTGRES_DB:-postgres}
      - POSTGRES_USER=${POSTGRES_USER:-postgres}
      - POSTGRES_PASSWORD=${POSTGRES_PASSWORD:-password1}
    ports:
      - "5432:5432"
    restart: unless-stopped
  api:
    container_name: boiler_api_container
    build: .
    ports:
      - "3000:3000"
    depends_on:
      - postgres
Sửa DB_HOST trong file .env, như đã nói trước đó, phải sửa host cho trùng với id của service trong docker compose khi mình build bằng docker:
DB_HOST=postgres
Sửa 1 tí schema prisma binaryTargets để nó support linux:
generator client {
  provider = "prisma-client-js"
  binaryTargets = ["native", "linux-musl"]
}
Okay giờ chúng ta có thể chạy lệnh docker để compose:
docker-compose up -d
Thêm file .gitignore:
node_modules
.env
dist
Tổng kết
Còn khá là nhiều thứ chúng ta có thể thêm vào app này, chẳng hạn như request model validation, testing, CI/CD, tuy nhiên mình muốn giữ cho boilerplate này thật đơn giản, các bạn có thể implement thêm tính năng nào các bạn cần.
Hy vọng qua tut này các bạn có thể tự dựng được 1 project nodejs sử dụng express và prisma, typescript.
Update: Bài viết có lỗi 1 tí về typo, mình đã sửa lại code từ heros về heroes.
Update 2 (14/04/2023): Nếu các bạn không muốn code typescript có thể tham khảo dựng API import CSV bằng nodejs của mình, code javas
All rights reserved
