Tạo input email như gmail (Phần 1)
Bài đăng này đã không được cập nhật trong 7 năm
Mình đang làm dự án có phần gửi email, mình có tham khảo thì thấy input nhập email của Gmail rất tuyệt vời. Bài viết này sẽ hướng dẫn các bạn có thể làm input email như của Gmail, sử dụng jQuery/HTML/CSS.

Yêu cầu
Phần input nhập email của gmail này có các tính năng sau:
- Gõ text vào input, TAB hoặc ENTER sẽ add text đang nhập thành một email.
- Các email được thêm vào được kiểm tra có hợp lệ hay không, nếu không hợp lệ thì có style khác (gạch đỏ dưới chân).
- Xóa email đã chọn khi click vào dấu x trong email, hoặc xóa email được chọn cuối cùng khi gõ phím BACKSPACE.
- Độ rộng của input thay đổi khi gõ text vào hoặc khi chọn, xóa email.
- Nếu có các emails đã nhập, sẽ được hiển thị ra bên cạnh input.
Đã rõ yêu cầu rồi, hãy cùng mình bắt tay vào làm nhé!
Mã HTML
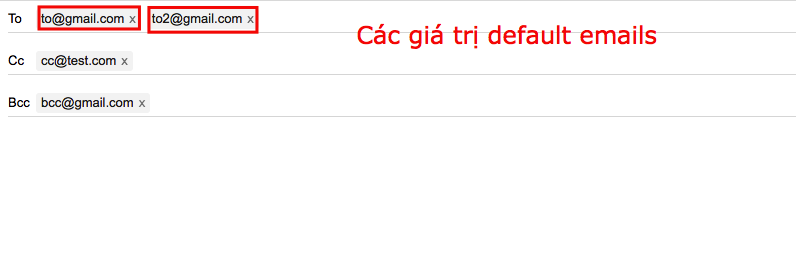
Các input được tạo có giá trị value="danh_sach_email" để hiển thị ra các emails mặc đinh, các emails được cách với nhau bởi dấu ,, nếu k set giá trị value này thì sẽ k có emails mặc định.
<div class="wrap">
  <div class="row d-flex">
    <div class="row__label">To</div>
    <div class="input-gmail-container row__value">
      <input class="input-gmail" type="text" value="to@gmail.com,to2@gmail.com" placeholder="" />
    </div>
  </div>
  <div class="row d-flex">
    <div class="row__label">Cc</div>
    <div class="input-gmail-container row__value">
      <input class="input-gmail" type="text" value="cc@test.com" placeholder="" />
    </div>
  </div>
  <div class="row d-flex">
    <div class="row__label">Bcc</div>
    <div class="input-gmail-container row__value">
      <input class="input-gmail" type="text" value="" placeholder="" />
    </div>
  </div>
</div>
Mã CSS (SCSS)
Style cho chung cho wrap & row
.wrap {
  width: 100%;
  font-size: 13px;
  line-height: 2;
  font-family: Arial,Helvetica Neue,Helvetica,sans-serif;
  box-sizing: border-box;
  * {
    box-sizing: border-box;
  }
}

.d {
  &-flex {
    display: flex;
  }
  &-none {
    display: none;
  }
}

.row {
  border-bottom: 1px solid #ddd;
  margin-bottom: 15px;
  &:last-child {
    margin-bottom: 0;
  }
  &__label {
    width: 25px;
  }
  &__value {
    width: calc(100% - 25px);
  }
}
Thêm style cho phần list email và input nhập email
.email {
  &-container {
    display: flex;
    flex-wrap: wrap;
  }
  &-item {
    white-space: nowrap;
    background-color: #f5f5f5;
    color: #222;
    height: 20px;
    line-height: 20px;
    border-radius: 3px;
    margin: 3px;
    padding: 0 5px;
    display: inline-block;
    &--invalid {
      background: none;
    }
    &__value {
      .email-item--invalid & {
        border-bottom: 2px dotted #d14836;
      }
    }
    &__remove {
      margin-left: 5px;
      opacity: 0.6;
      color: #333;
      cursor: pointer;
      &:hover {
        opacity: 1;
      }
    }
  }
  &-input {
    &__field {
      resize: none;
      border: none;
      height: 26px;
      padding: 3px 5px;
      line-height: 20px;
      overflow: hidden;
      margin: 0;
      vertical-align: middle;
      display: inline-block;
      &:focus {
        outline: none;
      }
    }
  }
}
Mã Javascript (jQuery)
Chúng ta sẽ tạo plugin có tên là inputGmail với một số options mặc định là biến defaults. Tiếp theo là gọi function với selectors là các input có class input-gmail. Input sẽ được add class d-none để ẩn đi, sẽ có function để add HTML vào thay thê.
(function($) {
  // Định nghĩa plugin inputGmail
  $.fn.inputGmail = function(options) {
    var defaults = {
      container: '.input-gmail-container',
      placeholder: ''
    };

    var opt = $.extend(defaults, options);
    return this.each(function() {
      var obj = $(this);
          obj.addClass('d-none');
    });
  };
})(jQuery)

// Gọi function inputGmail với class là input-gmail
$(document).ready(function(){
  $('.input-gmail').each(function() {
    $(this).inputGmail();
  })
});
Tạo function createHtml để tạo mã HTML sử dụng, function này được gọi khi bind function inputGmail. Function emailItem để tạo mã HTML cho các giá trị của email, mỗi giá trị email sẽ được chạy function emailItem một lần để tạo HTML, trong function emailItem thì các email được validate bởi function validateEmail để thêm class cho các email không hợp lệ.
  $.fn.inputGmail = function(options) {
    ... // code cũ
    return this.each(function() {
      ... // code cũ
      createHtml(obj, opt);
    });
  };

  // Khởi tạo HTML
  function createHtml(obj, opt) {
    var emails = obj.val() ? obj.val().split(',') : [];
    var emailList = '',
      emailsLength = emails.length;
    if (emailsLength > 0) {
      for(var i = 0; i< emailsLength; i++) {
        emailList += emailItem(emails[i]);
      }
    }
    var html = '<div class="email-container">'+emailList+
      '<textarea class="email-input__field" placeholder="'+opt.placeholder+'"></textarea>'+
      '</div>';
    obj.parents(opt.container).append(html);
  };

  function emailItem(email) {
    var valid = validateEmail(email),
      className = valid ? 'email-item' : 'email-item email-item--invalid',
      emailHtml = '<div class="'+className+'">'+
        '<span class="email-item__value">'+email+'</span>'+
        '<span class="email-item__remove">x</span>'+
        '</div>';
    return emailHtml;
  };

  // Validated email
  function validateEmail(email) {
    var re = /^(([^<>()[\]\\.,;:\s@\"]+(\.[^<>()[\]\\.,;:\s@\"]+)*)|(\".+\"))@((\[[0-9]{1,3}\.[0-9]{1,3}\.[0-9]{1,3}\.[0-9]{1,3}\])|(([a-zA-Z\-0-9]+\.)+[a-zA-Z]{2,}))$/;
    return re.test(email);
  };
})(jQuery)
Đoạn code ở trên giúp chúng ta tạo mã HTML ra từ các selectors input-gmail, nếu input này có default value(các emails đã được nhập) thì sẽ được hiển thị trong list emails.
Tạo function handleEvent để xử lý các event thêm, xoá emails.
- Khi người dùng nhập email và gõ TAB hoặc ENTER, sẽ thêm giá trị đang nhập vào danh sách emails, nếu TAB khi input chưa có giá trị thì sẽ không xử lý gì mà để mặc định của keyboard.
- Khi người dùng gõ BACKSPACE, nếu input có giá trị sẽ để mặc định của keyboard, nếu không có giá trị thì sẽ xoá email ở cuối cùng của danh sách emails.
- Khi người dùng click vào icon x ở mỗi email thì sẽ remove email đó ra khỏi danh sách emails.
  $.fn.inputGmail = function(options) {
    ... // code cũ
    return this.each(function() {
      ... // code cũ
      handleEvent(opt);
    });
  };
  // Xử lý các sự kiện thêm, xóa emails
  function handleEvent(opt) {
    // Event when click remove
    $(document).off().on('click', '.email-item__remove', function() {
      var elem = $(this),
        parent = elem.parents('.email-item'),
        emailList = elem.parents(opt.container).find('.email-item'),
        emailIndex = emailList.index(parent),
        obj = elem.parents(opt.container).find('.input-gmail'),
        oldValue = obj.val(),
        newEmails = oldValue ? oldValue.split(',') : [];
      newEmails.splice(emailIndex, 1);
      updateEmails(obj, newEmails);
    });

    // Event keydown on input field
    $('.email-input__field').unbind().on('keydown', function(evt) {
      var inputValue = $(this).val(),
          parent = $(this).parents(opt.container),
          obj = parent.find('.input-gmail'),
          oldValue = obj.val();

      //Add new value
      if (evt.which === 13 || evt.which === 9) {
        if (inputValue !== '') {
          var newValue = oldValue !== '' ? oldValue+','+inputValue : inputValue;
          var newEmails = newValue ? newValue.split(',') : [];
          updateEmails(obj, newEmails);
          evt.preventDefault();
        }
        if (evt.which === 13 ) {
          evt.preventDefault();
        }
      }

      //Event remove
      if (evt.which === 8) {
        if (oldValue !== '' && inputValue === '') {
          var newEmails = oldValue ? oldValue.split(',') : [];
          newEmails.splice(-1, 1);
          updateEmails(obj, newEmails);
          console.log('bind backspace', oldValue, newEmails);
          evt.preventDefault();
        }
      }
    })
  };

  // Cập nhật thêm, xóa emails
  function updateEmails(obj, emails) {
    var emailsHtml = '',
      emailsLength = emails.length;
    if (emailsLength > 0) {
      for(var i = 0; i< emailsLength; i++) {
        emailsHtml += emailItem(emails[i]);
      }
    }
    obj.val(emails.join());
    updateHtml(obj, emailsHtml);
  };

  function updateHtml(obj, emailsHtml) {
    var emailContainer = obj.next('.email-container');
    emailContainer.find('.email-item').remove();
    emailContainer.prepend(emailsHtml);
    emailContainer.find('.email-input__field').val('').focus();
  };
Kết quả
Với đoạn code ở trên thì input email của chúng ta đã thực hiện được các yêu cầu 1,2,3,5. Yêu cầu 4 sẽ được thực hiện ở phần tiếp theo. Dưới đây là demo của Phần 1.
All rights reserved
