Tạo Gantt Chart Reactjs với dhtmlxGantt
Bài đăng này đã không được cập nhật trong 7 năm
Create React APP with dhtmlxGantt
Để xây dựng ứng dụng đầu tiên chúng ta cần khởi tạo một ứng dụng react . Việc khởi tạo ứng dụng reactjs rất đơn giản để sử dụng Create React app tool, bạn có thể follow theo command sau:
npm install -g create-react-app
Tiếp theo tôi sẽ tạo một ứng dụng reactjs tên là gantt-react
create-react-app gantt-react
Vào thư mục dự án và khởi động bằng câu lệnh
cd gantt-react
npm start
Nếu các bước trên hoàn thành , bạn có thể check kết quả tại http://localhost:3000/
Tiếp theo chúng ta sẽ install dhtmlxGantt vào dự án, ở đây tôi dùng npm nếu muốn bạn có thể sử dụng yarn ()
npm install dhtmlx-gantt --save
Sau khi cài đặt xong bạn cần tạo react component cho gantt chart . Tại thư mục src tạo mới file Gantt.js
/*global gantt*/
import React, { Component } from 'react';
import 'dhtmlx-gantt';
import 'dhtmlx-gantt/codebase/dhtmlxgantt.css';

export default class Gantt extends Component {
  componentDidMount() {
    gantt.init(this.ganttContainer);
    gantt.parse(this.props.tasks);
  }

  render() {
    return (
        <div
            ref={(input) => { this.ganttContainer = input }}
            style={{width: '100%', height: '100%'}}
        ></div>
    );
  }
}
Component này sẽ thực hiện việc khởi tạo dhx gantt và gắn dữ liệu nó nhận được từ props và DOM để hiển thị. Lưu ý rằng dhtmlxGantt không có destructor nên chúng ta không cần phải định nghĩa componentWillUnmount. Điều đó có nghĩa là các thành phần trong dhtmlxGantt được lưu lại trong bộ nhớ và bạn có thể tái sử dụng chúng . Để xóa dữ liệu cũ được khi trong bộ nhớ đệm của gantt bạn có thể sử dụng
gantt.clearAll();
Theo cá nhân tôi thấy thì điều này là cần thiết khi bạn muốn xây dựng một ứng dụng hiển thị nhiều biểu đồ gantt trong một page.
Tiếp theo , Tôi sẽ sử dụng gantt để hiển thị dữ liệu trong component App, bạn có thể follow code sau
import React, { Component } from 'react';
import Gantt from './Gantt';
import './App.css';
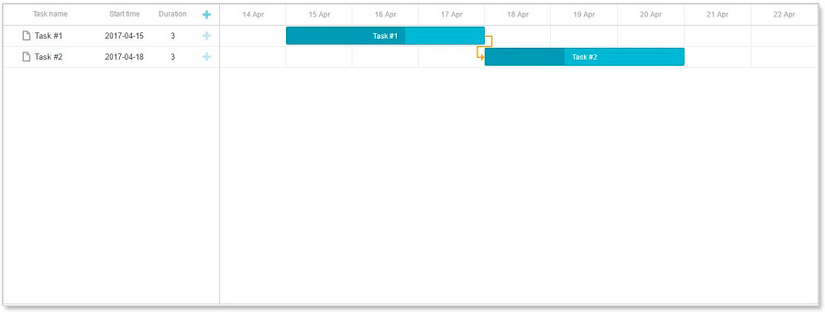
var data = {
data: [
{id: 1, text: 'Task #1', start_date: '15-04-2017', duration: 3, progress: 0.6},
{id: 2, text: 'Task #2', start_date: '18-04-2017', duration: 3, progress: 0.4}
],
links: [
{id: 1, source: 1, target: 2, type: '0'}
]
};
class App extends Component {
render() {
return (
<div>
<div className="gantt-container">
<Gantt tasks={data}/>
</div>
</div>
);
}
}
export default App;
Nếu bạn chạy ứng dụng , bạn có thể thấy biểu đồ gantt chart
Configuring Gantt chart
Config định dạng trong gantt . Gantt chart hiển thị mặc định với định dạng theo tháng , trong trường hợp bạn muốn bổ sung thêm định dạng ngày và giờ . Trong file Gantt.js chúng ta vừa khởi tạo phía trên bạn add thêm function như sau
  setZoom(value){
    switch (value){
      case 'Hours':
        gantt.config.scale_unit = 'day';
        gantt.config.date_scale = '%d %M';

        gantt.config.scale_height = 60;
        gantt.config.min_column_width = 30;
        gantt.config.subscales = [
          {unit:'hour', step:1, date:'%H'}
        ];
        break;
      case 'Days':
        gantt.config.min_column_width = 70;
        gantt.config.scale_unit = "week";
        gantt.config.date_scale = "#%W";
        gantt.config.subscales = [
          {unit: "day", step: 1, date: "%d %M"}
        ];
        gantt.config.scale_height = 60;
        break;
      case 'Months':
        gantt.config.min_column_width = 70;
        gantt.config.scale_unit = "month";
        gantt.config.date_scale = "%F";
        gantt.config.scale_height = 60;
        gantt.config.subscales = [
          {unit:"week", step:1, date:"#%W"}
        ];
        break;
      default:
        break;
    }
  }

  shouldComponentUpdate(nextProps ){
    return this.props.zoom !== nextProps.zoom;
  }

  componentDidUpdate() {
    gantt.render();
  }
Ngoài ra bạn cũng cần phải gọi đến functiom setZoom trong function render
  render() {
    this.setZoom(this.props.zoom);
    return (
        <div
            ref={(input) => { this.ganttContainer = input }}
            style={{width: '100%', height: '100%'}}
        ></div>
    );
Và giờ chúng ta cần định nghĩa thành phần zoom trong gantt . Để tùy chỉnh thuộc tính này chúng ta sẽ tạo ra các button "Hours" , "Days", "Months" , khi click vào các button sẽ trả ra các giá trị zoom tương ứng .
Create file Toolbar.js với nội dung sau
import React, { Component } from 'react';

export default class Toolbar extends Component {
  constructor(props) {
    super(props);
    this.handleZoomChange = this.handleZoomChange.bind(this);
  }

  handleZoomChange(e) {
    if(this.props.onZoomChange){
      this.props.onZoomChange(e.target.value)
    }
  }

  render() {
    let zoomRadios = ['Hours', 'Days', 'Months'].map((value) => {
      let isActive = this.props.zoom === value;
      return (
        <label key={value} className={`radio-label ${isActive ? 'radio-label-active': ''}`}>
          <input type='radio'
             checked={isActive}
             onChange={this.handleZoomChange}
             value={value}/>
          {value}
        </label>
      );
    });

    return (
      <div className="zoom-bar">
        <b>Zooming: </b>
          {zoomRadios}
      </div>
    );
  }
}
Chúng ta thêm toolbar vào App component:
    import Toolbar from './Toolbar';
    ...
    this.state = {
      currentZoom: null
    }
Thêm xử lý handleZoomChange
handleZoomChange(zoom) {
  this.setState({
    currentZoom: zoom
  });
}

return (
  <div>
    <Toolbar
      zoom={this.state.currentZoom}
      onZoomChange={this.handleZoomChange}
    />
    <div className="gantt-container">
      <Gantt
        tasks={data}
        zoom={this.state.currentZoom}
      />
    </div>
  </div>
);
Sau khi hoàn thành . truy cập localhost:30001 và chúng ta có kết quả
Tài liệu tham khảo
https://dhtmlx.com/blog/create-react-gantt-chart-component-dhtmlxgantt/ https://www.bryntum.com/docs/?gclid=Cj0KCQjwxvbdBRC0ARIsAKmec9Ziqt4V7ge_iabCj4UQ7p1aI0B-hXRLAPkZrKOrjJ1w0C469XBw52UaAjgGEALw_wcB
All rights reserved
