Tạo file zip với gem rubyzip
Bài đăng này đã không được cập nhật trong 4 năm
I. Mở đầu
Xin chào các bác (lay2)
Đến hẹn lại lên (honho).
Chắc hẳn khi sử dụng web app, ta không ít lần cần download file ở trên web về. Nếu số lượng và dung lượng thấp thì không nói làm gì. Nhưng ở trường hợp ngược lại, ta không thể send cho người dùng một lô một lốc các file vừa nặng, vừa nhiều được, nhìn rất sida. (facepalm)
Giải pháp đơn giản nhất để giải quyết ở đây là nén thành 1 file duy nhất trước khi gửi cho người dùng.
Và hôm nay tôi sẽ giới thiệu tới các bạn 1 gem rất hữu ích để nén dữ liệu - Rubyzip (dance2)
II. Demo
Giới thiệu về demo app
Dưới đây tôi sẽ demo cho các bạn cách sử dụng gem Rubyzip bằng cách xây dựng ứng dụng có các chức năng sau:
- Mở và đọc file zip khi import lên.
- Tạo ra file zip từ dữ liệu trong db.
Các công cụ sử dụng:
- Rails 4.2.1
- Ruby 2.1.4
Let's start
1. Khởi tạo
Sau khi khởi tạo rails app, táng ngay gem vào
gem "rubyzip"
Tạo 1 model mới tên Animal, có các trường như định nghĩa ở bên dưới
rails g model animal name:string age:integer species:string
Tạo Controller và View cho trang index. Đơn giản là show ra toàn bộ data hiện tại có trong DB thôi
class AnimalsController < ApplicationController
  def index
    @animals = Animal.all
  end
end
<%= link_to 'Add!', new_animal_path %>
<ul>
  <% @animals.each do |animal| %>
    <li>
      <strong>Name:</strong> <%= animal.name %><br>
      <strong>Age:</strong> <%= animal.age %><br>
      <strong>Species:</strong> <%= animal.species %>
    </li>
  <% end %>
</ul>
2. Import file zip
Xong trang index, ta sẽ sang trang new.
Trang này có nhiệm vụ import file zip từ client, controller sẽ đọc file zip và xử lý nó.
File zip của mình sẽ có các file bên trong dưới dạng JSON cho đơn giản:
animals.zip
  - animals_1.json
  - animals_1.json
Format của json sẽ như sau: { name: "Cat", age: 1, species: "Dog" }
Ở view của trang new, ta xây dựng form để import file vào
<%= form_tag animals_path, method: :post, multipart: true do %>
  <%= label_tag 'archive', 'Select archive' %>
  <%= file_field_tag 'archive' %>

  <%= submit_tag 'Add!' %>
<% end %>
File khi được submit lên server, controller của ta sẽ đọc file từ params và xử lý nó.
def create
  Zip::File.open(params[:archive].tempfile) do |zip_file|
    zip_file.each do |data|
      Animal.create(JSON.load(data.get_input_stream.read))
    end
  end
end
Vì file bên trong file zip bắt buộc phải là JSON, nên ta sửa lại 1 chút để giới hạn loại file cần đọc:
zip_file.glob('*.json').each do |data|
  ...
end
Kết quả sau khi import file json:
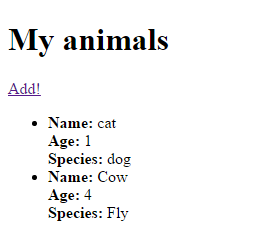
Nội dung file đã được đọc và lưu lại vào DB.
3. Tạo file zip từ dữ liệu trong DB
Ở trang index, ta thêm đường link để User download
...
<%= link_to 'Download archive', animals_path(format: :zip) %>
Đồng thời, phía controller điều chỉnh format response dữ liệu
def index
  @animals = Animal.all

  respond_to do |format|
    format.html
    format.zip do
      ...
    end
  end
end
Trong block format.zip {} ta gọi ra các method để tạo file và put data vào.
format.zip do
  compressed_filestream = Zip::OutputStream.write_buffer do |zos|
    @animals.each do |animal|
      zos.put_next_entry "#{animal.name}-#{animal.id}.json"
      zos.print animal.to_json(only: [:name, :age, :species])
    end
  end
end
File sau khi được định nghĩa, ta rewind và gọi hàm send_data để trả về cho client
...
compressed_filestream.rewind
send_data compressed_filestream.read, filename: "animals.zip"
Ví dụ trên ta dùng các config mặc định của gem.
Nếu cần config lại, ta tạo file config/initializers/rubyzip.rb.
Nội dung bên trong file để dưới dạng block như sau:
Zip.setup do |c|
  c.on_exists_proc = true
  c.continue_on_exists_proc = true
  c.unicode_names = true
  c.default_compression = Zlib::BEST_COMPRESSION
  ...
end
Một số các options của nó có ý nghĩa là:
on_exists_proc: Ghi đè lên file cũ nếu filename đã tồn tại trong quá trình extract.continue_on_exists_proc: Ghi đè lên file cũ nếu filename đã tồn tại trong quá trình tạo file nén.unicode_names: Ở phiên bản windows 7 trở về trước, nếu bạn muốn đặt tên file không phải theo unicode thì cần set options này = truedefault_compression: set mức độ nén filewrite_zip64_support: mặc định sẽ disable file zip64 khi writting, chuyển options này thành true nếu cần.
Kết quả sau khi download file về và giải nén

GGWP (honho)
Source
Nguồn tham khảo
All rights reserved
