Tạo extension "NOTE" của riêng bạn
Bài đăng này đã không được cập nhật trong 4 năm
Tham khảo : https://b29.vn/bai-viet/tao-extension-note-cua-rieng-ban?id=35
How to create an extension? 🛠
Để tạo extension này, chúng ta phải cần chuẩn bị những files sau :
1) manifest.json
File manifest.json cho Chrome biết các thông tin quan trọng về extension của bạn, chẳng hạn như tên và những quyền nào nó cần.
{
  // 3 thứ bắt buộc phải có : name, version, manifest_version
  "name": "Note extension", // chúng ta sẽ khai báo tên của extension
  "manifest_version": 2, // khai báo version manifest sử dụng
  "version": "1.0", // khai báo version cho ext của bạn

  "description": "Note",
  "content_scripts": [
    {
      "matches": ["<all_urls>"], // khai báo như này giúp cho hầu cứ mở chrome lên là bạn có thể sử dụng được ext
      "js": ["main.js"] // file chính để viết script
    }
  ],
  "icons": {
    "16": "images/icon.png",
    "48": "images/icon.png",
    "128": "images/icon.png"
  },
  "browser_action": {
    "default_popup": "index.html" // khai báo file html để hiển thị popup khi click vào icon
  },
  "permissions": [
    "downloads" // enable downloads chrome
  ]
}
2) index.html
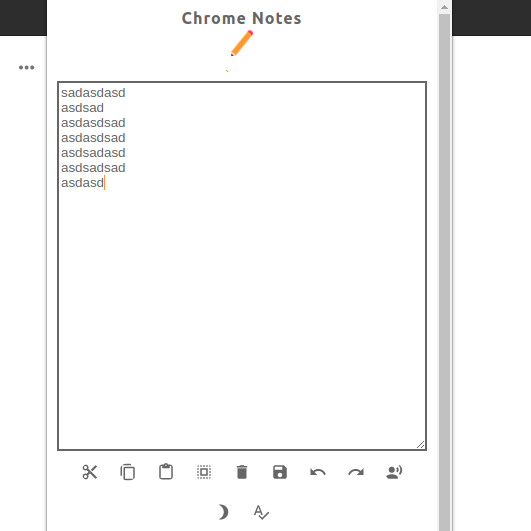
Mục đích tạo file này để khi click vào icon ext, sẽ mở ra cái popup cho chúng ta có thể note lại thông tin
// nhớ include css,js file
...
<h3>
    <b>Chrome Notes</b>
</h3>
<br>
<img id="appIcon" draggable="false" src="img/icon.svg"></img>
<br>
<div id="outterDiv">
    <div id="underlineDiv">
        <div id="squiggle"></div>
    </div>
</div>

<textarea id="notes" placeholder="Type here" spellcheck="false" autofocus></textarea>
<div id="iconDiv"></div>
...
Chú thích :
<h3>chứa tiêu đề extension trong popup<img />show image extension trong popupid=”outterDiv”: sử dụng để làm đẹp cho popup<textarea />: sử dụng để viết content note.id=”iconDiv”: sử dụng để show các icon thao tác
3) main.js
File này sẽ chịu trách nhiệm xử lý chính của ext của chúng ta :
// khai báo biến

window.onload = () => {
  let notes = document.getElementById(“notes”);
  let iconDiv = document.getElementById(“iconDiv”);
// bắt sự kiện khi nhập content để lưu nó lại trên localStorage
notes.onchange = () => {
  if (localStorage)
    localStorage.setItem("noteData", notes.value);
  }
...
}
Tiếp theo chúng ta sẻ xử lý là show các icon tương ứng với các action lên popup. Chúng ta sẽ đặt các icon tại /img/icon/ và lấy ra sau đó append vào id=”iconDiv”
// Những icon mà mình sử dụng ở đây sẽ tương ứng với các action được support bởi chrome
let iconNames = ["cut", "copy", "paste", "select-all", "delete", "save", "undo", "redo"];
for (let i = 0; i < iconNames.length; i++) {
  let icon = document.createElement("img");
  icon.src = "img/icon/" + iconNames[i] + ".svg";
  icon.id = iconNames[i];
  icon.className = "icon";
  icon.title = iconNames[i].substring(0, 1).toUpperCase() + iconNames[i].substring(1); //caps
  icon.draggable = false;
  icon.tabIndex = 0;
  icon.onkeydown = e => {
    if (evt.which === 13) icon.onclick();
  }
  iconDiv.appendChild(icon);
  if (iconNames[i] === "spellcheck") {
    iconDiv.appendChild(document.createElement("hr") );
  }
}
Chúng ta sẻ xử lý event cho các icons có trên popup :
// set title cho các icon này
document.getElementById("delete").title = "Delete Selection";
document.getElementById("select-all").title = "Select All";
document.getElementById("open-as-window").title = "Open in New Window";
document.getElementById("night-mode").title = "Night Mode";
document.getElementById("rate").title = "Rate / Share";
document.getElementById("save").title = "Download Notes as Text File";
document.getElementById("version").innerHTML = "Version " + chrome.runtime.getManifest().version;

// xử lý sự kiện
document.getElementById("cut").onclick = () => {
  notes.focus();
  document.execCommand("cut");
}
document.getElementById("copy").onclick = () => {
  notes.focus();
  document.execCommand("copy");
}
document.getElementById("paste").onclick = () => {
  notes.focus();
  document.execCommand("paste");
}
document.getElementById("select-all").onclick = () => {
  notes.focus();
  notes.select();
}
document.getElementById("delete").onclick = () => {
  notes.focus();
  document.execCommand("delete");
  // notes.value = "";
}
document.getElementById("save").onclick = () => {
  notes.focus();
  let file = {
    url: "data:application/txt," + encodeURIComponent(notes.value.replace(/\r?\n/g, '\r\n') ),
filename: "notes.txt"
  }
  chrome.downloads.download(file);
}
document.getElementById("undo").onclick = () => {
  notes.focus();
  document.execCommand("undo");
}
document.getElementById("redo").onclick = () => {
  notes.focus();
  document.execCommand("redo");
}
- Tất cả các events đều sử dụng
notes.focus();bởi vì các chrome actions cần select text để thực thi. execCommand(‘command-name’)được support bởi browser, bạn có thể xem nó tại đây : https://developer.mozilla.org/en-US/docs/Web/API/Document/execCommand
4) style.css
Chúng ta sẽ css cho nó đẹp hơn :
body {
  text-align: center;
  margin: 5px;
  padding: 5px;
}
p, #notes {
  font-family: Roboto, Arial;
}
h3 {
  font-size: 16px;
  display: inline;
  letter-spacing: 1px;
}
p {
  font-size: 100%;
}
a {
  text-decoration: none;
}
h3:hover, p:hover {
  cursor: default;
}
#notes {
  min-width: 300px;
  min-height: 300px;
  width: 500px;
  height: 500px;
  max-width: 700px;
  max-height: 700px;
  outline: 0 !important;
  caret-color: #f90;
}
.icon {
  border-radius: 50%;
  padding: 8px;
  margin: 2px;
}
.icon:hover {
  cursor: pointer;
}
h3, p, .icon, img, details {
  user-select: none;
}
hr {
  border: 1px dashed #666;
}
.icon.active {
  background-color: #f69;
}
5) Image Icon
Chúng ta cần các icon này để khi show trên chrome store, thanh tiện ích ... Các images cần được đặt trong folder images/...
"16": "images/icon.png",
"48": "images/icon.png",
"128": "images/icon.png"
6) Try it
Để import extension vào browser của bạn thì ta làm như sau :
- Truy cập chrome://extensions trong trình duyệt Chrome và bật "Developer mode" checkbox ở phía trên bên phải.
- Nhấn “Load unpacked” sau đó tải ext bạn vừa code lên.
- Tận hưởng thành quả
Kết
Cảm ơn các bạn đã quan tâm và theo giõi, hẹn gặp lại ở các bài sau, mong các bạn ủng hộ mình nhé.
Src : https://b29.vn/bai-viet/tao-extension-note-cua-rieng-ban?id=35
All rights reserved
