Tạo CRUD API đơn giản với Rust
Bài đăng này đã không được cập nhật trong 3 năm
Bài viết này được dịch tóm tắt từ https://medium.com/sean3z/building-a-restful-crud-api-with-rust-1867308352d8 về cách mà tác giả viết một crud api đơn giản bằng rust, nếu muốn tím hiểu thêm về rust, bạn có thể đọc https://viblo.asia/p/rust-getting-started-maGK7kMDKj2
Một số framework được sử dụng
- Rocket — web framework đơn giản cho fast web applications
- Serde — framework cho việc serializing và deserializing Rust data structures
- Diesel — safe, extensible ORM and query builder
Tạo application trong Rust
Đầu tiên, chúng ta phải tạo project của rust bằng cargo
$ cargo new hero-api --bin && cd hero-api
    Created binary (application) `hero-api` project
Trước khi tiếp tục, rocket yêu cầu chúng ta phải dùng rust nightly build. Cách đơn giản để chuyển qua nightly build:
$ rustup default nightly
$ rustup update && cargo update
Bạn sẽ nhận được vài dòng thông báo nhưng tốt nhất để check xem bạn đã thành công hay chưa, bạn có thể sử dụng:
$ cargo --version && rustc --version
cargo 1.72.0-nightly (5b377cece 2023-06-30)
rustc 1.72.0-nightly (0ab38e95b 2023-07-03)
Thêm dependency đầu tiên (rocket)
Trong thư mục hero-api ta sẽ thấy file Cargo.toml và thư mục src. File Cargo.toml tương tự như package.json trong nodejs. Để thêm dependency, thêm đoạn dưới đây vào file Cargo.toml:
[dependencies]
rocket = "0.4.4"
rocket_codegen = "0.4.4"
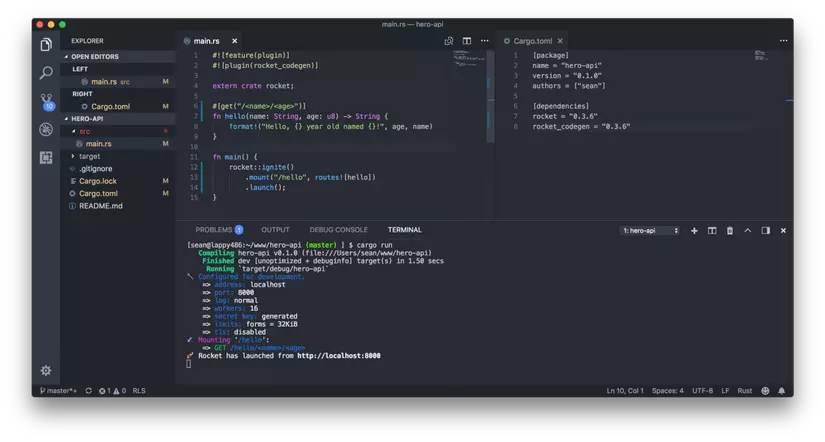
Được rồi giờ quay lại với src/main.rs. Thêm đoạn code sau vào file src/main.rs, đây là code tutorial của rocket, trước khi tự implement code, cũng nên chắc mọi thứ đã hoạt động đã:
#![feature(plugin)]
#![feature(proc_macro_hygiene, decl_macro)]
#[macro_use] extern crate rocket;

#[get("/<name>/<age>")]
fn hello(name: String, age: u8) -> String {
    format!("Hello, {} year old named {}!", age, name)
}

fn main() {
    rocket::ignite()
        .mount("/hello", routes![hello])
        .launch();
}
Để tìm hiểu kĩ hơn về đoạn code này bạn có thể vào trang chủ của rocket hoặc vào bài viết gôc của tác giả. Nào giờ chạy thử bằng lên cargo run rồi vào localhost:8000/duongtnhat/23 để xem kết qủa nào.
Building Restful endpoints dùng JSON (Serde)
Để tạo một CRUD ta cần 4 operation như sau:
- Create:POST /hero
- Read: GET /heroes
- Update: PUT /hero/:id
- Delete: DELETE /hero/:id
Giờ hãy sửa file Cargo.toml như sau để có Serde dependency:
[package]
name = "hero-api"
version = "0.1.0"

[dependencies]
rocket = "0.4.4"
rocket_codegen = "0.4.4"
serde = "1.0"
serde_json = "1.0"
serde_derive = "1.0"

[dependencies.rocket_contrib]
version = "*"
default-features = false
features = ["json"]
Sau đó tạo Serialize và Deserialize của hero vào src/hero.rs
#[derive(Serialize, Deserialize)]
pub struct Hero {
    pub id: Option<i32>,
    pub name: String,
    pub identity: String,
    pub hometown: String,
    pub age: i32
}
Tiếp theo ta cần endpoint để truy xuất hero:
#![feature(proc_macro_hygiene, decl_macro)]
#[macro_use] extern crate rocket;
#[macro_use] extern crate rocket_contrib;
#[macro_use] extern crate serde_derive;
use rocket_contrib::json::{Json, JsonValue};
mod hero;
use hero::{Hero};
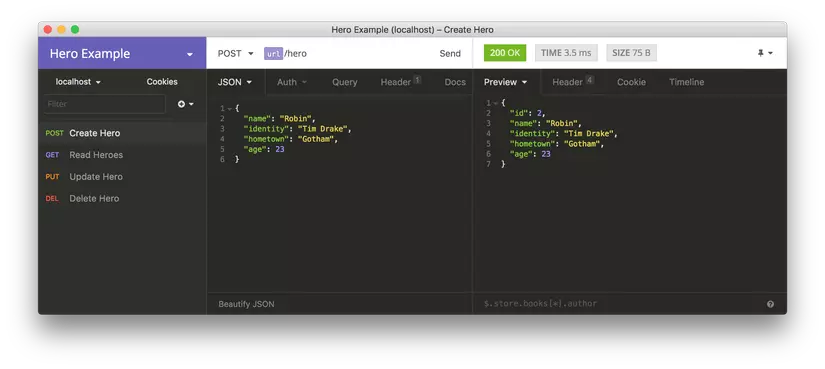
#[post("/", data = "<hero>")]
fn create(hero: Json<Hero>) -> Json<Hero> {
hero
}
#[get("/")]
fn read() -> Json<JsonValue> {
Json(json!([
"hero 1",
"hero 2"
]))
}
#[put("/<id>", data = "<hero>")]
fn update(id: i32, hero: Json<Hero>) -> Json<Hero> {
hero
}
#[delete("/<id>")]
fn delete(id: i32) -> Json<JsonValue> {
Json(json!({"status": "ok"}))
}
fn main() {
rocket::ignite()
.mount("/hero", routes![create, update, delete])
.mount("/heroes", routes![read])
.launch();
}
Code phía trên mới chỉ là mock các api để ta có thể chạy, chưa có logic hay dữ liệu gì, sau khi chạy cargo run bạn có thể thử các end point như đã liệt kê bên trên.

Truy vấn dữ liệu bằng ORM (Diesel)
Diesel cung cấp 1 cli tiện dụng cho việc generate các file migrate và truy xuất dữ liệu. Để sử dụng Diesel cli, cài đặt bằng lệnh:
cargo install diesel_cli
Thỉnh thoảng câu này sẽ bắn ra lỗi:
error: linking with `cc` failed: exit status: 1
Thì bạn thử thêm, mình thử cách này thì được:
sudo apt install libpq-dev
Tiếp theo là config database connection string để diesel có thể truy cập đến db:
$ export DATABASE_URL=mysql://user:pass@localhost/heroes
$ diesel setup
    Creating database: heroes
Tạo ra migration
$ diesel migration generate heroes
    Creating migrations/2018-03-17-180012_heroes/up.sql
    Creating migrations/2018-03-17-180012_heroes/down.sql
Ta phải sửa 2 file được tạo ra để có được database cần thiết up.sql:
CREATE TABLE heroes (
  id INT(11) PRIMARY KEY AUTO_INCREMENT,
  `name` VARCHAR(60) NOT NULL,
  identity VARCHAR(60) NOT NULL,
  hometown VARCHAR(60) NOT NULL,
  age INT(11) NOT NULL
)
down.sql
-- This file should undo anything in `up.sql`
DROP TABLE heroes;
Chạy migration bên trên:
$ diesel migration run
    Running migration 2018-03-17-180012_heroes
Sau khi có database ta cần r2d2-diesel để manage connection pool. Thêm đoạn sau vào Cargo.toml
[dependencies]
diesel = { version = "1.0.0", features = ["mysql"] }
diesel_codegen = { version = "*", features = ["mysql"] }
r2d2 = "*"
r2d2-diesel = "*"
Tạo file src/db.rs để tạo connection và manage pool
use std::ops::Deref;
use rocket::http::Status;
use rocket::request::{self, FromRequest};
use rocket::{Request, State, Outcome};

use r2d2;
use r2d2_diesel::ConnectionManager;

use diesel::mysql::MysqlConnection;

pub type Pool = r2d2::Pool<ConnectionManager<MysqlConnection>>;
static DATABASE_URL: &'static str = env!("DATABASE_URL");

pub fn connect() -> Pool {
    let manager = ConnectionManager::<MysqlConnection>::new(DATABASE_URL);
    r2d2::Pool::builder().build(manager).expect("Failed to create pool")
}

// Connection request guard type: a wrapper around an r2d2 pooled connection.
pub struct Connection(pub r2d2::PooledConnection<ConnectionManager<MysqlConnection>>);

/// Attempts to retrieve a single connection from the managed database pool. If
/// no pool is currently managed, fails with an `InternalServerError` status. If
/// no connections are available, fails with a `ServiceUnavailable` status.
impl<'a, 'r> FromRequest<'a, 'r> for Connection {
    type Error = ();

    fn from_request(request: &'a Request<'r>) -> request::Outcome<Connection, ()> {
        let pool = request.guard::<State<Pool>>()?;
        match pool.get() {
            Ok(conn) => Outcome::Success(Connection(conn)),
            Err(_) => Outcome::Failure((Status::ServiceUnavailable, ()))
        }
    }
}

// For the convenience of using an &Connection as an &SqliteConnection.
impl Deref for Connection {
    type Target = MysqlConnection;

    fn deref(&self) -> &Self::Target {
        &self.0
    }
}
Giờ thì binding hero của chúng ta vào db thôi. Sửa 1 chút ở file src/hero.rs
use diesel;
use diesel::prelude::*;
use diesel::mysql::MysqlConnection;
use schema::heroes;

#[table_name = "heroes"]
#[derive(Serialize, Deserialize, Queryable, Insertable)]
pub struct Hero {
    pub id: Option<i32>,
    pub name: String,
    pub identity: String,
    pub hometown: String,
    pub age: i32
}
Giờ ta có thể generate schema từ struct
$ diesel print-schema > src/schema.rs
Sau khi chạy lệnh trên, ta sẽ có được file schema.rs như sau
table! {
    heroes {
        id -> Nullable<Integer>,
        name -> Varchar,
        identity -> Varchar,
        hometown -> Varchar,
        age -> Integer,
    }
}
Thêm r2d2_diesel và schema vào src/main.rs
#[macro_use] extern crate diesel;
extern crate r2d2;
extern crate r2d2_diesel;
mod db;
mod schema;
Sửa một chút ở hàm main để có thể khởi tạo và sử dụng database.
fn main() {
    rocket::ignite()
        .manage(db::connect())
        .mount("/hero", routes![create, update, delete])
        .mount("/heroes", routes![read])
        .launch();
}
Thêm các method để truy vấn database ở src/hero.rs
impl Hero {
    pub fn create(hero: Hero, connection: &MysqlConnection) -> Hero {
        diesel::insert_into(heroes::table)
            .values(&hero)
            .execute(connection)
            .expect("Error creating new hero");

        heroes::table.order(heroes::id.desc()).first(connection).unwrap()
    }

    pub fn read(connection: &MysqlConnection) -> Vec<Hero> {
        heroes::table.order(heroes::id.asc()).load::<Hero>(connection).unwrap()
    }

    pub fn update(id: i32, hero: Hero, connection: &MysqlConnection) -> bool {
        diesel::update(heroes::table.find(id)).set(&hero).execute(connection).is_ok()
    }

    pub fn delete(id: i32, connection: &MysqlConnection) -> bool {
        diesel::delete(heroes::table.find(id)).execute(connection).is_ok()
    }
}
Và thêm lời gọi các method này ở các endpoint trong src/main.rs
#[post("/", data = "<hero>")]
fn create(hero: Json<Hero>, connection: db::Connection) -> Json<Hero> {
    let insert = Hero { id: None, ..hero.into_inner() };
    Json(Hero::create(insert, &connection))
}

#[get("/")]
fn read(connection: db::Connection) -> Json<Value> {
    Json(json!(Hero::read(&connection)))
}

#[put("/<id>", data = "<hero>")]
fn update(id: i32, hero: Json<Hero>, connection: db::Connection) -> Json<Value> {
    let update = Hero { id: Some(id), ..hero.into_inner() };
    Json(json!({
        "success": Hero::update(id, update, &connection)
    }))
}

#[delete("/<id>")]
fn delete(id: i32, connection: db::Connection) -> Json<Value> {
    Json(json!({
        "success": Hero::delete(id, &connection)
    }))
}
Giờ thì có thể chạy thử và xem kết quả rồi
Đoạn kết
Đoạn cuối bài là setup test performance của tác giả với rust, java, nodejs... Bạn có thể vào bài viết gốc để xem chi tiết nhưng tóm lại đấy là kết quả:
 Rust khá là mất công nhưng đổi lại lại có performance tuyệt vời.
All rights reserved
