Tạo component hightlight menu trong VueJS
Bài đăng này đã không được cập nhật trong 7 năm
Giới thiệu
Hôm nay trong bài viết này mình sẽ giới thiệu cho các bạn cách để tạo component highlight menu trong vuejs.
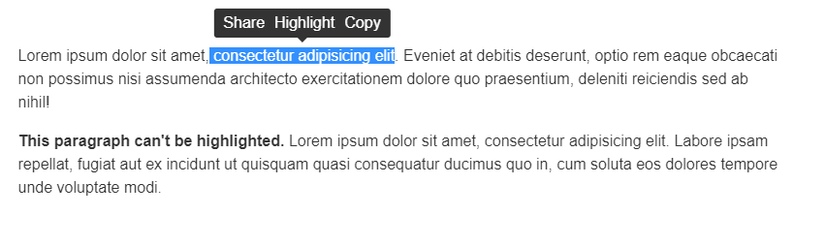
Ví dụ chúng ta bôi đen một đoạn text thì nó sẽ hiện lên menu này. Menu này chứa các nút cho phép bạn thực hiện một số hành động nhất định trên văn bản đã chọn như highlight nó lên, sao chép hoặc chia sê, ...
Các bước thực hiện
Dĩ nhiên mình hướng dẫn các bạn làm trong vuejs nên các bạn cần phải có vue-cli để tạo một project vue. Các bạn có thể cài vue-cli với câu lệnh như sau:
npm install -g @vue/cli-service-global
Và trong thư mục của project ta cần có 2 component đó là App.vue và Highlightable.vue. Trong đó Highlightable.vue là component dùng để hiển thị menu nkhi chúng ta chọn một vùng text. Còn App.vue là component chính để chạy app của chúng ta.
App.vue
Trong file App.vue của chúng ta có một đoạn có thể hiện menu highlight và một đoạn không có menu highlight. Và file App.vue sẽ trông như thế này:
<template>
  <div id="app">
    <highlightable
      @share="onShare"
      @highlight="onHighlight"
      @copy="onCopy"
    >
      <p>
        Lorem ipsum dolor sit amet, consectetur adipisicing elit.
        Eveniet at debitis deserunt, optio rem eaque obcaecati non possimus nisi assumenda architecto exercitationem dolore quo praesentium, deleniti reiciendis sed ab nihil!
      </p>
    </highlightable>
    <p>
      <strong>This paragraph can't be highlighted.</strong> Lorem ipsum dolor sit amet, consectetur adipisicing elit.
      Labore ipsam repellat, fugiat aut ex incidunt ut quisquam quasi consequatur ducimus quo in, cum soluta eos dolores tempore unde voluptate modi.
    </p>
  </div>
</template>

<script>
import Highlightable from './Highlightable'
export default {
  components: { Highlightable },

  methods: {
    onShare(text) {
      console.log('share:', text)
    },

    onHighlight(text) {
      console.log('highlight:', text)
    },

    onCopy(text) {
      console.log('copy:', text)
    },
  }
}
</script>

<style scoped>
* {
  box-sizing: border-box;
}

#app {
  width: 800px;
  margin: 40px auto;
  padding: 10px;
  font-family: Verdana;
  color: #333;
  width: 100%;
}

p {
  line-height: 1.5;
}
</style>
Ở trên các bạn có thể thấy mình xử lý 3 sự kiện đó là share, highlight và copy. Các bạn có thể tùy chỉnh các sự kiện của mình theo mong muốn.
Highlightable.vue
Trong component này sẽ có 2 phần là phần để hiển thị menu và phần để hiển thị văn bản được truyền từ ngoài vào <slot/>
- Phần
templatenhư sau:
<template>
  <div>
    <div
      v-show="showMenu"
      class="menu"
    >
      <span class="item">
        Share
      </span>
      <span class="item">
        Highlight
      </span>
      <span class="item">
        Copy
      </span>
    </div>

    <slot/>
  </div>
</template>
- Chúng ta sẽ đến phần style cho menu một chút:
<style scoped>
.menu {
  height: 30px;
  padding: 5px 10px;
  background: #333;
  border-radius: 3px;
  position: absolute;
  top: 0;
  left: 0;
  transform: translate(-50%, -100%);
  transition: 0.2s all;
  display: flex;
  justify-content: center;
  align-items: center;
}

.menu:after {
  content: '';
  position: absolute;
  left: 50%;
  bottom: -5px;
  transform: translateX(-50%);
  width: 0;
  height: 0;
  border-left: 6px solid transparent;
  border-right: 6px solid transparent;
  border-top: 6px solid #333;
}

.item {
  color: #FFF;
  cursor: pointer;
}

.item:hover {
  color: #1199ff;
}

.item + .item {
  margin-left: 10px;
}
</style>
Và để phần menu này hiển thị chính xác lên phần text mà mình đang chọn thì cần có phần script sau:
3. Bắt đầu với data
export default {
  data () {
    return {
      x: 0,
      y: 0,
      isShowMenu: false,
      selectedText: '',
    };
  },
}
Trong đó:
- x và y là vị trí của menu.
- isShowMenu là biến dùng để ẩn và hiện menu.
- selectedText biến chứa đoạn text đang được chọn.
- Bây giờ ta đến với
computed
computed: {
  highlightableEl () {
    return this.$slots.default[0].elm;
  }
}
Vì sao lại this.$slot.default[0] vì ở đây chúng ta truyền text như sau <highlightable>your text</highlightable> nên chỉ có 1 slot mặc định là default.
- Tiếp theo đến phần
hookđể bắt sự kiện và hủy sự kiện
mounted () {
  window.addEventListener('mouseup', this.onMouseup);
},

beforeDestroy () {
  window.removeEventListener('mouseup', this.onMouseup);
}
Khi đã mount component chúng ta bắt sự kiện mouseup để lấy vị trị text đã chọn, Và hủy sự kiện khi component hị hủy.
Với sự kiện mouseup chúng ta sẽ handle trong method onMouseup dới đây.
6. Phần methods
methods: {
  onMouseup() {
    const selection = window.getSelection();
    const selectionRange = selection.getRangeAt(0);
    // startNode là element bắt đầu của phần chọn
    // endNote là phần tử kết thúc của phần chọn
    const startNode = selectionRange.startContainer.parentNode;
    const endNode = selectionRange.endContainer.parentNode;

    // Nếu văn bản được chọn không phải là một phần của highlightableEl (tức là <p>)
    // hoặc
    // if startNode! == endNode (nghĩa là người dùng đã chọn nhiều đoạn)
    // thì
    // Không hiển thị menu
    if (!startNode.isSameNode(this.highlightableEl) || !startNode.isSameNode(endNode)) {
      this.showMenu = false;
      return;
    }

    // Lấy x, y, và width của phần được chọn
    const { x, y, width } = selectionRange.getBoundingClientRect();

    // Nếu width === 0 (Tức là không có text được chọn)
    // Thì ẩn menu đi
    if (!width) {
      this.showMenu = false;
      return;
    }

    // Cuối cùng, nếu lựa chọn hợp lệ
    // Gán x, y bằng vị trí của phần text được chọn
    // Gán selectText thành nội dung đâng chọn
    // Rồi sau đó hiển thị menu
    this.x = x + (width / 2);
    this.y = y + window.scrollY - 10;
    this.selectedText = selection.toString();
    this.showMenu = true;
  },

  handleAction(action) {
    this.$emit(action, this.selectedText);
  },
}
Bây giờ chúng ta sẽ update lại phần template một chút.
<template>
  <div>
    <div
      v-show="showMenu"
      class="menu"
      :style="{
        left: `${x}px`,
        top: `${y}px`
      }"
      @mousedown.prevent=""
    >
      <span
        class="item"
        @mousedown.prevent="handleAction('share')"
      >
        Share
      </span>
      <span
        class="item"
        @mousedown.prevent="handleAction('highlight')"
      >
        Highlight
      </span>
      <span
        class="item"
        @mousedown.prevent="handleAction('copy')"
      >
        Copy
      </span>
    </div>

    <slot/>
  </div>
</template>
Chúng ta đã áp dụng x và y để chỉnh lại vị trí của menu và thêm các sự kiện khi click vào các item trên menu.
Vậy là đã xong. Chúng ta hãy cùng nhau thưởng thức thành quả đạt được nào.
Kết luận
Vậy trên đây mình đã hướng dẫn các bạn tạo một component để hiển thị menu khi chọn 1 đoạn text nào đó. Cám ơn các bạn đã đọc bài viết của mình, hy vọng nó có thể giúp ích được cho các bạn.
Chúc các bạn học tập và làm việc tốt  ))))
))))
Bài viết được lấy ý tưởng từ https://medium.freecodecamp.org/how-to-create-a-medium-like-highlight-menu-in-vue-dc515f2dddef
All rights reserved
