Tạo blog review bằng reactjs
Bài đăng này đã không được cập nhật trong 7 năm
Giới thiệu
Trong thời gian vừa rồi mình có nhận 1 thử thách: tạo blog review thức ăn và sử dụng reactjs làm front-end. Trong bài thử thách đấy có một số yêu cầu khá thú vị nên mình sẽ viết bài này để chia sẽ những thứ mình vừa học được sau khi hoàn thành thử thách
Trang review thức ăn sẽ bao gồm các phần sau:
- Cho phép nhập tên món ăn
- Cho phép upload ảnh đại diện của món ăn
- Cho phép nhập mô tả món ăn sử dụng text-editor
Tiếp theo mình xin chia sẻ cách xây dựng front-end của trang review food trên nền tảng react-js
Setup môi trường
Để setup cho ứng dụng react, mình sẽ sử dụng package react-create-app để tạo base cho ứng dụng react. Để cài đặt bạn gõ lệnh sau:
npx create-react-app food-review
cd food-review
npm start
Kết thúc phần tạo base, tiếp theo để cài đặt các component cần thiết cho ứng dụng, ta sẽ sửa dependencies trong file package.json như sau:
"dependencies": {
    "immutability-helper": "^2.6.6",
    "react": "16.3.2",
    "react-addons-update": "^15.6.2",
    "react-bootstrap": "^0.32.4",
    "react-dom": "16.3.2",
    "react-dropzone": "^7.0.1",
    "react-quill": "^1.3.2",
    "react-scripts": "1.1.4"
}
Ngoài các thư viện cần thiết cho reactjs, mình cũng đã bổ sung thêm các thư viện để giải quyết các bài toàn trên:
- react-dropzone
- react-quill
Tạo trang food-review
Đầu tiên mình sẽ giới thiệu về cây thư mục của dự án như sau:
node_modules
public
src
├── FoodContainer
│   ├── index.jsx
│   ├── ReviewForm.jsx
├── index.js
├── serviceWorker.js
package.json
package-lock.json
Trong phần code của index.js mình sẽ sửa lại code như sau:
import React from "react";
import ReactDOM from "react-dom";
import FoodContainer from "./FoodContainer/index"

ReactDOM.render(<FoodContainer />, document.getElementById('root') );

serviceWorker.unregister();
Tiếp theo mình cũng xin được giới thiệu sơ qua về bố cục của food-app. Mình sử dụng react-bootrap để làm phần core cho component (responsive system), mọi người cũng biết bootrap là framework cho css nổi tiếng và được sử dụng rất nhiều. File index.jsx sẽ là xương sống cho ứng dụng:
import React from 'react'
import {Grid, Row, Col} from 'react-bootstrap';
import ReviewForm from './ReviewForm'

class FoodContainer extends React.Component {
  constructor(props) {
    super(props);
    this.state = {

    };
  }

  render(){
    return (
      <div>
        <Grid>
          <Row className="show-grid">
            <Col md={2}>
            </Col>
            <Col md={8}>
              <ReviewForm />
            </Col>
            <Col md={2}>
            </Col>
          </Row>
        </Grid>
      </div>
    );
  }
}

export default FoodContainer
Mình sẽ xử lý các yêu cầu của bài toán trong file ReviewForm.jsx.
Yêu cầu đầu tiên của ứng dụng là nhập tên món ăn review khá là dễ thở. Chỉ cần một tạo component input là đã đáp ứng được yêu cầu này:
import React from 'react';
import {FormGroup, FormControl, Button} from 'react-bootstrap';
import {Grid, Row} from 'react-bootstrap';
import update from 'react-addons-update'
import './index.css';

class ReviewForm extends React.Component {
  constructor(props) {
    super(props);
    this.state = {
      foodName: ''
    };
  }

  handleInput = (e) => {
    this.setState({
      foodName: e.target.value
    })
  }

   render() {
    return(
      <div>
        <FormGroup controlId="food-name">
          <FormControl
            type="text"
            value={this.state.foodName}
            placeholder="Enter food name"
            onChange={this.handleInput}
          />
        </FormGroup>
        <div className="btnSubmit">
          <Button
            bsStyle="success"
            type="submit"
            onClick={() => this.handleSubmit()}
          >
            Submit
          </Button>
        </div>
      </div>
    );
  }

export default ReviewForm
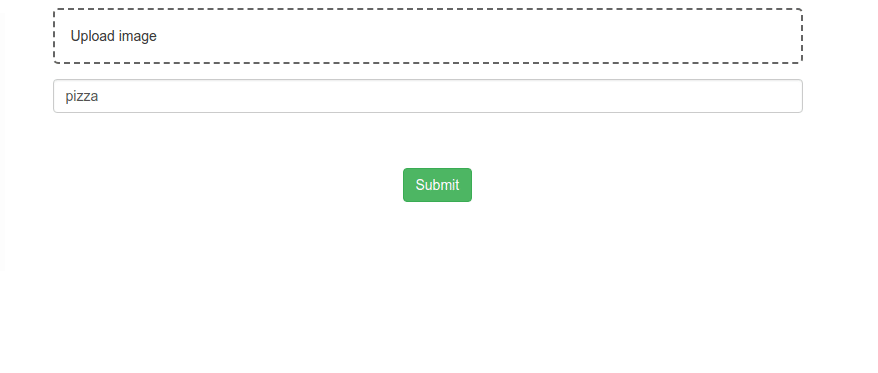
Phần thứ 2 đó là cho phép upload ảnh review thức ăn. Ở phần này mình sẽ dự dụng component react-dropzone cho phép kéo thả anh và nâng cao hơn 1 chút mình sẽ hỗ trợ cho phép preview ảnh sau khi thả:
import React from 'react';
import {FormGroup, FormControl, Button} from 'react-bootstrap';
import {Grid, Row} from 'react-bootstrap';
import Dropzone from "react-dropzone";
import update from 'react-addons-update'
import './index.css';

const imageMaxSize = 1000000000 //bytes
const acceptedFileTypes = 'image/x-png, image/png, image/jpg, image/jpeg, image/gif'
const acceptedFileTypesArray = acceptedFileTypes.split(",").map((item) => item.trim())
class ReviewForm extends React.Component {
  constructor(props) {
    super(props);
    this.state = {
      foodName: '',
      uploadedFiles: [],
      imagePreviews: [],
    };
  }

  verifyFiles = (files) => {
    if (files && files.length > 0) {
      let currentFile = files[0]
      let currentFileType = currentFile.type
      let currentFileSize = currentFile.size

      if (currentFileSize > imageMaxSize) {
        return false
      }

      if (!acceptedFileTypesArray.includes(currentFileType)) {
        return false
      }
    }
    return true
  }

  onFileDropped = (acceptedFiles, rejectedFiles) => {
    let files = this.state.uploadedFiles
    let filesPreview = this.state.imagePreviews
    if (this.verifyFiles(acceptedFiles)) {
      files.push(acceptedFiles[0]);

      let currentFile = acceptedFiles[0]
      let reader = new FileReader()
      reader.addEventListener("load", ()=>{
        filesPreview.push(reader.result)
        this.setState({
          imagePreviews: filesPreview
        })
      })
      reader.readAsDataURL(currentFile)

      this.setState({
        uploadedFiles: files || null,
      });
    }
  }

  handleRemove = (index) => {
    let listPreviews = update(this.state.imagePreviews, {})
    let listUpload = update(this.state.uploadedFiles, {})
    if (listPreviews.length > 0 && listUpload.length > 0) {
      listPreviews.splice(index, 1);
      listUpload.splice(index, 1);
      this.setState({
        imagePreviews: listPreviews,
        uploadedFiles: listUpload,
      });
    }
  }

  renderDropZone(fileName) {
    return(
      <Dropzone
        onDrop={this.onFileDropped}
        id="dropzone-upload-component"
        accept={acceptedFileTypes}
        multiple={false}
      >
        <div>{fileName}</div>
      </Dropzone>
    )
  }

  render() {
    let fileName = "Upload image";
    let imagePreviews = this.state.imagePreviews
    return(
      <div>
        <FormGroup controlId="food-name">
          <FormControl
            type="text"
            value={this.state.foodName}
            placeholder="Enter food name"
            onChange={this.handleInput}
          />
        </FormGroup>
        <div className="btnSubmit">
          <Button
            bsStyle="success"
            type="submit"
            onClick={() => this.handleSubmit()}
          >
            Submit
          </Button>
        </div>
      </div>
    );
  }
}

export default ReviewForm
Sửa file index.css để cải thiện giao diện một chút:
.btnSubmit {
  max-width: 50px;
  margin: 55px auto 10px;
}

#dropzone-upload-component {
  width: auto !important;
  height: auto !important;
  padding: 16px;
}

.img-preview {
  height: 100px;
  width: 100px;
  margin: 5px
}

.img-inline {
  display:inline-block
}
Sau đây là kết quả sau khi mình thực hiện:
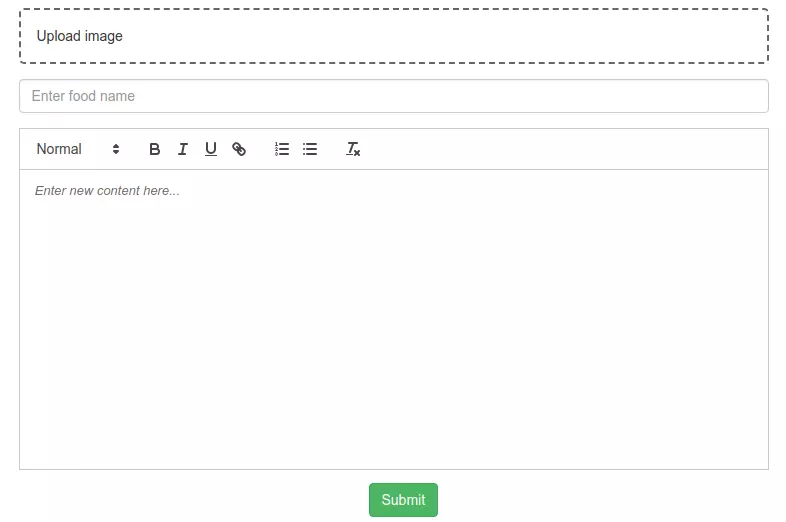
Phần cuối cùng là 1 phần đặc biệt bởi vì đề bài yêu cầu sử dụng text-editor là quill. Ngoài ra sau khi apply quill vào ứng dụng, đề bài còn đặt ra thử thách có thể insert/resize ảnh trong text editor; insert/resize video youtube.
Mình xin giới thiệu qua quill 1 chút: quill là 1 thư viện được sử dụng để làm text-editor và đã được apply trong slack, gannet, reedsy các bạn có thể tham khảo tại đây
Mình sẽ sử dụng react-quill trong ứng dụng này như sau:
...
import ReactQuill, {Quill} from 'react-quill'

class ReviewForm extends React.Component {
  constructor(props) {
    super(props);
    this.state = {
      foodName: '',
      uploadedFiles: [],
      text: '',
      imagePreviews: [],
    };
  }

  handleChange = (value) => {
    this.setState({
      text: value
    })
  }

  render() {
  ...
        <FormGroup controlId="editor">
          <ReactQuill
            value={this.state.text}
            onChange={this.handleChange}
            placeholder={"Enter new content here..."}
            style={{height: "300px"}}
          />
        </FormGroup>
  ...
  }
Tuy nhiên editor hiện tại mởi chỉ bao gồm các chức năng đơn giản, còn thiếu insert ảnh, video youtube. Trên document của quill có hướng dẫn add thêm các module nâng cao hơn, các bạn có xem tại đây
render() {
    ...
    const modulesQill = {
      toolbar: [
        [{ 'header': '1'}, {'header': '2'}, { 'font': [] }],
        [{size: []}],
        ['bold', 'italic', 'underline', 'strike', 'blockquote'],
        [{'list': 'ordered'}, {'list': 'bullet'},
         {'indent': '-1'}, {'indent': '+1'}],
        ['link', 'image', 'video'],
        ['clean']
      ],
      clipboard: {
        matchVisual: false,
      },
      history: {
        delay: 1000,
        maxStack: 50,
        userOnly: false
      },
      imageResize: {
        displayStyles: {
          backgroundColor: 'black',
          border: 'none',
          color: 'white'
        },
        modules: ['Resize', 'DisplaySize', 'Toolbar']
      },
    }
    const formats = [
      'header', 'font', 'size',
      'bold', 'italic', 'underline', 'strike', 'blockquote',
      'list', 'bullet', 'indent',
      'link', 'image', 'video'
    ]
    return(
      <div>
        ...
        <FormGroup controlId="editor">
          <ReactQuill
            value={this.state.text}
            onChange={this.handleChange}
            modules={modulesQill}
            formats={formats}
            placeholder={"Enter new content here..."}
            style={{height: "300px"}}
          />
        </FormGroup>
        <div className="btnSubmit">
          <Button
            bsStyle="success"
            type="submit"
            onClick={() => this.handleSubmit()}
          >
            Submit
          </Button>
        </div>
      </div>
    );
  }
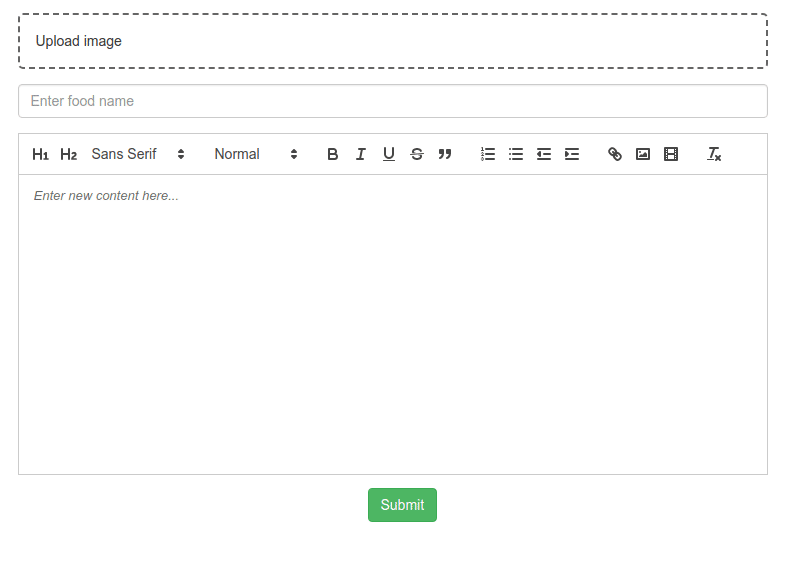
Cuối cùng là phần resize ảnh và video youtube. Ở phần này mình cũng tìm thư viện ở bên thứ 3 để hỗ trợ, chứ không tự code được, các bạn có thể tham khảo trên github của mình được up ở cuối bài.
Kết thúc
Cảm ơn các bạn đã đọc bài viết của mình, tuy kiến thức trong bài viết không có gì cao siêu tuy nhiên đó cũng là công sức mình bỏ ra nghiên cứ và tìm tòi . Hy vọng bài viết của mình sẽ giúp được các bạn trong dự án
Source code mình up ở đây nhé: https://github.com/duongpham910/food-review
All rights reserved
