Tạo api với nodejs, express và MySQL
Bài đăng này đã không được cập nhật trong 5 năm
Trước khi bắt đầu thì dưới đây là những điều kiện cần cũng như bắt buộc phải có để chúng ta có thể triển khai ứng dụng nhé:
Node.js là một môi trường chạy mã nguồn mở, đa nền tảng để phát triển các ứng dụng mạng và phía máy chủ. Mọi người nên có kiến thức cơ bản về nodejs nhé.
ExpressJS là một trong những framework thịnh hành nhất cho node.js. Nó được xây dựng trên mô-đun http node.js và thêm hỗ trợ cho định tuyến, phần mềm trung gian, hệ thống xem, v.v. Nó rất đơn giản và tối thiểu, không giống như các khung công tác khác.
MySQL là một hệ quản trị cơ sở dữ liệu quan hệ mã nguồn mở. Tên của nó là sự kết hợp giữa “My”, tên của con gái đồng sáng lập Michael Widenius và “SQL”, tên viết tắt của Structured Query Language.
EcmaScript (ES) là một ngôn ngữ kịch bản được chuẩn hóa cho JavaScript (JS). Phiên bản ES hiện tại được hỗ trợ trong các trình duyệt hiện đại là ES5. Tuy nhiên, ES6 giải quyết rất nhiều hạn chế của ngôn ngữ cốt lõi, giúp các nhà phát triển viết mã dễ dàng hơn.
Postman là một công cụ phát triển API (giao diện lập trình ứng dụng) giúp xây dựng, kiểm tra và sửa đổi các API, nó có khả năng thực hiện các loại yêu cầu HTTP khác nhau (GET, POST, PUT, v.v.v).
IDE (môi trường phát triển tích hợp) là một ứng dụng phần mềm cung cấp cơ sở vật chất toàn diện cho các lập trình viên máy tính để phát triển phần mềm. Một IDE thường bao gồm ít nhất một trình soạn thảo mã nguồn, xây dựng các công cụ tự động hóa và một trình gỡ lỗi. Trong trường hợp của tôi, tôi thích sử dụng mã studio trực quan hơn.
1. Tạo project
Tạo một project bằng lệnh như bên dưới nhé:
// Create directory
mkdir NodeMysqlCrudApp
// then Navigate to NodeMysqlCrudApp
cd NodeMysqlCrudApp
2. Khởi tạo và cấu hình project
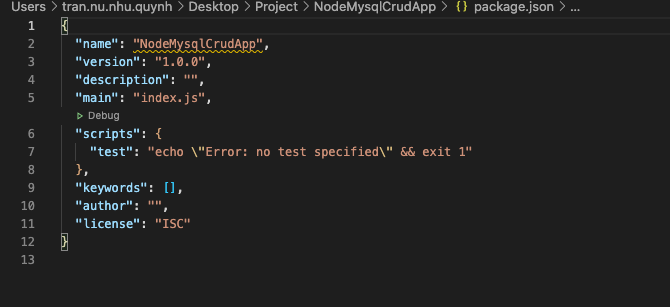
Để khởi tạo project chúng ta gõ lệnh: npm init, nếu muốn tránh một số câu hỏi thì chúng ta gõ lệnh: npm init -y. Kết quả ta được file package.json ở bên dưới:
3. Cài đặt express và các phụ thuộc khác
Expressjs là một framework được xây dựng trên nền tảng của Nodejs.
// Lệnh cài đặt
npm install express --save
Body Parser trả về một function hoạt động như một middleware. Chức năng lắng nghe trên req.on (\'data\') và xây dựng req.body từ các đoạn dữ liệu mà nó nhận được.
npm install body-parser --save
MySQL là cơ sở dữ liệu mã nguồn mở sử dụng để tương tác với cơ sở dữ liệu và thao tác các bản ghi.
npm install mysql --save
Nodemon là một công cụ giúp phát triển các ứng dụng dựa trên node.js bằng cách tự động khởi động lại ứng dụng khi phát hiện thấy các thay đổi tệp trong thư mục.
// --save-dev: package will appear in your devDependencies
npm install --save-dev nodemon
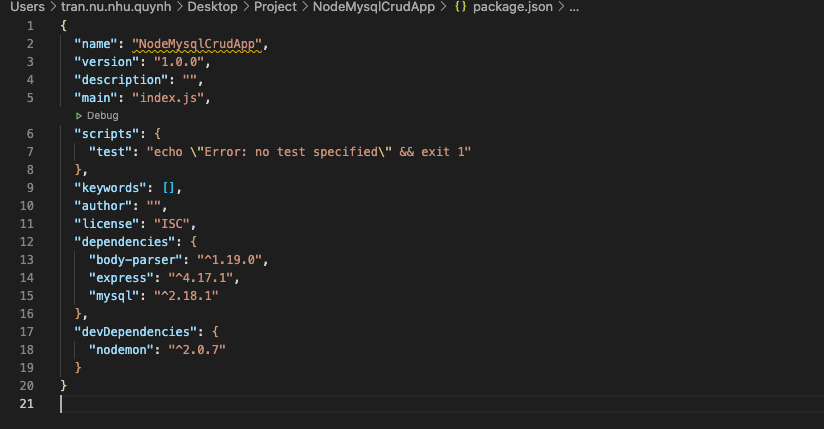
Giờ hãy kiểm tra lại file package.json nhé:
4. Khởi tạo và start server
Tạo file server.js ở thư mục gốc dự án và thêm vài dòng code vào nhé:
const express = require('express');
const bodyParser = require('body-parser');
// create express app
const app = express();
// Setup server port
const port = process.env.PORT || 5000;
// parse requests of content-type - application/x-www-form-urlencoded
app.use(bodyParser.urlencoded({ extended: true }))
// parse requests of content-type - application/json
app.use(bodyParser.json())
// define a root route
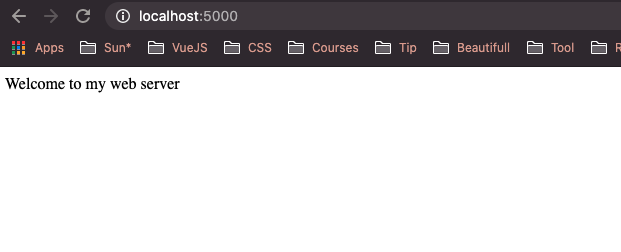
app.get('/', (req, res) => {
res.send("Welcome to my web server");
});
// listen for requests
app.listen(port, () => {
console.log(`Server is listening on port ${port}`);
});
Giờ chúng ta run web server lên xem nhé:
node server.js // or node server
Mở trình duyệt và vào http://localhost:5000. Nếu trình duyệt hiển thị "Welcome to my web server" thì lúc đó server bạn tạo đã hoạt động rồi nhé.
Ở các bước trình thì mình đã cài nodemon. Nếu muốn server tự động restart khi có thay đổi thì chúng ta chỉ cần thêm đoạn code dưới vào file package.json nhé:
"start": "nodemon server"
Giờ chúng ta sẽ run server bằng lệnh: npm start

5. Tạo database
Mọi người tải MySQL và tạo database của mình nhé. Ở đây mình sẽ copy đoạn script mà mình đã tạo cho mọi người tham khảo nhé.
CREATE DATABASE node_mysql_crud_db;

CREATE  TABLE IF NOT EXISTS `employees` (
  `id` BIGINT UNSIGNED AUTO_INCREMENT,
  `first_name` VARCHAR(255) NOT NULL,
  `last_name` VARCHAR(255) NOT NULL,
  `email` VARCHAR(255) NOT NULL,
  `phone` VARCHAR(50) NOT NULL,
  `organization` VARCHAR(255) NOT NULL,
  `designation` VARCHAR(100) NOT NULL,
  `status` TINYINT UNSIGNED DEFAULT 0,
  `is_deleted` TINYINT UNSIGNED DEFAULT 0,
  `created_at` DATETIME NOT NULL,
  `updated_at` DATETIME DEFAULT CURRENT_TIMESTAMP ON UPDATE CURRENT_TIMESTAMP,
  PRIMARY KEY (`id`))
ENGINE = InnoDB;

INSERT INTO `node_mysql_crud_db`.`employees` (`first_name`, `last_name`, `email`, `phone`, `organization`, `designation`, `salary`, `status`, `is_deleted`, `created_at`) VALUES ('John', 'Doe', 'johndoe@gmail.com', '1234567890', 'BR Softech Pvt Ltd', 'Full Stack Developer', '1', '0', '2019-11-19 03:30:30');
6. Kết nối database
Để tạo kết nối với cơ sở dữ liệu trong dự án, hãy tạo một thư mục cấu hình tại thư mục gốc và tạo file db.config.js bên trong thư mục config.
mkdir config // create folder config
cd config
touch db.config.js // create file db.config.js
Tiếp theo, thêm đoạn code dưới để tạo mysql connection nhé:
'use strict';
const mysql = require('mysql');
//local mysql db connection
const dbConn = mysql.createConnection({
host : 'localhost',
user : 'root',
password : 'Aa@123456',
database : 'node_mysql_crud_db'
});
dbConn.connect(function(err) {
if (err) throw err;
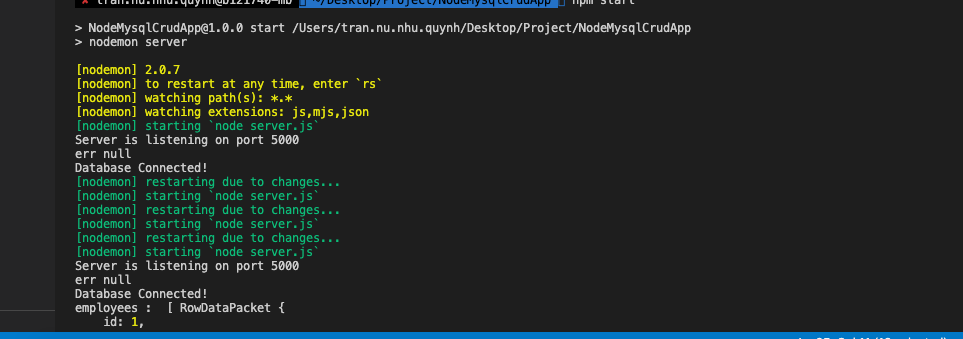
console.log("Database Connected!");
});
module.exports = dbConn;
Nếu sau khi connect hiển thị như dưới thì mọi người đã thành công connect đến database của mình rồi nhé.
7. Cấu trúc thư mục dự án
Cùng nhìn lại cấu trúc thư mục dự án xem thế nào nhé:
Dưới đây mình sẽ demo viết một api lấy tất cả nhân viên theo mô hình MVC, mọi người cùng xem nhé:
// employee.model.js
'use strict';
var dbConn = require('./../../config/db.config');

//Employee object create

var Employee = function(employee){
  this.first_name     = employee.first_name;
  this.last_name      = employee.last_name;
  this.email          = employee.email;
  this.phone          = employee.phone;
  this.organization   = employee.organization;
  this.designation    = employee.designation;
  this.salary         = employee.salary;
  this.status         = employee.status ? employee.status : 1;
  this.created_at     = new Date();
  this.updated_at     = new Date();
};

Employee.getAll = function (result) {
    dbConn.query("Select * from employees", function (err, res) {
        if(err) {
          console.log("error: ", err);
          result(null, err);
        }
        else{
          console.log('employees : ', res);
          result(null, res);
        }
    });
};
module.exports= Employee;
// employee.controller.js
'use strict';
const Employee = require('../models/employee.model');

exports.getAll = function(req, res) {
    Employee.getAll(function(err, employee) {
      console.log('controller')
      if (err)
      res.send(err);
      console.log('res', employee);
      res.send(employee);
    });
};
// employee.routes.js
const express = require('express')

const router = express.Router()

const employeeController =   require('../controllers/employee.controller');

// Get all employees
router.get('/', employeeController.getAll);

module.exports = router
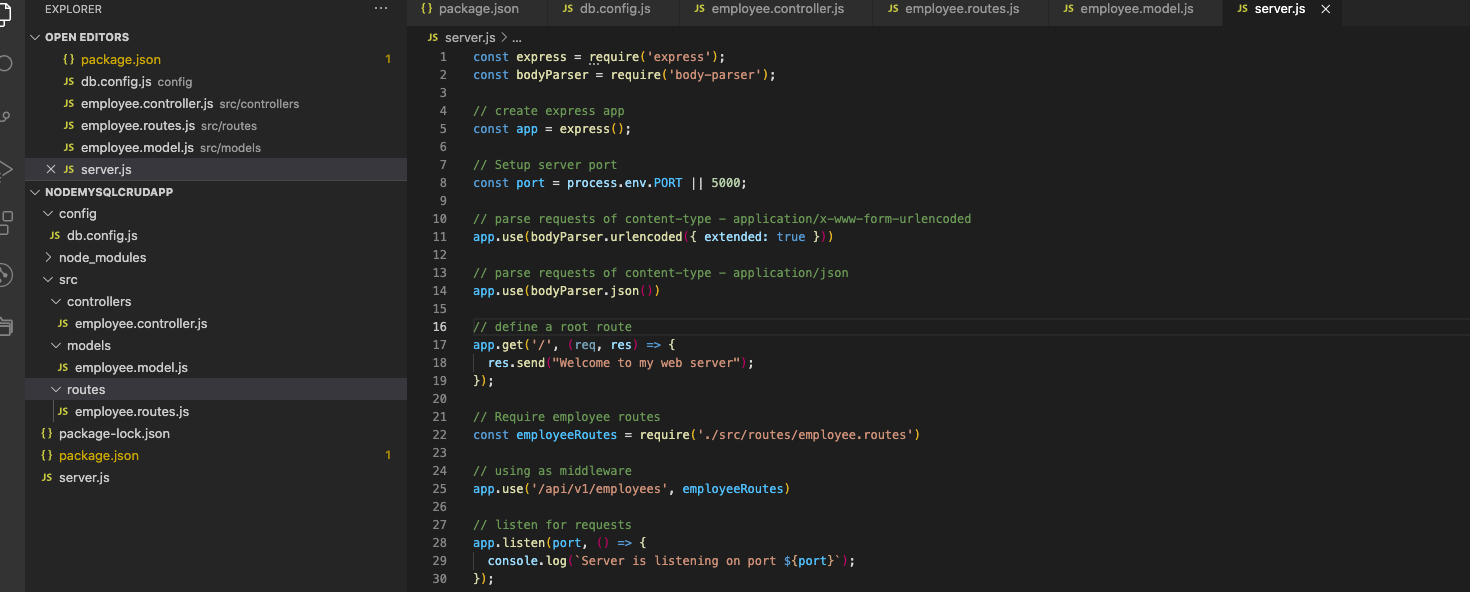
Cuối cùng chúng ta update code file server.js:
const express = require('express');
const bodyParser = require('body-parser');

// create express app
const app = express();

// Setup server port
const port = process.env.PORT || 5000;

// parse requests of content-type - application/x-www-form-urlencoded
app.use(bodyParser.urlencoded({ extended: true }))

// parse requests of content-type - application/json
app.use(bodyParser.json())

// define a root route
app.get('/', (req, res) => {
  res.send("Welcome to my web server");
});

// Require employee routes
const employeeRoutes = require('./src/routes/employee.routes')

// using as middleware
app.use('/api/v1/employees', employeeRoutes)

// listen for requests
app.listen(port, () => {
  console.log(`Server is listening on port ${port}`);
});
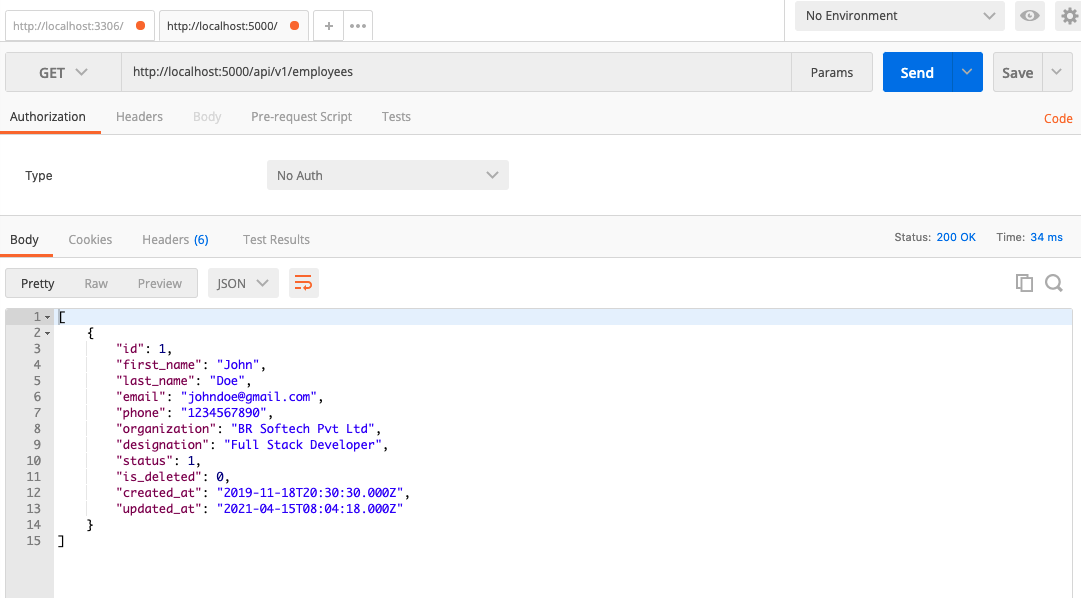
Okay, thành quả sau khi mình test postman nhé mọi người.
Tài liệu tham khảo: https://medium.com/@rahulguptalive/create-crud-apis-in-nodejs-express-and-mysql-abda4dfc2d6
Cảm ơn mọi người đã theo dõi bài viết, hẹn mọi người ở các bài viết tiếp theo nhé ❤️

All rights reserved
