[SwiftUI] Tạo ứng dụng Search Danh Bạ với SwiftUI
Bài đăng này đã không được cập nhật trong 6 năm
Kế hoạch thực hiện
-
Sử dụng Contacts framework để lấy danh bạ điện thoại.
-
Đưa chúng vào SwiftUI List.
-
Sử dụng protocol
UIViewRepresentableđể tạoUISearchBarcho SwiftUI. -
Filter danh sách liên lạc dựa trên văn bản tìm kiếm.
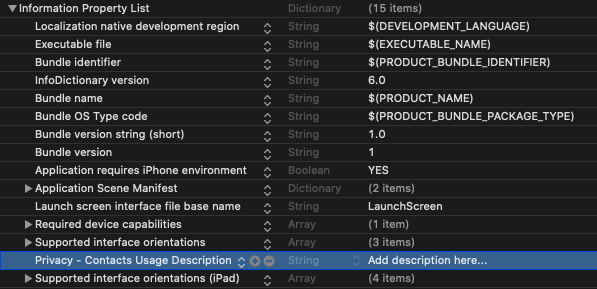
Bắt đầu - Thêm Privacy Description
Contacts framework cho phép bạn lấy thông tin danh bạ mà không thực hiện bất kỳ thay đổi nào.
Để truy cập ứng dụng đó, trước tiên cần set privacy contacts usage descriptions trong tệp info.plist.
Chỉ cần thêm NSContactsUsageDescription với nội dung giải thích.
Kết hợp UISearchBar với UIViewRepresentable và Coordinators
Hiện tại SwiftUI chưa hỗ trợ tích hợp search bars.
Vì vậy, chúng ta cần conform struct của mình với protocol UIViewRepresentable và khởi tạo UISearchBar của UIKit trong nó như dưới đây:
struct SearchBarView: UIViewRepresentable {

    @Binding var text: String
    var placeholder: String

    func makeCoordinator() -> Coordinator {
        return Coordinator(text: $text)
    }

    func makeUIView(context: Context) -> UISearchBar {
        let searchBar = UISearchBar(frame: .zero)
        searchBar.delegate = context.coordinator
        searchBar.placeholder = placeholder
        searchBar.searchBarStyle = .minimal
        searchBar.autocapitalizationType = .none
        searchBar.showsCancelButton = true
        return searchBar
    }

    func updateUIView(_ uiView: UISearchBar,
                      context: Context) {
        uiView.text = text
    }
}
Hàm makeCoordinator() cho phép chúng ta tạo class Coordinator, chịu trách nhiệm truyền đạt các thay đổi từ UIKit View sang giao diện SwiftUI.
Chúng ta sẽ định nghĩa class Coordinator, cũng khai báo cả protocol UISearchBarDelegate:
class Coordinator: NSObject, UISearchBarDelegate {

    @Binding var text: String

    init(text: Binding<String>) {
        _text = text
    }

    func searchBar(_ searchBar: UISearchBar, textDidChange searchText: String) {
        text = searchText
    }

    func searchBarCancelButtonClicked(_ searchBar: UISearchBar) {
        searchBar.resignFirstResponder()
    }
}
Tạo class ObservableObject để lấy danh bạ
ObservableObject protocol được sử dụng để thông báo các thay đổi trong SwiftUI view thông qua thuộc tính @Published.
Trong đoạn mã sau, chúng ta sẽ tìm lấy các contacts, đảm bảo rằng quyền được cấp và sau đó lưu trữ trong thuộc tính @Published :
class ContactStore: ObservableObject {

    @Published var contacts: [CNContact] = []
    @Published var error: Error? = nil

     func fetchContacts() {

        let store = CNContactStore()
        store.requestAccess(for: .contacts) { (granted, error) in
            if let error = error {
                print("failed to request access", error)
                return
            }

            if granted {

                let keys = [CNContactGivenNameKey, CNContactFamilyNameKey, CNContactPhoneNumbersKey]
                let request = CNContactFetchRequest(keysToFetch: keys as [CNKeyDescriptor])

                request.sortOrder = .givenName

                do {

                    var contactsArray = [CNContact]()
                    try store.enumerateContacts(with: request, usingBlock: { (contact, stopPointer) in
                        if (contact.phoneNumbers.first?.value.stringValue) != nil{
                            contactsArray.append(contact)
                        }
                    })

                    self.contacts = contactsArray

                } catch let error {
                    print("Failed to enumerate contact", error)
                }
            } else {
                print("access denied")
            }
        }
    }
}


extension CNContact: Identifiable {
    var name: String {
        return [givenName, familyName].filter{ $0.count > 0}.joined(separator: " ")
    }
}
SwiftUI cần một cách để xác định từng contact duy nhất. Để làm điều đó, chúng tôi đã tạo ra một extension ở cuối conform với protocol Identifiable.
Bây giờ, tất cả đã được setup xong để tích hợp search bar.
Tích hợp SearchBarView
Chúng ta sử dụng @EnvironmentObject để truy xuất danh bạ.
Trong đoạn mã sau, bằng cách sử dụng SwiftUI List, chúng ta có thể lấy danh bạ và filter chúng dựa trên các giá trị được nhập vào ở searchText.
struct ContentView: View {

    @EnvironmentObject var store: ContactStore
    @State private var searchText : String = ""

    var body: some View {
        NavigationView {
            VStack {
                SearchBarView(text: $searchText, placeholder: "Type here")
                List{

                    ForEach(self.store.contacts.filter{
                        self.searchText.isEmpty ? true : $0.givenName.lowercased().contains(self.searchText.lowercased())
                    }, id: \.self.name) {
                        (contact: CNContact) in

                        VStack(alignment: .leading){
                            Text(contact.name).font(.headline)
                            Text(contact.phoneNumbers.first?.value.stringValue ?? "").font(.subheadline)
                        }

                    }
                }.onAppear{
                    DispatchQueue.main.async {
                        self.store.fetchContacts()
                    }
                }
                .navigationBarTitle(Text("SwiftUI Contacts"))
            }
        }
    }
}
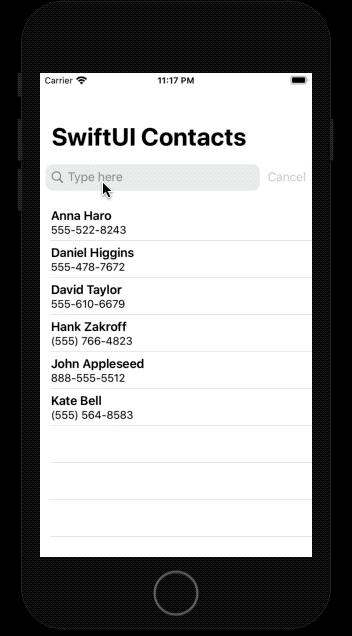
Kết quả:
Kết luận
Chúng ta đã thiết lập ứng dụng danh bạ SwiftUI với chức năng tìm kiếm khá nhanh - mặc dù search bar không được hỗ trợ trong SwiftUI.
Làm điều tương tự với UITableView và UISearchBar sẽ khá tốn thời gian, công sức và code đáng kể.
Hy vọng sẽ thấy SwiftUI 2.0 trong WWDC 2020 hỗ trợ các tính năng mới.
Bạn có thể tải xuống mã nguồn đầy đủ từ Github Repository.
Cảm ơn các bạn vì đã xem đến đây.
Nguồn: medium.com
All rights reserved
