[SWIFT] Custom Animated Splash Screen in iOS
Bài đăng này đã không được cập nhật trong 5 năm
Môi trường phát triển:
- Swift Language Version: Swift 5
- Xcode: Version 12.1
- Deployment Target: 11.0
Bước 1: Create Animation Image View
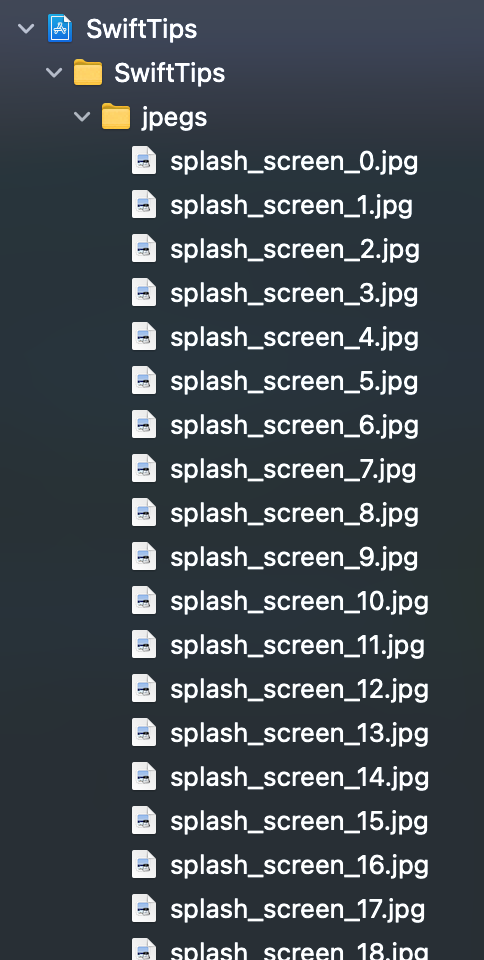
- Ta cần chuẩn bị 1 folder jpegs chứa các ảnh định dạng JPG được cắt từ 1 ảnh GIF.
Sau đó, tạo class AnimationImageView kế thừa từ UIImageView và protocol AnimationImageViewDelegate
protocol AnimationImageViewDelegate: NSObject {
    func didFinishAnimationImageView()
}

class AnimationImageView: UIImageView {

    private var imageNames: [String] = []
    private var timer = Timer()
    private var imageIndex: Int!
    weak var delegate: AnimationImageViewDelegate!

    init(imageNames: [String]) {
        super.init(frame: .zero)
        self.imageNames = imageNames
    }

    required init?(coder: NSCoder) {
        fatalError("init(coder:) has not been implemented")
    }
}
Trong đó:
- didFinishAnimationImageView(): function báo thời điểm kết thúc animation của UIImageView.
- imageNames: Array kiểu string chứa các tên của image trong folder jpegs.
- imageIndex: Vị trí của ảnh trong imageNames.
// override
override func startAnimating() {
    if self.timer.isValid {
        self.stopAnimating()
    }

    self.imageIndex = 0
    let timerInterval = self.animationDuration
    self.timer = Timer.scheduledTimer(timeInterval: timerInterval,
                                      target: self,
                                      selector: #selector(timerDidFire),
                                      userInfo: nil,
                                      repeats: true)
}

// override
override func stopAnimating() {
    if self.timer.isValid {
        self.timer.invalidate()
    }
}

@objc
private func timerDidFire() {
    if self.imageIndex >= self.imageNames.count {
        self.finishAnimating()
    } else {
        self.setCurrentImageAndIncreaseIndex()
    }
}
Tiếp theo, ta override hàm startAnimating() và stopAnimating() của UIImageView. Trong hàm startAnimating(), ta set giá trị cho imageIndex = 0 và khởi tạo biến timer. Trong hàm stopAnimating() thì ta sẽ hủy biến timer.
- animationDuration = 1/30 giây
private extension AnimationImageView {
    func setCurrentImageAndIncreaseIndex() {
        self.setImageByImageIndex(imageIndex: self.imageIndex)
        self.imageIndex+=1
    }

    func setImageByImageIndex(imageIndex: Int) {
        if imageIndex >= self.imageNames.count {
            return
        }
        let bundlePath: String = Bundle.main.bundlePath
        let filePath: String = bundlePath.stringByAppendingPathComponent(path: self.imageNames[imageIndex])
        let nextImage: UIImage = UIImage(contentsOfFile: filePath)!
        self.image = nextImage
    }

    func finishAnimating() {
        self.stopAnimating()
        self.delegate.didFinishAnimationImageView(imageView: self)
    }
}
Bước 2: Create Animation View
Ở bước này, ta tạo class AnimationView kế thừa từ UIView và protocol AnimationViewDelegate
let kAnimationImagePrefix = "splash_screen_"
let kAnimationImageSuffix = ".jpg"
let kImageMaxIndex = 59

protocol AnimationViewDelegate: NSObject {
    func animationDidFinished()
}

class AnimationView: UIView, AnimationImageViewDelegate {
    weak var delegate: AnimationViewDelegate?
    private var imageNames: [String] = []
    private var animationView: AnimationImageView?

    required init?(coder aDecoder: NSCoder) {
        super.init(coder: aDecoder)
        self.backgroundColor = UIColor.clear
        imageNames = AnimationView.getImageNames()
        animationView = AnimationImageView(imageNames: self.imageNames)
        animationView?.delegate = self
        animationView?.contentMode = UIView.ContentMode.scaleAspectFit
    }

    static func getImageNames() -> [String] {
        let filePrefix: String = kAnimationImagePrefix
        let fileSuffix: String = kAnimationImageSuffix
        var tmpArray: [String] = []
        for index in 0...kImageMaxIndex {
            let filename = String(format: "%@%d%@", filePrefix, index, fileSuffix)
            tmpArray.append(filename)
        }
        return tmpArray
    }

    func startAnimation() {
        self.animationView?.startAnimating()
    }

    func didFinishAnimationImageView() {
        self.delegate?.animationDidFinished()
    }
}
Trong đó:
- didFinishAnimationImageView(): function báo thời điểm kết thúc animation của UIImageView.
- imageNames: Array kiểu string chứa các tên của image trong folder jpegs.
- imageIndex: Vị trí của ảnh trong imageNames.
override func layoutSubviews() {
    super.layoutSubviews()
    let screenSize = UIScreen.main.bounds.size
    var imageSize: CGSize = .zero

    guard let animationView = self.animationView else { return }

    if self.imageNames.count > 0 {
        let image = UIImage.init(named: self.imageNames.first!)
        imageSize = image?.size ?? .zero
    }

    if imageSize.width < screenSize.width {
        imageSize.height = imageSize.height * screenSize.width / imageSize.width
        imageSize.width = screenSize.width
    }

    if imageSize.height < screenSize.height {
        imageSize.width = imageSize.width * screenSize.height / imageSize.width
        imageSize.height = screenSize.height
    }

    animationView.frame = CGRect(x: 0, y: 0, width: imageSize.width, height: imageSize.height)
    animationView.center = CGPoint(x: screenSize.width / 2.0, y: screenSize.height / 2.0)

    self.addSubview(animationView)
}
- Trong hàm layoutSubview(), ta tính toán lại kích thước và vị trí của animationView.
Bước 3: Create Splash storyboard and SplashViewController
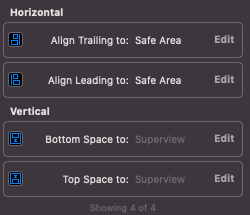
Ta tạo Splash.storyboard và SplashViewController, trong storyboard ta tạo 1 view kiểu AnimationView và đặt tên là splashView. Sau đó set constraints cho splashView và set lại Main Interface của project.

class SplashViewController: UIViewController, AnimationViewDelegate {

    @IBOutlet private weak var splashView: AnimationView!

    override func viewDidLoad() {
        super.viewDidLoad()
        splashView.delegate = self
        splashView.startAnimation()
    }

    func animationDidFinished() {
        let storyboard = UIStoryboard(name: "Main", bundle: nil)
        let vc = storyboard.instantiateViewController(withIdentifier: "NavigationViewController")
        let appDelegate: AppDelegate? = UIApplication.shared.delegate as? AppDelegate


        appDelegate?.switchRootViewController(viewController: vc)
    }
}
- Trong hàm animationDidFinished(), khi animation của màn splash screen kết thúc thì ta sẽ thay đổi RootViewController (SplashViewController => MainViewController).
- Ta khai báo hàm switchRootViewController(viewController: UIViewController) trong AppDelegate.
func switchRootViewController(viewController: UIViewController) {
    guard let window = self.window else { return }
    let snapShot = window.snapshotView(afterScreenUpdates: true)
    if let snapShot = snapShot {
        viewController.view.addSubview(snapShot)
    }
    window.rootViewController = viewController

    UIView.animate(withDuration: 0.3,
                   animations: {
                    snapShot?.layer.opacity = 0
                   },
                   completion: { _ in
                    snapShot?.removeFromSuperview()
                   })
}
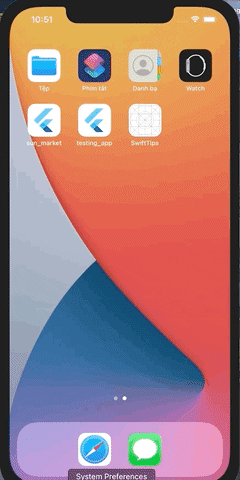
Kết quả:
Link github:
All rights reserved
