Sử dụng Twilio để bảo mật và xác thực SMS cho ứng dụng Rails
Bài đăng này đã không được cập nhật trong 10 năm
Bài viết này sẽ cho chúng ta biết cách tích hợp Twilio vào ứng dụng rails 4. Cụ thể dưới đây là 2 ứng dụng cơ bản của Twilio là tính bảo mật và việc xác minh thông qua SMS.
Đăng ký tài khoản Twilio
Để có thể sử dụng được Twilio ta cần đăng ký tài khoản trên https://www.twilio.com.
Sau khi đăng ký miễn phí, ta sẽ nhận được 1 số điện thoại miễn phí
để sau này dùng để gửi SMS trong ứng dụng rails của ta. Ngoài ra bạn cũng cần quan tâm đến ACCOUNT SID và AUTH TOKEN ( click vào Show API Credential ).
Thiết lập vào ứng dụng Rails
Ví dụ khởi tạo 1 ứng dụng rails
rails new twilio-demo
thêm Gem twilio và bundle install
gem 'twilio-ruby'
ta điền 2 giá trị ACCOUNT SID và AUTH TOKEN vào config/secrets.yml
development:
  secret_key_base: 'your secret key base'
  twilio_account_sid: <%= ENV["TWILIO_ACCOUNT_SID"] %>
  twilio_auth_token: <%= ENV["TWILIO_AUTH_TOKEN"] %>

production:
  secret_key_base: 'your secret key base'
  twilio_account_sid: <%= ENV["TWILIO_ACCOUNT_SID"] %>
  twilio_auth_token: <%= ENV["TWILIO_AUTH_TOKEN"] %>
Thiết lập chế độ bảo mật
Bây giờ ta có thể thiết lập Rack middleware để bảo mật cho ứng dụng. Giả sử, ta sẽ áp dụng bảo mật cho môi trường production. Ta sẽ khai báo trong config/environments/production.rb.
config.middleware.use Rack::TwilioWebhookAuthentication, Rails.application.secrets.twilio_auth_token
Chú ý là ta phải chạy trên terminal các biến môi trường ( sau này khi deploy thì các biến môi trường này ta phải thiết lập )
export TWILIO_ACCOUNT_SID=your Twilio Account SID
export TWILIO_AUTH_TOKEN=your Twilio Auth Token
Giả sử ứng dụng rails của chúng ta cần get 1 API trả ra 1 đối tượng user dưới dạng json:
class UsersController < ApplicationController
  def index
    @user = User.first
    render json: @user
  end
end
Chạy server rails, dùng Resclient để GET API theo địa chỉ http://localhost:3000/users/index
rails s
lúc này ta sẽ nhận được kết quả của API trên
{"id":1,"name":"thang","created_at":"2015-11-23T14:12:42.886Z","updated_at":"2015-11-23T14:12:42.886Z"}
Rõ ràng là ta chưa thấy kết quả của việc bảo mật. Tuy nhiên cần nhớ lại là ta chỉ config TwilioWebhookAuthentication cho production nên ta cần chạy server cho môi trường production
rails server -e production
Bây giờ ta sẽ lại dùng Restclient để get API bên trên. Kết quả là
Twilio Request Validation Failed.
Sử dụng Twilio để xác thực bằng SMS
Trước tiên, ta sẽ add thêm một số trường vaopf bảng User đã tạo ở trên để lưu một số thông tin : phone_number , pin và verified
rails g model add_some_column_to_user phone_number:string pin:string verified:boolean
Khởi tạo controller Quá trình xác thực của ta bao gồm 3 bước:
- User điền số điện thoại
- Hệ thống sẽ lưu số điện thoại đó lại và send cho user mã pin
- Hệ thống xác thực thông qua mã pin user điền vào
Ta tiến hàng sửa file routes
post 'users/verify' => "users#verify"
Ở đây ta sẽ sử dụng AJAX để giải quyết việc xác thực. Trước tiên ta sẽ khởi tạo User trong users_controller
def new
  @user = User.new
end
Ta sử dụng thư viên bootstrap tạo giao diện cho sinh động. Thêm vào app/views/layouts/application.html.erb
<%= stylesheet_link_tag "https://maxcdn.bootstrapcdn.com/bootstrap/3.3.4/css/bootstrap.min.css", media: 'all', 'data-turbolinks-track' => true %>
thêm thẻ div trong <body>
<body>
  <div class="container">
    <%= yield %>
  </div>
</body>
Bây giờ ta sẽ tạo view
touch app/views/users/new.html.erb
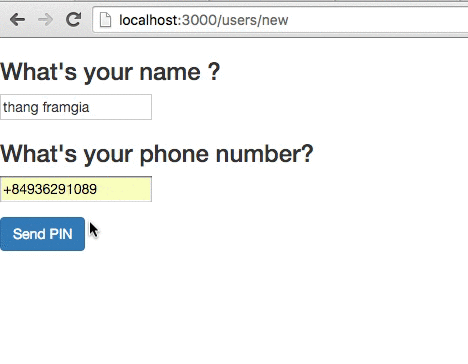
Tạo form để nhập số điện thoại của user
<div id="send-pin">
  <%= form_for @user, remote: true do |f| %>
    <h3>What's your name ?</h3>
    <div class="form-group">
      <%= f.text_field :name%>
    </div>
    <h3>What's your phone number?</h3>
    <div class="form-group">
      <%= f.text_field :phone_number %>
    </div>
    <%= f.submit "Send PIN", class: "btn btn-primary", id: 'send-pin-link' %>
  <% end %>
</div>
Form để user nhập mã PIN xác nhận
<div id="verify-pin" style="display:none">
  <h3>Enter your PIN</h3>
  <%= form_tag new_user_path, remote: true do |f| %>
    <%= hidden_field_tag 'hidden_phone_number', '' %>
    <div class="form-group">
      <%= text_field_tag :pin %>
    </div>
    <%= submit_tag "Verify PIN", class: "btn btn-primary" %>
  <% end %>
</div>

<div id="status-box" class="alert alert-success" style="display:none">
  <p id="status-message">Status: Haven’t done anything yet</p>
</div>
chú ý là 2 thẻ div này đều display:none. Ta sẽ dùng AJAX để hiển thị chúng khi submit PIN.
Ta sẽ thêm login vào hàm create trong users_controller
def create
    @user = User.find_or_create_by(name: params[:user][:name], phone_number: params[:user][:phone_number])
    @user.generate_pin
    @user.send_pin
    respond_to do |format|
      format.js # render app/views/phone_numbers/create.js.erb
    end
end
Ở đây hàm generate_pin ta khai báo trong model để sinh ra 1 mã pin random gửi cho user
def generate_pin
  self.pin = rand(0000..9999).to_s.rjust(4, "0")
  save
end
Bây giờ ta sẽ config account Twilio trong ứng dụng của chúng ta. CHúng ta sẽ khai báo trong model hàm send pin:
def send_pin
  twilio_client = Twilio::REST::Client.new("your twilio account sid", "your Twilio AUTH TOKEN")
  twilio_client.messages.create(
    to: phone_number,
    from: "your phonephone twilio phone number",
    body: "Your PIN is #{pin}"
  )
end
Cuối cùng ta sẽ xử lý post form bằng AJAX. Ta tạo view create format js:
user.js.erb
$('#hidden_phone_number').val('<%= @user.phone_number %>' )
$('#send-pin').hide()
$('#verify-pin').fadeToggle()
$('#pin').focus()
Chú ý là số điện thoại nhập vào thuộc quốc gia nào thì ta phải enable cho nó. Truy cập vào link sau đây để enable : https://www.twilio.com/user/account/settings/international/sms
Bây giờ ta sẽ thực hiện bước cuối cùng là xác thực thông qua mã PIN mà user nhận được. Ta viết hàm verify trong controller:
def verify
@user = User.find_by(phone_number: params[:hidden_phone_number])
  @user.verify(params[:pin])
  respond_to do |format|
    format.js
  end
end
ở trên ta gọi hàm verify trong model:
def verify pin
  update(verified: true) if self.pin == pin
end
Cuối cùng ta tạo view verify.js.erb để thực hiển thị các thông báo thông qua jquery
<% if @user.verified %>
  $('#verify-pin').hide()
  $('#status-box').removeClass()
  $('#status-box').addClass('alert alert-success')
  $('#status-message').text('Success!!')
<% else %>
  $('#status-box').removeClass()
  $('#status-box').addClass('alert alert-warning')
  $('#status-message').text("Sorry, that wasn't the right pin.")
<% end %>
$('#status-box').fadeToggle()
Bây giờ ta có thể chạy server và xem thành quả.
Tuy nhiên đây mới chỉ là các bước thực hiện xác thực cơ bản. Để có thể áp dụng vào ứng dụng thực tế thì ta cần phải thêm một số logic và nghiệp vụ nữa, ví dụ như thời gian sống của mã PIN hay một số điện thoại thì không thể đăng ký được nhiều user ...
All rights reserved
