Sử dụng SpriteKit để tạo animations trong Swift
Bài đăng này đã không được cập nhật trong 4 năm
1. Tổng quan
Animation là 1 cách thức hiệu quả để giải thích chức năng của app thông qua các chuyển động cũng như gây chú ý cho người dùng. Bổ sung animation hợp lý có thể làm cho UI trở nên bóng bẩy và đẹp hơn. Nhưng việc tạo ra các animation trông có cảm giác thật tốn khá nhiều thời gian để tinh chỉnh cũng như kinh nghiệm để xử lý. Đó là lý do tại sao người ta lại hay dụng tool để build animations. SpriteKit chính là 1 tool như vậy. SpriteKit là 1 framework được Apple xây dựng từ iOS 7 cho mục đích phát triển game là chủ yếu. Mặc dù vậy, nó cũng là 1 tool khá tốt cho animation 2D. Sprite Kit hỗ trợ người dùng tạo ra các scenes khá phức tạp. Thực tế là tại WWDC 2017 , Apple tiết lộ họ đã thực sự sử dụng SpriteKit cho việc xây dựng UI (for memory debugger in Xcode) Trong bài viết này, tôi sẽ giới thiệu về việc sử dụng SpriteKit trong việc tạo ra animation cho ứng dụng iOS
2. Tạo Project
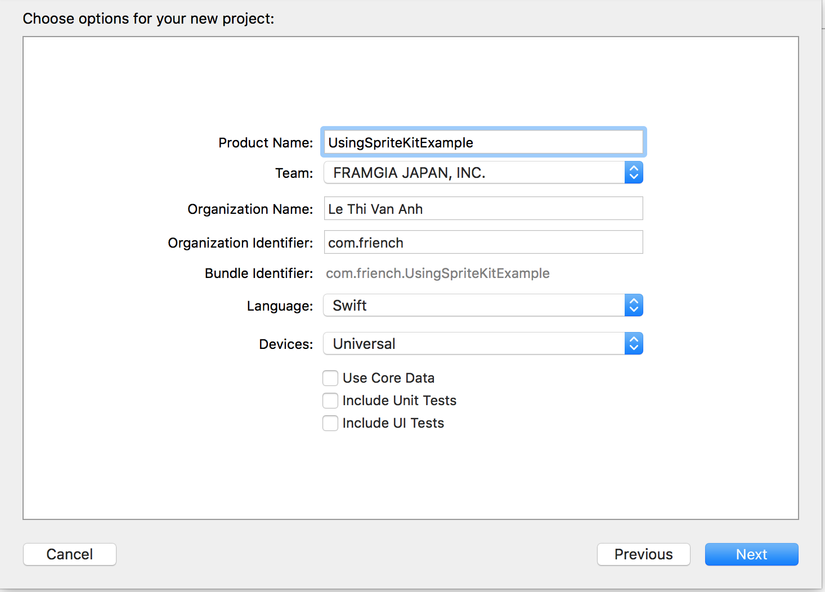
Việc đầu tiên là mở Xcode và tạo project mới. Bạn chú ý là có 1 options là "Game", nếu bạn chọn option này thì Xcode sẽ khởi tạo các bước ban đầu cho bạn. Nhưng kịch bản ở đây là chúng ta có 1 app sẵn rồi và muốn có animation trên 1 màn hình nào đó. Do vậy chúng ta sẽ chọn app vs option "Single view Application" Ứng dụng tên là : UsingSpriteKitExample
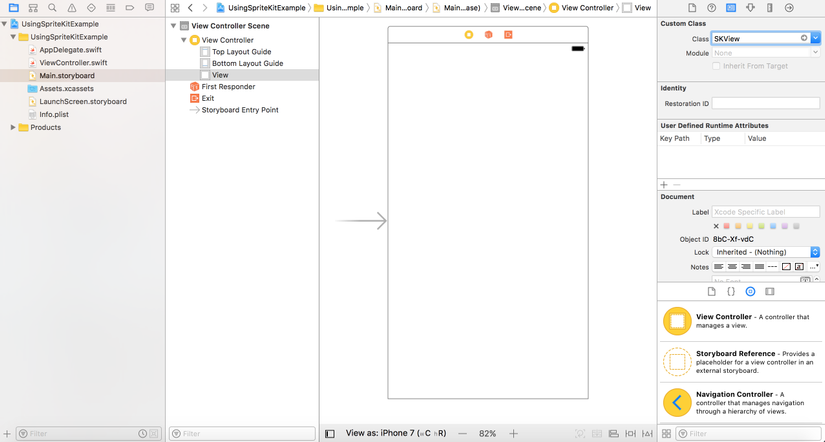
Mở storyboardstoryboard. Mục đích là sử dụng tool của SpriteKit mà Apple cung cấp nên chúng ta cần SKView trong viewController thay vì sử dụng UIVIew. Phía bên trái của interface builder, chọn view. Phía bên tay phải, chọn tab "Identify Inspector", thay class của view sang SKView
3.KhởiTạo Animation Scene
Tạo 1 file Swift mới tên là AnimationScene. Nội dung của file như sau
import SpriteKit
class AnimationScene: SKScene {

    var animationBackground: SKSpriteNode!

    required init?(coder aDecoder: NSCoder) {
        fatalError("init(coder:) has not been implemented")
    }

    override init(size: CGSize) {
        super.init(size: size)
    }

    override func update(_ currentTime: CFTimeInterval) {

    }
}
Type của class là SKScene. Vậy thì vai trò của SKSCene ở đây là gì. Tôi sẽ lấy 1 ví dụ đơn giản. Nếu viewcontroller như 1 cái TV thì SKView như cái màn hình TV, nó sẽ trình chiếu phim và SKScene là 1 cảnh trong phim, còn SKNode chính là các diễn viên và các phong cảnh trong film. Trong code của AnimationScene bao giờ cũng có “required init” khi kế thừa từ SKScene. Tham số thứ 2 của hàm này là size, chính là size cho scene của bạn. Bạn còn cần chú ý đến 1 thông số nữa là anchor point của scene. (0,0) là góc trái bên dưới, (1,1) là góc phải trên cùng, (0,1) là góc trai trên cùng...Hàm update sẽ được gọi từ SKScene trước mỗi frame
3. Present Animation scene
Tạo ra 1 đối tượng của SKView để trình chiếu SKScene
import UIKit
import SpriteKit
class ViewController: UIViewController {

    var scene: AnimationScene!
    var size: CGSize!

    override func viewDidLoad() {
        super.viewDidLoad()
        size = self.view.frame.size
        scene = AnimationScene(size: size)

        let skView = self.view as! SKView
        skView.presentScene(scene)
    }
}
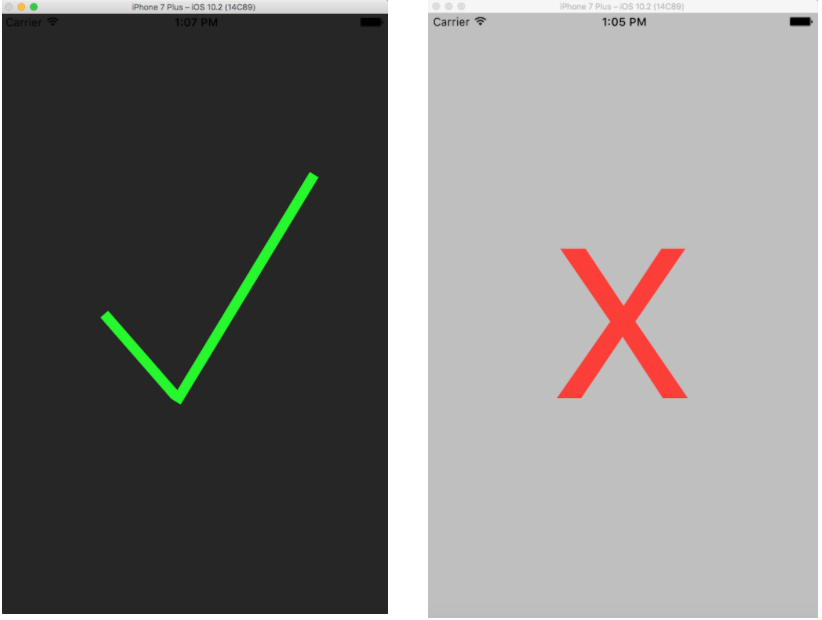
Build app lên, nếu thấy present được scene màu đen là bạn đã thành công bước đầu rồi.Nếu ra màn hình màu xám, thì chia buồn 1 chút, bạn nên xem lại các bước bên trên xem đã thực hiện đúng chưa nhé!
4. Animation Scenario
Kịch bản của chúng ta sẽ là add sprite node lên scene, cụ thể là một trái tim, khi touch vào trái tim thì trái tim sẽ có animation thu nhỏ rồi phình to ra, đồng thời sinh ra các trái tim bay xung quanh rồi bay ra khỏi màn hình.Thú vị phải không nào?
-
Add trái tim lên scene chính là add sprite kit, cách làm như sau
self.backgroudSprite = SKSpriteNode(color: UIColor.white, size: size) self.backgroudSprite.position = CGPoint(x: 0, y: 0) self.backgroudSprite.anchorPoint = CGPoint(x: 0, y: 0) self.addChild(backgroudSprite) //Calculate center heart size heartWidth = [UIScreen.main.bounds.size.width, UIScreen.main.bounds.size.height].min()! * self.kHeartScaleWithScreenSize; self.centerHeartSize = CGSize(width: heartWidth, height: heartWidth) //Add center heart to the scene self.centerHeart = SKSpriteNode(imageNamed: "heart") self.centerHeart.position = CGPoint(x: size.width/2, y: size.height/2) self.centerHeart.size = self.centerHeartSize self.backgroudSprite.addChild(self.centerHeart) -
Animation trái tim thu nhỏ vào và phình to lên là sequence của SKAction scale down và scale up
let scaleDownAction = SKAction.scale(to: 0.1, duration: 0.05) let scaleUpAction = SKAction.scale(to: 1, duration: 0.1) let scaleActionSequence = SKAction.sequence([scaleDownAction, scaleUpAction]) centerHeart.run(scaleActionSequence) -
Animation bay ra của các trái tim nhỏ là chuỗi sequence của 2 action là scaleAction thu nhỏ dần trái tim và moveAction di chuyển ra ngoài màn hình. Khi ra khỏi màn hình, các SpriteKit Node sẽ được remove đi
    var heartArr = [SKSpriteNode](repeating: SKSpriteNode(), count:3)
            for i in 0...2 {
                heartArr[i] = SKSpriteNode(imageNamed: "heart")
                heartArr[i].position = CGPoint(x: smallHeart.position.x  , y: smallHeart.position.y)
                self.backgroudSprite.addChild(heartArr[i])
                let desX = destionationX + 25
                let desY = destionationY
                let moveAcction = SKAction.move(to: CGPoint(x: desX + CGFloat(30 * i),y: desY), duration: duration*2/3)
                let scaleAction = SKAction.scale(to: 0.01, duration: duration*2/3)
                heartArr[i].size = CGSize(width:self.heartWidth*randomScale, height: self.heartWidth*randomScale)
                heartArr[i].run(scaleAction)
                heartArr[i].run(moveAcction, completion: {
                    heartArr[i].removeFromParent()
                })
                heartArr[i].alpha = self.randomFloat(minVal: minAlpha, maxVal: maxAlpha)
            }
Refer source code at: https://github.com/oLeThiVanAnh/R10_2017 Reference link: https://www.raywenderlich.com/89222/sprite-kit-animations-texture-atlases-swift https://medium.com/@johnsundell/using-spritekit-to-create-animations-in-swift-703d7dedc6bf
All rights reserved
