Sử dụng Repository trong Laravel
Bài đăng này đã không được cập nhật trong 5 năm
Repository Pattern rất hữu ích trong Laravel , nó giúp chúng ta dễ dàng maintain code, và giảm thiểu được việc xử lý logic trong Controller. Repository là một abstraction, tức là nó tạo một layer ở giữa việc xử lý logic và database trong ứng dụng.
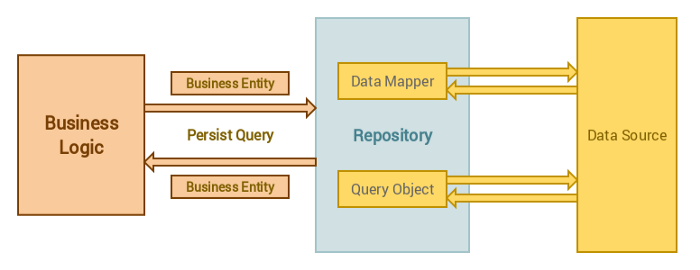
Repository được sử dụng để giải quyết sự tách biệt khi triển khai một ứng dụng, điều này rất quan trọng khi viết code giúp chúng ta dễ dàng maintain. Chẳng hạn, khi ứng dụng của chúng ta đang sử dụng MySQL và muốn đổi sang MongoDB. Vì chúng ta sử dụng Repository Pattern nên, mọi logic trong ứng dụng của chúng ta được giữ nguyên và tất cả những gì chúng ta phải làm là thay đổi repository mà thôi. Nghe có vẻ dễ dàng hơn rồi phải không nào! 😀
Hãy cùng xem 1 ví dụ đơn giản sau để hiểu rõ hơn nhé:
Bước 1: Tạo một Repository Interface
Chúng ta cần 1 interface để hoạt động như một contract cho các repository. Vậy contract là gì?
Contract đơn giản giống như một bản hợp đồng bằng văn bản mô tả một công việc cụ thể, ở đây nó chính là interface.
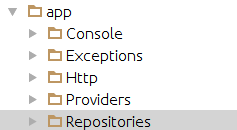
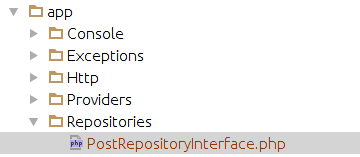
Tạo một folder bên trong folder app đặt tên là Repositories.
Sau đó tạo 1 file PostRepositoryInterface.php.
Đây là Interface mà chúng ta sẽ sử dụng. Bên trong interface này, bạn add vào đoạn code sau:
namespace App\Repositories;

interface PostRepositoryInterface
{

}
Bây giờ, chúng ta cần thêm các contract hoặc các method để PostRepository có thể implement sau này:
namespace App\Repositories;

interface PostRepositoryInterface
{
    /**
     * Get's a post by it's ID
     *
     * @param int
     */
    public function get($post_id);

    /**
     * Get's all posts.
     *
     * @return mixed
     */
    public function all();

    /**
     * Deletes a post.
     *
     * @param int
     */
    public function delete($post_id);

    /**
     * Updates a post.
     *
     * @param int
     * @param array
     */
    public function update($post_id, array $post_data);
}
Chú ý rằng sẽ không có đóng và mở ngoặc nhọn {}, bởi vì chúng ta không triển khai hàm trong interface ( nếu bạn nào quên có thể xem lại các tính chất trong lập trình hướng đối tượng OOP), do đó sẽ không có việc xử lý logic nằm trong interface, các method chỉ được phép khai báo.
Bước 2: Tạo Repository
Chúng ta bắt đầu tạo các class. Bên trong folder Repositories tạo file PostRepository.php Class này sẽ implement lại interface PostRepositoryInterface mà chúng ta vừa tạo ở Bước 1.
Code trong file PostRepository.php như sau:
namespace App\Repositories;

class PostRepository implements PostRepositoryInterface
{

}
Tiếp theo, vẫn trong file PostRepository.php, chúng ta bắt buộc phải tạo các method được khai báo trong interface và triển khai chúng, nếu không sẽ gặp lỗi trong quá trình chạy và sẽ không sử dụng được class mà ta vừa tạo ra.
Ở đây chúng ta sẽ sử dụng Eloquent model Post, vì vậy chúng ta phải khai báo để sử dụng:
use App\Post;
Chỉnh sửa PostRepository.php như sau:
namespace App\Repositories;

use App\Post;

class PostRepository implements PostRepositoryInterface
{
    /**
     * Get's a post by it's ID
     *
     * @param int
     * @return collection
     */
    public function get($post_id)
    {
        return Post::find($post_id);
    }

    /**
     * Get's all posts.
     *
     * @return mixed
     */
    public function all()
    {
        return Post::all();
    }

    /**
     * Deletes a post.
     *
     * @param int
     */
    public function delete($post_id)
    {
        Post::destroy($post_id)
    }

    /**
     * Updates a post.
     *
     * @param int
     * @param array
     */
    public function update($post_id, array $post_data)
    {
        Post::find($post_id)->update($post_data);
    }
}
Như vậy, chúng ta đã tạo được 1 interface và 1 class sử dụng interface đó. Bây giờ, chúng ta cần phải đăng ký repository với container trong Laravel
Bước 3: Khai báo Repository với Laravel IoC Container
Tạo một file BackendServiceProvider.php bên trong thư mục Repositories. File này đống vai trò như một kết nối tới Laravel IoC Container và cho phép chúng ta sử dụng dependency injection để thêm vào các interface repository của chúng ta.
Code trong BackendServiceProvider.php:
namespace App\Repositories;

use Illuminate\Support\ServiceProvider;

class BackendServiceProvider extends ServiceProvider
{

    public function register()
    {
        $this->app>bind(
            'App\Repositories\PostRepositoryInterface',
            'App\Repositories\PostRepository'
        );
    }
}
Một điều chú ý ở đây là thứ tự giữa interface và class, bạn phải để interface trước class mà bạn sử dụng, ở ví dụ này, nếu bạn thử đặt App\Repositories\PostRepository trước App\Repositories\PostRepositoryInterface thì sẽ gặp lỗi, bắt buộc bạn phải bind interface trước.
Sau các bước trên, chúng ta sẽ có một cấu trúc thư mục và các file như sau:
- app
--- Repositories
------ BackendServiceProvider.php
------ PostRepositoryInterface.php
------ PostRepository.php
Bước 4: Sử dụng Repository trong Controller
Chúng ta bắt đầu sử dụng repository, ở đây giả sử chúng ta đã có 1 controller là PostController.php và controller này xử lý mọi thứ liên quan đến Post của bạn.
Việc chúng ta phải làm là thêm interface vào trong controlller thông qua constructor khi controller được khởi tạo. Bằng cách này chúng ta có thể sử dụng repository cho các tương tác với posts model:
namespace App\Http\Controllers;

use App\Http\Requests;
use App\Repositories\PostRepositoryInterface;

class PostController extends Controller
{

    protected $post;

    /**
     * PostController constructor.
     *
     * @param PostRepositoryInterface $post
     */
    public function __construct(PostRepositoryInterface $post)
    {
        $this->post = $post;
    }

    /**
     * List all posts.
     *
     * @return mixed
     */
    public function index()
    {
        $data = [
            'posts' => $this->post->all()
        ];

        return view('templates.posts', $data)
    }

}
Việc đầu tiên chúng ta thêm PostRepositoryInterface vào constructor
Sau đó, chúng ta đặt một biến $post thành một instance của object PostRepository thông qua interface. Điều này cho phép chúng ta gọi các phương thức trong PostRepository giống như chúng ta sử dụng với phương thức index(), các bạn có thể thấy:
$this->post->update($data_array);
$this->post->delete($post_id);
$this->post->get($post_id);
Điều này ngăn việc truy cập trực tiếp vào model giống như Post::find($id), và nó thêm cho chúng ta một lớp trừu tượng vào bên trong ứng dụng.
Ở đầu bài viết, chúng ta từng đề cập tới việc ngừng sử dụng MySQL và sử dụng MongoDB để thay thế, hay bất kì một công nghệ nào khác, tất cả những điều cần phải làm là chỉ việc thay đổi logic của PostRepository.
Điều đó có nghĩa rằng code trong controller chúng ta không cần phải thay đổi gì. 
Bước 5: Sử dụng nhiều Repository hơn
Trong một ứng dụng bạn có thể thêm nhiều Repository khác nhau. Tất cả việc bạn cần làm là tạo một interface và sau đó tạo repository, sau đó đăng ký chúng với Laravel IoC Container trong Service Provider.
Ví dụ, chúng ta thêm một **Comment Repository **
Trong thư mục app:
- Repositories
--- BackendServiceProvider.php
------ PostRepositoryInterface.php
------ PostRepository.php
------ CommentRepositoryInterface.php
------ CommentRepository.php
Tạo một CommentRepositoryInterface tương tự với việc tạo PostRepositoryInterface ở các bước trước.
CommentRepositoryInterface.php
namespace App\Repositories;

interface CommentRepositoryInterface
{
    // Define all methods here but remember not to use curly braces.
    public function all(); // Like this..
}
CommentRepository.php
namespace App\Repositories;

use App\Comment;

class CommentRepository implements CommentRepositoryInterface
{
    // Must use all methods that were defined in the CommentRepositoryInterface here
    public function all()
    {
        return Comment::all();
    }
}
Cuối cùng là khai báo nó trong IoC Container bên trong BackendServiceProvider.php.
namespace App\Repositories;

use Illuminate\Support\ServiceProvider;

class BackendServiceProvider extends ServiceProvider
{

    public function register()
    {
        $this->app->bind(
            'App\Repositories\PostRepositoryInterface',
            'App\Repositories\PostRepository'
        );

        $this->app->bind(
            'App\Repositories\CommentRepositoryInterface',
            'App\Repositories\CommentRepository'
        );
    }
}
Trên đây là tìm hiểu của mình về Repository trong Laravel. Hy vọng nó có thể giúp ích được các bạn! 
All rights reserved
