Sử dụng Parse với ứng dụng iOS
Bài đăng này đã không được cập nhật trong 4 năm
Parse là một bên thứ ba "Giải pháp ứng dụng điện toán đám mây" đó là nền tảng độc lập. cung cấp các API và các dịch vụ đám mây dành cho các ứng dụng iOS, Android...Khi sử dụng Parse API, bạn có thể chạy các ứng dụng di động của mình trên đám mây một cách nhanh chóng và hao tốn ít tài nguyên. Parse SDK cung cấp tất cả tính co giãn của một nền tảng đám mây.
Bắt đầu
Adding the Parse Framework
Đầu tiên cần đăng nhập hoặc tạo mới tài khoản parse tại https://www.parse.com.
Sau đó vào menu Dashboard tiếp tục click vào Create a new App”. và hoàn tất quá trình tạo 1 app mới trên parse.
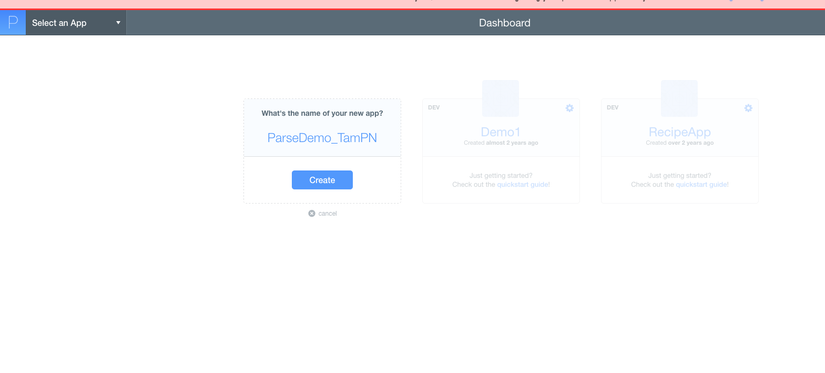
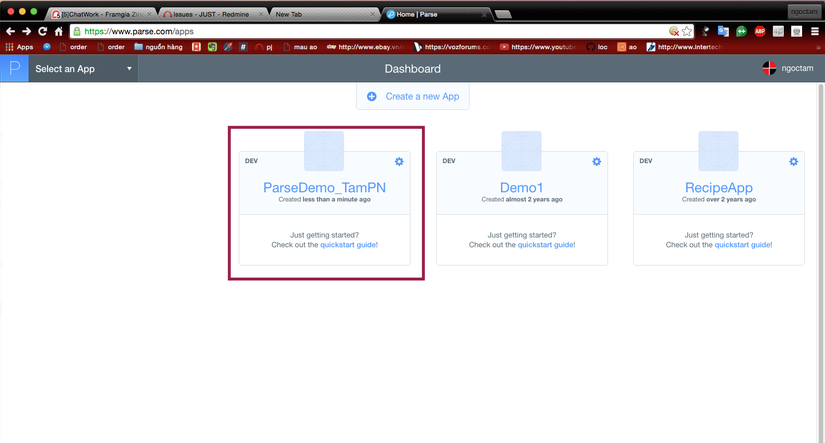
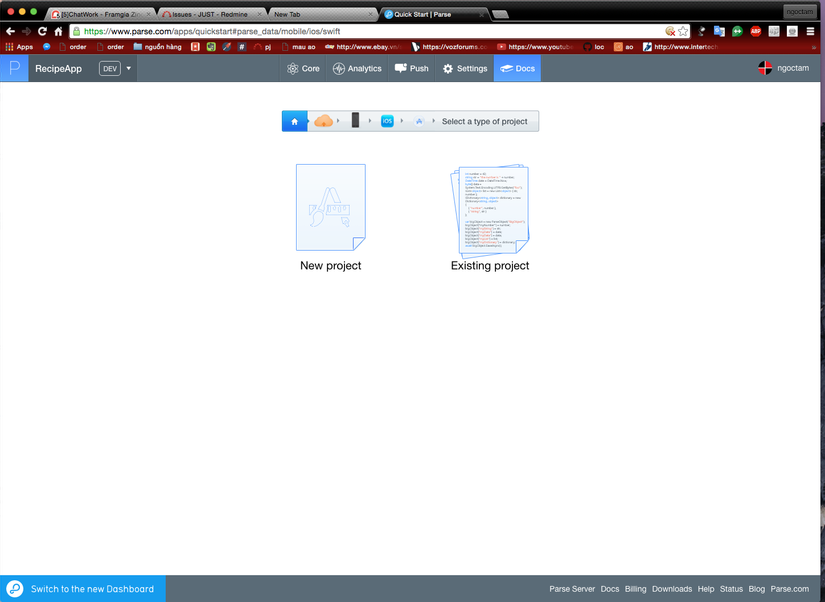
Tiếp tục nhấn vào widget, và chọn “Quickstart Guide”, sau đó đến màn hình giao diện kế tiếp chọn Data > Mobile > iOS > Swift — Existing Project.
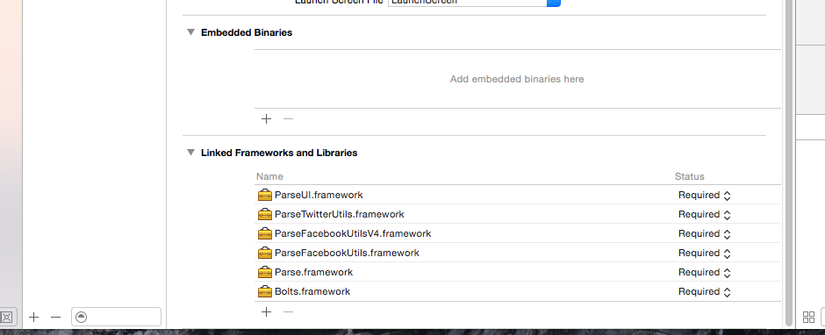
Tiếp theo cài đặt SDK và add Parse framework và một số thư viện cần thiết như hình dưới.
Sau khi quá trình cài đặt ban đầu thành công tiếp đó đến bước khởi tạo Parse. thực hiện bằng cách import Parse và Bolts frameworks trong file AppDelegate.swift với QuickStart code được tạo ra :
func application(application: UIApplication, didFinishLaunchingWithOptions launchOptions: [NSObject: AnyObject]?) -> Bool {

    Parse.enableLocalDatastore()

    // Initialize Parse.
    Parse.setApplicationId("OYf03TogUstGp0wxv2Yj3n0BJr22Bhr0bzPWzzcY", clientKey: "SSArDoCRuJSt4V3TLMnVgCGpKlz6gCYLe87OGWsM")

    // [Optional] Track statistics around application opens.
    PFAnalytics.trackAppOpenedWithLaunchOptions(launchOptions)

    return true
}
để ý và thay thế applicationID và clientKey trên parse, lấy 2 key này ở phần dashboard trong parse
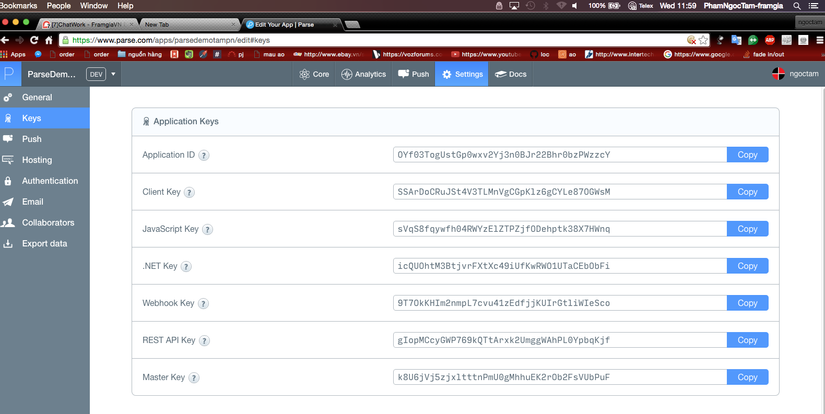
Trong bài demo bao gồm các class sau, và mỗi class tương ứng cần import Parse
LoginViewController.swift
HomeViewController.swift
SignUpViewController.swift
ResetPasswordViewController.swift
Home screen trong màn hình home thiết kế 1 số control đơn giản cần thiết như:
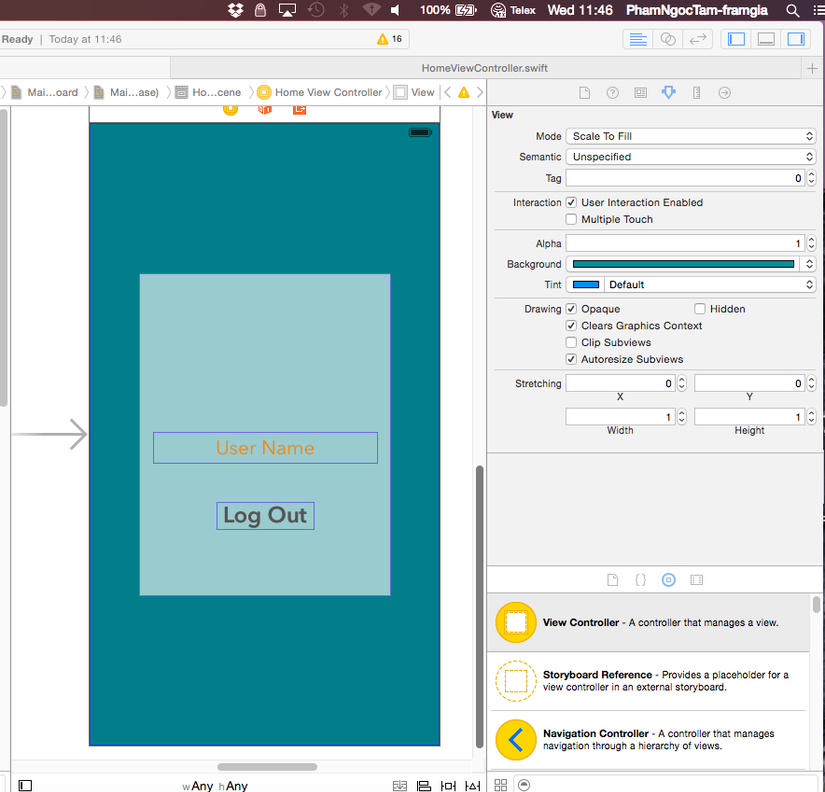
trong LoginViewController.swift khai báo outlet variables cho usernameLabel
@IBOutlet weak var userNameLabel: UILabel!
- user Name Label để thực hiện việc hiển thị tên user sau khi đăng nhập thành công
- Logout button: thực hiện hành động logout
Login Screen
Trong màn hình login ta cần thiết kế một số control cần thiết như hình dưới
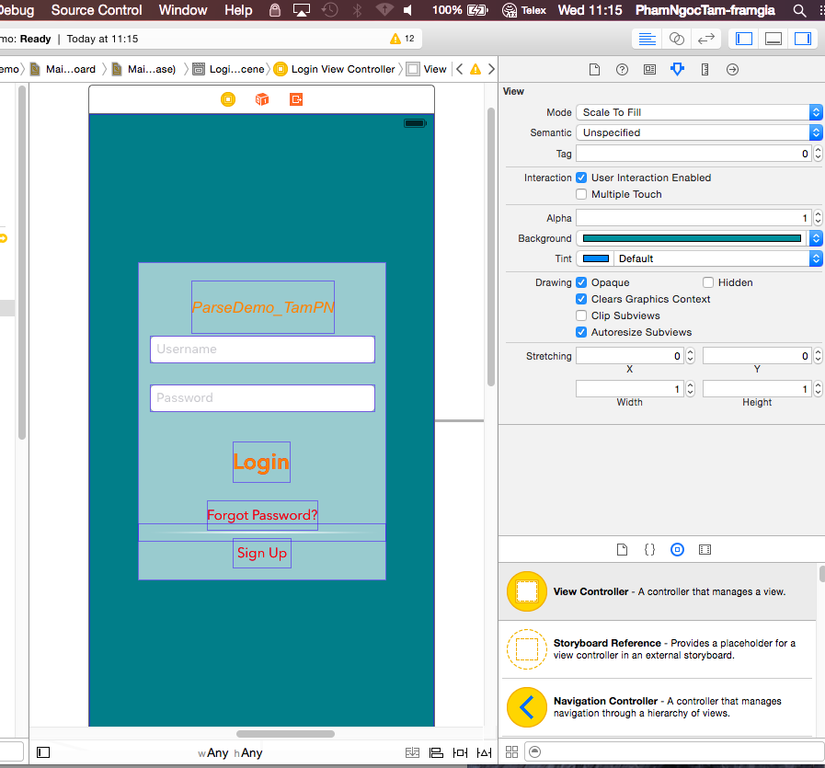
trong LoginViewController.swift khai báo outlet variables cho username và password:
@IBOutlet weak var usernameField: UITextField!
@IBOutlet weak var passwordField: UITextField!
Trong file HomeViewController.swift thêm method sau đây để thực hiện LoginViewController với Storyboard Id là “Login”
override func viewWillAppear(animated: Bool) { if (PFUser.currentUser() == nil) { dispatch_async(dispatch_get_main_queue(), { () -> Void in
        let viewController:UIViewController = UIStoryboard(name: "Main", bundle: nil).instantiateViewControllerWithIdentifier("Login") as! UIViewController
        self.presentViewController(viewController, animated: true, completion: nil)
    })
}
}```Swift
Sign Up Screen
tiếp tục thiết kế màn hình sign up với các control tương tự:
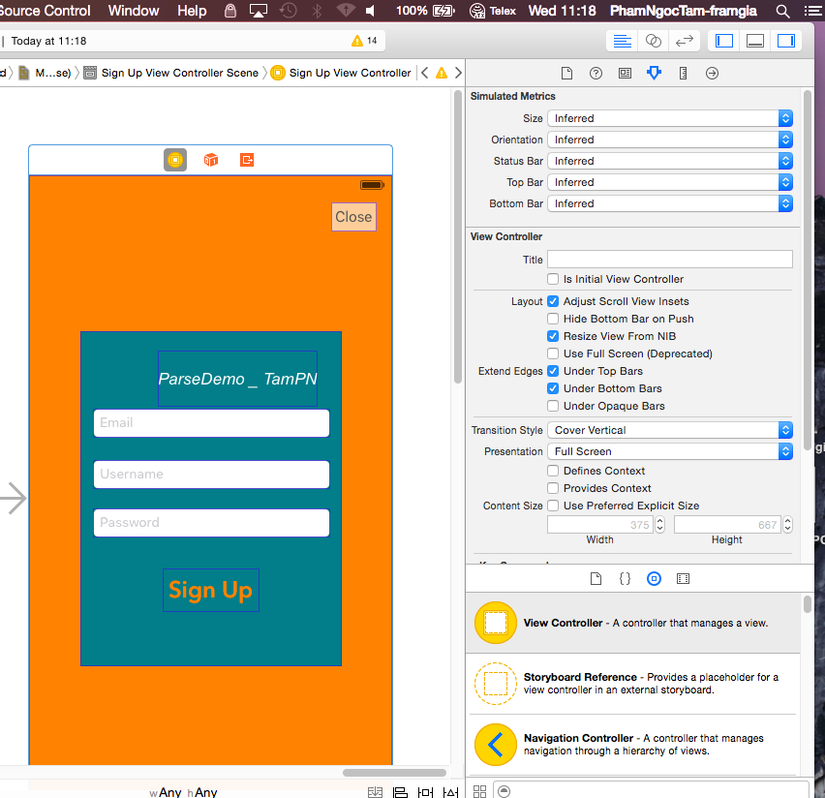
trong In SignUpViewController.swift khai báo các outlet tương ứng với các field
@IBOutlet weak var emailField: UITextField!
@IBOutlet weak var usernameField: UITextField!
@IBOutlet weak var passwordField: UITextField!
Tiếp theo tạo signUpAction để thực hiện việc singup
@IBAction func signUpAction(sender: AnyObject) {

    var username = self.usernameField.text
    var password = self.passwordField.text
    var email = self.emailField.text
    var finalEmail = email.stringByTrimmingCharactersInSet(NSCharacterSet.whitespaceCharacterSet())

    if count(username) < 6 {
        var alert = UIAlertView(title: "Error", message: "Username must be greater than 5 characters", delegate: self, cancelButtonTitle: "OK")
        alert.show()

    } else if count(password) < 12 {
        var alert = UIAlertView(title: "Error", message: "Password must be greater than 12 characters", delegate: self, cancelButtonTitle: "OK")
        alert.show()

    } else if count(email) < 12 {
        var alert = UIAlertView(title: "Error", message: "Please enter a valid email address", delegate: self, cancelButtonTitle: "OK")
        alert.show()

    } else {
        var spinner: UIActivityIndicatorView = UIActivityIndicatorView(frame: CGRectMake(0, 0, 220, 220)) as UIActivityIndicatorView
        spinner.startAnimating()

        var user = PFUser()

        user.username = username
        user.password = password
        user.email = finalEmail

        // user Sign up
        user.signUpInBackgroundWithBlock({ (succeed, error) -> Void in

            // Stop spinner
            spinner.stopAnimating()
            if ((error) != nil) {
                var alert = UIAlertView(title: "Error", message: "\(error)", delegate: self, cancelButtonTitle: "OK")
                alert.show()

            } else {
                var alert = UIAlertView(title: "Success!", message: "Sign Up ok", delegate: self, cancelButtonTitle: "OK")
                alert.show()
                dispatch_async(dispatch_get_main_queue(), { () -> Void in
                    let viewController:UIViewController = UIStoryboard(name: "Main", bundle: nil).instantiateViewControllerWithIdentifier("Home") as! UIViewController
                    self.presentViewController(viewController, animated: true, completion: nil)
                })
            }
        })
    }
}
Phương thức trên được xảy ra khi người dùng tap vào nút signup và check valid data, Nếu quá trình check thành công, action method sẽ gọi phương thức signUpInBackgroundWithBlock Parse. Khi hoàn tất đăng ký thành công ứng dụng sẽ hiển thị màn hình home.
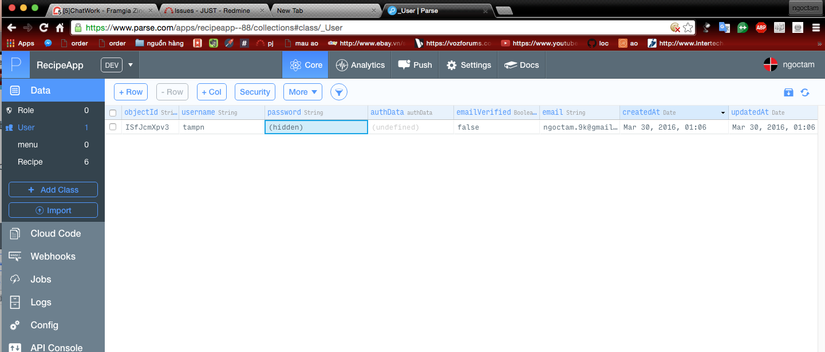
Bước tiếp theo vào Parse account trên trình duyệt và chọn app vừa tạo, tiếp tục vào menu user để theo dõi dữ liệu người dùng đã đăng ký trước đó.
Login và Log out
trong loginAction thực hiện code xử lý như sau:
@IBAction func loginAction(sender: AnyObject) {
    var username = self.usernameField.text
    var password = self.passwordField.text

    if count(username) < 6 {
        var alert = UIAlertView(title: "Invalid", message: "Username must be greater than 5 characters", delegate: self, cancelButtonTitle: "OK")
        alert.show()

    } else if count(password) < 12 {
        var alert = UIAlertView(title: "Invalid", message: "Password must be greater than 12 characters", delegate: self, cancelButtonTitle: "OK")
        alert.show()

    } else {
        // spinner progress
        var spinner: UIActivityIndicatorView = UIActivityIndicatorView(frame: CGRectMake(0, 0, 220, 220)) as UIActivityIndicatorView
        spinner.startAnimating()

        PFUser.logInWithUsernameInBackground(username, password: password, block: { (user, error) -> Void in

            spinner.stopAnimating()

            if ((user) != nil) {
                var alert = UIAlertView(title: "Success", message: "Log In OK", delegate: self, cancelButtonTitle: "OK")
                alert.show()

                dispatch_async(dispatch_get_main_queue(), { () -> Void in
                    let viewController:UIViewController = UIStoryboard(name: "Main", bundle: nil).instantiateViewControllerWithIdentifier("Home") as! UIViewController
                    self.presentViewController(viewController, animated: true, completion: nil)
                })

            } else {
                var alert = UIAlertView(title: "Error", message: "\(error)", delegate: self, cancelButtonTitle: "OK")
                alert.show()
            }
        })
    }
}
Phương thức trên được hoạt động khi người dùng nhấn vào nút login trên màn hình, tương tự như signup trong SignUpViewController.
ta sẽ gọ logInWithUsernameInBackground để pass thực hiện việc truyền username và password tới Parse. sau khi đăng nhập thành công ứng dụng đưa đén màn hình chính HomeViewController.
tiếp tục thực hiện logout trong class HomeViewController.swift:
@IBAction func logOutAction(sender: AnyObject){

    // Send a request to log out a user
    PFUser.logOut()

    dispatch_async(dispatch_get_main_queue(), { () -> Void in
        let viewController:UIViewController = UIStoryboard(name: "Main", bundle: nil).instantiateViewControllerWithIdentifier("Login") as! UIViewController
        self.presentViewController(viewController, animated: true, completion: nil)
    })

}
cập nhật phương thức viewDidLoad:
override func viewDidLoad() {
    super.viewDidLoad()

    if let userName = PFUser.currentUser()?["username"] as? String {
        self.userNameLabel.text = "@" + userName
    }
}
Reset Password
Trong ResetPasswordViewController.swift khai báo outlet variable cho EmailTextField
@IBOutlet weak var emailField: UITextField!
Tiếp tục thực hiện action method thực hiện reset password
@IBAction func passwordReset(sender: AnyObject) {
    var email = self.emailField.text
    var fEmail = email.stringByTrimmingCharactersInSet(NSCharacterSet.whitespaceCharacterSet())

    // reset  password
    PFUser.requestPasswordResetForEmailInBackground(fEmail)

    var alert = UIAlertController (title: "Password Reset", message: " password has been sent to " + fEmail + ".", preferredStyle: UIAlertControllerStyle.Alert)
    alert.addAction(UIAlertAction(title: "Ok", style: UIAlertActionStyle.Default, handler: nil))
    self.presentViewController(alert, animated: true, completion: nil)
}
Bước này chỉ cần gọi method requestPasswordResetForEmailInBackground với email được thiết lập lại mật khẩu. Các thiết lập lại password sau đó sẽ được xử lý bởi Parse.
All rights reserved