Sử dụng gem Rails ERD và Annotate trong dự án Rails.
Bài đăng này đã không được cập nhật trong 4 năm
Lần đầu tiên khi được add vào một dự án với các tính năng đã được xây dựng gần như hoàn chỉnh, chắc hẳn chúng ta sẽ đều cảm thấy choáng ngợp với số lượng model, controller, bảng và các trường trong cơ sở dữ liệu. Hôm nay mình sẽ giới thiệu với các bạn 2 gem Rails ERD và Annotate, hy vọng sẽ giúp các bạn nhanh chóng hiểu và làm quen với dự án mới hơn.
I. Gem Rails ERD. Rails ERD là gem giúp chúng ta generate mô hình thực thể quan hệ trong dự án. Với một dự án lớn, việc đầu tiên của chúng ta có lẽ là xem các mối quan hệ của các model, các attribute ở mỗi bảng và tác dụng của chúng. Rails ERD sử dụng Graphviz để sinh ra file diagrams, vì vậy muốn sử dụng gem Rails ERD, trước hết chúng ta phải cài Graphviz, chi tiết hơn về dự án Graphviz các bạn có thể tham khảo tại đây http://graphviz.org/.
-
Bước 1: Cài đặt Graphviz: Nếu bạn dùng Mac OS X:
brew install graphvizNếu dùng ubuntu thì chạy lệnh sau:sudo aptitude install graphvizNote: Để tránh các lỗi nhỏ xảy ra, các bạn nên dùng bản Graphviz 2.22 trở lên, nếu đã cài đặt graphviz -
Bước 2: Cài gem Rails ERD Gem Rails ERD yêu cầu phiên bản Rails 3 trở lên, Ruby 1.9.3 trở lên. Trong gem file, các bạn thêm gem
 group :development do
     gem "rails-erd"
end
Sau đó chạy
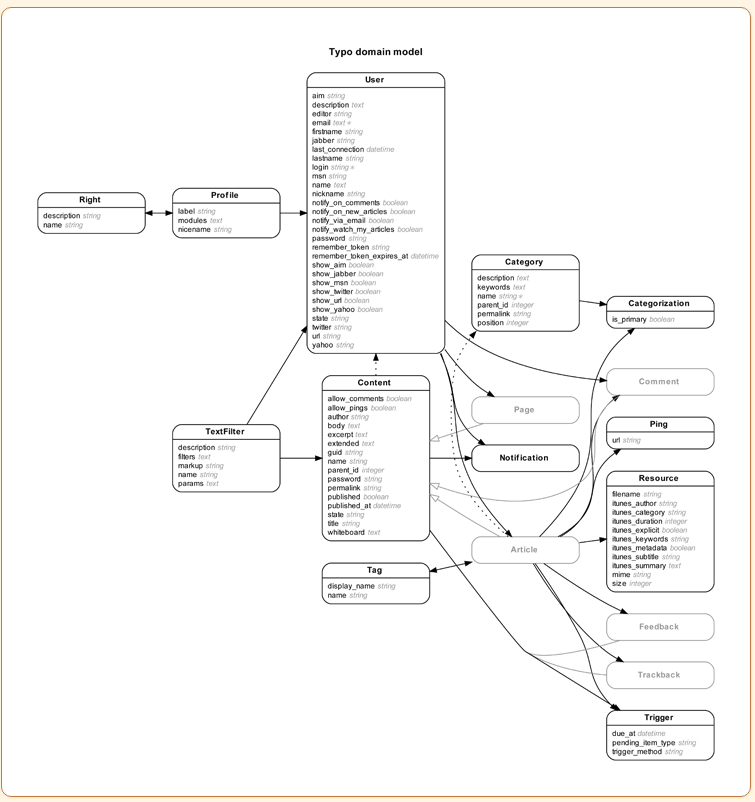
bundle installnhé. Sau khi install gem xong, Rails ERD đã tạo cho chúng ta 1 Rake task, để tạo ra file Diagram, chúng ta chỉ việc chạy rake:rake erdXong rồi, giờ thì chúng ta đã có 1 file ERD.pdf, đây là file diagram của dự án như ví dụ bên dưới.
Tuy nhiên nếu bạn muốn xuất file với định dạng khác, hoặc đặt tên file khác thì có thể truyền thêm tham số vào rake như sau:
rake erd filename='My project', filetype='dot'
Ngoài ra, nếu không muốn truyền tham số nhiều lần, các bạn có thể tạo 1 file config yml có tên ~/.erdconfig trong thư mục dự án với nội dung như sau :
attributes:
 - content
 - foreign_key
 - inheritance
disconnected: true
filename: erd
filetype: pdf
indirect: true
inheritance: false
markup: true
notation: simple
orientation: horizontal
polymorphism: false
sort: true
warn: true
title: sample title
exclude: null
only: null
only_recursion_depth: null
prepend_primary: false
cluster: false
splines: spline
Chi tiết các tham số, các bạn có thể tham khảo tại đây: https://voormedia.github.io/rails-erd/customise.html.
II. Gem Annotate
Annotate là gem rất hữu ích khi bạn được add vào dự án khi số lượng Model, attributes và routes path là rất lớn, khi đó rất khó để chúng ta follow danh sách các thuộc tính, type, limit trong database. Annotate sẽ sinh ra các dòng comment bên trên mỗi file model hoặc routes khi chúng ta code. Sau khi code xong chúng ta có thể remove hết comment đi và push code lên, rất tiện lợi phải không nào  .
Để sử dụng gem Annotate, chúng ta làm như sau:
Bước 1:
Add gem vào gemfile
.
Để sử dụng gem Annotate, chúng ta làm như sau:
Bước 1:
Add gem vào gemfile
  group :development do
    gem 'annotate'
  end
Sau đó chạy bundle install để cài đặt gem.
Bước 2:
Các bạn chạy lệnh annotate tại đường dẫn của project, gem anottate sẽ add thêm các chú thích vào file của chúng ta như bên dưới.
# == Schema Info
#
# Table name: line_items
#
#  id                  :integer(11)    not null, primary key
#  quantity            :integer(11)    not null
#  product_id          :integer(11)    not null
#  unit_price          :float
#  order_id            :integer(11)
#

 class LineItem < ActiveRecord::Base
   belongs_to :product
Một lưu ý nhỏ đó là nếu chỉ chạy lệnh annotate, gem sẽ tự động comment toàn bộ các file trong models, tests, fixtures, and factories của dự án, để loại bỏ phần nào, các bạn thêm vào tham số như sau:
annotate --exclude tests,fixtures,factories
Với routes, để hiển thị danh sách đường dẫn của routes, chúng ta dùng lệnh: annotate --routes. Trong file route.rb, các dòng chú thích sẽ được thêm vào bên trên
# == Route Map
#
#                   Prefix Verb   URI Pattern                   Controller#Action
#                     root GET    /                             welcome#index
#                     home GET    /home(.:format)               home#index
#         new_user_session GET    /login(.:format)              devise/sessions#new
#             user_session POST   /login(.:format)              devise/sessions#create
#     destroy_user_session DELETE /logout(.:format)             devise/sessions#destroy
#        new_user_password GET    /password/new(.:format)       devise/passwords#new
#       edit_user_password GET    /password/edit(.:format)      devise/passwords#edit
#            user_password PATCH  /password(.:format)           devise/passwords#update
#                          PUT    /password(.:format)           devise/passwords#update
#                          POST   /password(.:format)           devise/passwords#create
# cancel_user_registration GET    /cancel(.:format)             registrations#cancel
#    new_user_registration GET    /signup(.:format)             registrations#new
#   edit_user_registration GET    /edit(.:format)               registrations#edit
#        user_registration PATCH  /                             registrations#update
#                          PUT    /                             registrations#update
#                          DELETE /                             registrations#destroy
#                          POST   /                             registrations#create
#            conversations POST   /conversations(.:format)      conversations#create
#       close_conversation POST   /close_conversation(.:format) conversations#close
Khá là giống lệnh rake routes đúng không .
Sau khi code xong, để đẩy file code sạch sẽ lên github mà không có chú thích vừa thêm, các bạn chạy lệnh
annotate --delete và annotate --routes --delete nhé.
All rights reserved
