Sử dụng Fragment trong Android
Bài đăng này đã không được cập nhật trong 4 năm
Hello everyone, mình sẽ chia sẻ với các bạn cách sử dụng fragment trong android. Nó là một thành phần quan trọng. Nó khá giống activity. Hôm nay mình đi vào phần 1 static fragment, phần 2 dynamics fragment mình sẽ chia sẻ vào bài viết lần sau. Giờ chúng ta cùng tìm hiểu nhé.
1. Một số khái niệm cơ bản
- Trong các ứng dụng android, tại một thời điểm, chỉ có một Activity được hiển thị duy nhất trên màn hình. Chúng ta muốn chia màn hình ra nhiều phần để dễ sử dụng thì fragment đáp ứng điều đó
- Fragment là một thành phần android độc lập, được sử dụng bởi một activity, giống như một sub-activity. Fragment có vòng đời và UI riêng. Các Fragment thường có một file java đi kèm với file giao diện xml. Các fragment không có file giao diện xml thường được gọi là headless fragments.
- Fragment sử dụng method getActivity() để lấy ra Activity bố
- Fragment được định nghĩa trong file xml của activity (static definition) hoặc có thể sửa đổi fragment khi đang chạy (dynamic definition)
2. Fragment life cycle - vòng đời của 1 fragment
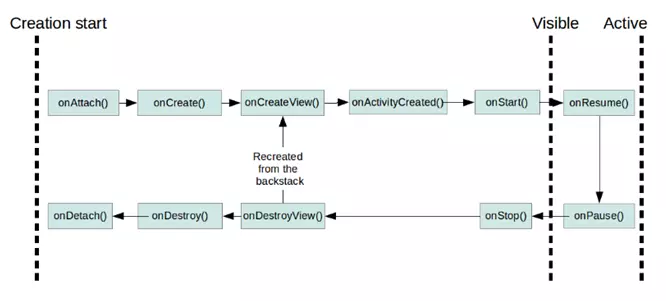 onAttach(): hàm này thực hiện tạo tham chiếu từ một fragment đến activity đã khởi tạo nó, và thực hiện một số bước trong quá trình khởi tạo
onCreate(): thực hiện khởi tạo fragment
onCreateView(): thực hiện tạo giao diện(view), trả về view là giao diện file xml tương ứng fragment. ko nên tương tác với activity trong hàm này bởi vì activity chưa được khởi tạo đầy đủ. Không cần thực hiện hàm này với các fragment không có header
onActivityCreated(): thực hiện hoàn thành nốt việc khởi tạo activity và fragment. Trong bước này chúng ta có thể gọi findViewById()
onStart(): thực hiện việc hiển thị fragment lên màn hình
onResume(): fragment chính thức hoạt động hoàn toàn
onPause(): fragment bị tạm dừng hoạt động, nó vẫn có thể được nhìn thấy
onStop(): fragment bị ẩn
onDestroyView(): giao diện(view) của fragment bị hủy. Nếu nó được gọi quay lại, nó sẽ quay trở lại thực hiện hàm onCreateView()
onDestroy(): bị hủy
onDetach(): bị hủy hoàn toàn
3. Static Fragment Static Fragment là kiểu fragment được khai báo (định nghĩa) trực tiếp trong file activity_main.xml Ví dụ ta có 2 static fragment là Fragment1.java(fragment1.xml) và Fragment2.java(fragment2.xml) Trong file activity_main.xml khai báo tĩnh:
<fragment
    android:id="@+id/listFragment"
    android:layout_weight="1"
    android:layout_width="0dp"
    android:layout_height="match_parent"
    class="com.example.android.fragment1.MyFragment1"
    tools:layout="@layout/fragment1">
</fragment>
Chú ý: Bắt buộc phải có thuộc tính android:id. Nếu không sẽ gây lỗi. Hai class Fragment1.java và Fragment2.java phải extends Fragment Và phải ghi đè phương thức onCreateView():
public View onCreateView(LayoutInflater inflater, ViewGroup container, Bundle savedInstanceState) {
    super.onCreateView(inflater, container, savedInstanceState);
    View view = inflater.inflate(R.layout.fragment1, container, false);
    return view;
}
Example:
MainActivity.java
package com.example.tuantv6.fragmentdemo;

import android.support.v7.app.AppCompatActivity;
import android.os.Bundle;

public class MainActivity extends AppCompatActivity {

    @Override
    protected void onCreate(Bundle savedInstanceState) {
        super.onCreate(savedInstanceState);
        setContentView(R.layout.main_activity);
    }
}
Fragment1
package com.example.tuantv6.fragmentdemo;

import android.os.Bundle;
import android.support.annotation.Nullable;
import android.support.v4.app.Fragment;
import android.view.LayoutInflater;
import android.view.View;
import android.view.ViewGroup;

public class Fragment1 extends Fragment {
    @Nullable
    @Override
    public View onCreateView(LayoutInflater inflater, @Nullable ViewGroup container, @Nullable Bundle savedInstanceState) {
        super.onCreateView(inflater, container, savedInstanceState);
        View view = inflater.inflate(R.layout.fragment1, container, false);
        return view;
    }
}
Fragment2
package com.example.tuantv6.fragmentdemo;

import android.os.Bundle;
import android.support.annotation.Nullable;
import android.support.v4.app.Fragment;
import android.view.LayoutInflater;
import android.view.View;
import android.view.ViewGroup;

public class Fragment2 extends Fragment {
    @Nullable
    @Override
    public View onCreateView(LayoutInflater inflater, @Nullable ViewGroup container, @Nullable Bundle savedInstanceState) {
        super.onCreateView(inflater, container, savedInstanceState);
        View view = inflater.inflate(R.layout.fragment2, container, false);
        return view;
    }
}
fragment1.xml
<?xml version="1.0" encoding="utf-8"?>
<LinearLayout xmlns:android="http://schemas.android.com/apk/res/android"
    android:orientation="vertical" android:layout_width="match_parent"
    android:background="#FF0000"
    android:layout_height="match_parent">
    <TextView
        android:layout_width="wrap_content"
        android:layout_height="wrap_content"
        android:text="fragment 1"
        android:textSize="30dp"
        android:layout_gravity="center"
        />
</LinearLayout>
fragment2.xml
<?xml version="1.0" encoding="utf-8"?>
<LinearLayout xmlns:android="http://schemas.android.com/apk/res/android"
    android:orientation="vertical" android:layout_width="match_parent"
    android:background="#AA0099"
    android:layout_height="match_parent">
    <TextView
        android:layout_width="wrap_content"
        android:layout_height="wrap_content"
        android:text="fragment 2"
        android:textSize="30dp"
        android:layout_gravity="center"
        />
</LinearLayout>
mainactivity.xml
<?xml version="1.0" encoding="utf-8"?>
<LinearLayout xmlns:android="http://schemas.android.com/apk/res/android"
    xmlns:tools="http://schemas.android.com/tools"
    android:orientation="horizontal"
    android:layout_width="match_parent"
    android:layout_height="match_parent">

    <fragment
        android:id="@+id/listFragment"
        class="com.example.haitm.fragmentdemo.MyFragment1"
        android:layout_width="0dp"
        android:layout_height="match_parent"
        android:layout_weight="1"
        tools:layout="@layout/fragment1">

    </fragment>

    <fragment
        android:id="@+id/detailFragment"
        class="com.example.haitm.fragmentdemo.MyFragment2"
        android:layout_width="0dp"
        android:layout_height="match_parent"
        android:layout_weight="1"
        tools:layout="@layout/fragment2">

    </fragment>

</LinearLayout>
Kết quả
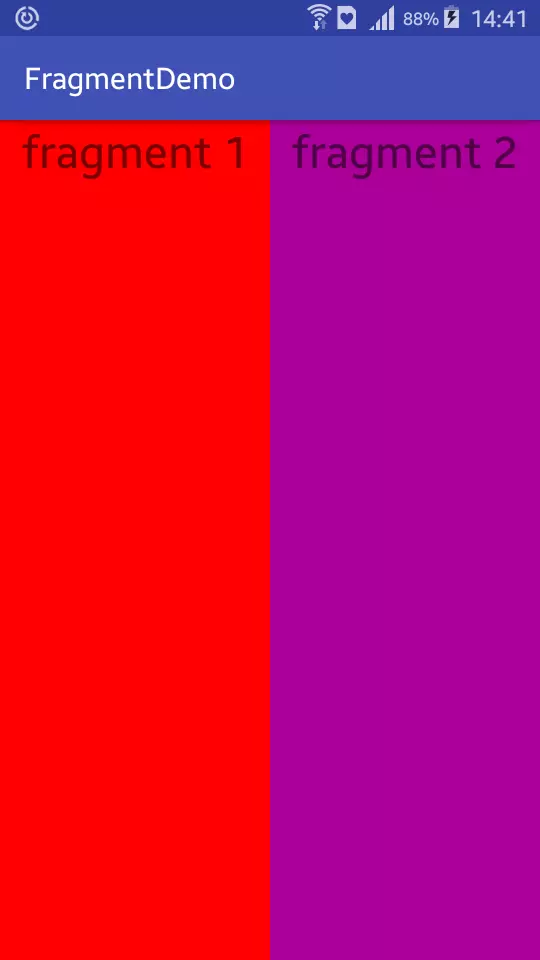
Trên đây là hướng dẫn cơ bản về sử dụng static fragment, các bạn cùng chờ đón phần 2 về dynamic fragment trong bài viết tiếp theo của mình nhé.  Refer link: http://www.vogella.com/tutorials/AndroidFragments/article.html
All rights reserved
