Sử dụng Credit Cards trong Paypal (Ruby on rails)
Bài đăng này đã không được cập nhật trong 4 năm
1, Giới thiệu về paypal
Paypal là một cổng thanh toán điện tử trực tuyến giúp chúng ta có thê đưa tiền từ tài khoản ngân hàng vào tài khoản PayPal để tiến hành giao dịch trên mạng. Hoặc rút tiền từ tài khoản PayPal về tài khoản nngân hàng. Khi sử dụng PayPal làm trung gian thì quá trình giao dịch sẽ đơn giản hơn và bảo mật hơn.
2, Sử dụng Credit Cards với Paypal
Để sư dụng chức năng này trước hết phải tạo một tài khoản paypal và một ứng dựng rails theo hướng dẫn trong bài viêt https://viblo.asia/DinhHuan/posts/XogBG2JbGxnL
Để sử dụng Credit Cards với Paypal, chúng ta làm theo các bước sau:
Bước 1:
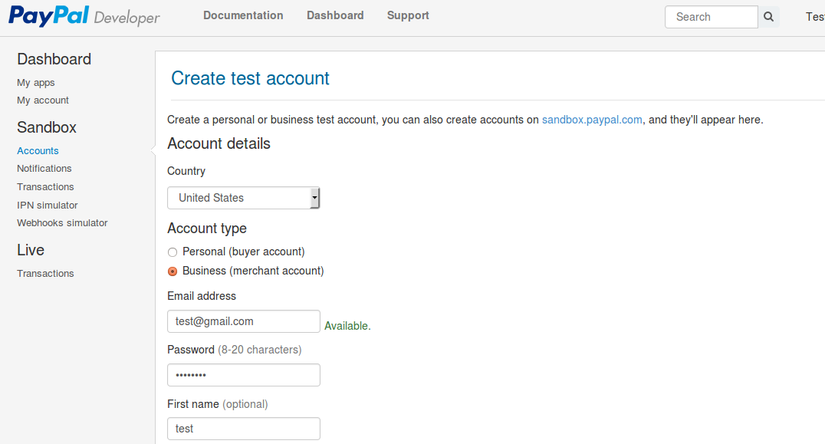
Vào trang Paypal developer site Dashboard > Sandbox: Accounts > Create Account tạo một tài khoản business.
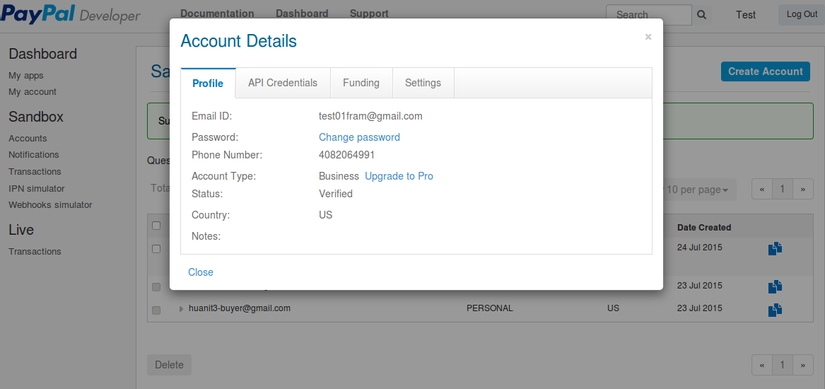
Sau đó. chúng ta cần update tài khoản này lên Pro để có thể sử dụng các thẻ credit cards, debit cards. Vào danh sách accounts và chọn profile của tài khoản mới tạo và click "Upgrade to Pro".
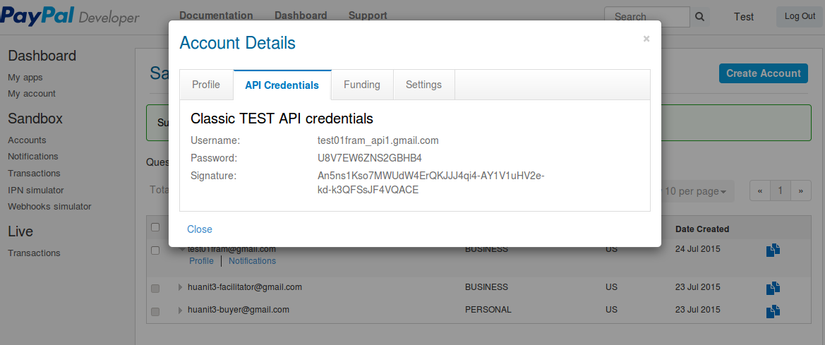
Đồng thời chúng ta cũng lưu các thông tin trên tab API Credentials để sử dụng cho các bước tiếp theo.
Bước 2: Tạo form credit Cards
Chúng ta cần tạo một credit cards model để lưu các thông tin thanh toán.
rails g model Card registration:references ip_address:string first_name:string last_name:string card_type:string card_expires_on:date

rake db:migrate
Form đăng ký này sẽ cho phép chúng ta chọn các cách thanh toán card của paypal.
Trong view registration app/views/registrations/new.html.haml,chúng ta sẽ thêm phần chọn cách thanh toán có thể cho phép nguwoif dùng chọn cách thanh toán là paypal hay credit card.
    .field.payment_method
      = label_tag :payment_method
      = radio_button_tag :payment_method, "paypal"
      = image_tag "ppcom.svg"
      = radio_button_tag :payment_method, "card", checked: true
      = image_tag "credit-card.jpg", style: "max-width: 100px;"
      :javascript
        $(document).on("click", "#new_registration input[type='radio']",
          function(e) {
            if ($("#payment_method_card:checked").val() == "card") {
              $("fieldset.card_info").show();
            }
            else {
              $("fieldset.card_info").hide();
            }
          });
Và thêm một fieldset dùng để nhập tất cả các thông tin dùng cho việc thanh toán.
%fieldset.card_info
  %legend Card info
  = f.fields_for :card do |c|
    .field
      = c.label :first_name
      = c.text_field :first_name
    .field
      = c.label :last_name
      = c.text_field :last_name
    .field
      = c.label :card_type
      = c.select :card_type, [["Visa", "visa"], ["MasterCard", "master"], ["Discover", "discover"], ["American Express", "american_express"]]
    .field
      = c.label :card_number
      = c.text_field :card_number
    .field
      = c.label :card_verification, "Card Verification Value (CVV)"
      = c.text_field :card_verification
    .field
      = c.label :card_expires_on
      = c.date_select :card_expires_on, discard_day: true, start_year: Date.today.year, end_year: (Date.today.year+10), add_month_numbers: true
Bởi vì Paypal gateway chậm và khi submit có nhiều form hoặc có lỗi hệ thống lên sau khi chúng ta submit form thì cần phải disable nút submit và hiển thị thông báo đợi cho người dùng.
.actions
  = f.submit "Registration Payment", class: "btn", style: "color: white;background: rgb(242, 118, 73);"
  :javascript
    $("form#new_registration").submit( function() {
      $(this).find('input[type=submit]').attr('disabled', 'disabled');
      $(this).find('input[type=submit]').val("Submitting, please wait ...");
    });
Bước 3: Cấu hình Active Merchant
Thêm gem 'activemerchant' vào trong Gemfile, và bundle install.
Thêm các thông tin tài khoản mà bạn vừa tạo ở trên vào file config/environment/development.rb
config.after_initialize do
  ActiveMerchant::Billing::Base.mode = :test  # :production when you will use a real Pro Account
  ::GATEWAY = ActiveMerchant::Billing::PaypalGateway.new(
    login: "test01fram_api1.gmail.com",
    password: "U8V7EW6ZNS2GBHB4",
    signature: "An5ns1Kso7MWUdW4ErQKJJJ4qi4-AY1V1uHV2e-kd-k3QFSsJF4VQACE"
  )
end
Các thông tin này rất cần thiết để Paypal biết giao dịch đang được thực hiện cho tài khoản nào.
Bước 4: Xử lý thanh toán.
Trong controller registration chúng ta thêm trường hợp thanh toán bằng với card khi khi tạo giao dịch.
def create
    ...
      case params['payment_method']
        when "paypal"
          redirect_to @registration.paypal_url(registration_path(@registration))
        when "card"
          if @registration.card.purchase
            redirect_to registration_path(@registration), notice: @registration.card.card_transaction.message
          else
            redirect_to registration_path(@registration), alert: @registration.card.card_transaction.message
          end
    ...
  end
Trong model Card chúng ta thêm các method xử lý việc thực hiện giao dịch với creadit cards
class Card < ActiveRecord::Base
  belongs_to :registration
  has_one :card_transaction

  # These attributes won't be stored
  attr_accessor :card_number, :card_verification
  ...
  def credit_card
    @credit_card ||= ActiveMerchant::Billing::CreditCard.new(
        type:                card_type,
        number:              card_number,
        verification_value:  card_verification
    )
  end
end
Chúng ta cần chú ý thông tin trong trường card_number và card_verification sẽ không được lưu trữ trong database, do vậy trong quá trình tạo giao dịch nêu bị lỗi thì người dùng bắt buộc phải thực hiện lại các bước đã tiến hành mà không thể retry được.
Tiếp theo chúng ta tạo một Card Transaction model dùng để lưu các thông tìn phản hồi từ hệ thông Paypal đối với giao dịch đã được tạo ra.
rails g model card_transaction card:references action:string amount:integer success:boolean authorization:string message:string params:text
Trong model chúng ta sẽ xử lý
class CardTransaction < ActiveRecord::Base
  belongs_to :card
  serialize :params

  def response=(response)
    self.success       = response.success?
    self.authorization = response.authorization
    self.message       = response.message
    self.params        = response.params
  end
Cuối cùng chúng ta thêm liên kết giữa model Registration với Card.
 has_one :card
  accepts_nested_attributes_for :card
Bước 5: Test chức năng
Vào trang chủ của project localhost:3000 3000 là cổng mặc định chúng ta chạy chương trình.
Chọn 1 course để hiển thị ra màn hình nhập dữ liệu:
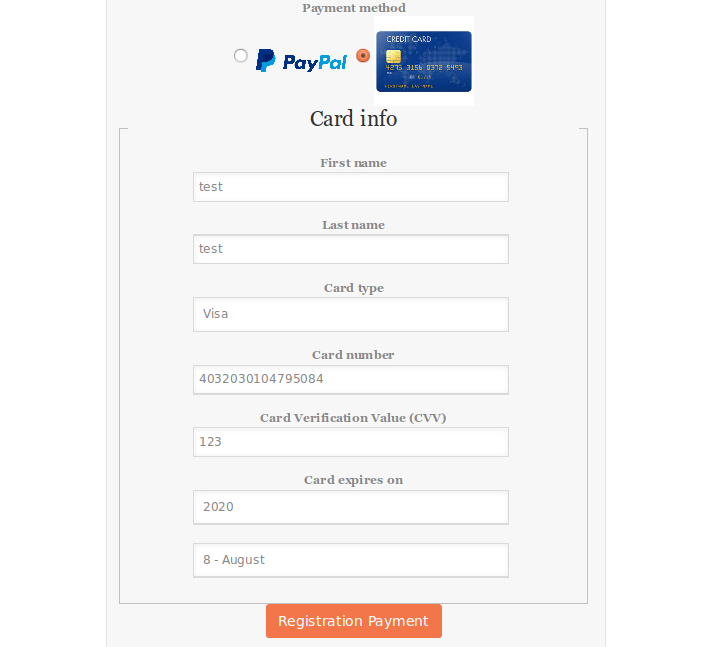
Ở đây chúng ta sẽ sử dụng môt card number 4032030104795084 CVV 123 được chấp nhận cho test ở paypal.
Sau khi nhập đầy đủ thông tin trên form click Registration Payment và đơi khoảng 10s để đợi để tạo giao dịch trên paypal. Sau đó sẽ hiển thị lên màn hình thông báo giao dịch đã được tạo thành công
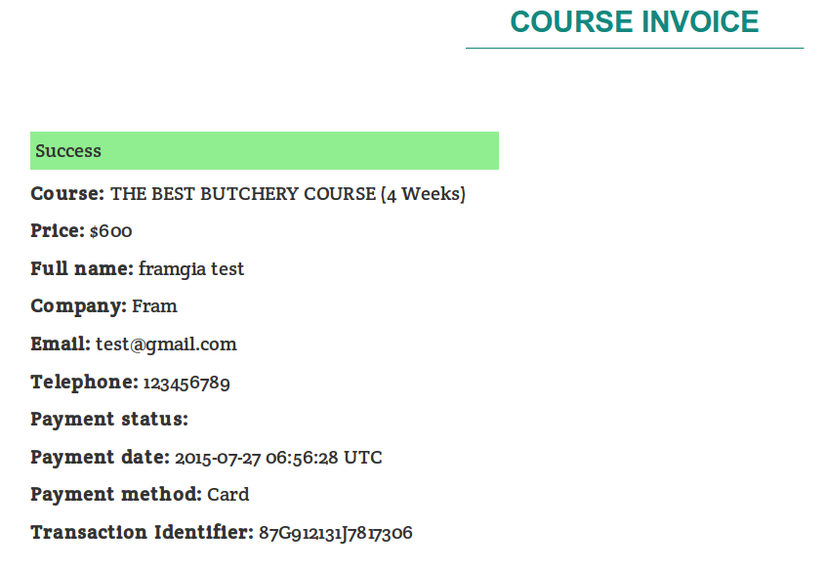 Để xem kỹ hơn chúng ta có thể truy cập vào trang Paypal Sandbox với tài khoản mà chúng ta đã tạo ở bước 1 để xem thông tin giao dich.
Source: https://github.com/dinhhuan/paypal_in_rails
References
https://developer.paypal.com/docs/
http://railscasts.com/episodes/141-paypal-basics
http://www.gotealeaf.com/blog/paypal-payments-with-credit-cards
All rights reserved