Sử dụng animation tuỳ chỉnh việc chuyển đổi giữa các ViewControllers
Bài đăng này đã không được cập nhật trong 4 năm

1. Chuyển đổi giữa các viewcontroller
Trong iOS để chuyển từ viewcontroller này sang viewcontroller khác chúng ta có 2 cách:
- Đơn giản nhất là từ viecontrollerA ta sử dụng hàm
- (void)presentViewController:(UIViewController *)viewControllerToPresent
                     animated:(BOOL)flag
                   completion:(void (^)(void))completion;
- Cách thứ 2: dùng navigationController quản lý việc chuyển đổi các viewController này.
Tuy nhiên 2 cách trên thì được apple xây dựng sẵn cho chúng ta nên không thể tuỳ chỉnh việc các viewController xuất hiện: thêm hiệu ứng, tuỳ chỉnh thời gian chuyển đổi ...
Trong bài viết này mình bày cách tuỳ chỉnh việc chuyển đổi giữa các viewController trong iOS.
2. Tuỳ chỉnh Present Modal ViewController
Trước khi chỉnh sửa việc chuyển đổi viewcontroller có hiệu ứng như sau:

Chúng ta có thể thấy nó khá đơn giản không có nhiều hiệu ứng lắm, chúng ta sẽ chỉnh sủa 1 chút để việc chuyển viewController trông đẹp hơn.
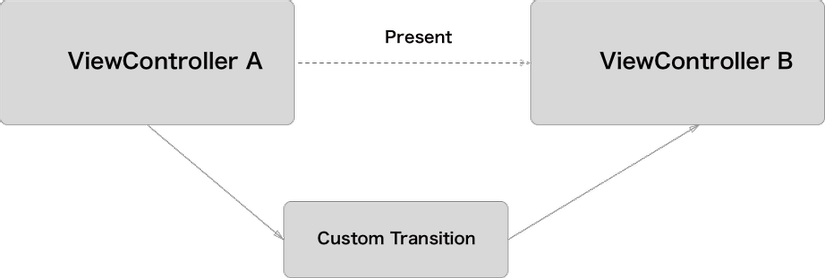
Để tuỳ chỉnh việc chuyển đổi viewcontroller ta để viewcontroller đó adpot UIViewControllerTransitioningDelegate, mỗi khi chúng ta hiển thị 1 viewcontroller mới lên thông qua delegate viewcontroller sẽ sử dụng 1 custom transition tuỳ chỉnh việc hiển thị 1 viewcontroller khác từ viewController đó.

3. Thực hiện
Đầu tiên ta tạo 1 file CustomPresentModalAnimator
class CustomPresentModalAnimator: NSObject, UIViewControllerAnimatedTransitioning {
}
Để file CustomPresentModalAnimator adpot protocol UIViewControllerAnimatedTransitioning ta thêm vào 2 hàm sau:
func transitionDuration(transitionContext: UIViewControllerContextTransitioning?)-> NSTimeInterval
func animateTransition(transitionContext: UIViewControllerContextTransitioning)
Tiếp đó ở CustomPresentModalViewController ta adopt protocol UIViewControllerTransitioningDelegate và thêm 2 hàm sau:
func animationControllerForPresentedController(presented: UIViewController, presentingController presenting: UIViewController, sourceController source: UIViewController) ->
        UIViewControllerAnimatedTransitioning?
viewcontroller sẽ nhận object trả về ở đây để làm animation khi ta present viewcontroller
func animationControllerForDismissedController(dismissed: UIViewController) -> UIViewControllerAnimatedTransitioning?
Viewcontroller sẽ nhận object trả về ở đây để làm animation khi dismiss viewcontroller vừa present lên
Mở lại file CustomPresentModalAnimator ta sẽ thêm vào 1 số thuộc tính sau:
let duration = 0.4
var presenting = true
var xScaleFactor: CGFloat = 0.0
var yScaleFactor: CGFloat = 0.0
var originFrame = CGRect.zero
var initialFrame = CGRect.zero
var finalFrame = CGRect.zero
- duration: là thời gian dùng để hiển thị animation trong quá trình chuyển đổi viewcontroller.
- presenting: xác định khi nào là present , khi nào dismiss viewcontroller
- xScaleFactor, yScaleFactor: tỉ lệ avatar imageview khi tiến hành animation.
- originFrame, initialFrame, finalFrame: frame của avatar imageview thay đổi trong quá trình present lên và dismiss
Trong hàm transitionDuration chúng ta return về duration vừa khai báo ở trên.
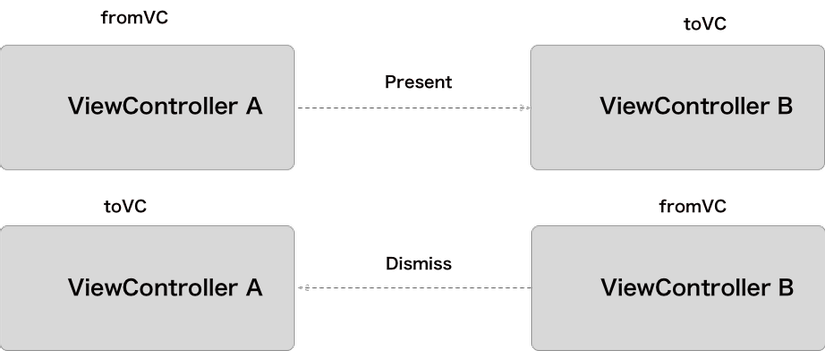
Quá trình present và dismiss được tóm gọn lại như sau

Để xác định đc viewcontroller fromVC và toVC ta thêm đoạn code sau vào hàm animateTransition
guard let fromVC = transitionContext.viewControllerForKey(UITransitionContextFromViewControllerKey) else {
    return
}

guard let toVC = transitionContext.viewControllerForKey(UITransitionContextToViewControllerKey) else {
    return
 }
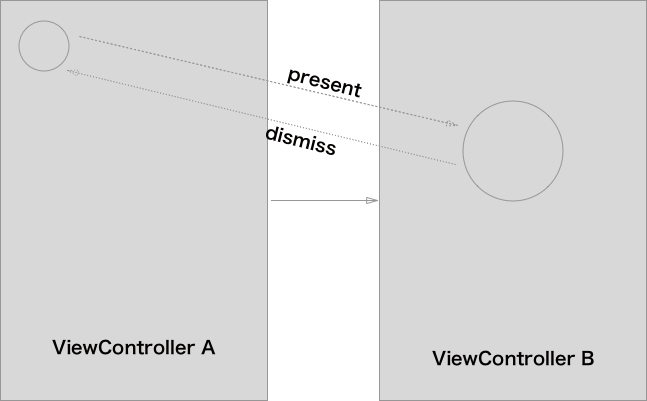
Ở đây ta sẽ làm animation khi present từ viewcontroller A -> B avatar sẽ chuyển từ nhỏ sang to và khi dismiss thì chuyển từ to về nhỏ

Ta thấy rằng để làm được animation như vậy thì trong quá trình diễn ra animation ta phải ẩn 2 avatar image view ở 2 viewcontroller
Để làm được điều đó trước tiên ta phải lấy ra được 2 viewcontroller A và B Để lấy viewcontroller A ta sử dụng đoạn code sau:
let navigationControllerFirst = presenting ? (fromVC as! UINavigationController) : (toVC as! UINavigationController)
let customPresentModalVC = navigationControllerFirst.viewControllers.last as! CustomPresentModalViewController
Để lấy viewcontroller B:
let avatarViewController = presenting ? (toVC as! AvatarViewController) : (fromVC as! AvatarViewController)
Tiếp đó ta lấy tiếp ra 2 avatar image view
let avatarImageViewFirst = topView.subviews.flatMap{ $0 }.filter{ $0.tag == AvatarImageViewTag }.first!
let avatarImageViewSecond = avatarViewController.view.subviews.flatMap{ $0 }.filter{ $0.tag == AvatarImageViewTag }.first!
và ẩn 2 avatar đó đi
avatarImageViewFirst.layer.opacity = 0.0
avatarImageViewSecond.layer.opacity = 0.0
để có hiệu ứng animation avatar sẽ phóng to ra khi present và nhỏ lại khi dismiss ta cần tạo 1 fakeAvatarImageView
let fakeAvatarImageView = UIImageView(image: UIImage(named: "image.jpg"))
Tính tỉ lệ scale của avatar imageview
xScaleFactor = finalFrame.size.width / initialFrame.size.width
yScaleFactor = finalFrame.size.height / initialFrame.size.height
let scaleTransform = CGAffineTransformMakeScale(xScaleFactor, yScaleFactor)
và tạo animation cho toàn bộ quá trình trên:
UIView.animateWithDuration(transitionDuration(transitionContext),
                           delay: 0,
                           options: .CurveEaseInOut,
                           animations: {
                            fakeAvatarImageView.transform = scaleTransform
                            fakeAvatarImageView.center = CGPointMake(CGRectGetMidX(self.finalFrame), CGRectGetMidY(self.finalFrame))
                            toVC.view.layer.opacity = 1.0
    }) { finished in
        // show avatar in both view controller
        avatarImageViewFirst.layer.opacity = 1.0
        avatarImageViewSecond.layer.opacity = 1.0

        // remove fake avatar iamge view
        fakeAvatarImageView.removeFromSuperview()

        // complete
        transitionContext.completeTransition(!transitionContext.transitionWasCancelled())
}
và đây là thành quả chúng ta đặt được

4. Demo
https://github.com/pqhuy87it/MonthlyReport/tree/master/CusomPresentViewController
5. Tham khảo
All rights reserved