「Spring Boot #9」 Giải thích cách Thymeleaf vận hành + Expression + Demo Full
Bài đăng này đã không được cập nhật trong 7 năm
Nguồn: loda.me
Giới thiệu
Trong bài trước, mình đã đề cập với các bạn kiến trúc web của Spring Boot và giới thiệu chức năng của @Controller.
Trong bài này, chúng ta sẽ tìm hiểu chi tiết hơn về Thymeleaf và sử dụng nó để làm một trang web đơn giản.
Thymeleaf
Thymeleaf là một Java Template Engine. Có nhiệm vụ xử lý và generate ra các file HTML, XML, v.v..
Các file HMTL do Thymeleaf tạo ra là nhờ kết hợp dữ liệu và template + quy tắc để sinh ra một file HTML chứa đầy đủ thông tin.
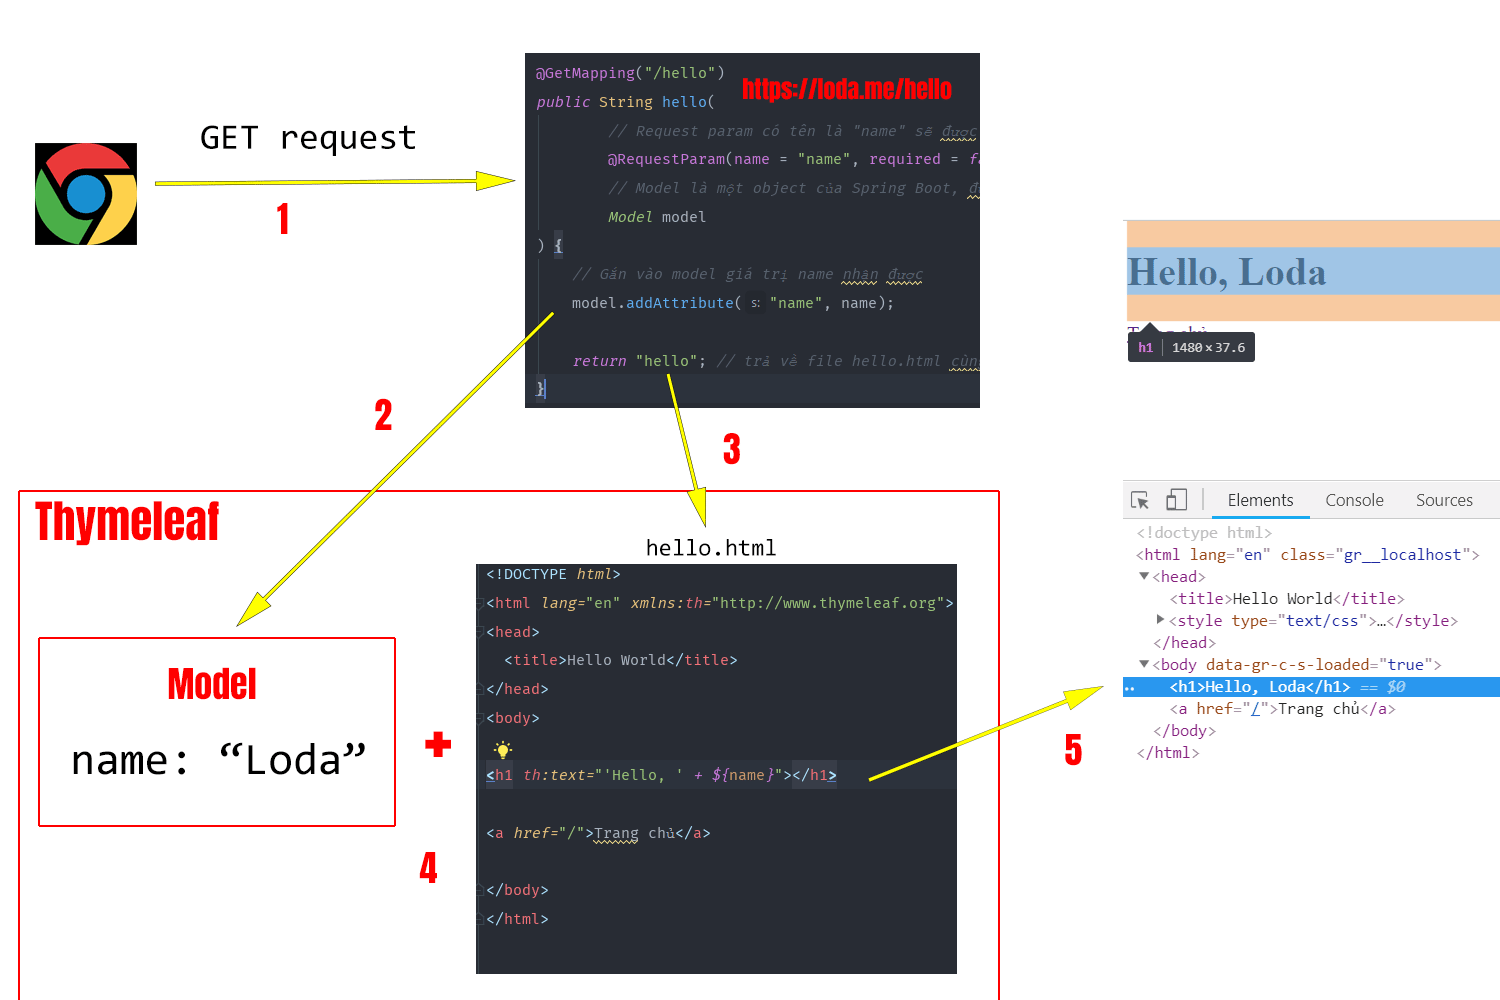
Việc của bạn là cung cấp dữ liệu và quy định template như nào, còn việc dùng các thông tin đó để render ra HTML sẽ do Thymeleaf giải quyết.
Cú pháp
Cú pháp của Thymeleaf sẽ là một attributes (Thuộc tính) của thẻ HTML và bắt đầu bằng chữ th:.
Với cách tiếp cận này, bạn sẽ chỉ cần sử dụng các thẻ HTML cơ bản đã biết mà không cần bổ sung thêm syntax hay thẻ mới như JSP truyền thống.
Ví dụ:
Để truyền dữ liệu từ biến name trong Java vào một thẻ H1 của HTML.
<h1 th:text="${name}"></h1>
Chúng ta viết thẻ H1 như bình thường, nhưng không chứa bất cứ text nào trong thẻ. Mà sử dụng cú pháp th:text="${name}" để Thymeleaf lấy thông tin từ biến name và đưa vào thẻ H1.
Kết quả khi render ra:
// Giả sử String name = "loda"
<h1>Loda</h1>
thuộc tính th:text biến mất và giá trị biến name được đưa vào trong thẻ H1.
Đó là cách Thymeleaf hoạt động.
Model & View Trong Spring Boot
Trong bài trước, tôi đã demo cách sử dụng đối tượng Model. Bây giờ tôi sẽ nói kĩ hơn một chút.
Model là đối tượng lưu giữ thông tin và được sử dụng bởi Template Engine để generate ra webpage. Có thể hiểu nó là Context của Thymeleaf
Model lưu giữ thông tin dưới dạng key-value.
Trong template thymeleaf, để lấy các thông tin trong Model. bạn sẽ sử dụng Thymeleaf Standard Expression.
${...}: Giá trị của một biến.*{...}: Giá trị của một biến được chỉ định (sẽ giải thích ở dưới)
Ngoài ra, để lấy thông tin đặc biệt hơn:
#{...}: Lấy message@{...}: Lấy đường dẫn URL dựa theo context của server
Nói tới đây có lẽ hơi khó hiểu, chúng ta sẽ dùng ví dụ để hiểu rõ từng loại Expression.
${...} - Variables Expressions
Trên Controller bạn đưa vào một số giá trị:
model.addAttribute("today", "Monday");
Để lấy giá trị của biến today, tôi sử dụng ${...}
<p>Today is: <span th:text="${today}"></span>.</p>
Đoạn expression trên tương đương với:
ctx.getVariable("today");
*{...} - Variables Expressions on selections
Dấu * còn gọi là asterisk syntax. Chức năng của nó giống với ${...} là lấy giá trị của một biến.
Điểm khác biệt là nó sẽ lấy ra giá trị của một biến cho trước bởi th:object
  <div th:object="${session.user}">
    <!-- th:object tồn tại trong phạm vi của thẻ div này -->

    <!-- Lấy ra tên của đối tượng session.user -->
    <p>Name: <span th:text="*{firstName}"></span>.</p>
    <!-- Lấy ra lastName của đối tượng session.user -->
    <p>Surname: <span th:text="*{lastName}"></span>.</p>
  </div>
Còn ${...} sẽ lấy ra giá trị cục bộ trong Context hay Model.
Vậy đoạn code ở trên tương đương với:
<div>
  <p>Name: <span th:text="${session.user.firstName}"></span>.</p>
  <p>Surname: <span th:text="${session.user.lastName}"></span>.</p>
</div>
#{...} - Message Expression
Ví dụ, trong file config .properties của tôi có một message chào người dùng bằng nhiều ngôn ngữ.
home.welcome=¡Bienvenido a nuestra tienda de comestibles!
Thì cách lấy nó ra nhanh nhất là:
<p th:utext="#{home.welcome}">Xin chào các bạn!</p>
Đoạn text tiếng việt bên trong thẻ p sẽ bị thay thế bởi thymeleaf khi render #{home.welcome}.
@{...} - URL Expression
@{...} xử lý và trả ra giá trị URL theo context của máy chủ cho chúng ta.
Ví dụ:
<!-- tương đương với 'http://localhost:8080/order/details?orderId=3' -->
<a href="details.html"
   th:href="@{http://localhost:8080/order/details(orderId=${o.id})}">view</a>

<!-- tương đương  '/order/details?orderId=3' -->
<a href="details.html" th:href="@{/order/details(orderId=${o.id})}">view</a>

<!-- tương dương '/gtvg/order/3/details' -->
<a href="details.html" th:href="@{/order/{orderId}/details(orderId=${o.id})}">view</a>
Nếu bắt dầu bằng dấu / thì nó sẽ là Relative URL và sẽ tương ứng theo context của máy chủ của bạn.
Demo minh họa
Chúng ta sẽ tạo ra một trang web đơn giản để hiểu các loại Expression trong Thymeleaf.
pom.xml
<?xml version="1.0" encoding="UTF-8"?>
<project xmlns="http://maven.apache.org/POM/4.0.0" xmlns:xsi="http://www.w3.org/2001/XMLSchema-instance"
         xsi:schemaLocation="http://maven.apache.org/POM/4.0.0 http://maven.apache.org/xsd/maven-4.0.0.xsd">
    <modelVersion>4.0.0</modelVersion>
    <packaging>pom</packaging>
    <parent>
        <groupId>org.springframework.boot</groupId>
        <artifactId>spring-boot-starter-parent</artifactId>
        <version>2.0.5.RELEASE</version>
        <relativePath /> <!-- lookup parent from repository -->
    </parent>
    <groupId>me.loda.spring</groupId>
    <artifactId>spring-boot-learning</artifactId>
    <version>0.0.1-SNAPSHOT</version>
    <name>spring-boot-learning</name>
    <description>Everything about Spring Boot</description>

    <properties>
        <java.version>1.8</java.version>
    </properties>

    <dependencies>

        <!--spring mvc, rest-->
        <dependency>
            <groupId>org.springframework.boot</groupId>
            <artifactId>spring-boot-starter-web</artifactId>
        </dependency>

        <!-- thymeleaf -->
        <dependency>
        <groupId>org.springframework.boot</groupId>
        <artifactId>spring-boot-starter-thymeleaf</artifactId>
        </dependency>
    </dependencies>

    <build>
        <plugins>
        <plugin>
            <groupId>org.springframework.boot</groupId>
            <artifactId>spring-boot-maven-plugin</artifactId>
        </plugin>
        </plugins>
    </build>

</project>
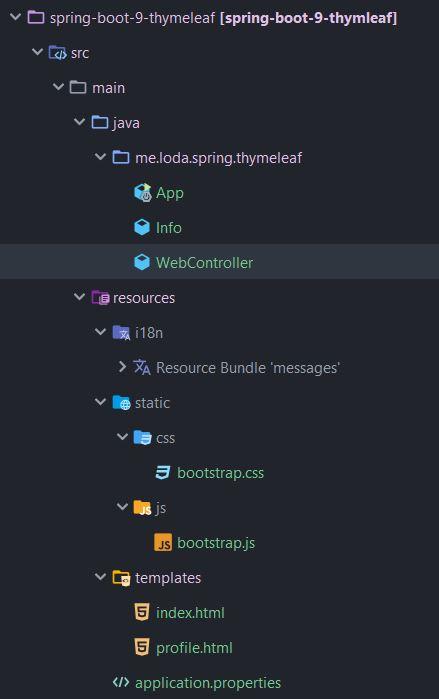
Cấu trúc thư mục:
Cấu hình thymeleaf
Chúng ta sẽ cấu hình ứng dụng bằng file application.properties.

application.properties
#Chạy ứng dụng trên port 8085
server.port=8085

# Bỏ tính năng cache của thymeleaf để lập trình cho nhanh
spring.thymeleaf.cache=false

# Các message tĩnh sẽ được lưu tại thư mục i18n
spring.messages.basename=i18n/messages


# Bỏ properties này đi khi deploy
# Nó có tác dụng cố định ngôn ngữ hiện tại chỉ là Tiếng Việt
spring.mvc.locale-resolver=fixed

# Mặc định ngôn ngữ là tiếng việt
spring.mvc.locale=vi_VN
# Đổi thành tiếng anh bằng cách bỏ comment ở dứoi
# spring.mvc.locale=en_US
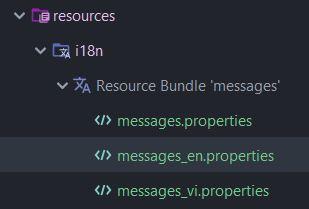
Chức năng messages
Các trang website hỗ trợ đã ngôn ngữ (i18n) thì các message sẽ được lưu dưới dạng key-value. Và tùy theo từng vùng địa lý mà chọn sử dụng value cho hợp lý.
Thymeleaf sẽ tự làm điều này cho chúng ta, vì ở trên chúng ta đã cấu hình cho nó vị trí lưu trũ các messages này rồi.
Ví dụ:
Tôi có một câu chào đơn giản cho 2 vùng và US và VN.
i18n/messages_vi.properties
loda.hello=Xin chào tất cả các bạn tới với Loda Website
i18n/messages_en.properties
loda.hello=Welcome to Loda Website
Static & Templates
Làm Web thì không thể thiếu css và javascript. Các file này sẽ được lưu tại thư mục resources/static.
File .html là dạng template sử dụng để render ra webpage và trả về cho người dùng. Nó sẽ được lưu tại thư mục resources/templates
Thymleaf sẽ tự biết tìm đường tới những tài nguyên này.
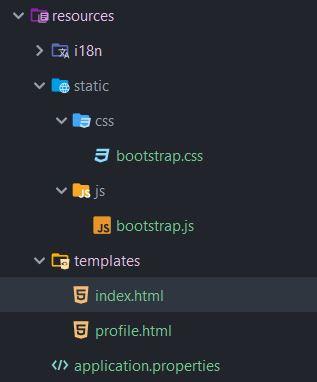
index.html
index.html sẽ là file mặc định mà Thymeleaf tìm đầu tiên và trả về mỗi khi người dùng vào địa chỉ / hay https://localhost:8085/ mà chúng ta không cần config gì cả.
Trong index.html tôi sẽ:
- Gọi ra
bootstrap.cssvàbootstrap.jstrong thư mụcresource/staticbằng expression@{...} - Hiển thị dòng chữ chào
loda.hellotrong thư mụcresource/i18nbằng expression#{...}
index.html
<!DOCTYPE html>
<html xmlns:th="http://www.thymeleaf.org">
<head>
  <meta charset="UTF-8" />
  <title>Loda</title>
  <meta http-equiv="Content-Type" content="text/html; charset=UTF-8" />

  <!--css-->
  <link th:href="@{/css/bootstrap.css}" rel="stylesheet" />

  <!--js-->
  <script th:src="@{/js/bootstrap.js}"></script>

</head>
<body>
  <h1 th:utext="#{loda.hello}"></h1>

  <a th:href="@{/profile}" class="btn btn-primary">Loda Profile</a>
</body>

</html>
Chạy thử 1.
Sau khi config và tạo ra file index.html là chúng ta đã có một trang Web cơ bản rồi.
Hãy chạy thử ứng dụng Spring Boot của mình.
App.java
@SpringBootApplication
public class App {
    public static void main(String[] args) {
        SpringApplication.run(App.class, args);
    }
}
Truy cập vào địa chỉ http://localhost:8085/
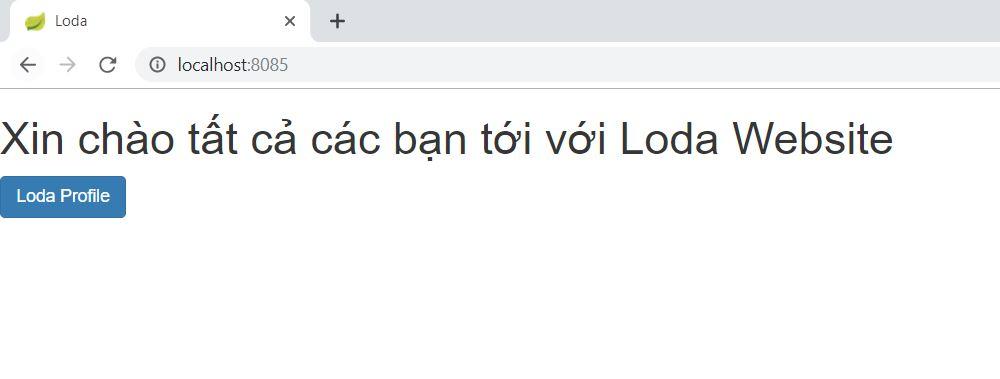
Ứng dụng hiện ra dòng chữ chào mừng lấy từ messages và button được trang trí nhờ bootstrap trong static.
Thêm @Controller cho path /profile
Bây giờ chúng ta sẽ bổ sung thêm @Controller để handle các request tới địa chỉ /profile.
Tại đây, tôi có sử dụng Lombok, hãy dám chắc bạn biết nó trước khi lập trình Spring Boot
Info.java
import lombok.AllArgsConstructor;
import lombok.Data;

/**
 * TẠo ra class này chỉ để lưu giữ thông tin
 */
@Data
@AllArgsConstructor
public class Info {
    String key;
    String value;
}
WebController.java
import java.util.ArrayList;
import java.util.List;

import org.springframework.stereotype.Controller;
import org.springframework.ui.Model;
import org.springframework.web.bind.annotation.GetMapping;

@Controller
public class WebController {

    @GetMapping("/profile")
    public String profile(Model model){
        // Tạo ra thông tin
        List<Info> profile = new ArrayList<>();
        profile.add(new Info("fullname", "Nguyễn Hoàng Nam"));
        profile.add(new Info("nickname", "lốddaf"));
        profile.add(new Info("gmail", "loda.namnh@gmail.com"));
        profile.add(new Info("facebook", "https://www.facebook.com/nam.tehee"));
        profile.add(new Info("website", "https://loda.me"));

        // Đưa thông tin vào Model
        model.addAttribute("lodaProfile", profile);

        // TRả về template profile.html
        return "profile";
    }
}
Sau đó chúng ta tạo thêm template profile.html để xử lý các thông tin trong Model.
resources/templates/profile.html
<!DOCTYPE html>
<html xmlns:th="http://www.thymeleaf.org">
<head>
  <meta charset="UTF-8" />
  <title>Loda</title>
  <meta http-equiv="Content-Type" content="text/html; charset=UTF-8" />

  <!--css-->
  <link th:href="@{/css/bootstrap.css}" rel="stylesheet" />

  <!--js-->
  <script th:src="@{/js/bootstrap.js}"></script>

</head>
<body>
<h1 th:utext="#{loda.hello}"></h1>
<h2>Loda Profile</h2>

<ul>
  <!--Duyệt qua toàn bộ phần tử trong biến "lodaProfile"-->
  <li th:each="info : ${lodaProfile}">
    <!--Với mỗi phần tử, lấy ra key và value-->
    <span th:text="*{info.key}"></span> : <span th:text="*{info.value}"></span>
  </li>
</ul>

</body>

</html>
Ở đây, chúng ta sử dụng:
${...}để lấy giá trị của biếnlodaProfiletrongModel*{...}để lấy giá trị của biếninfođã chỉ định,
Chạy thử lần 2.
Chúng ta chạy lại chương trình lần nữa và truy cập vào địa chỉ http://localhost:8085/.
Click vào Button Loda Profile. Trình duyệt sẽ đi tới đại chỉ http://localhost:8085/profile
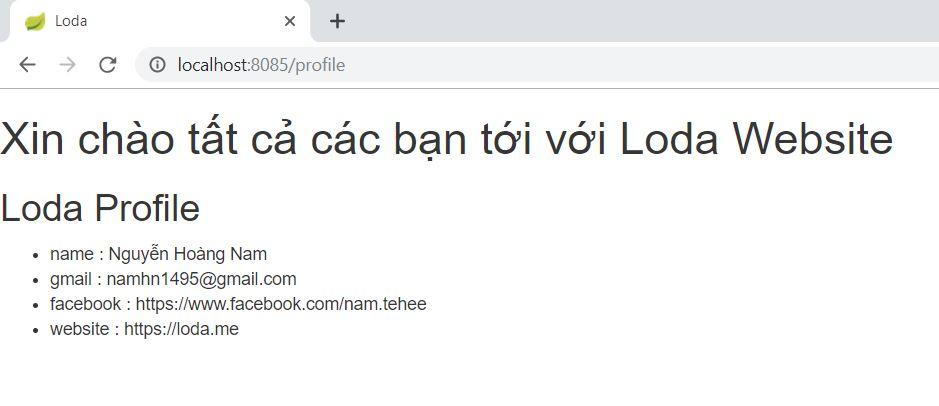
Hiển thị ra toàn bộ thông tin.
Vậy là chúng ta đã thành công.
Kết
Đây là một bài viết trong [Series làm chủ Spring Boot, từ zero to hero][link-series-spring-boot] [link-series-spring-boot]: https://loda.me/spring-boot-0-series-lam-chu-spring-boot-tu-zero-to-hero-loda1558963914472
Như mọi khi, toàn bộ code tham khảo tại Github <i class="fab fa-github"></i>
All rights reserved
