「Spring Boot #4」 @Component vs @Service vs @Repository
Bài đăng này đã không được cập nhật trong 6 năm
Nguồn: loda.me
Giới thiệu
Trong bài trước chúng ta đã tìm hiểu các khái niệm căn bản và cần thiết trong Spring Boot.
- [「Spring Boot #1」Hướng dẫn @Component và @Autowired][link-spring-boot-1]
- [「Spring Boot #2」@Autowired - @Primary - @Qualifier][link-spring-boot-2]
- [「Spring Boot #3」Spring Bean Life Cycle + @PostConstruct và @PreDestroy][link-spring-boot-3]
Trong bài này tôi sẽ giới thiệu với các bạn các khái niệm về @Component, @Service, @Repository.
Kiến trúc trong Spring Boot
Kiến trúc MVC trong Spring Boot được xây dựng dựa trên tư tưởng "độc lập" kết hợp với các nguyên lý thiết kế hướng đối tượng (một đại diện tiêu biểu là Dependency Inversion). Độc lập ở đây ám chỉ việc các layer phục vụ các mục đích nhất định, khi muốn thực hiện một công việc ngoài phạm vi thì sẽ đưa công việc xuống các layer thấp hơn.
Kiến trúc Controller-Service - Repository chia project thành 3 lớp:

Consumer Layer hay Controller: là tầng giao tiếp với bên ngoài và handler các request từ bên ngoài tới hệ thống.
Service Layer: Thực hiện các nghiệp vụ và xử lý logic
Repository Layer:: Chịu trách nhiệm giao tiếp với các DB, thiết bị lưu trữ, xử lý query và trả về các kiểu dữ liệu mà tầng Service yêu cầu.
@Controller vs @Service vs @Repository
Để phục vụ cho kiến trúc ở trên, Spring Boot tạo ra 3 Annotation là @Controller vs @Service vs @Repository để chúng ta có thể đánh dấu các tầng với nhau.
Trong bài này, chúng ta sẽ tìm hiểu 2 Annotation @Service vs @Repository trước.
@ServiceĐánh dấu một Class là tầng Service, phục vụ các logic nghiệp vụ.
@RepositoryĐánh dấu một Class Là tầng Repository, phục vụ truy xuất dữ liệu.
Cài đặt
pom.xml
<?xml version="1.0" encoding="UTF-8"?>
<project xmlns="http://maven.apache.org/POM/4.0.0" xmlns:xsi="http://www.w3.org/2001/XMLSchema-instance"
         xsi:schemaLocation="http://maven.apache.org/POM/4.0.0 http://maven.apache.org/xsd/maven-4.0.0.xsd">
    <modelVersion>4.0.0</modelVersion>
    <packaging>pom</packaging>
    <parent>
        <groupId>org.springframework.boot</groupId>
        <artifactId>spring-boot-starter-parent</artifactId>
        <version>2.0.5.RELEASE</version>
        <relativePath /> <!-- lookup parent from repository -->
    </parent>
    <groupId>me.loda.spring</groupId>
    <artifactId>spring-boot-learning</artifactId>
    <version>0.0.1-SNAPSHOT</version>
    <name>spring-boot-learning</name>
    <description>Everything about Spring Boot</description>

    <properties>
        <java.version>1.8</java.version>
    </properties>

    <dependencies>

        <!--spring mvc, rest-->
        <dependency>
            <groupId>org.springframework.boot</groupId>
            <artifactId>spring-boot-starter-web</artifactId>
        </dependency>
        <dependency>
            <groupId>org.apache.commons</groupId>
            <artifactId>commons-lang3</artifactId>
            <version>3.9</version>
        </dependency>
    </dependencies>

    <build>
        <plugins>
        <plugin>
            <groupId>org.springframework.boot</groupId>
            <artifactId>spring-boot-maven-plugin</artifactId>
        </plugin>
        </plugins>
    </build>

</project>
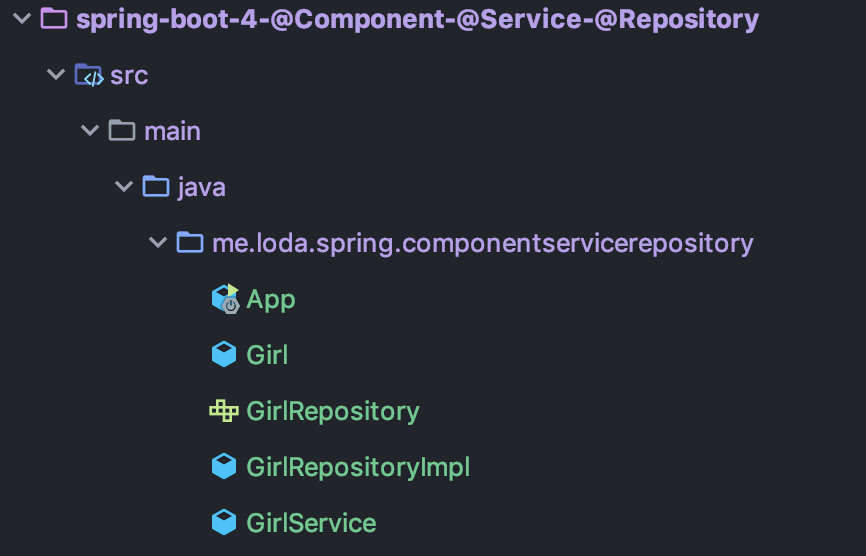
Cấu trúc thư mục:

Implement
Tôi tạo ra một model Girl.
public class Girl {
    private String name;

    public Girl(String name) {
        this.name = name;
    }

    public String getName() {
        return name;
    }

    public void setName(String name) {
        this.name = name;
    }

    @Override
    public String toString() {
        return "Girl(" + this.name + ")";
    }
}
Tạo ra một interface GirlRepository để giao tiếp với DB.
public interface GirlRepository {
    /**
     * Tìm kiếm một cô gái trong database theo tên
     * @param name
     * @return
     */
    Girl getGirlByName(String name);
}
Kế thừa GirlRepository và đánh dấu nó là @Repository
@Repository
public class GirlRepositoryImpl implements GirlRepository {

    @Override
    public Girl getGirlByName(String name) {
        // Ở đây tôi ví dụ là database đã trả về
        // một cô gái với tên đúng như tham số

        // Còn thực tế phải query trong csđl nhé.
        return new Girl(name);
    }
}
Tạo ra một class GỉrlService để giải quyết các logic nghiệp vụ. Lớp GirlService sẽ giao tiếp với DB thông qua GirlRepository.
import org.apache.commons.lang3.RandomStringUtils;
import org.springframework.beans.factory.annotation.Autowired;
import org.springframework.stereotype.Service;

@Service
public class GirlService {
    @Autowired
    private GirlRepository girlRepository;

    public Girl getRandomGirl(){
        // Random 1 cái tên độ dài 10
        String name = randomGirlName(10);

        // Gọi xuông tầng repository để query lấy một cô gái tên là "name" trong database
        return girlRepository.getGirlByName(name);
    }

    public String randomGirlName(int length) {
        // Random một string có độ dài quy định
        // Sử dụng thư viện Apache Common Lang
        return RandomStringUtils.randomAlphanumeric(length).toLowerCase();
    }
}
Chạy chương trình:
import org.springframework.boot.SpringApplication;
import org.springframework.boot.autoconfigure.SpringBootApplication;
import org.springframework.context.ApplicationContext;

@SpringBootApplication
public class App {

    public static void main(String[] args) {
        ApplicationContext context = SpringApplication.run(App.class, args);

        // Lấy ra bean GirlService
        GirlService girlService = context.getBean(GirlService.class);
        // Lấu ra random một cô gái từ tầng service
        Girl girl = girlService.getRandomGirl();
        // In ra màn hình
        System.out.println(girl);

    }
}
Output:
Girl(ulmvchvgkf)
Giải thích
Về bản chất @Service và @Repository cũng chính là @Component. Nhưng đặt tên khác nhau để giúp chúng ta phân biệt các tầng với nhau.
Cùng nhìn vào source code của 2 Annotation này:
Service.java
@Target({ElementType.TYPE})
@Retention(RetentionPolicy.RUNTIME)
@Documented
@Component // Cũng là một @Component
public @interface Service {
    @AliasFor(
        annotation = Component.class
    )
    String value() default "";
}
Repository.java
@Target({ElementType.TYPE})
@Retention(RetentionPolicy.RUNTIME)
@Documented
@Component
public @interface Repository {
    @AliasFor(
        annotation = Component.class
    )
    String value() default "";
}
Trong các bài đầu tiên chúng ta đã biết @Component đánh dấu cho Spring Boot biết Class đó là Bean. Và hiển nhiên @Service và @Repository cũng vậy. Vì thế ở ví dụ trên chúng ta có thể lấy GirlService từ ApplicationContext.
Về bản chất thì bạn có thể sử dụng thay thế 3 Annotation @Component, @Service và @Repository cho nhau mà không ảnh hưởng gì tới code của bạn cả. Nó vẫn sẽ hoạt động.
Tuy nhiên từ góc độ thiết kế thì chúng ta cần phân rõ 3 Annotation này cho các Class đảm nhiệm đúng nhiệm vụ của nó.
@Servicegắn cho cácBeanđảm nhiệm xử lý logic@Repositorygắn cho cácBeanđảm nhiệm giao tiếp với DB@Componentgắn cho cácBeankhác.
Kết
Đây là một bài viết trong [Series làm chủ Spring Boot, từ zero to hero][link-series-spring-boot] [link-series-spring-boot]: https://loda.me/spring-boot-0-series-lam-chu-spring-boot-tu-zero-to-hero-loda1558963914472
Như mọi khi, [code được up tại Github][link-github] <i class="fab fa-github"></i> [link-spring-boot-1]: https://loda.me/spring-boot-1-huong-dan-component-va-autowired-loda1557412317602 [link-spring-boot-2]: https://loda.me/spring-boot-2-autowired-primary-qualifier-loda1557561089057 [link-spring-boot-3]: https://loda.me/spring-boot-3-spring-bean-life-cycle-post-construct-va-pre-destroy-loda1557583753982 [link-github]: https://github.com/loda-kun/spring-boot-learning
All rights reserved