「Spring Boot #1」 Hướng dẫn @Component và @Autowired
Giới thiệu
Đây là bài giới thiệu về 2 Annotation cơ bản trong Spring Boot và @Component và @Autowire, để có thể hiểu phần này tốt nhất, bạn nên nắm chắc 2 khái niệm sau:
- Khái niệm tight-coupling (liên kết ràng buộc) và cách loosely coupled
- Giải thích Dependency Injection (DI) và IoC
Cài đặt
Bạn có thể cài đặt các gói thư viện của Spring Boot trong Maven bằng cách thêm gói spring-boot-starter-parent là parent của cả project:
<parent>
    <groupId>org.springframework.boot</groupId>
    <artifactId>spring-boot-starter-parent</artifactId>
    <version>2.0.5.RELEASE</version>
    <relativePath /> <!-- lookup parent from repository -->
</parent>
và để thêm các thư viện cho việc lập trình web hoặc server side, chúng ta thêm:
<dependencies>
    <dependency>
        <groupId>org.springframework.boot</groupId>
        <artifactId>spring-boot-starter-web</artifactId>
    </dependency>
</dependencies>
pom.xml
<?xml version="1.0" encoding="UTF-8"?>
<project xmlns="http://maven.apache.org/POM/4.0.0" xmlns:xsi="http://www.w3.org/2001/XMLSchema-instance"
         xsi:schemaLocation="http://maven.apache.org/POM/4.0.0 http://maven.apache.org/xsd/maven-4.0.0.xsd">
    <modelVersion>4.0.0</modelVersion>
    <packaging>pom</packaging>
    <parent>
        <groupId>org.springframework.boot</groupId>
        <artifactId>spring-boot-starter-parent</artifactId>
        <version>2.0.5.RELEASE</version>
        <relativePath /> <!-- lookup parent from repository -->
    </parent>
    <groupId>me.loda.spring</groupId>
    <artifactId>spring-boot-learning</artifactId>
    <version>0.0.1-SNAPSHOT</version>
    <name>spring-boot-learning</name>
    <description>Everything about Spring Boot</description>

    <properties>
        <java.version>1.8</java.version>
    </properties>

    <dependencies>

        <!--spring mvc, rest-->
        <dependency>
            <groupId>org.springframework.boot</groupId>
            <artifactId>spring-boot-starter-web</artifactId>
        </dependency>
    </dependencies>

    <build>
        <plugins>
        <plugin>
            <groupId>org.springframework.boot</groupId>
            <artifactId>spring-boot-maven-plugin</artifactId>
        </plugin>
        </plugins>
    </build>

</project>
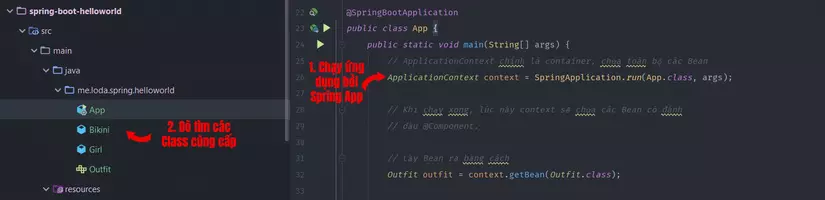
Cấu trúc thư mục:

Cách chạy ứng dụng Spring Boot
Nếu trong Java truyền thống, khi chạy cả một project, chúng ta sẽ phải định nghĩa một hàm main() và để nó khởi chạy đầu tiên.
Thì Spring Boot cũng vậy, chúng ta sẽ phải chỉ cho Spring Boot biết nơi nó khởi chạy lần đầu, để nó cài đặt mọi thứ.
Cách thực hiện là thêm annotation @SpringBootApplication trên class chính và gọi SpringApplication.run(App.class, args); để chạy project.
import org.springframework.boot.SpringApplication;
import org.springframework.boot.autoconfigure.SpringBootApplication;
import org.springframework.context.ApplicationContext;

@SpringBootApplication
public class App {
    public static void main(String[] args) {
        SpringApplication.run(App.class, args);
    }
}
Đọc bài Giải thích Dependency Injection (DI) và IoC. Bạn sẽ hiểu, một trong những nhiệm vụ chính của Spring là tạo ra một cái Container chứa các Dependency cho chúng ta.
SpringApplication.run(App.class, args) chính là câu lệnh để tạo ra container. Sau đó nó tìm toàn bộ các dependency trong project của bạn và đưa vào đó.
Spring đặt tên cho container là ApplicationContext
và đặt tên cho các dependency là Bean
@SpringBootApplication
public class App {
    public static void main(String[] args) {
        // ApplicationContext chứa toàn bộ dependency trong project.
        ApplicationContext context = SpringApplication.run(App.class, args);
    }
}
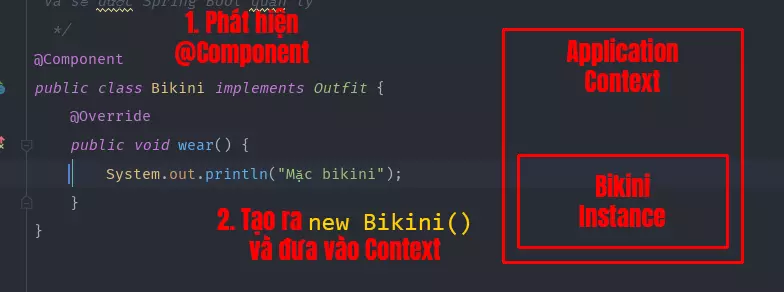
Vậy làm sao Spring biết đâu là dependency? Chúng ta tới với khái niệm @Component
@Component
@Component là một Annotation (chú thích) đánh dấu trên các Class để giúp Spring biết nó là một Bean.
Ví dụ:
Chúng ta có một interface Outfit
public interface Outfit {
    public void wear();
}
implement nó là Class Bikini
/*
 Đánh dấu class bằng @Component
 Class này sẽ được Spring Boot hiểu là một Bean (hoặc dependency)
 Và sẽ được Spring Boot quản lý
*/
@Component
public class Bikini implements Outfit {
    @Override
    public void wear() {
        System.out.println("Mặc bikini");
    }
}
Chạy chương trình, và xem kết quả:
@SpringBootApplication
public class App {
    public static void main(String[] args) {
        // ApplicationContext chính là container, chứa toàn bộ các Bean
        ApplicationContext context = SpringApplication.run(App.class, args);

        // Khi chạy xong, lúc này context sẽ chứa các Bean có đánh
        // dấu @Component.

        // Lấy Bean ra bằng cách
        Outfit outfit = context.getBean(Outfit.class);

        // In ra để xem thử nó là gì
        System.out.println("Instance: " + outfit);
        // xài hàm wear()
        outfit.wear();
    }
}
Output:
[1] Instance: me.loda.spring.helloworld.Bikini@1e1f6d9d
[2] Mặc bikini
Bạn sẽ thấy Outfit lúc này chính là Bikini. Class đã được đánh dấu là @Component.
Spring Boot khi chạy sẽ dò tìm toàn bộ các Class cùng cấp hoặc ở trong các package thấp hơn so với class App mà bạn cung cấp cho Spring (Chúng ta có thể cấu hình việc tìm kiếm này, sẽ đề cập sau). Trong quá trình dò tìm này, khi gặp một class được đánh dấu @Component thì nó sẽ tạo ra một instance và đưa vào ApplicationContext để quản lý.
Quá trình chạy sẽ như sau:
@Autowired
Bây giờ mình tạo ra một Class Girl và có một thuộc tính là Outfit.
Mình cũng đánh dấu Girl là một @Component. Tức Spring Boot cần tạo ra một instance của Girl để quản lý.
@Component
public class Girl {

    @Autowired
    Outfit outfit;

    public Girl(Outfit outfit) {
        this.outfit = outfit;
    }

    // GET
    // SET
}
Tôi đánh dấu thuộc tính Outfit của Girl bởi Annotation @Autowired. Điều này nói với Spring Boot hãy tự inject (tiêm) một instance của Outfit vào thuộc tính này khi khởi tạo Girl.
Lúc này, chạy thử chương trình.
@SpringBootApplication
public class App {
    public static void main(String[] args) {
        // ApplicationContext chính là container, chứa toàn bộ các Bean
        ApplicationContext context = SpringApplication.run(App.class, args);

        // Khi chạy xong, lúc này context sẽ chứa các Bean có đánh
        // dấu @Component.

        // Lấy Bean ra bằng cách
        Outfit outfit = context.getBean(Outfit.class);

        // In ra để xem thử nó là gì
        System.out.println("Output Instance: " + outfit);
        // xài hàm wear()
        outfit.wear();

        Girl girl = context.getBean(Girl.class);

        System.out.println("Girl Instance: " + girl);

        System.out.println("Girl Outfit: " + girl.outfit);

        girl.outfit.wear();
    }
}
Output:
[1] Output Instance: me.loda.spring.helloworld.Bikini@2e16f13a
[2] Mặc bikini
[3] Girl Instance: me.loda.spring.helloworld.Girl@353cb1cb
[4] Girl Outfit: me.loda.spring.helloworld.Bikini@2e16f13a
[5] Mặc bikini
Spring Boot đã tự tạo ra một Girl và trong quá trình tạo ra đó, nó truyền Outfit vào làm thuộc tính.
Singleton
Điều đặc biệt là các Bean được quản lý bên trong ApplicationContext đều là singleton. Bạn chắc đã để ý điều này từ các Output ở phía trên.
[1] Output Instance: me.loda.spring.helloworld.Bikini@2e16f13a

[4] Girl Outfit: me.loda.spring.helloworld.Bikini@2e16f13a
Outfit ở 2 đối tượng trên là một.
Tất cả những Bean được quản lý trong ApplicationContext đều chỉ được tạo ra một lần duy nhất và khi có Class yêu cầu @Autowired thì nó sẽ lấy đối tượng có sẵn trong ApplicationContext để inject vào.
Trong trường hợp bạn muốn mỗi lần sử dụng là một instance hoàn toàn mới. Thì hãy đánh dấu @Component đó bằng @Scope("prototype")
@Component
@Scope("prototype")
public class Bikini implements Outfit {
    @Override
    public void wear() {
        System.out.println("Mặc bikini");
    }
}
Kết
Tới đây bạn đã tiếp cận với hai khái niệm cơ bản nhất trong Spring Boot và cũng là nền tảng cốt lõi của nó. Việc nắm được cách vận hành của @Component và @Autowired là bạn đã đi được nửa chặng đường rồi.
Đây là một bài viết trong Series làm chủ Spring Boot, từ zero to hero
Như mọi khi, Code được up tại Github. <i class="fab fa-github"></i>
All rights reserved
