Single sign on rails
Bài đăng này đã không được cập nhật trong 8 năm
Ở bài viết này mình sẽ giới thiệu về single sign on, một ứng dụng của OAuth2 để tạo một site Authenticate cho nhiều application khác nhau.
Giới thiệu
Theo mình thì có một số nguyên nhân chính dẫn đến sự ra đời của các phương thức Authenticate đó là:
-
Tăng trải nghiệm người dùng: Sự xuất hiện của rất nhiều các trang Web thì việc nhớ được tất cả các account sử dụng của từng site khá là bất tiện với người dùng. Người dùng sẽ có thể sử dụng một account để đăng nhập cho nhiều site khác nhau, và Google, Facebook, Twitter có lẽ là đang trở nên rất phổ biến hiện nay. Chúng ta vẫn có thể sử dụng các tool để lưu trữ mật khẩu cho các site khác nhau tuy nhiên không thể phủ định rằng SSO rất thân thiện với người dùng.
-
Tăng tính bảo mật:
- Thông tin của user được cung cấp trực tiếp tới SSO server mà không phải là một service nào đó mà người dùng muốn truy cập. Điều này làm cho những thông tin của người dùng được quản lý tập trung tại SSO server, và không bị cached ở service. SSO cũng khiến cho việc bị đánh cắp mật khẩu khó khăn hơn. Người dùng sẽ chỉ phải đăng nhập trên site SSO và không phải type username và password trên site thứ 3 và chỉ tập trung vào để xem SSO site có chính xác không, điều này giúp hạn chế được các lỗ hổng bảo mật của bên serivce như XSS, phishing. Thử tưởng tượng hacker giả mạo một service giống với service của chúng ta và gửi một email phishing đến email người dùng yêu cầu xác thực, thông tin như username, password hoàn toàn có thể bị đánh cắp.
- Token được gửi cho service cũng chỉ có thể truy cập một số app được đăng kí trước đó với SSO service, vì vậy việc truy cập các service khác là điều khó có thể xảy ra.
- Tiết kiệm tài nguyên và công sức: Tập trung tài nguyên vào một bên SSO service, điều này giúp giảm tải được xử lý của service, quản trị viên có thể tập trung vào việc tối ưu hóa cho SSO service.
Cách thức hoạt động
Bài viết này mình tập trung vào việc triển khai trên rails chứ không nặng về lý thuyết, để hiểu sâu thêm về các phương thức xác thực các bạn có thể đọc thêm các tài liệu tham khảo bên dưới. SSo mà mình viết dựa trên Grant Type: Authorization Code, nghĩa là sẽ trả về authorization_code cho phía client(ở đây được hiểu là service cần xác thực của chúng ta), client sẽ sử dụng authorization_code này để exchange lấy access_token. Đây là cách hoạt động phổ biến nhất của Oauth2.
Trong OAuth2 có một số định nghĩa như sau:
- Resource Owner: là chúng ta
- Application: Là bên service yêu cầu chúng ta cung cấp thông tin
- Authorization: Chính là service SSO của chúng ta, cung cấp token và chứng thực.
Mình miêu tả cách thức hoạt động như sau
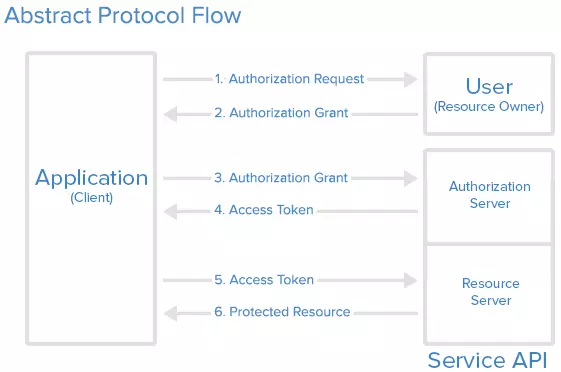
- Client gửi yêu cầu xác thực lên server, request này có dạng như sau
/auth/sso/authorize?client_id=public&redirect_uri=http%3A%2F%2Flocalhost%3A3000%2Fauth%2Fsso%2Fcallback&response_type=code&state=1b5c5a7af8bb5b900a95728fee2383d1630ce63c2231429f
trong đó
client_id: chính là client_id mà chúng ta đăng kí với App
redirect_uri: là url callback sẽ được SSo service redirect về sau sau
response_type: vì ta đang implement theo GrantType: authorzation code nên có giá trị là code
state: Một đoạn kí tự được generate ra để xác thực ngăn ngừa CSRF
- Sau khi nhận được request từ phía Client, server redirect về callbackuri ở trên cùng với một số parameter
http://localhost:3000/auth/sso/callback?code=4ba15c2a8544efef2a5ddb6be32f6f8f&response_type=code&state=1b5c5a7af8bb5b900a95728fee2383d1630ce63c2231429f
trong đó
code: là authorization code được trả về cho Client
response_type & code: Tương tự step 1
- Client gửi yêu cầu Grant Permission lên SSo service để lấy Access token
 Ở đây Client sẽ gửi lên Sso service:
- Client_id & secret: Key đã đăng kí với Sso service
- authorization_code: Authorization code nhận từ Sso service từ trước đó
- State: xác thực CSRF
- SSo service xác thực request, trả về cho Client access_token nếu thành công response có dạng như sau
{
  "access_token": "eyJz93a...k4laUWw",
  "refresh_token": "GEbRxBN...edjnXbL"
}
Access Token ở đây được tạo ra theo JWT. Thường thì JWT sẽ sign vào token một số thông tin của User như: user_id, name, sau đó access_token sẽ được gửi về cho Client, server không lưu lại nó(Stateless). Với Cookie thì Sso service sẽ phải lưu lại cookies để so sánh với cookies ở client. Chính vì vậy JWT phù hợp với các ứng dụng API hay Sso.
- Có access_token rồi thì Client gửi lên để lấy resource Từ giờ đến khi access token expired thì mỗi request Client gửi lên Sso service sẽ có thêm access_token trong header. Sso service sẽ xác thực dựa vào Token này để trả về resource cho Client.
authorization: Bearer ACCESS_TOKEN
Nếu accss_token expires và Sso service hỗ trợ refresh_token thì Client có thể được cấp lại 1 access_token khác.
- SSo verify access_token, trả về resource cho Client nếu thành công Việc verify token sẽ do phía Sso service đảm nhận. Từ thông tin của User có trong token, Sso service sẽ tìm được User và thông tin trong DB để trả về resource cho Client.
Triển khai
Mình sẽ triển khai xây dựng một SSO service, và client có thể tương tác xác thực với Server Rails có sẵn các gem để giúp chúng ta viết các strategies cho khác nhau, phù hợp cho từng hệ thống. Mình sẽ tạo mới một ứng dụng luôn Các bạn tạo mới một project là sso-provider và sso-client. Sau đó thêm gem và install
gem "omniauth"
gem "omniauth-oauth2"
gem "devise"
Ở provider có 3 bảng:
- User: lưu thông tin user, password ....
- Client: lưu thông tin app được đăng kí, gồm client_id và secret(giống với Facebook App khi bạn đăng kí)
- AccessGrant(lưu thông tin đăng nhập, gồm access_token, authorize_token, refresh_token, expire_at của access_token)
Ruby có gem omniauth-oauth2 giúp chúng ta định nghĩa các strategies dễ dàng hơn, strategies hoạt động như một Rack middleware vậy.
Đây là strategies mình định nghĩa ở phía Client.
Raw_info là function parse info từ phía server gửi về, các bạn có thể định nghĩa thêm tuỳ vào info server trả về.
Ở Client đơn giản chúng ta chỉ việc khai báo strategies và đăng kí client_key, client_secret, việc này gần giống với ta sử dụng gem "omniauth-facebook" vậy.
module OmniAuth
  module Strategies
    class Sso < OmniAuth::Strategies::OAuth2
      # Give your strategy a name.
      option :name, "sso"

      # This is where you pass the options you would pass when
      # initializing your consumer from the OAuth gem.
      option :client_options, {
        :site => ENV["PROVIDER_URL"],
        :authorize_url => "#{ENV["PROVIDER_URL"]}/auth/sso/authorize",
        :access_token_url => "#{ENV["PROVIDER_URL"]}/auth/sso/get_access_token"
      }

      # These are called after authentication has succeeded. If
      # possible, you should try to set the UID without making
      # additional calls (if the user id is returned with the token
      # or as a URI parameter). This may not be possible with all
      # providers.
      uid{ raw_info['id'] }

      info do
        {
          :email => raw_info["info"]['email']
        }
      end

      def raw_info
        @raw_info ||= access_token.get("/auth/sso/get_info_user.json?oauth_token=#{access_token.token}").parsed
      end
    end
  end
end
callback uri của Client mình để như sau
def create
    @user = User.find_by(email: auth.info.email, uid: auth.info.uid)
    unless @user
      @user = User.new(email: auth.info.email, uid: auth.info.uid)
    end
    @user.save
    login @user
    redirect_to root_path
end

def auth
    env['omniauth.auth']
end

#routes
  root "home#index"

  get '/auth/:provider/callback', to: 'sessions#create'
  get '/auth/failure', to: 'sessions#failure'
Về phần Sso service: Khai báo Route
- /auth/sso/authorize: xử lý việc trả về authorization_code cho Client
- /auth/sso/get_access_token: xử lý việc trả xác thực client và trả về Access_token
- /oauth/token': Trước khi lấy data resource cần gửi token lên cho SSo service xác thực
- /auth/sso/get_info_user: xử lý việc trả về data resource
#routes
  devise_for :users
  # For details on the DSL available within this file, see http://guides.rubyonrails.org/routing.html
  match '/auth/sso/authorize', to: "auth#authorize", via: :all
  match '/auth/sso/get_access_token', to: "auth#get_access_token", via: :all

  match '/auth/sso/get_info_user', to: "auth#get_info_user", via: :all

  match '/oauth/token', to: "auth#get_access_token", via: :all
Xử lý các authorization request
class AuthController < ApplicationController
  before_action :authenticate_access_token!
  before_action :authenticate_user!, except: :get_access_token
  skip_before_action :verify_authenticity_token, only: :get_access_token

  def authorize
    # need verify if have token? , if no -> go to root_path login
    # need authenticate_user
    # AccessGrant.prune!
    application = Client.find_by(public_key: params[:client_id])
    unless application
      redirect_to new_user_session_url
    end

    access_grant = AccessGrant.create(
      client_id: application.id,
      user_id: current_user.id
    )

    redirect_to access_grant.generate_redirect_url(params[:redirect_uri], params[:state])
  end

  def get_access_token
    application = Client.authenticate(params[:client_id], params[:client_secret])
    if application.nil?
      render :json => {:error => "Could not find application"}
      return
    end

    access_grant = AccessGrant.authenticate(params[:code], application.id)
    if access_grant.nil?
      render :json => {:error => "Could not authenticate access code"}
      return
    end
    render :json => {:access_token => access_grant.access_token, :refresh_token => access_grant.refresh_token}
  end

  def get_info_user
    render json: {
      provider: 'sso',
      id: current_user.id.to_s,
      uid: current_user.uid,
      info: {
         email: current_user.email,
      }
    }.to_json
  end

  private
  def authenticate_access_token!
    if params[:oauth_token]
      access_grant = AccessGrant.find_by(access_token: params[:oauth_token])
      if access_grant&.user
        sign_in access_grant&.user
      end
    end
  end
end
Code không dài nhưng theo mình thấy thì để hiểu được lý thuyết thì cần implement thử. Mình đã từng đọc nhưng sau một thời gian là quên hoặc nhiều chỗ cảm thấy khó hiểu. Trên đây là một số thứ mình tìm hiểu được về SSo trong rails Bài viết có tham khảo:
https://auth0.com/docs/api-auth/tutorials/authorization-code-grant
https://viblo.asia/p/introduction-to-oauth2-3OEqGjDpR9bL
link repo: https://bitbucket.org/mitom07/sso-client-build/src
https://bitbucket.org/mitom07/sso-provider-build/src/master/
All rights reserved
