Simple CryptoCurrency Tracker App With React Native
Bài đăng này đã không được cập nhật trong 6 năm
Chắc hẳn mọi người đều đã biết hoặc nghe đến React Native, một nền tảng để xây dựng ứng dụng di động cross-platform. Nhân tiện ngày thị trường cryptocurrency nhuộm máu =)) mình demo luôn 1 app nhỏ để tracker giá coin cho bản thân theo dõi cũng như kiểm tra lại kiến thức React Native đã học được.
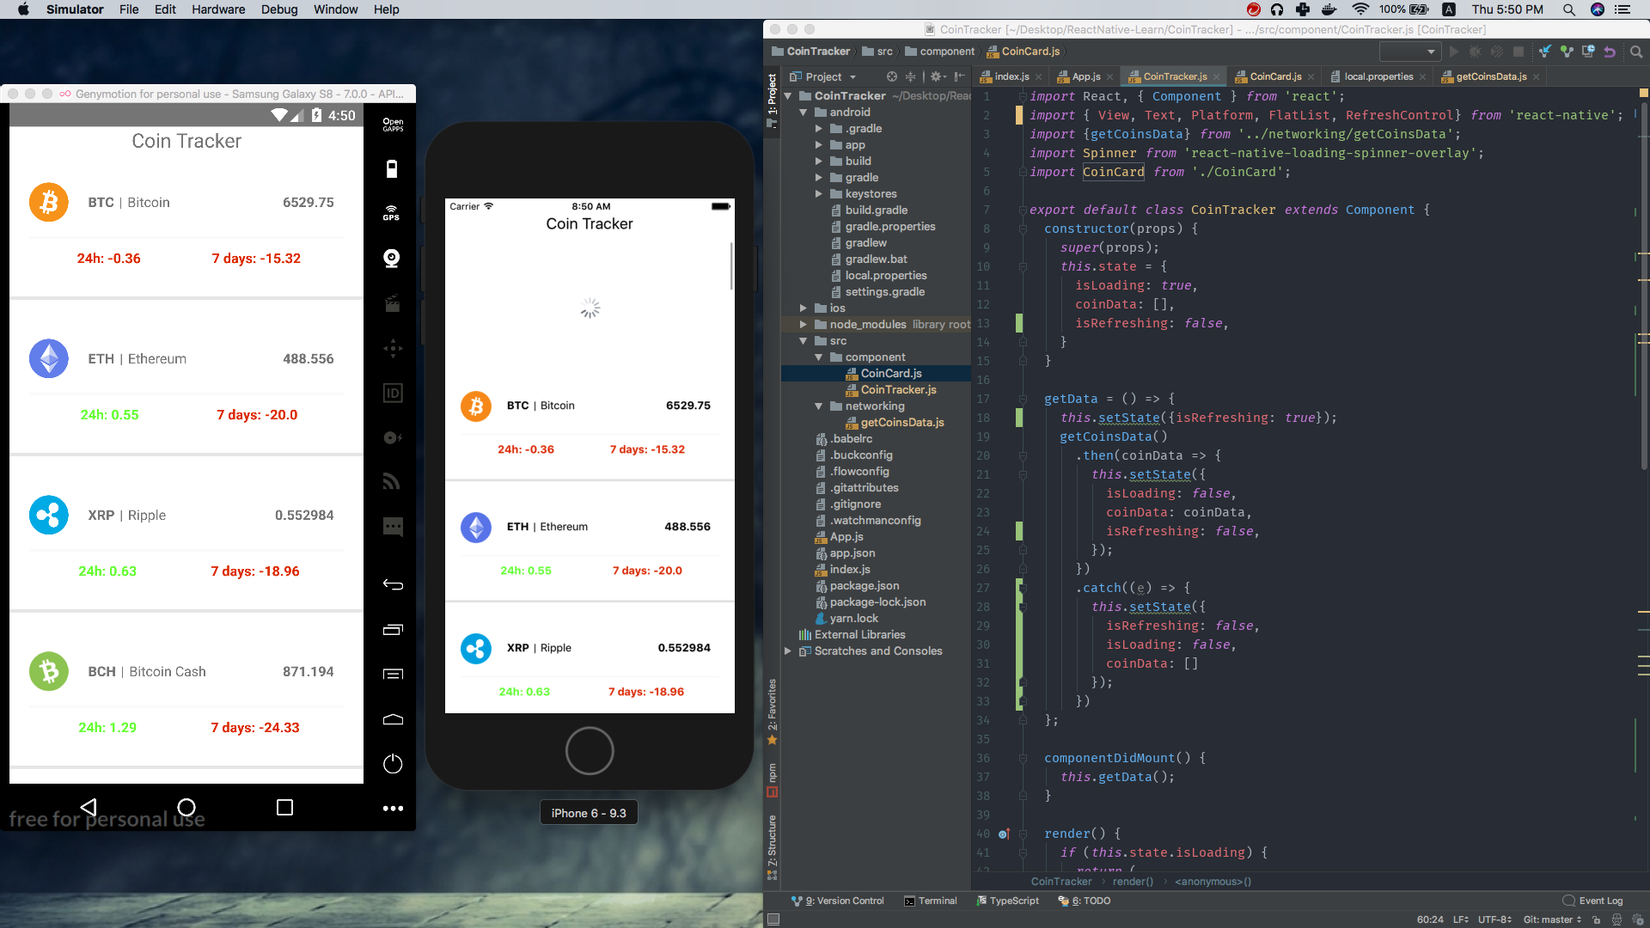
Trong bài viết này, mình sẽ nói về các bước mình đã trải qua để viết 1 app để tracking crypto currency price bằng React Native, đây là kết quả đạt được:
1. Chuẩn bị
Đầu tiên, chúng ta cùng nhau khởi tạo ứng dụng React Native với react-native-cli:
cd Workspace
react-native init CoinTracker
Tạo 2 thư mục component và networking trong folder của app:
cd CoinTracker
mkdir /src/component // thư mục chứa các component của ứng dụng
mkdir /src/networking // thư mục chứa các hàm gọi đến API của sàn giao dịch để lấy data
2. Bắt tay vào code thôi
Tạo file getCoinData.js trong thư mục networking vừa tạo ở bên trên. File này sẽ chứa các hàm để mình lấy dữ liệu từ coinmarketcap về, mình sử dụng API của coinmarketcap là:
https://api.coinmarketcap.com/v1/ticker/?limit=10
Các bạn có thể đánh đường link trên vào trình duyệt, kết quả sẽ trả về dữ liệu dạng JSON của top 10 coin đầu tiên trên trang Coin Market Cap. Nếu muốn hiện nhiều coin hơn thì có thể thay đổi số lượng limit trên URL.
networking/getCoinData.js :
const axios = require('axios');

const coinMarketCapAPI = 'https://api.coinmarketcap.com/v1/ticker/?limit=10';

async function getCoinsData() {
  try {
    let response = await axios.get(coinMarketCapAPI);
    return response.data;
  } catch (e) {
    console.error(e);
  }
}

export {getCoinsData};
Ở đây mình dùng thư viện axios của javascript để lấy dữ liệu từ API, ngoài ra các bạn có thể dùng trực tiếp fetch API mà javascript cung cấp mà k phải dùng thư viện. Tuy nhiên theo kiến thức hạn hẹp của mình thì dùng axios sẽ có nhiều điểm hay hơn khi dùng native fetch API khi dùng các phương thức khác như POST, PUT, DELETE... vì thế mình tập dùng thư viện này luôn. Chi tiết các bạn có thể search google thêm để biết rõ hơn. Vì là hàm bất đồng bộ sử dụng async/await nên các bạn nhớ cho vào try/catch để có thể bắt được lỗi nếu có.
OK, vậy là mình đã có hàm để get dữ liệu về, vậy hàm này mình sẽ dùng ở đâu? Tiếp đến chúng ta sẽ dùng đến thư mục component đã tạo ở trên, hàm getCoinData này sẽ được phát huy hiệu quả ở đây 
Tạo file CoinTracker.js trong thư mục component. Đây sẽ là component chính của chúng ta. Tiếp theo, import các Component và thư viện cần thiết.
component/CoinTracker.js:
import React, { Component } from 'react';
import { View, Text, Platform, FlatList, RefreshControl} from 'react-native';
import {getCoinsData} from '../networking/getCoinsData';
import Spinner from 'react-native-loading-spinner-overlay';
import CoinCard from './CoinCard'; //component này mình sẽ nói ở bên dưới
Ở đây mình có dùng thư viện react-native-loading-spinner-overlay, thư viện này sẽ giúp chúng ta tạo một màn hình loading khi app load dữ liệu, kiểu như thế này:
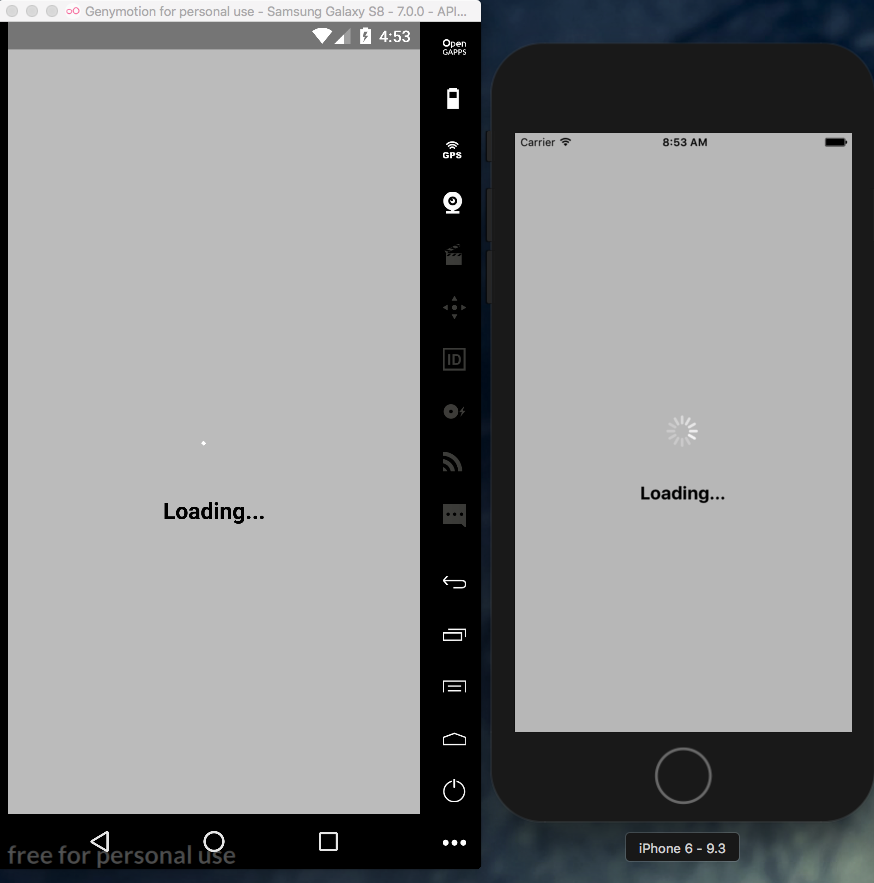
Các bạn nhớ chạy lệnh
npm install react-native-loading-spinner-overlayđể có thể sử dụng thư viện.
Tiếp theo, ta bắt tay vào xây dựng Component chính. Và đây là đoạn code Cointracker component. Chi tiết các bạn đọc comment trong code để hiểu rõ hơn.
component/CoinTracker.js:
export default class CoinTracker extends Component {
  constructor(props) {
    super(props);
    this.state = {  // Khởi tạo state cho ứng dụng
      isLoading: true, // sử dụng để tạo màn hình loading khi dữ liệu đang được get từ API về
      coinData: [],  // mảng chứa data được get từ API coinmarketcap
      isRefreshing: false,  // state được sử dụng khi dùng chức năng Pull to Refresh
    }
  }

  getData = () => {  // Hàm để get data, sử dụng hàm getCoinsData đã được viết ở trên trong thư mục networking
    this.setState({isRefreshing: true});  // Vì đang gọi API nên sẽ để bằng true
    getCoinsData() // Hàm được import từ thư mục networking
      .then(coinData => {
        this.setState({  // Get thành công dữ liệu từ API về thì ta setState cho các state tương ứng
          isLoading: false,  // Vì load thành công data nên sẽ gán giá trị false để không hiển thị Loading nữa
          coinData: coinData, // Gán data vào coinData state
          isRefreshing: false, // Hoàn thành lấy data từ API nên gán bằng false
        });
      })
      .catch((e) => { // Get thất bại dữ liệu từ API thì ta setState cho các state tương ứng
        this.setState({
          isRefreshing: false,  // Dù get thành công hay thất bại thì đều dừng nên sẽ gán bằng false
          isLoading: false,  // ý nghĩa giống isRefreshing
          coinData: []  // get thất bại nên sẽ để mảng rỗng, k có dữ liệu
        });
      })
  };

  componentDidMount() { // Khi ứng dụng được chạy lần đầu sẽ gọi hàm này để load dữ liệu từ API về
    this.getData();
  }

  render() {
    if (this.state.isLoading) { // Tạo màn hình Loading... khi app đang get dữ liệu từ API về
      return (
        <View>
          <Spinner
            visible={this.state.isLoading}
            textContent={'Loading...'}
            textStyle={{color: 'black'}}
            animation="fade"
          />
        </View>
      );
    }
    return ( // Khi Load xong, View của CoinTracker component sẽ được hiển thị
      <View style={{flex: 1, backgroundColor: 'white', marginTop: Platform.OS === 'ios' ? 20 : 0}}>
        <Text style={{fontSize: 20, textAlign: 'center', marginBottom: 10}}>Coin Tracker</Text>
        <FlatList
          data={this.state.coinData}
          renderItem={({item, index}) => {
            return (
              <CoinCard  //Component cho mỗi loại coin, truyền vào các props tương ứng để hiển thị
                coin_name={item.name}
                symbol={item.symbol}
                price_usd={item.price_usd}
                percent_change_24h={item.percent_change_24h}
                percent_change_7d={item.percent_change_7d}
              ></CoinCard>
            );
          }}
          keyExtractor={(item, index) => index.toString()}
          refreshControl={
            <RefreshControl  //Component cho chức năng Pull to Refresh
              refreshing={this.state.isRefreshing}  // check xem có hành động Pull trên màn hình của user hay không
              onRefresh={this.getData} // mỗi lần pull thì sẽ thực hiện hàm getData để load dữ liệu về
            ></RefreshControl>
          }
        ></FlatList>
      </View>
    );
  }
}
Trong đoạn code trên ta có sử dụng component CoinCard (I know what you think  ) thế nên ta sẽ phải viết code cho component này.
Tạo file CoinCard.js trong thư mục component. Dưới đây là code cho CoinCard component.
component/CoinCard.js:
import React, { Component } from 'react';
import { View, Text, StyleSheet, Image } from 'react-native';
// Component để hiển thị cho từng coin
export default class CoinCard extends Component {
  render() {
    return (
      <View style={container}>
        <View style={upperRow}>
          <Image
            style={{height: 40, width: 40}}
            source={{uri: images[this.props.symbol]}}
          />
          <Text style={coinSymbol}>{this.props.symbol}</Text>
          <Text style={seperator}>|</Text>
          <Text style={coinName}>{this.props.coin_name}</Text>
          <Text style={coinPrice}>{this.props.price_usd}</Text>
        </View>
        <View style={statisticsContainer}>
          <Text style={this.props.percent_change_24h < 0 ? percentChangeMinus : percentChangePlus}>
            24h: <Text>{this.props.percent_change_24h}</Text>
          </Text>
          <Text style={this.props.percent_change_7d < 0 ? percentChangeMinus : percentChangePlus}>
            7 days: <Text>{this.props.percent_change_7d}</Text>
          </Text>
        </View>
      </View>
    );
  }
}

// Ảnh (image) cho mỗi loại coin
export const images = {
  BTC: 'https://res.cloudinary.com/da7jhtpgh/image/upload/v1508609483/bitcoin_eqld4v.png',
  ETH: 'https://res.cloudinary.com/da7jhtpgh/image/upload/v1508609485/ethereum_nw0chu.png',
  XRP: 'https://res.cloudinary.com/da7jhtpgh/image/upload/v1508609486/ripple_p0xeut.png',
  BCH: 'https://res.cloudinary.com/da7jhtpgh/image/upload/v1516327336/bch_2x_hahroi.png',
  LTC: 'https://res.cloudinary.com/da7jhtpgh/image/upload/v1512427497/ltc_fjbqjf.png',
  DASH: 'https://res.cloudinary.com/da7jhtpgh/image/upload/v1508609484/dash_oltvqi.png',
  XEM: 'https://res.cloudinary.com/da7jhtpgh/image/upload/v1508609486/nem_imprip.png',
  BCC: 'https://res.cloudinary.com/da7jhtpgh/image/upload/v1508609486/bitconnect_oj1bo5.png',
  XMR: 'https://res.cloudinary.com/da7jhtpgh/image/upload/v1508609486/monero_wzk3ur.png',
  NEO: 'https://res.cloudinary.com/da7jhtpgh/image/upload/v1508609486/neo_fvoo6c.png',
  MIOTA: 'https://res.cloudinary.com/da7jhtpgh/image/upload/v1512510148/miota_2x_xkby9u.png',
  ADA: 'https://res.cloudinary.com/da7jhtpgh/image/upload/v1513434489/cardano_unympj.png',
  BTG: 'https://res.cloudinary.com/da7jhtpgh/image/upload/v1513434542/bitcoin-gold_reytam.png',
  XLM: 'https://res.cloudinary.com/da7jhtpgh/image/upload/v1516326886/xlm_2x_jfwlwt.png',
  ADA: 'https://res.cloudinary.com/da7jhtpgh/image/upload/v1516326874/ada_2x_g4fs0c.png',
  IOTA: 'https://res.cloudinary.com/da7jhtpgh/image/upload/v1516327102/miota_2x_zsvtqc.png',
  TRX: 'https://res.cloudinary.com/da7jhtpgh/image/upload/v1516326885/trx_2x_ukhxjm.png',
  EOS: 'https://res.cloudinary.com/da7jhtpgh/image/upload/v1516326878/eos_2x_dvr7p0.png'
};

// Thêm style vào để hiển thị cho đẹp nào
const styles = StyleSheet.create({
  container: {
    display: "flex",
    marginBottom: 20,
    borderBottomColor: "#e5e5e5",
    borderBottomWidth: 3,
    padding: 20
  },
  upperRow: {
    display: "flex",
    flexDirection: "row",
    marginBottom: 15
  },
  coinSymbol: {
    marginTop: 10,
    marginLeft: 20,
    marginRight: 5,
    fontWeight: "bold",
  },
  coinName: {
    marginTop: 10,
    marginLeft: 5,
    marginRight: 20
  },
  seperator: {
    marginTop: 10,
  },
  coinPrice: {
    marginTop: 10,
    marginLeft: "auto",
    marginRight: 10,
    fontWeight: "bold",
  },
  statisticsContainer: {
    display: "flex",
    borderTopColor: "#FAFAFA",
    borderTopWidth: 2,
    padding: 10,
    flexDirection: "row",
    justifyContent: "space-around"
  },
  percentChangePlus: {
    color: "#66ff33",
    fontWeight: "bold",
    marginLeft: 5
  },
  percentChangeMinus: {
    color: "#DD2C00",
    fontWeight: "bold",
    marginLeft: 5
  }
});

const {container, upperRow, coinSymbol, coinName, coinPrice,
statisticsContainer,seperator,percentChangePlus, percentChangeMinus} = styles;
3. Hoàn thành
Import và render vào component App thôi.
App.js:
import CoinTracker from './src/component/CoinTracker';

type Props = {};
export default class App extends Component<Props> {
  render() {
    return (
      <CoinTracker />
    );
  }
}
Ok, finally, chúng ta đã tạo được 1 app nhỏ để check coin rồi, ae chuẩn bị tinh thần nhảy cầu tiếp thôi, thị trường nhuộm đỏ rồi =))
Source code mình đã upload lên github tại đây: CoinTracker app
Các bạn có thể tham khảo, hoặc tải về và build ra android hoặc ios để dùng, mình đã build ra android cho con điện thoại của mình để tiện check coin =)).
Cảm ơn các bạn đã đọc. Nếu có gì thiếu sót mong các bạn để lại comment bên dưới để mình có thể cải thiện thêm.
All rights reserved
