Setup Boilerplate cho dự án NestJS - Phần 5: Cấu hình API Docs với Swagger một cách chuyên nghiệp
Bài đăng này đã không được cập nhật trong 3 năm
Đây là bài viết nằm trong Series NestJS thực chiến, các bạn có thể xem toàn bộ bài viết ở link: https://viblo.asia/s/nestjs-thuc-chien-MkNLr3kaVgA
Đặt vấn đề
Chào mọi người hôm này chúng ta sẽ đến với phần 5 của loạt bài viết 'Setup Boilerplate cho dự án NestJS'. Trong phần này, chúng ta sẽ khám phá cách sử dụng Swagger để cấu hình tài liệu API trong dự án NestJS một cách đầy đủ và chỉnh chu nhất.
Swagger là một công cụ phổ biến vì tính mạnh mẽ giúp tạo ra tài liệu API tự động và tương tác với API một cách dễ dàng. Bằng cách tích hợp Swagger vào boilerplate của chúng ta, các bạn có thể tạo ra tài liệu API rõ ràng và dễ hiểu cho dự án của mình, giúp sự giao tiếp giữa các team trở nên rõ ràng và thuận tiện, đồng thời tiết kiệm thời gian và công sức khi phát triển và kiểm thử API.
Thông tin package
Các bạn có thể tải về toàn bộ source code của phần này ở đây.
1. Cài đặt
Tiến hành cài đặt các package bên dưới:
npm install --save @nestjs/swagger
npm install --save-dev @types/multer
Do
@nestjs/swaggerđã có sẵn Swagger UI nên chúng ta không cần phải cài thêm.
2. Cấu hình
Chúng ta sẽ cấu hình Swagger dựa theo tài liệu từ Nest và bổ sung thêm một vài thứ. Tuy nhiên, theo mình việc config Swagger chung ở file main.ts sẽ làm cho nội dung file dài dòng khó đọc, vì thế mình sẽ tách ra file config riêng dễ quản lí hơn. Tạo file và thêm vào nội dung như bên dưới.
import { INestApplication } from '@nestjs/common';
import { DocumentBuilder, SwaggerModule } from '@nestjs/swagger';
export function configSwagger(app: INestApplication) {
	const config = new DocumentBuilder()
		.setTitle('Flash card project')
		.setDescription('## The flash card API description')
		.setVersion('1.0')
		.build();
	const document = SwaggerModule.createDocument(app, config);
	SwaggerModule.setup('api-docs', app, document);
}
Giải thích:
- Chúng ta sẽ dùng
DocumentBuilderđể tạo config cho document, sau đó dùngcreateDocumentđể tạo document. Document có thể dùng để setup hoặc export ra file. - Giá trị truyền vào
setDescriptionchúng ta có thể dùng markdown. api-docstrongSwaggerModule.setupchính là url được Swagger generate ra cho chúng ta.
Thêm config vừa tạo vào file main.ts:
import { configSwagger } from '@configs/api-docs.config';
...
async function bootstrap() {
	const logger = new Logger(bootstrap.name);
	const app = await NestFactory.create(AppModule);
	configSwagger(app); // <--- Ở đây
	...
Vậy là đã cấu hình xong chúng ta sẽ kết hợp giữa server url với giá trị được config ở SwaggerModule.setup truy cập vào http://localhost:3333/api-docs để xem kết quả. Swagger sẽ tự động detect các API của chúng ta và hiển thị chúng lên.
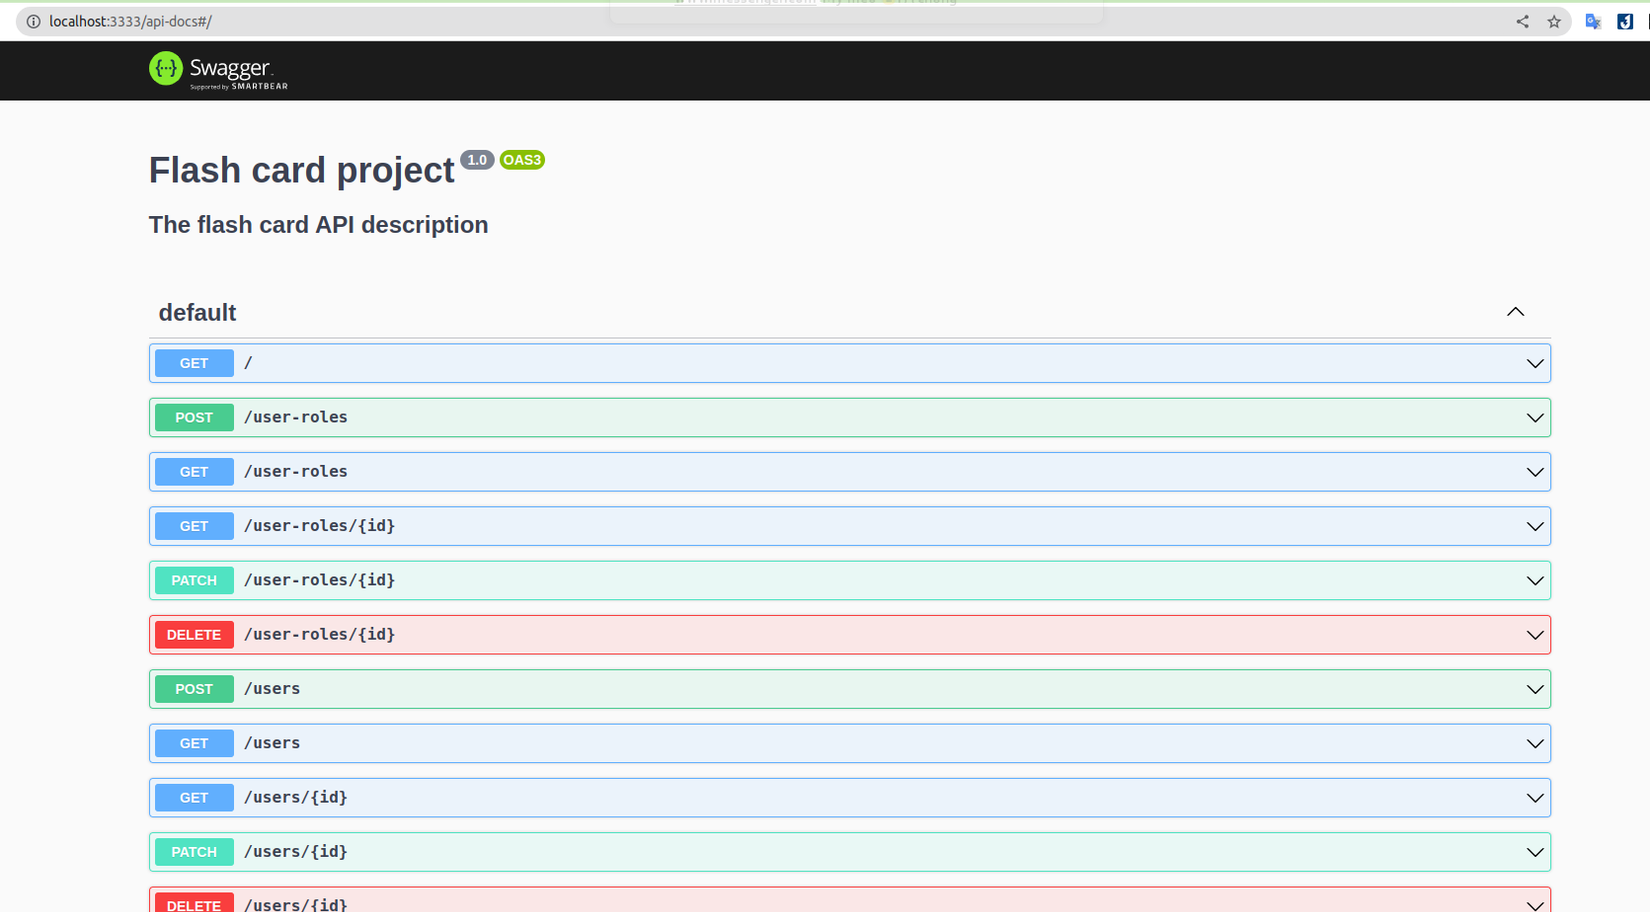
Việc cấu hình chỉ đơn giản vậy thôi, việc tiếp theo của chúng ta là làm cho document dễ đọc và tường minh nhất có thể để việc giao tiếp giữa các team được thuận tiện và hiệu quả.
3. Các trường hợp thông dụng
3.1 Dùng ApiTags để group API
Hiện tại danh sách API của chúng ta đang được gộp lại vào group default nên hơi khó nhìn. Để tách chúng ta theo group từng module riêng chúng ta có thể dùng decorator ApiTags. Decorate controller của các module với decorator ApiTags, như bên dưới chúng ta thêm cho module user, các module còn lại các bạn thêm tương tự.
import { ApiTags } from '@nestjs/swagger';
...
@Controller('users')
@ApiTags('users')
@UseInterceptors(MongooseClassSerializerInterceptor(User))
export class UsersController { ... }
...
Khi đã thêm vào đầy đủ cho các module còn lại, chúng ta sẽ thu được kết quả như hình.

3.2 Viết mô tả API với ApiOperation
Việc đầu tiên chúng ta cần làm khi viết docs cho các API là viết mô tả về nó, giúp cho thành viên của các team khác khi nhìn vào mô tả có thể hiểu được API thực hiện chính xác chức năng gì.
Đa số các bạn hay bỏ qua mô tả vì nghĩ khi nhìn vào API url và thông tin request body là có thể hiểu được. Việc đó là không nên vì khi dự án phát triển đủ lâu và có hàng loạt API xuất hiện, đôi khi với chính người viết ra API, nếu chỉ nhìn vào các thông số đó cũng phải mất thời gian để nhớ lại nó làm chức năng gì.
Để viết mô tả chúng ta dùng decorator ApiOperation.
import { ApiOperation, ApiTags } from '@nestjs/swagger';
...
export class UsersController {
	...
	@Post()
	@ApiOperation({
		summary: 'Admin create new user',
		description: `
* Only admin can use this API

* Admin create user and give some specific information`,
	})
	create(@Body() create_user_dto: CreateUserDto) {...}
    ...
Chú thích: ở bài trước chúng ta đã cho tạo user bằng API sign-up nên sau này API tạo user sẽ để Admin dùng để tạo các user riêng.
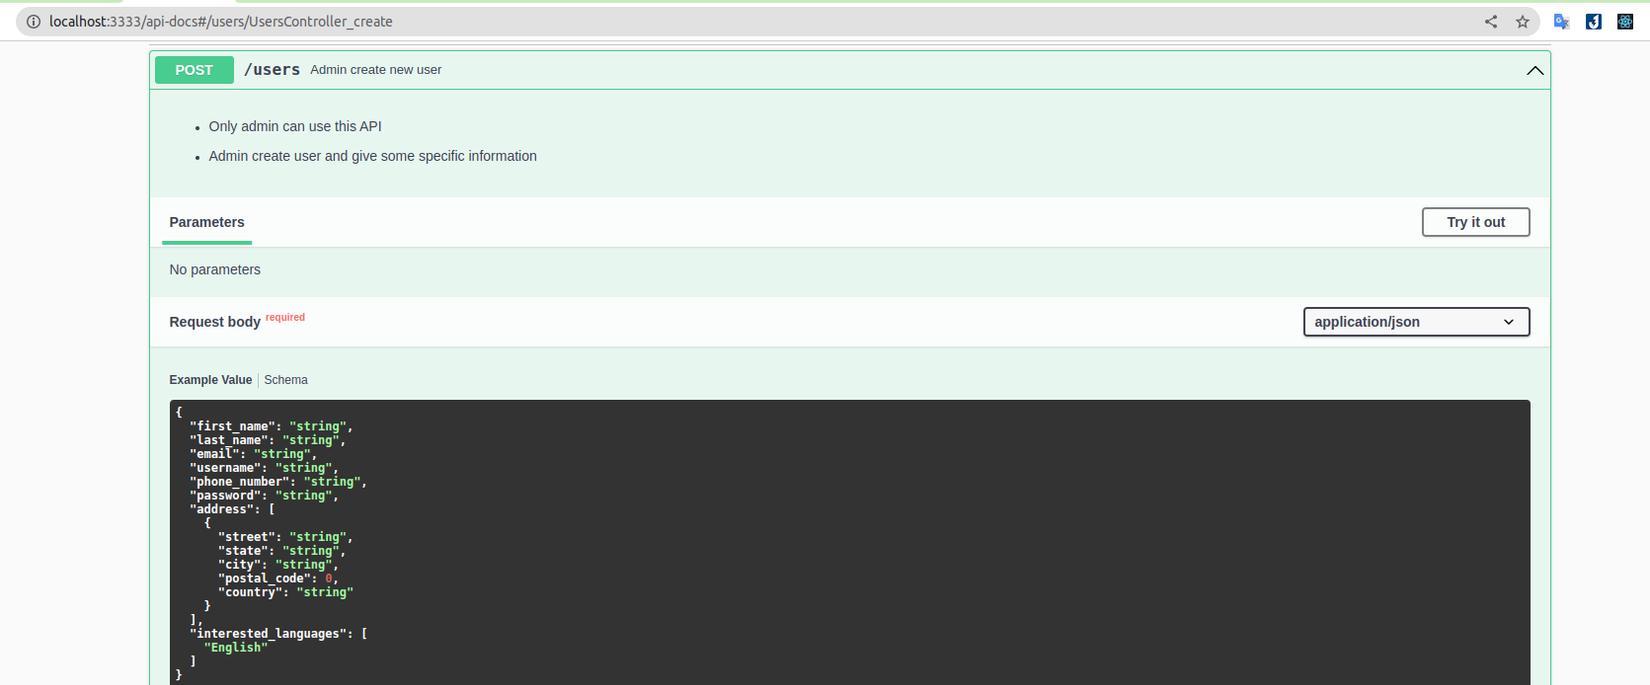
Ở trên thông tin API mà chúng ta tạo đã hiển thị lên. Với option description chúng ta cũng có thể dùng markdown để mô tả chi tiết API, giúp người đọc dễ hiểu và dễ dàng sử dụng.
3.3 Dùng ApiBody để biểu diễn request body
Mặc định với các API POST Swagger sẽ tự động lấy thông tin được khai báo từ DTO để generate thông tin ở request body (tương tự với response và schema). Ví dụ như hình dưới, mặc dù chúng ta chưa thêm gì từ Swagger vào API POST flash-card nhưng vẫn có thông tin request cũng như response.
Ở các project cũ của mình, Swagger không tự generate như vậy, mình thử update version swagger lên cũng không thấy. Không biết là do nguyên nhân gì. Bạn nào biết comment góp ý giúp mình nha.
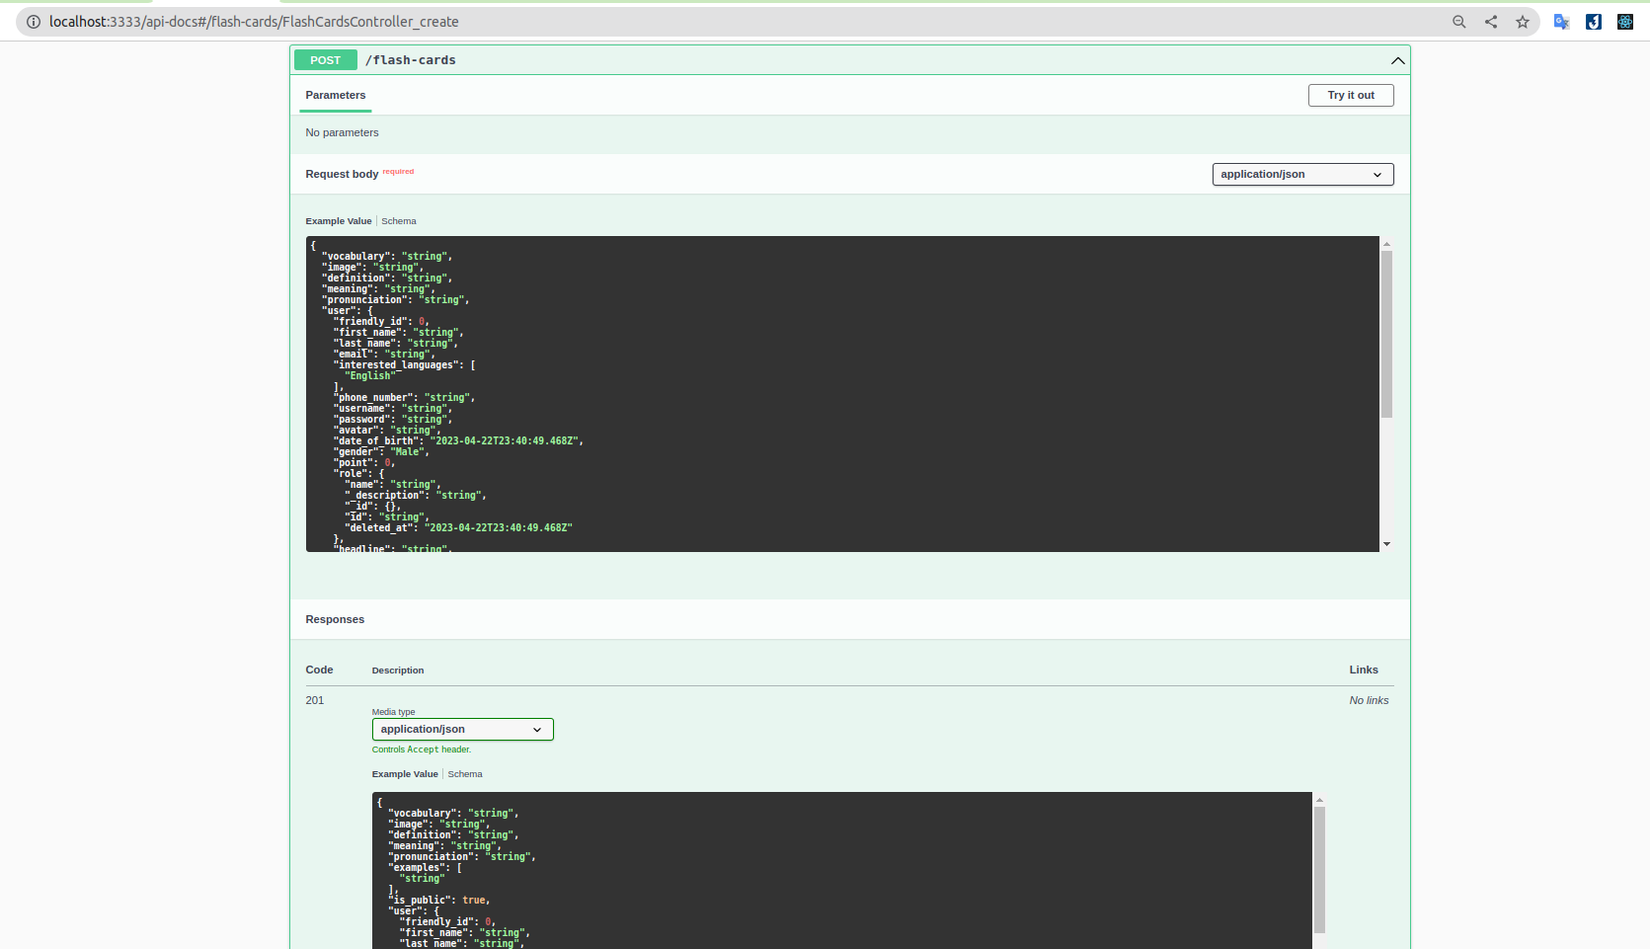
Tuy nhiên, các bạn có thể thấy nó không phù hợp lắm với những gì chúng ta cần gửi đi. Ví dụ như property user chúng ta sẽ lấy ra từ token chứ không gửi lên trong request body. Để mọi thứ hoạt động theo đúng ý chúng ta hơn, mình sẽ dùng decorator ApiBody để biểu diễn thông tin request body. Để minh họa sẽ dùng module auth (lát nữa module flash-card sẽ được dùng cho việc minh họa upload file bằng multipart/form-data).
import { ApiBody, ApiTags } from '@nestjs/swagger';
...
export class AuthController {
...
    @Post('sign-up')
	@ApiBody({
		type: SignUpDto,
		examples: {
			user_1: {
				value: {
					first_name: 'John',
					last_name: 'Doe',
					email: 'johndoe@example.com',
					password: '1232@asdS',
				} as SignUpDto,
			},
			user_2: {
				value: {
					first_name: 'Michael',
					last_name: 'Smith',
					email: 'michaelsmith@example.com',
					password: '1232@asdS',
				} as SignUpDto,
			},
		},
	})
	async signUp(@Body() sign_up_dto: SignUpDto) {
        console.log({ sign_up_dto });
		return await this.auth_service.signUp(sign_up_dto);
	}
    ...
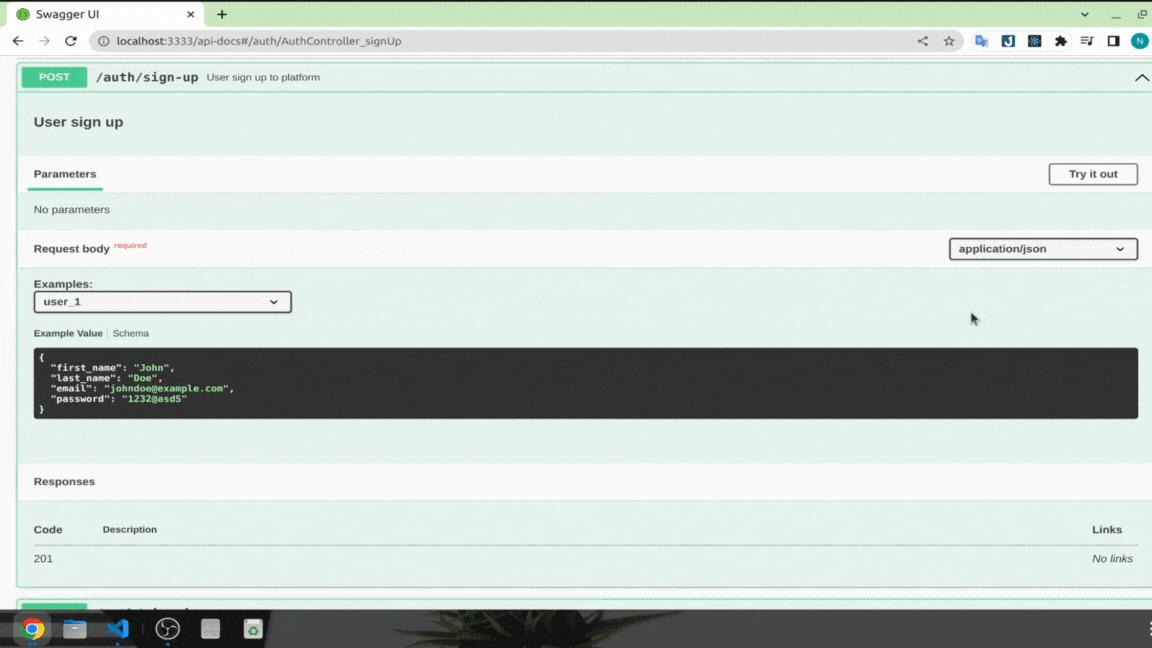
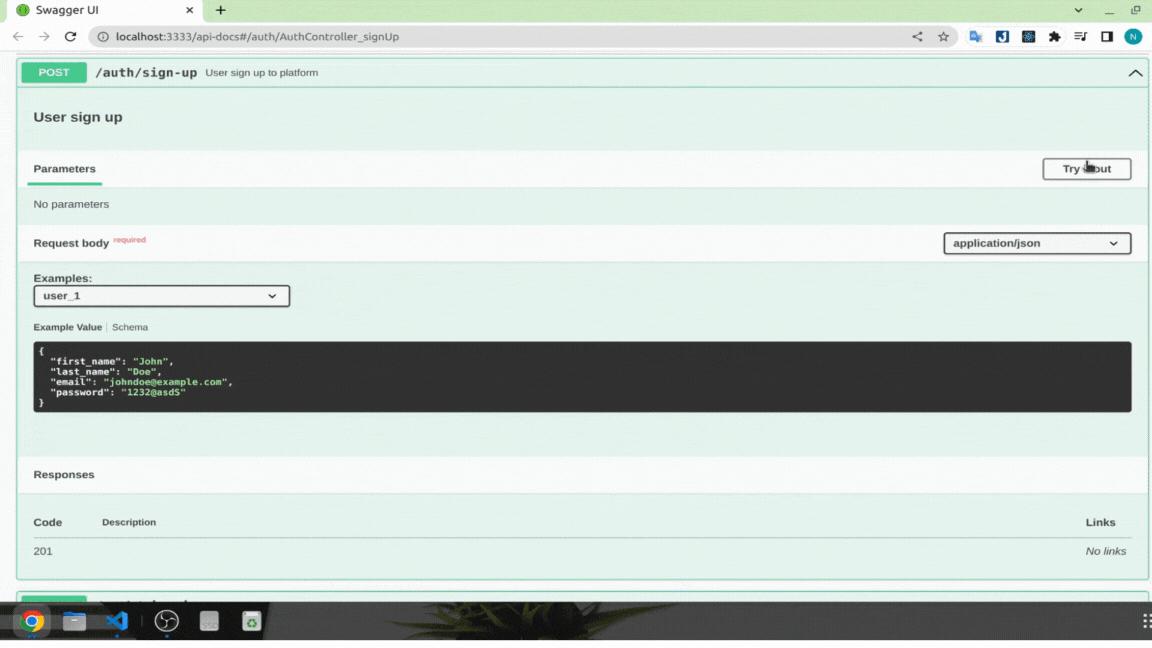
Với các payload dạng application/json chúng ta có thể sử dụng option examples để hiển thị nhiều dữ liệu mẫu giúp gọi API thuận tiện hơn. Ở trên mình đã tạo ra 2 user mẫu giờ việc sign-up chỉ cần chọn user là xong không cần mất thời gian nhập dữ liệu.
Mình sẽ thử gọi API với Swagger UI bằng cách bấm Execute xem có gọi được đến server của chúng ta hay không.
3.4 API gọi đến domain server khác
Ví dụ trong trường hợp chúng ta dùng microservices và auth module nằm ở một domain riêng thì phải làm thế nào?
Để giải quyết vấn đề này lúc trước mình dùng method addServer ở file config swagger, cơ bản giải quyết được vấn đề, tuy nhiên phải mất công chuyển switch trở lại domain sau khi gọi auth module xong. Sau khi có thời gian tìm hiểu thì mình đã tìm được cách tốt hơn, đó là sử dụng option servers bên trong decorator ApiOperation. Bằng cách này chúng ta có thể thêm vào danh sách các domain server mà API chúng ta có thể gọi tới.
import { ApiBody, ApiOperation, ApiTags } from '@nestjs/swagger';
...
export class AuthController {
    @Post('sign-up')
	@ApiOperation({
        summary: 'User sign up to platform',
		description: '## User sign up',
		servers: [
			{ url: 'http://localhost:3333', description: 'Current server' },
			{
				url: 'http://localhost:9000',
				description: 'Authentication service if exist',
			},
		],
	})
    @ApiBody({...})
    async signUp(@Body() sign_up_dto: SignUpDto) {...}
Có thể thấy khi chúng ta chuyển qua url http://localhost:9000 thì thông tin gọi đi ở Curl đã thay đổi
Lưu ý: khi chúng ta dùng option servers ở đây, nó sẽ override lại method addServer ở file config swagger (nếu có).
3.5 Upload single file
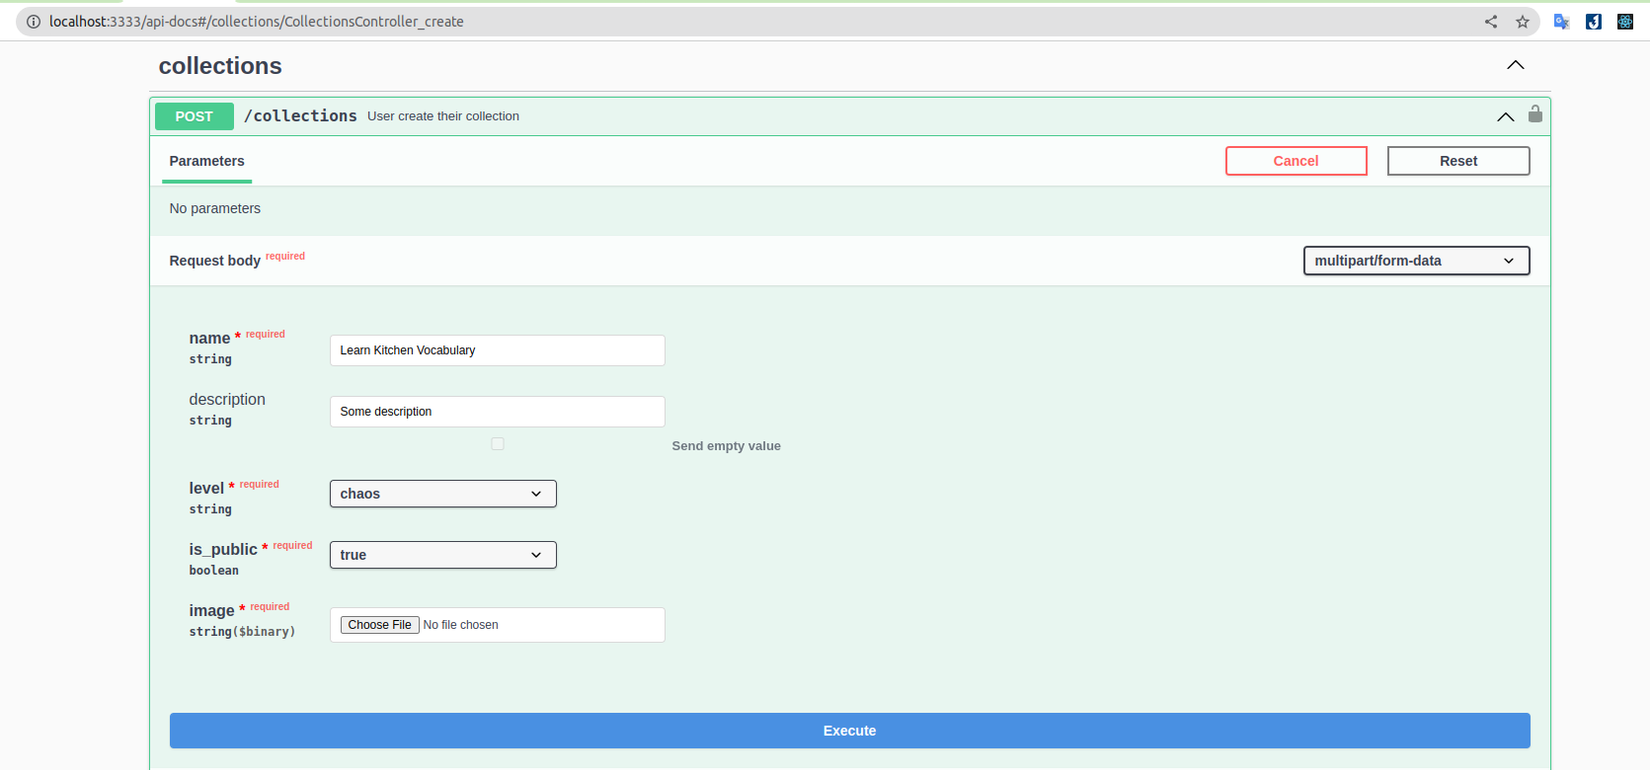
Trong trường hợp chúng ta cần gửi file lên server thì Swagger cũng cung cấp cho chúng ta decorator ApiConsumes với giá trị multipart/form-data. Để lấy ví dụ mình sẽ dùng với module collection, khi user tạo collection sẽ gửi lên hình nền cho collection đó.
import { ApiBody, ApiBearerAuth, ApiConsumes, ApiOperation, ApiTags } from '@nestjs/swagger';
import { FileInterceptor } from '@nestjs/platform-express';
...
export class CollectionsController {
    ...
    @Post()
	@ApiOperation({
		summary: 'User create their collection',
	})
    @ApiBearerAuth('token')
	@ApiConsumes('multipart/form-data')
	@ApiBody({
		schema: {
			type: 'object',
			properties: {
				name: {
					type: 'string',
					default: 'Learn Kitchen Vocabulary',
				},
				description: { type: 'string', default: 'Some description' },
				level: {
					type: 'string',
					enum: Object.values(COLLECTION_LEVEL),
					default: COLLECTION_LEVEL.CHAOS,
				},
				is_public: {
					type: 'boolean',
					default: true,
				},
				image: {
					type: 'string',
					format: 'binary',
				},
			},
			required: ['name', 'level', 'is_public', 'image'],
		},
	})
	@UseInterceptors(FileInterceptor('image'))
	create(
		@Req() request: RequestWithUser,
		@UploadedFile() image: Express.Multer.File,
		@Body() create_collection_dto: CreateCollectionDto,
	) {
		console.log(image);
		return this.collections_service.create({
			...create_collection_dto,
			user: request.user,
			image: image.originalname,,
		});
	}
    ...
Giải thích:
- Do API create collection cần xác thực nên mình sẽ dùng decorator
ApiBearerAuth. Khi đó người sử dụng docs cần thêm vào token thì Swagger mới cho phép gọi API. Phần tiếp theo chúng ta sẽ dùng pre-script để tự động đăng nhập. - Để áp dụng multipart/form-data chúng ta cần dùng decorator
ApiConsumes. - Nội dung
ApiBodysẽ hơi khác hơn so với application/json.- Chúng ta sẽ dùng option
schemađể mô tả các properties của request body. - Các cặp key-value bên trong option
propertieschính là thông tin cần gửi đi, chúng ta có thể chỉ định kiểu dữ liệu cũng như giá trị mặc định. - Option
enumsẽ tạo ra dropdown để dễ thao tác hơn. Lưu ý: option này nhận vào array nên nếu dùng enum của typescript các bạn nhớ dùngObject.valuesđể convert về array.
- Chúng ta sẽ dùng option
FileInterceptordùng để xử lý file gửi lên, nếu thiếu option này request body sẽ mất các property dẫn đến class-validator báo lỗi validate.- Hiện tại chúng ta chưa implement việc lưu file nên mình tạm thời dùng originalname từ image để thêm vào property image của collection. Sau này chúng ta sẽ quay lại xử lí file sau.
Nếu bạn nào gặp lỗi khi sử dụng
Express.Multer.Filelà do chưa cài @types/multer
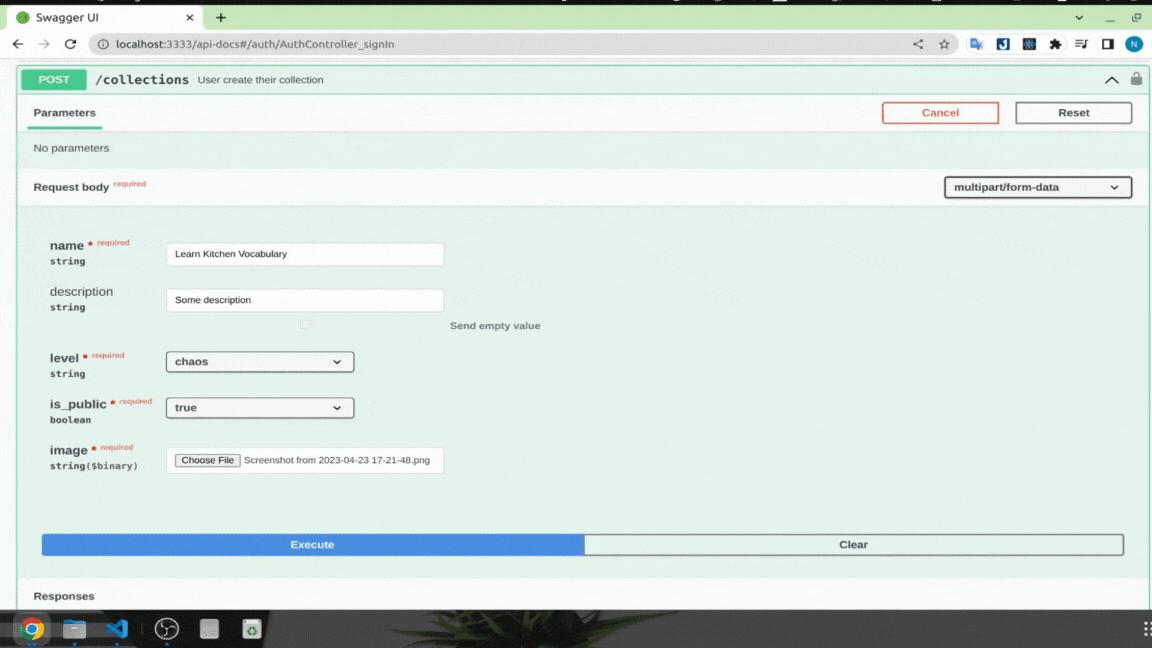
Kết quả Swagger UI sẽ thay đổi như hình bên dưới.
Các bạn gọi API sign-in để lấy access token, sau đó thêm vào ổ khóa phía trên góc phải của API để gửi access_token đi kèm với request.
3.6 Upload multiple files
Khi upload nhiều file trong API sẽ có 3 trường hợp xảy ra:
- Nhiều file được upload với cùng một property name
- Nhiều file với các property name khác nhau
- Cả 2 trường hợp trên
Cùng tên property
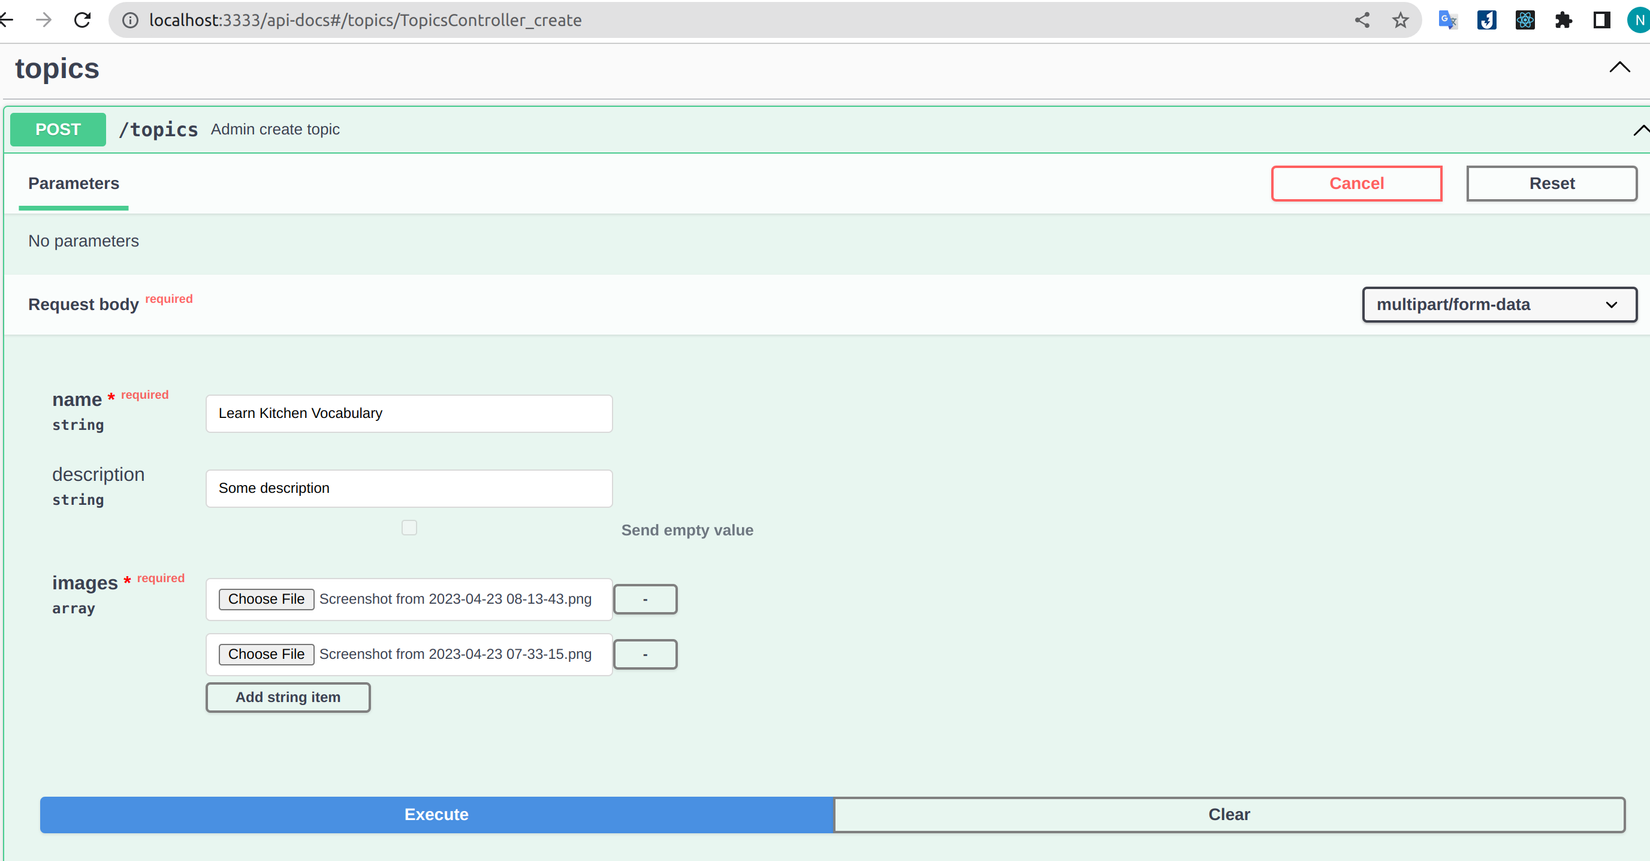
Chúng ta sẽ đi vào trường hợp đầu tiên khi gửi nhiều file với cùng property name. Ví dụ ở đây API tạo topic chúng ta sẽ chỉnh sửa lại cho gửi vào nhiều ảnh minh họa cho topic đó.
import { FilesInterceptor } from '@nestjs/platform-express';
...
export class TopicsController {
    ...
    @Post()
	@ApiOperation({
		summary: 'Admin create topic',
	})
	@ApiConsumes('multipart/form-data')
	@ApiBody({
		schema: {
			type: 'object',
			properties: {
				name: {
					type: 'string',
					default: 'Learn Kitchen Vocabulary',
				},
				description: { type: 'string', default: 'Some description' },
				images: {
					type: 'array',
					items: {
						type: 'string',
						format: 'binary',
					},
				},
			},
			required: ['name', 'images'],
		},
	})
	@UseInterceptors(FilesInterceptor('images'))
	create(
		@UploadedFiles() images: Express.Multer.File,
		@Body() createTopicDto: CreateTopicDto,
	) {
		console.log(images);
		return this.topicsService.create(createTopicDto);
	}
    ...
Giải thích:
- Chúng ta sử dụng
ApiBodytương tự với single file, để áp dụng multiple files chúng ta sẽ chỉnh sửa lại propertyimagestừ typeobjectsangarrayvà dùng optionitemsđể biểu diễu kiểu dữ liệu của các element bên trong array đó. - Chúng ta cũng cần thay đổi từ
FileInterceptorsangFilesInterceptornếu không sẽ gặp lỗiUnexpected field - Để API lấy được file chúng ta cũng cần đổi từ
UploadedFilesangUploadedFilesnếu không giá trị biến images sẽ làundefined
Kết quả sau khi thêm vào sẽ như bên dưới:
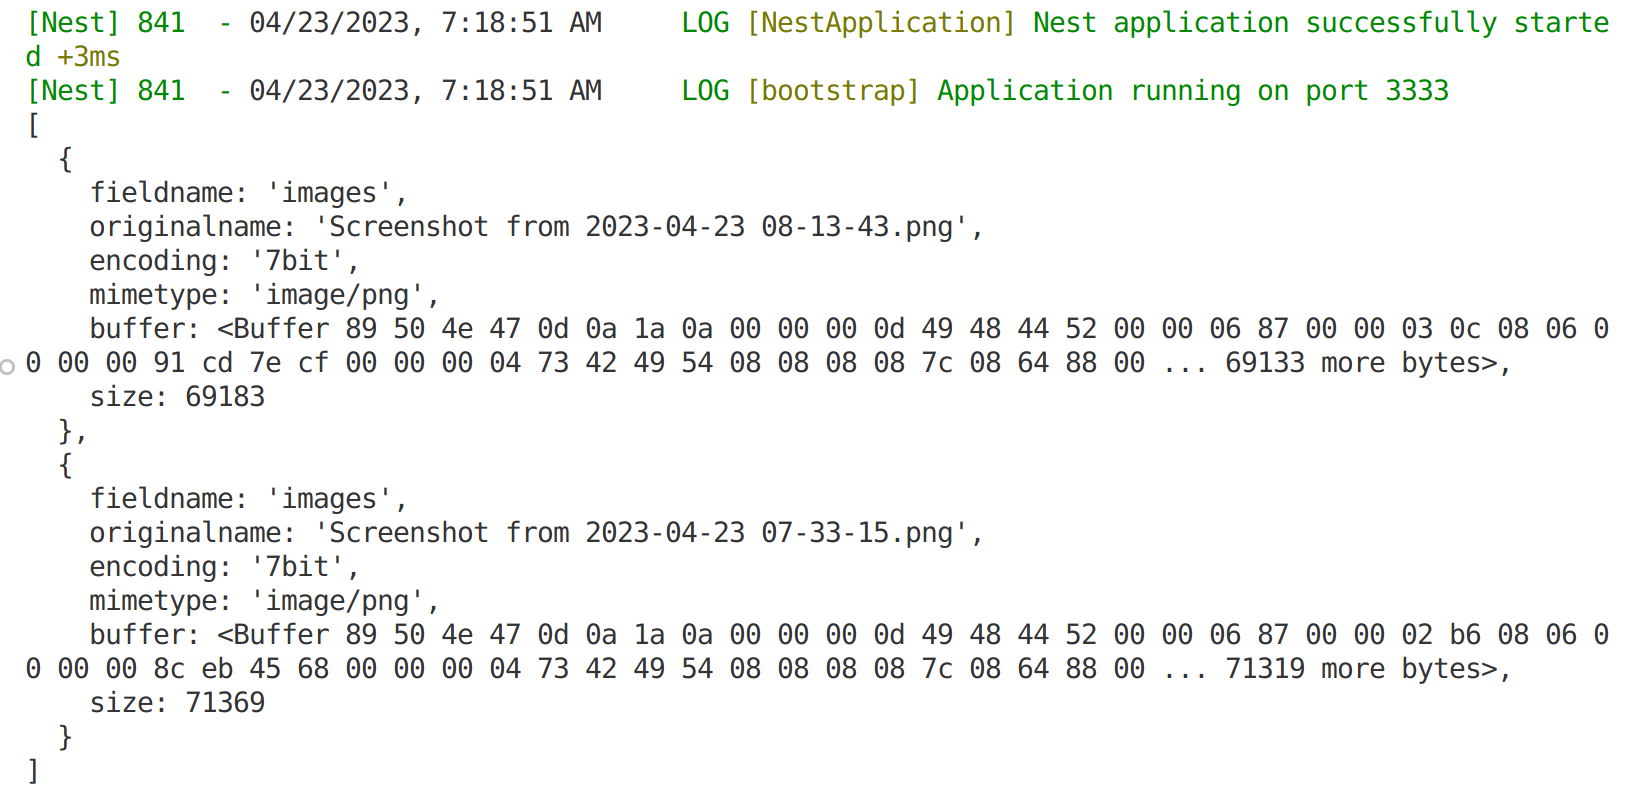
 Thử bấm
 Execute để xem kết quả ở console. Chúng ta thu được array với 2 file ở swagger mà chúng ta đã gửi lên
Khác tên property
Để lấy ví dụ, giả sử chúng ta có use case: nếu user có thẻ học sinh, sinh viên sẽ được truy cập vào các collection premium và để chứng minh user cần gửi lên mặt trước và mặt sau thẻ của mình. Chúng ta sẽ tạo API với 2 property student_card_front và student_card_back trong module user để biểu thị 2 mặt thẻ.
import { AnyFilesInterceptor } from '@nestjs/platform-express';
...
export class UsersController {
    ...
    @Post('student-cards')
	@ApiOperation({
		summary: 'Student update their student card',
	})
	@ApiConsumes('multipart/form-data')
	@ApiBody({
		schema: {
			type: 'object',
			properties: {
				student_card_front: {
					type: 'string',
					format: 'binary',
				},
				student_card_back: {
					type: 'string',
					format: 'binary',
				},
			},
			required: ['student_card_front', 'student_card_back'],
		},
	})
	@UseInterceptors(AnyFilesInterceptor())
	updateStudentCard(
		@UploadedFiles() files: Array<Express.Multer.File>,
	) {
		console.log(files);
        // Vì đây là bài viết về api docs nên mình sẽ k viết logic cho API này
		return files.map((file) => file.originalname);
	}
Giải thích:
- Chúng ta chỉ cần thêm vào property
type:stringvàformat:binaryứng với từng file chúng ta cần upload là được. - Vì các file có tên khác nhau nên chúng ta cần dùng
AnyFilesInterceptorthay vìFilesInterceptor
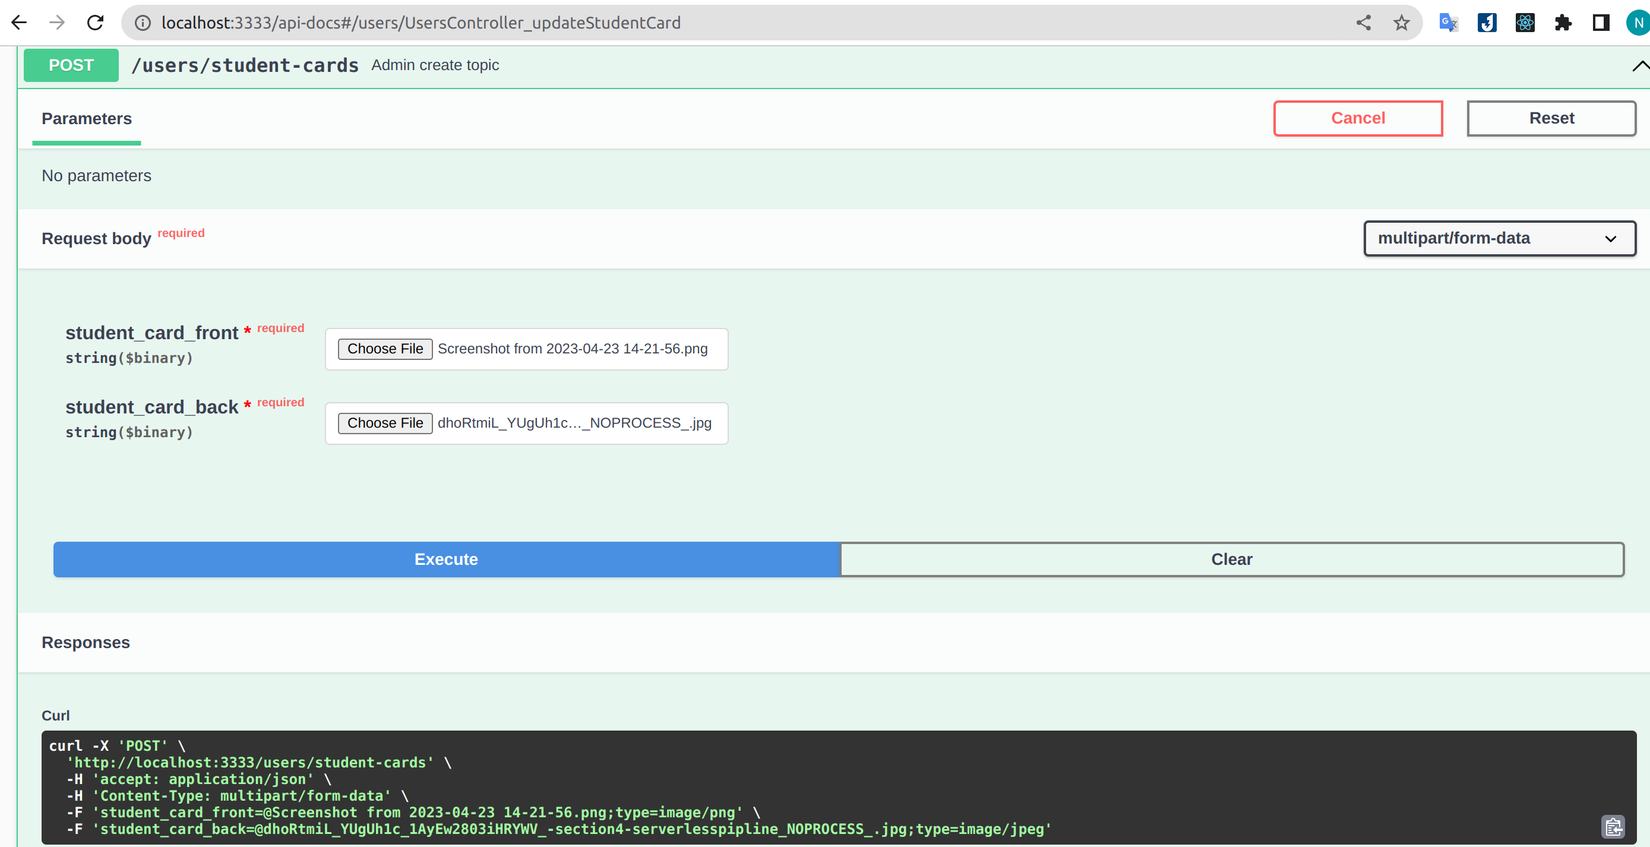
Swagger UI sẽ hiển thị kết quả như hình:
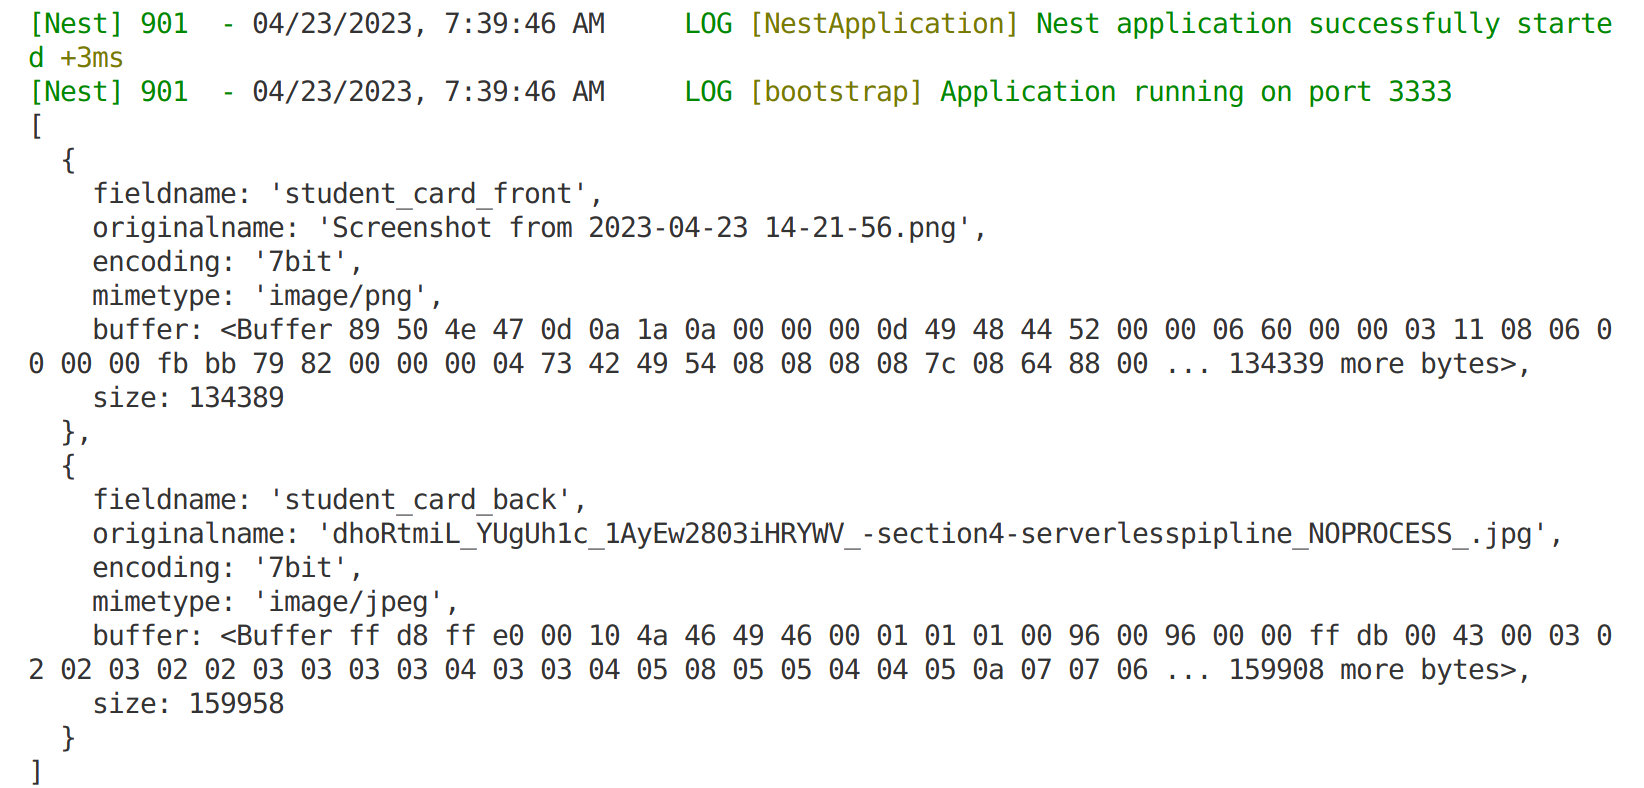
Tương tự bấm Execute để xem kết quả nhận được phía server:
Khác tên property nhưng trong property có nhiều file
Trường hợp này là sự kết hợp có 2 trường hợp ở trên, để lấy ví dụ chúng ta sẽ chỉnh sửa API vừa tạo, yêu cầu user gửi thêm ít nhất 2 tấm hình chụp chân dung để chứng minh thẻ học sinh, sinh viên đó là của họ.
import { AnyFilesInterceptor } from '@nestjs/platform-express';
...
export class UsersController {
    ...
    @Post('student-cards')
	@ApiOperation({
		summary: 'Student update their student card',
	})
	@ApiConsumes('multipart/form-data')
	@ApiBody({
		schema: {
			type: 'object',
			properties: {
				student_card_front: {
					type: 'string',
					format: 'binary',
				},
				student_card_back: {
					type: 'string',
					format: 'binary',
				},
                live_photos: {
					type: 'array',
					items: {
						type: 'string',
						format: 'binary',
					},
				},
			},
			required: ['student_card_front', 'student_card_back', 'live_photos'],
		},
	})
	@UseInterceptors(AnyFilesInterceptor())
	updateStudentCard(
		@UploadedFiles() files: Array<Express.Multer.File>,
	) { ... }
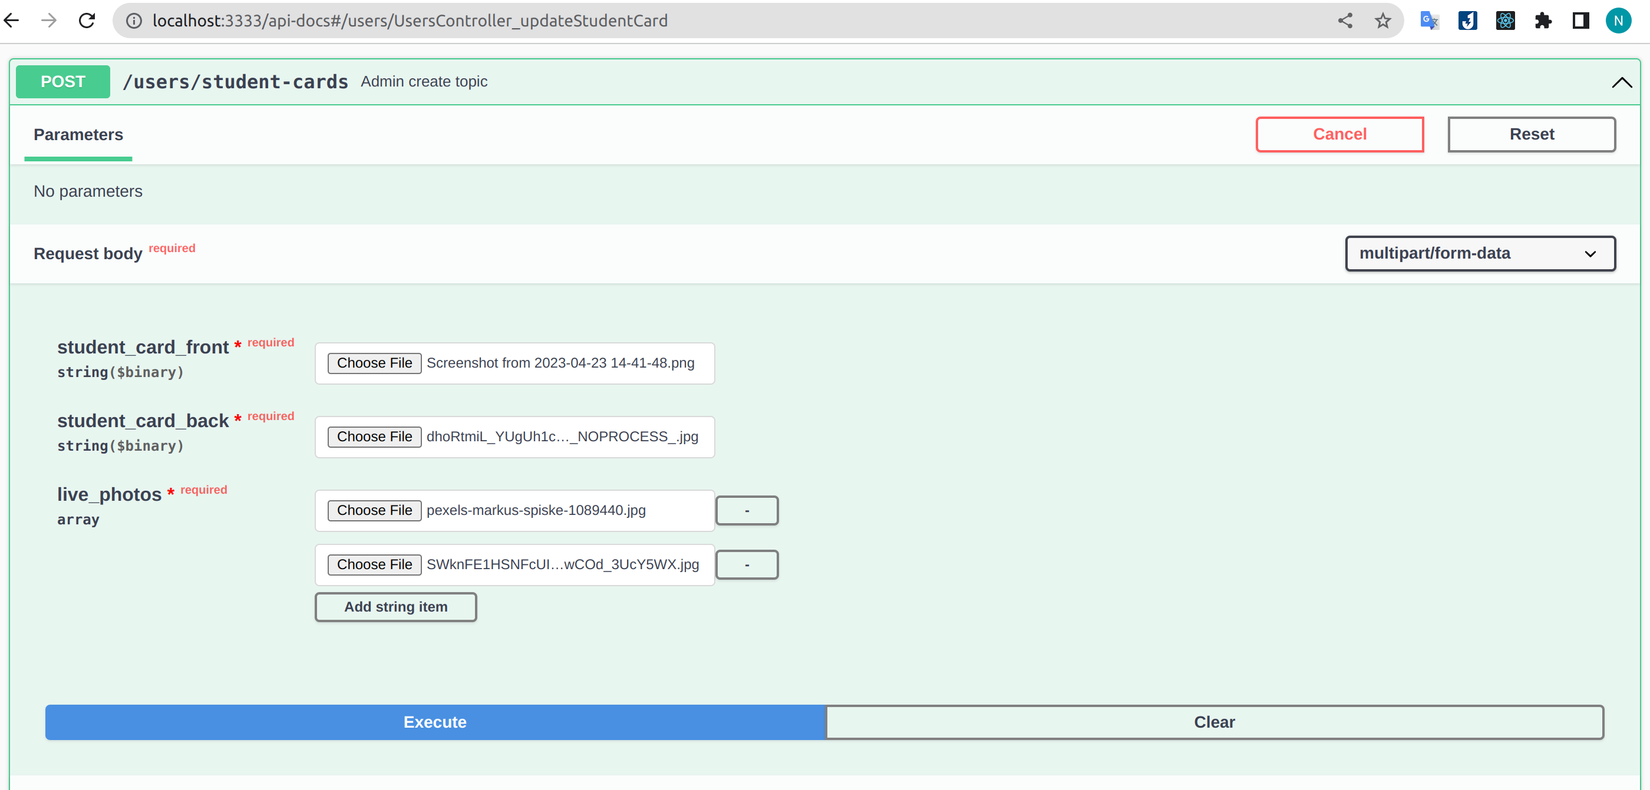
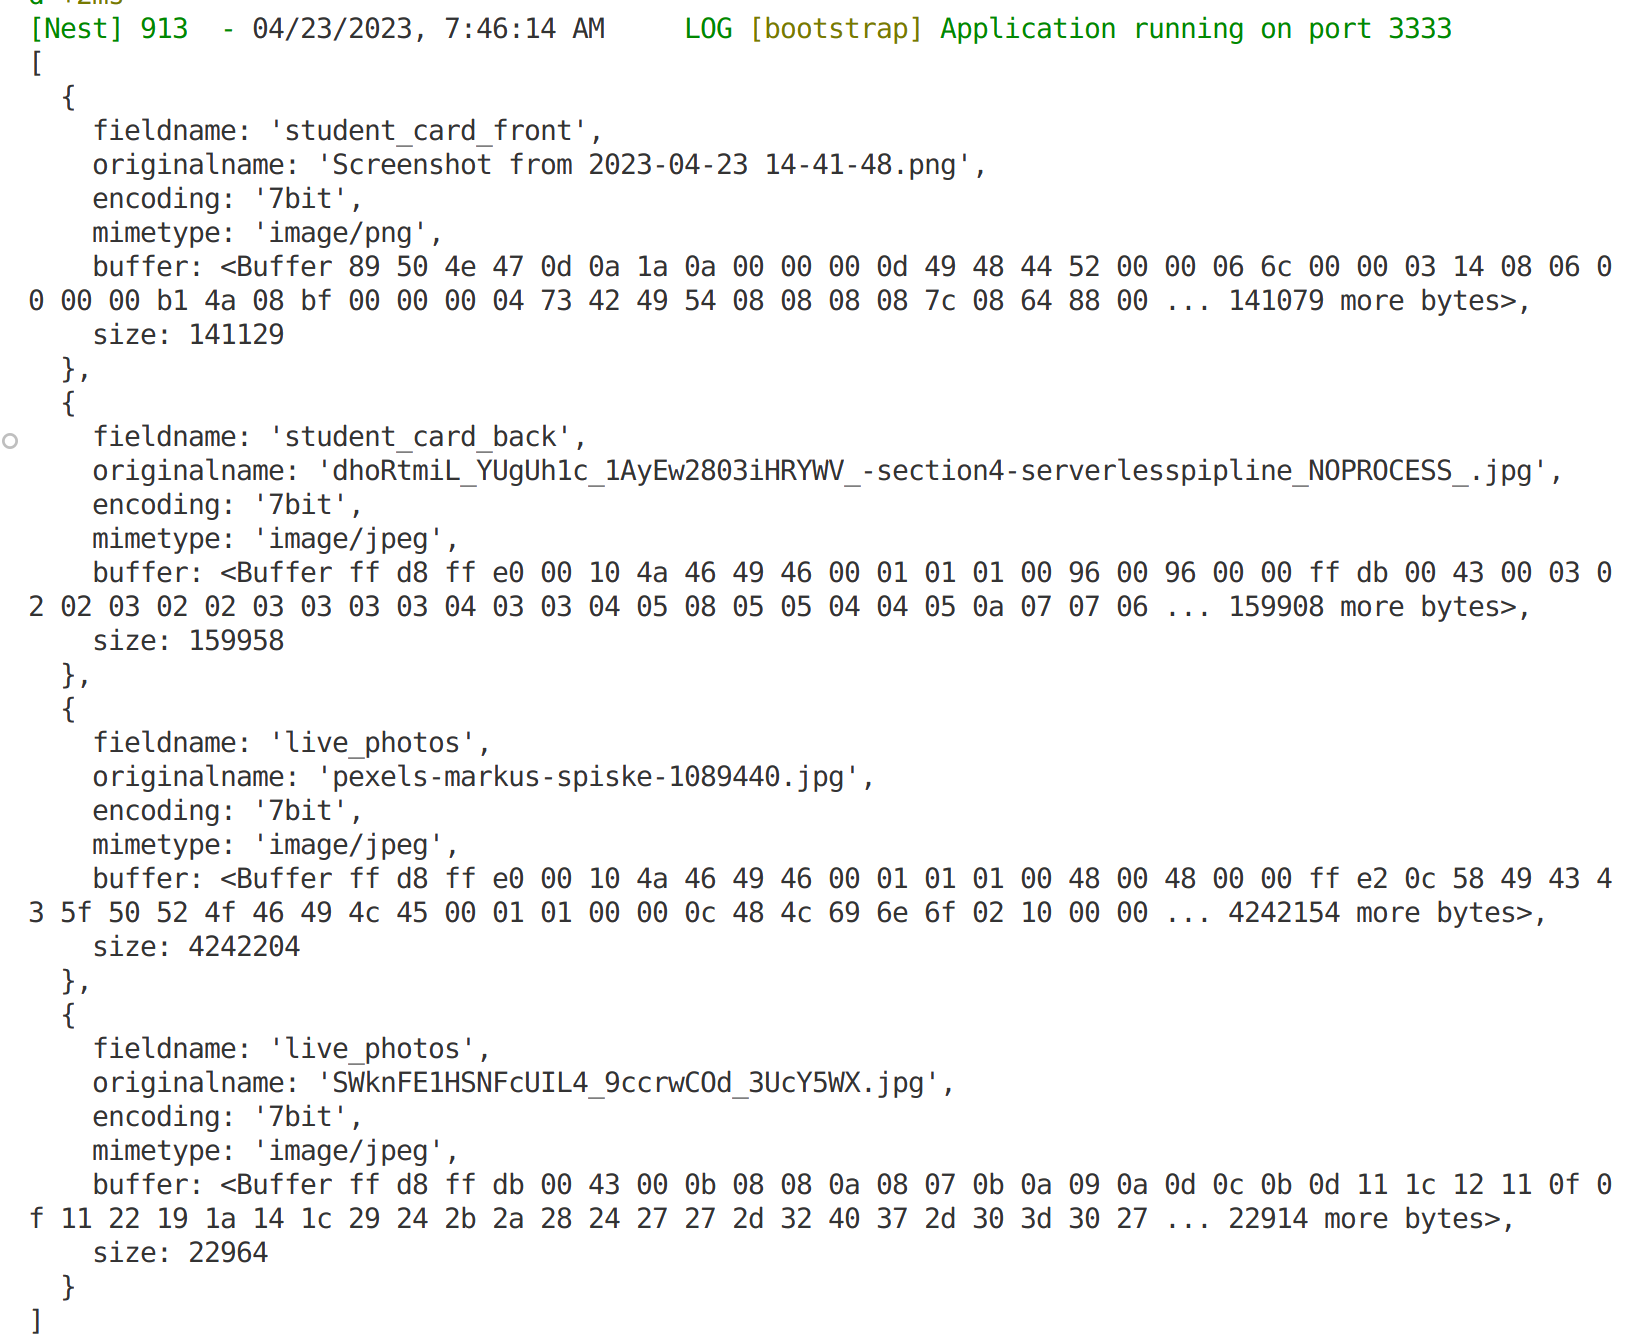
Đơn giản chỉ cần thêm vào property live_photos dạng array như ở trường hợp 1. Kết quả thu được sẽ như bên dưới:
Và các file server nhận được như sau:
3.7 Property có dạng array trong multipart/form-data
Ở trên chúng ta đã dùng array để upload multiple files, tuy nhiên khi thao tác với các property type bình thường trong multipart/form-data chúng ta sẽ gặp một vấn đề nhỏ. Cụ thể chúng ta sẽ lấy ví dụ với API tạo flash-cards.
...
export class FlashCardsController {
	...
    @Post()
	@ApiOperation({
		summary: 'User create their new flash card',
	})
	@ApiConsumes('multipart/form-data')
	@ApiBody({
		schema: {
			type: 'object',
			properties: {
				vocabulary: {
					type: 'string',
					default: 'provision',
				},
				definition: {
					type: 'string',
					default: 'the action of providing or supplying something for use.',
				},
				meaning: {
					type: 'string',
					default: 'sự cung cấp',
				},
				pronunciation: {
					type: 'string',
					default: 'prəˈviZHən',
				},
				examples: {
					type: 'array',
					items: {
						type: 'string',
						default: '',
					},
					default: [
						'new contracts for the provision of services',
						'low levels of social provision',
						'civilian contractors were responsible for provisioning these armies',
					],
				},
				image: {
					type: 'string',
					format: 'binary',
				},
			},
			required: ['vocabulary', 'definition', 'meaning', 'image'],
		},
	})
	@UseInterceptors(FileInterceptor('image'))
    @UseGuards(JwtAccessTokenGuard)
	create(
		@Req() request: RequestWithUser,
		@UploadedFile() image: Express.Multer.File,
		@Body() create_flash_card_dto: CreateFlashCardDto,
	) {
		console.log(create_flash_card_dto.examples);
		return this.flash_cards_service.create({
			...create_flash_card_dto,
			user: request.user,
			image: image.originalname,
		});
	}
    ...
import { User } from '@modules/users/entities/user.entity';
import { ArrayMinSize, IsArray, IsNotEmpty, IsOptional } from 'class-validator';

export class CreateFlashCardDto {
	@IsNotEmpty()
	vocabulary: string;

	image: string;

	@IsNotEmpty()
	definition: string;

	@IsNotEmpty()
	meaning: string;

	@IsOptional()
	@IsArray()
	@ArrayMinSize(1)
	examples?: string[];

	@IsOptional()
	pronunciation: string;

	user?: User;
}
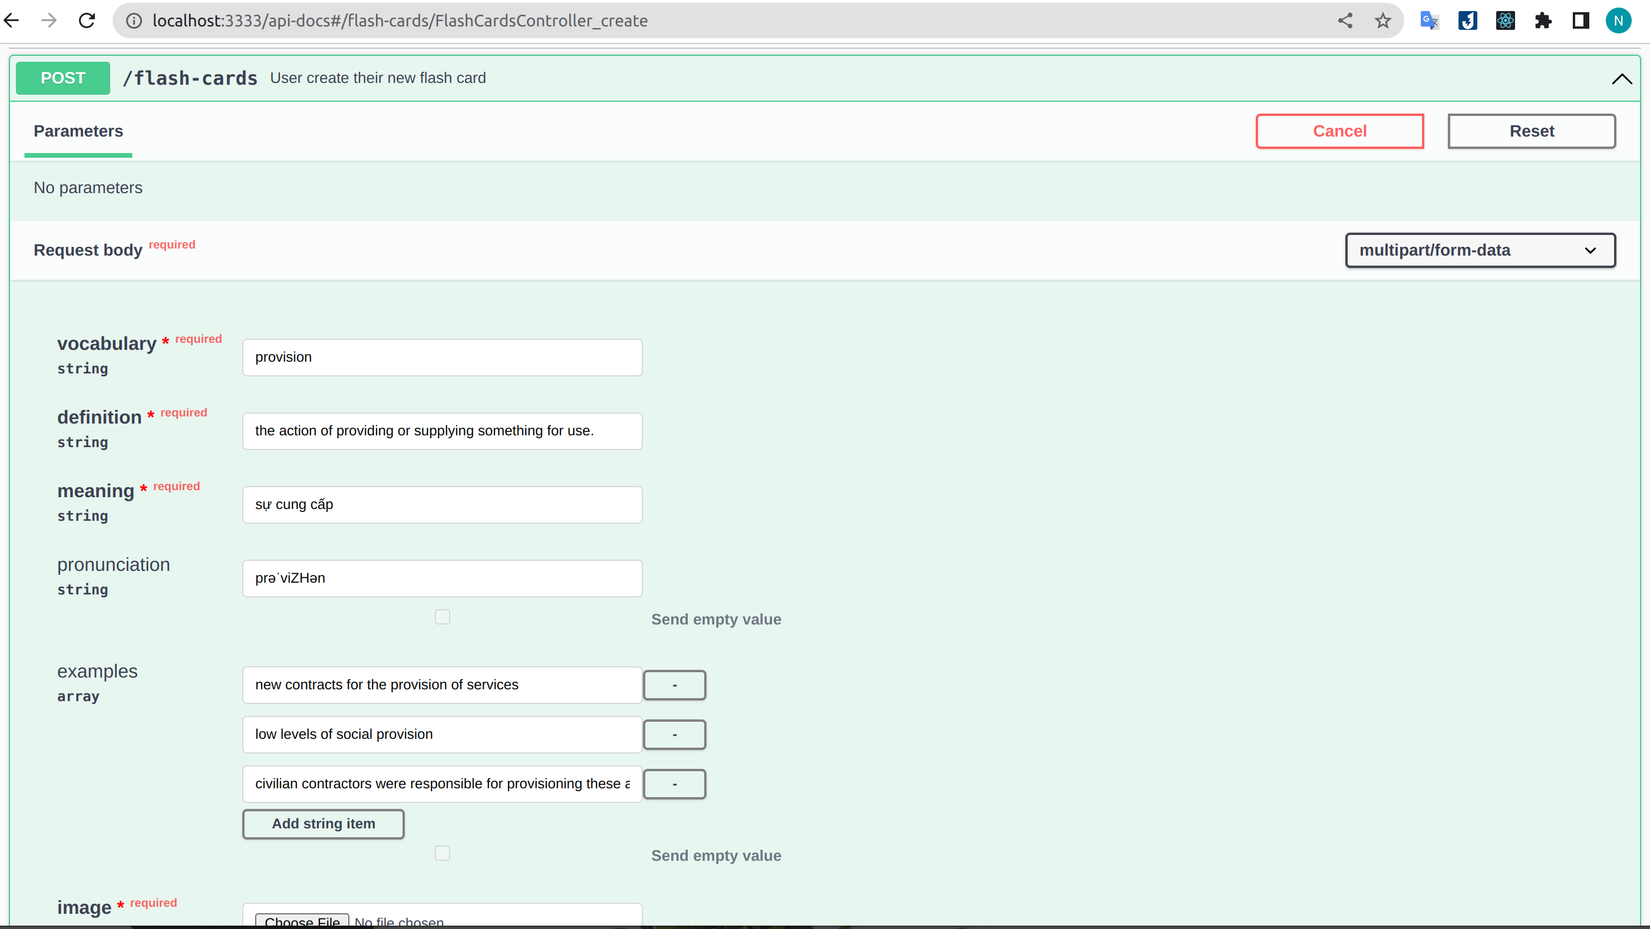
Tương ứng với đoạn code trên, kết quả ở Swagger UI sẽ như bên dưới.
 Mọi thứ trông rất ổn đến khi bấm
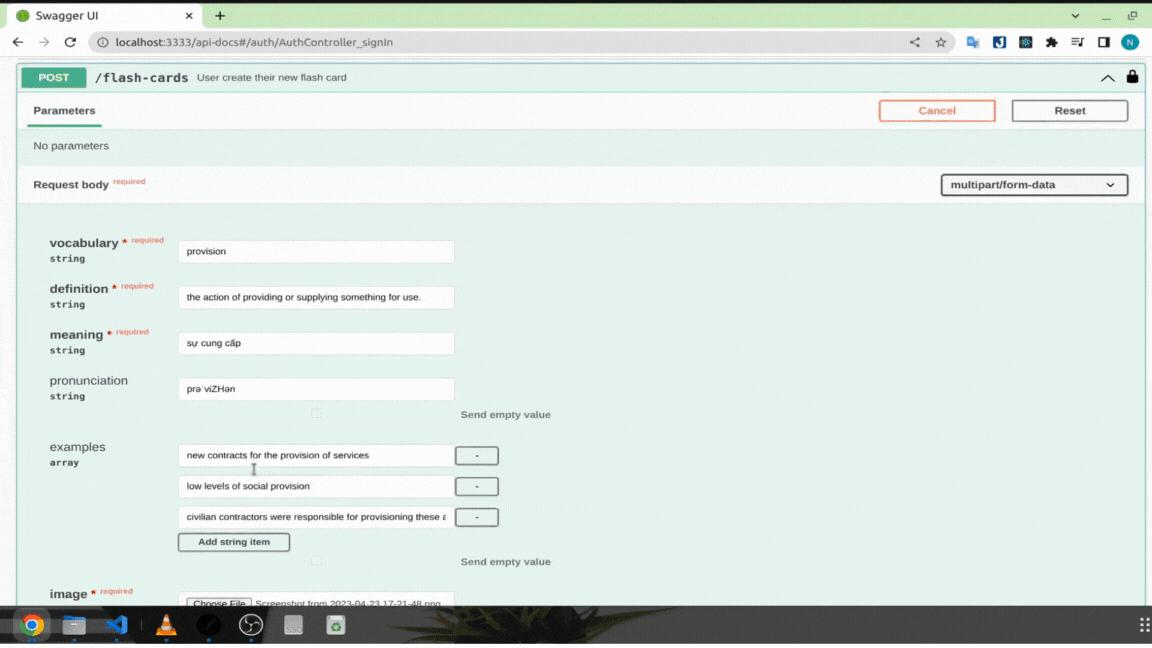
 Execute để kiểm tra kết quả. Class-validator báo giá trị biến examples không phải array. Đây là một inner bug của Swagger UI, mặc dù đã khai báo là array nhưng thay vì gửi array đi thì nó gửi một chuỗi string. Nếu các bạn gọi từ Postman hoặc Front-end thì sẽ không gặp lỗi này.
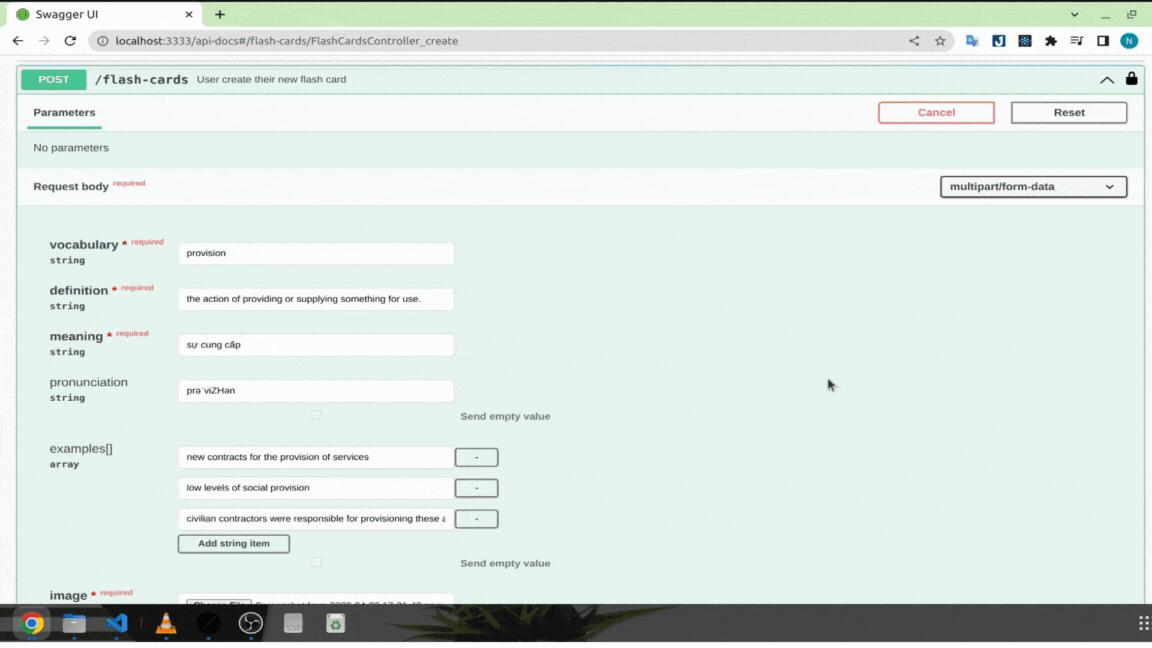
Chúng ta sẽ thử giải quyết bằng cách thêm vào [] phía sau examples, đây là cách dùng thông dụng với các property dạng array. Kết quả đã khả quan hơn, tuy nhiên vấn đề khác phát sinh là nó gộp lại các thông tin chúng ta gửi vào cùng một element của array.
Để tạm thời giải quyết các lỗi trên và chờ nhà phát triển fix nó trong tương lai thì mình sẽ tạo ra 1 interceptor để convert các property dạng array trong form-data khi request được gọi từ Swagger UI
import {
	CallHandler,
	ExecutionContext,
	Injectable,
	NestInterceptor,
} from '@nestjs/common';
import { isArray } from 'class-validator';
import { Request } from 'express';
import { Observable } from 'rxjs';

@Injectable()
export class SwaggerArrayConversion implements NestInterceptor {
	constructor(private readonly property_name: string) {}
	intercept(
		context: ExecutionContext,
		next: CallHandler<any>,
	): Observable<any> | Promise<Observable<any>> {
		const request: Request = context.switchToHttp().getRequest();
		const API_DOCS_URL = 'http://localhost:3333/api-docs';
		if (
			request.headers.referer === API_DOCS_URL &&
			request.body[this.property_name]
		) {
			if (
				isArray(request.body[this.property_name]) &&
				request.body[this.property_name].length === 1
			) {
				request.body[this.property_name] =
					request.body[this.property_name][0].split(',');
			}
		}
		return next.handle();
	}
}
Giải thích:
- Để reusable cho các module khác chúng ta sẽ cho truyền vào
name. - Chúng ta dùng option
refererđể lấy ra thông tin url của request đang gọi tới. Sau đó so sánh xem có cùng url với Swagger UI hay không. Các bạn nên đưa biếnAPI_DOCS_URLra config env để lấy giá trị tương ứng với từng môi trường. - Chuyển đổi chuỗi về thành kết quả chính xác mà user gửi lên.
Để sử dụng interceptor này chúng ta sẽ thêm vào method handler của API mà chúng ta cần.
import { SwaggerArrayConversion } from 'src/interceptors/swagger-array-conversion.interceptor';
...
export class FlashCardsController {
	...
    @Post()
	@ApiOperation({
		summary: 'User create their new flash card',
	})
	@ApiConsumes('multipart/form-data')
	@ApiBody({...})
    @UseInterceptors(new SwaggerArrayConversion('examples')) // <--- Thêm vào đây
	@UseInterceptors(FileInterceptor('image'))
    @UseGuards(JwtAccessTokenGuard)
	create(
		@Req() request: RequestWithUser,
		@UploadedFile() image: Express.Multer.File,
		@Body() create_flash_card_dto: CreateFlashCardDto,
	) {
		console.log(create_flash_card_dto.examples);
		return this.flash_cards_service.create({
			...create_flash_card_dto,
			user: request.user,
			image: image.originalname,
		});
	}
    ...
Lưu ý: chúng ta cần đặt SwaggerArrayConversion nằm trên FileInterceptor để chờ FileInterceptor xử lí dữ liệu nếu không giá trị request.body sẽ là object rỗng.
Sau hàng loạt các bước trên thì cuối cùng chúng ta cũng đã có kết quả như mong đợi:

Chúng ta vẫn có thể gặp lỗi nếu trong từng example có dấu
,nên khi bàn giao docs cho các team khác các bạn nhớ lưu ý họ không dùng,cho nội dung các property dạng array.
3.8 Dùng ApiQuery với query parameters
Chúng ta sẽ cùng đến với docs cho các query parameters, tương tự với request body chúng ta có thể mô tả cho các biến query đi kèm với ví dụ. Mình sẽ lấy ví dụ về API findAll collection:
import { ApiQuery } from '@nestjs/swagger';
...
export class CollectionsController {
    ...
   @Get()
	@ApiQuery({
		name: 'offset',
		type: Number,
		examples: {
			'0': {
				value: 0,
				description: 'Start from 0',
			},
			'10': {
				value: 10,
				description: `Skip 10 collection`,
			},
		},
	})
	@ApiQuery({
		name: 'limit',
		type: Number,
		examples: {
			'10': {
				value: 10,
				description: `Get 10 collection`,
			},
			'50': {
				value: 50,
				description: `Get 50 collection`,
			},
		},
	})
	@ApiQuery({
		name: 'level',
		type: 'string',
		enum: COLLECTION_LEVEL,
		example: COLLECTION_LEVEL.MEDIUM,
        required: false
	})
	findAll(
		@Query('offset', ParseIntPipe) offset: number,
		@Query('limit', ParseIntPipe) limit: number,
		@Query('level', new ParseEnumPipe(COLLECTION_LEVEL)) level: string,
	) {
		return this.collections_service.findAll();
	}
Giải thích:
- Cách sử dụng
type,exampletương tự vớiApiBody. - Khác với enum trong multipart/form-data, chúng ta chỉ cần truyền thẳng vào enum trong ApiQuery là được.
Lưu ý: nếu chúng ta không dùng ApiQuery thì Swagger sẽ tự động detect dựa vào decorator Query.

Việc sử dụng ApiQuery khá là đơn giản, tuy nhiên chúng ta sẽ gặp một vấn đề khá giống ở trên nhưng đến từ bản thân NestJS - mình đã thử với Postman kết quả vẫn tương tự. Ví dụ ở đây thay gì cho filter bằng một loại level, mình sẽ cho filter nhiều hơn. Chúng ta sẽ chỉnh sửa lại ApiQuery với level và xem lỗi đó như thế nào.
import { ApiQuery } from '@nestjs/swagger';
...
export class CollectionsController {
    ...
   @Get()
	...
	@ApiQuery({
		name: 'level',
		type: 'array',
		examples: {
			one_level_type: {
				value: [COLLECTION_LEVEL.HARD],
			},
			two_level_type: {
				value: [COLLECTION_LEVEL.EASY, COLLECTION_LEVEL.MEDIUM],
			},
		},
		required: false,
	})
	findAll(
		@Query('offset', ParseIntPipe) offset: number,
		@Query('limit', ParseIntPipe) limit: number,
		@Query('level') level: string[],
	) {
		return this.collections_service.findAll();
	}
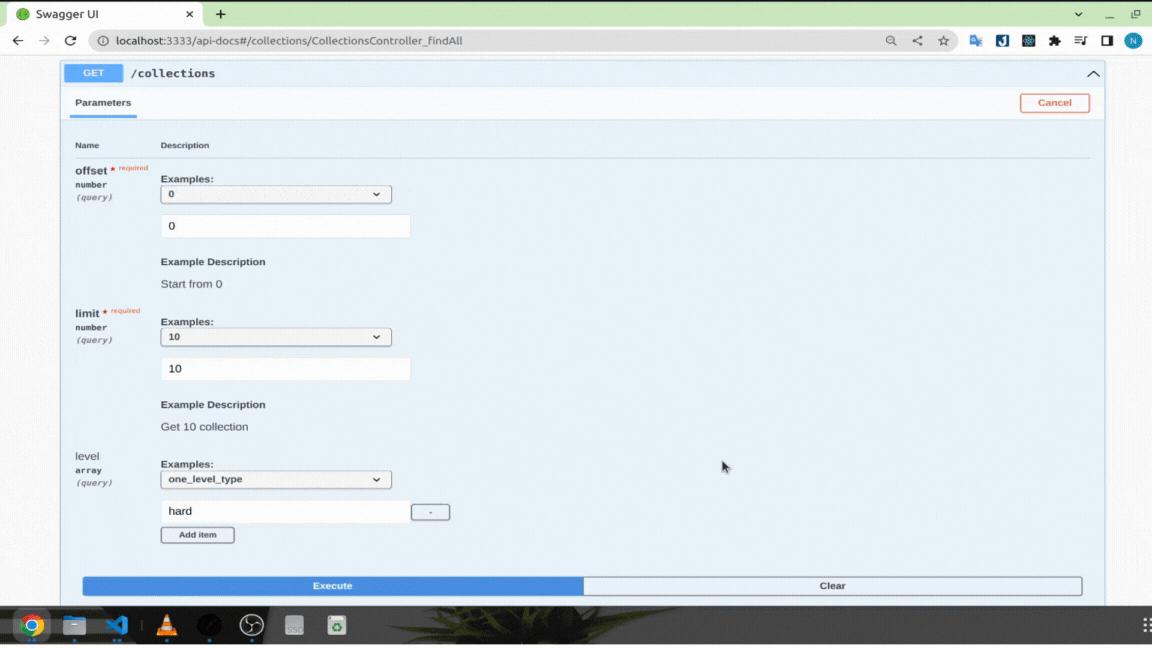
Với 1 level gửi đi thì kiểu là string còn từ 2 level trở lên thì sẽ là array. Mình không rõ tại sao NestJS lại có behavior này. Để giải quyết thì đơn giản hơn so với lỗi của Swagger, chúng ta chỉ cần kiểm tra nếu level được gửi lên và type của nó là string thì chúng ta sẽ convert về array.
...
    findAll(
		@Query('offset', ParseIntPipe) offset: number,
		@Query('limit', ParseIntPipe) limit: number,
		@Query('level') level: string[],
	) {
        if (level && typeof level === 'string') {
			level = [level];
		}
		console.log({ level });
		return this.collections_service.findAll();
	}
    ...
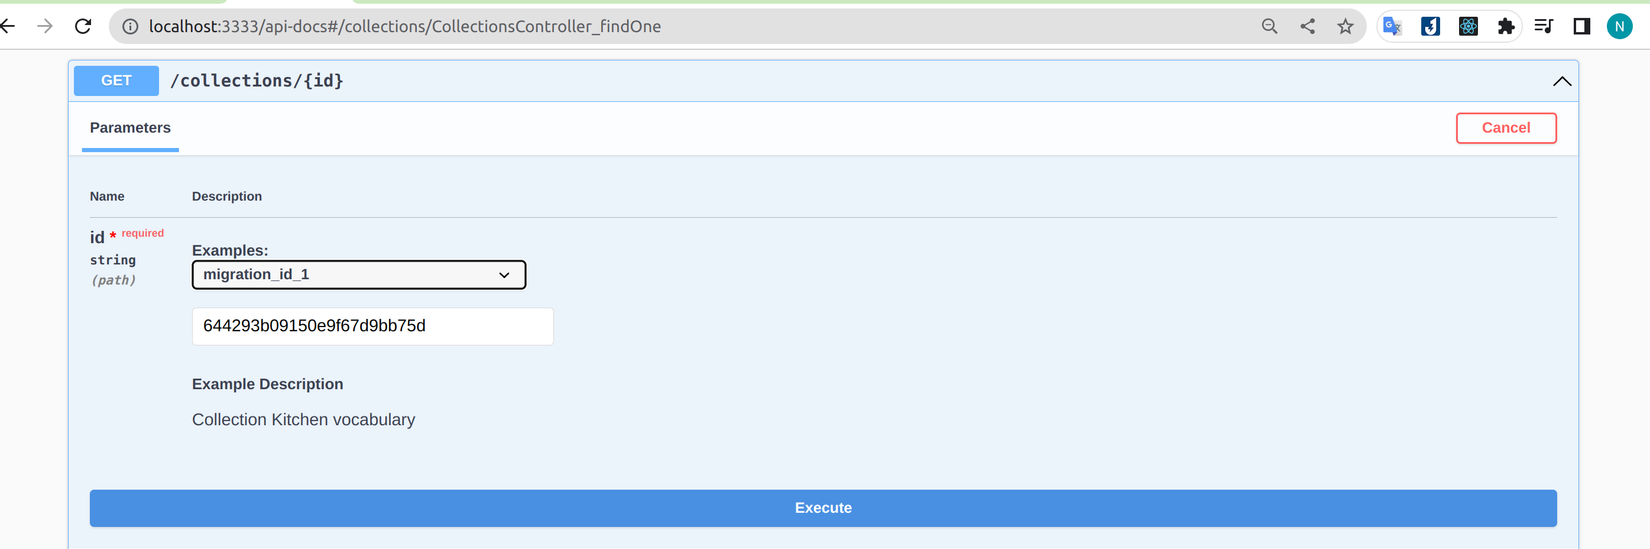
3.9 Dùng ApiParam với path parameters
Với ApiParam chúng ta dùng tương tự ApiQuery, ví dụ dùng examples để truy cập các collection có id được migrate sẵn.
import { ApiParam } from '@nestjs/swagger';
...
    @Get(':id')
	@ApiParam({
		name: 'id',
		type: 'string',
		examples: {
			migration_id_1: {
				value: '644293b09150e9f67d9bb75d',
				description: `Collection Kitchen vocabulary`,
			},
			migration_id_2: {
				value: '6442941027467f9a755ff76d',
				description: `Collection Sport vocabulary`,
			},
		},
	})
	findOne(@Param('id') id: string) {
		return this.collections_service.findOne(id);
	}
Nhờ có option description, người dùng document của chúng ta sẽ dễ dàng nhận biết id thuộc collection nào.
3.10 Dùng ApiResponse để minh họa response
Một phần không thể thiếu của API docs là response, khi viết response không những giúp người đọc dễ hiểu mà còn giúp chúng ta kiểm soát được các response cũng như lỗi trả về từ API của mình. Chúng ta sẽ viết docs response cho API sign up với các trường hợp sau: đăng ký thành công, lỗi trùng email, lỗi validate các property trong payload.
import { ApiBadRequestResponse, ApiConflictResponse, ApiCreatedResponse } from '@nestjs/swagger';
...
export class AuthController {
    @Post('sign-up')
    @ApiOperation({...})
    @ApiBody({...})
    @ApiCreatedResponse({
		description: 'User created successfully!!',
		content: {
			'application/json': {
				examples: {
					created_user: {
						summary: 'Response after sign up',
						value: {
							access_token:
								'eyJhbGciOiJSUzI1NiIsInR5cCI6IkpXVCJ9.eyJ1c2VyX2lkIjoiNjQ0MWNkNmJlMWQ0ZTBiNDRjNzA3NDk2IiwiaWF0IjoxNjgyMDM0MDI3LCJleHAiOjE2ODIwMzc2Mjd9.AH4z7uDWuEDjOs8sesB0ItxKUJ2M3rjul1D1mmjAKieOZblej5mp0JQE5IdgB9LlAOzOtKOLL5RWhxLCZ-YskvoRA7Yqza_rOjfIHeNseC3M66kKYqORN07aZDiA2OWhT3pXBqoKRCUBQCKLgMCAPT-CHryc0wUQGaKxP8YJO8dwIhGtjADchmzNJVBs4G7qYnpZAsORayd5GNfgoLpWmVFIBHSnPLNIL4dL8dLof0GBmVhdjhnHIUXYQlqL1wiwsmxmUC9TU2uiChm-TAhuiQyVwFokSySBJzBrLmEtgy89aaR0YizFK-QMg2xW3cJiiRzEBigTdsR0kvdUlk5GOg',
							refresh_token:
								'eyJhbGciOiJSUzI1NiIsInR5cCI6IkpXVCJ9.eyJ1c2VyX2lkIjoiNjQ0MWNkNmJlMWQ0ZTBiNDRjNzA3NDk2IiwiaWF0IjoxNjgyMDM0MDI3LCJleHAiOjE2ODIwNTkyMjd9.aKNZymKdf3VEbPkda2cYYTS7KlpCbTqdXP30LREQ2b_fJ8q8cA0OyNEARK3Jm5yGsKoNd3txi54XmEbf19LC9CuDf9kwgLasPizEeMZsAJqSbSguzE4-9b4sSdf22GyipCcZJpkXkp01Bew04J8Y4FqhNARONsWzySXg8_VVWOGkfHGJVHFs7xYyVvmt3RErJwRM5s1Ou1ok7VW62FSTSAvXw6-qsHp5T7kXo73jECBqSuNEs5JcdluoBjdaAxggHYaDgTXoRh7y4Mn_fVKCQarAsUAxg6w0fxc8Gj0nP1ct3-GjG-Of-0O-iF7uynI2Lnq_On7WUsH7rFSysNyHUg',
						},
					},
				},
			},
		},
	})
	@ApiBadRequestResponse({
		description: 'Validation failed',
		content: {
			'application/json': {
				examples: {
					invalid_email_password: {
						value: {
							statusCode: 400,
							message: [
								'email must be an email',
								'password is not strong enough',
							],
							error: 'Bad Request',
						},
					},
					some_fields_missing: {
						value: {
							statusCode: 400,
							message: [
								'last_name must be shorter than or equal to 50 characters',
								'last_name should not be empty',
							],
							error: 'Bad Request',
						},
					},
				},
			},
		},
	})
	@ApiConflictResponse({
		description: 'Conflict user info',
		content: {
			'application/json': {
				examples: {
					email_duplication: {
						value: {
							statusCode: 409,
							message: 'Email already existed!!',
							error: 'Conflict',
						},
					},
                    username_duplication: {
						value: {
							statusCode: 409,
							message: 'Username already existed!!',
							error: 'Conflict',
						},
					},
				},
			},
		},
	})
    async signUp(@Body() sign_up_dto: SignUpDto) {
		return await this.auth_service.signUp(sign_up_dto);
	}
    ...
Chú thích:
- Chúng ta dùng các decorator
Api*Responseđể biểu diễn các response trả về. Về bản chất thì các decorator này được custom lại từApiResponsenên các bạn có thể dùng luônApiResponsecũng được. - Giá trị truyền vào option
contentcó thể làapplication/json,application/xmlhoặctext/plainđể chúng ta có thể biểu diễn response một cách đầy đủ nhất.
Vậy là cấu hình hoàn chỉnh cho 1 API documentation đúc kết từ kinh nghiệm của mình đã xong, các bạn nên tải về source code để tham khảo kỹ hơn. Nếu bạn nào có những kiến thức hay hơn từ Swagger có thể đóng góp ý kiến ở comment để chúng ta cùng tham khảo. Phần tiếp theo chúng ta sẽ refactor lại để rút gọn một số đoạn code có decorator của Swagger bị lặp lại và đi đến một số trick giúp tăng tính tiện lợi trong lúc dùng API documentation.
4. Một số trick để tối ưu thời gian dev
4.1 Tạo decorator tái sử dụng multipart/form-data
Nếu để ý các bạn có thể thấy các API POST/PATCH sử dụng multipart/form-data bị lặp lại các decorator ApiComsumes, ApiBody, FileInterceptor và FilesInterceptor. Trường hợp khác là các API GET với pagination có sự lặp lại của offset và limit. Các trường hợp trên chúng ta có thể tạo ra các decorator chung để gôm chúng vào giúp code được gọn gàng hơn.
import { UseInterceptors, applyDecorators } from '@nestjs/common';
import { FileInterceptor } from '@nestjs/platform-express';
import { MulterOptions } from '@nestjs/platform-express/multer/interfaces/multer-options.interface';
import { ApiBody, ApiConsumes } from '@nestjs/swagger';
import {
	ReferenceObject,
	SchemaObject,
} from '@nestjs/swagger/dist/interfaces/open-api-spec.interface';

export function ApiBodyWithSingleFile(
	name = 'file',
	body_properties?: object,
	required_properties?: string[],
	local_options?: MulterOptions,
) {
	let properties: Record<string, SchemaObject | ReferenceObject>;
	const api_body = {
		schema: {
			type: 'object',
			properties,
			required: required_properties,
		},
	};
	if (!body_properties) {
		api_body.schema = {
			...api_body.schema,
			properties: {
				[name]: {
					type: 'string',
					format: 'binary',
				},
			},
		};
	} else {
		api_body.schema = {
			...api_body.schema,
			properties: {
				...body_properties,
				[name]: {
					type: 'string',
					format: 'binary',
				},
			},
		};
	}
	return applyDecorators(
		ApiConsumes('multipart/form-data'),
		ApiBody(api_body),
		UseInterceptors(FileInterceptor(name, local_options)),
	);
}
Giải thích:
- Chúng ta sẽ kết hợp 3 decorator
ApiConsumes,ApiBody, vàFileInterceptorlại với nhau. Do đó tham số truyền vào sẽ là tên property của file, nội dung củaApiBody, các field bắt buộc phải nhập dữ liệu vào và các config option (nếu có) của multer. - Ở đây sẽ có 2 trường hợp xảy ra:
body_propertieskhông được truyền vào: chỉ cần tạo ra một cặp key/value với key là property chứa file.body_propertiesđược truyền vào: chúng ta sẽ kết hợp cả nội dung của nó với propertyname.
- Cuối cùng dùng
applyDecoratorsđể kết hợp các decorator lại với nhau.
Để sử dụng decorator trên chúng ta sẽ chỉnh sửa lại tạo collection như sau:
...
    @Post()
	@ApiOperation({
		summary: 'User create their collection',
	})
	@ApiBearerAuth('token')
	@ApiBodyWithSingleFile(
		'image', // <--- Tên của property chứa file
		{ // <--- Các property còn lại của request payload
			name: {
				type: 'string',
				default: 'Learn Kitchen Vocabulary',
			},
			description: { type: 'string', default: 'Some description' },
			level: {
				type: 'string',
				enum: Object.values(COLLECTION_LEVEL),
				default: COLLECTION_LEVEL.CHAOS,
			},
			is_public: {
				type: 'boolean',
				default: true,
			},
			image: {
				type: 'string',
				format: 'binary',
			},
		},
		['name', 'level', 'is_public', 'image'], // <--- Các trường bắt buộc
	)
	@UseGuards(JwtAccessTokenGuard)
	create(...) { ... }
    ...
Tiếp theo là decorator về pagination, decorator này thì đơn giản hơn, chúng ta chỉ cần truyền vào tên module để description được rõ ràng hơn.
import { ApiQuery } from '@nestjs/swagger';
...

export function ApiDocsPagination(entity: string) {
	return applyDecorators(
		ApiQuery({
			name: 'offset',
			type: Number,
			examples: {
				'0': {
					value: 0,
					description: 'Start from 0',
				},
				'10': {
					value: 10,
					description: `Skip 10 ${entity}s`,
				},
			},
		}),
		ApiQuery({
			name: 'limit',
			type: Number,
			examples: {
				'10': {
					value: 10,
					description: `Get 10 ${entity}s`,
				},
				'50': {
					value: 50,
					description: `Get 50 ${entity}s`,
				},
			},
		}),
	);
}
Chúng ta sẽ cập nhât lại API findAll collection:
...
export class CollectionsController {
    ...
    @Get()
	@ApiDocsPagination('collection') // <--- Thêm vào đây
	@ApiQuery({
		name: 'level',
		type: 'array',
		examples: {
			one_level_type: {
				value: [COLLECTION_LEVEL.HARD],
			},
			two_level_type: {
				value: [COLLECTION_LEVEL.EASY, COLLECTION_LEVEL.MEDIUM],
			},
		},
		required: false,
	})
	findAll( ... ) { ... }
Các bạn có thể mở Swagger UI để kiểm tra lại kết quả:
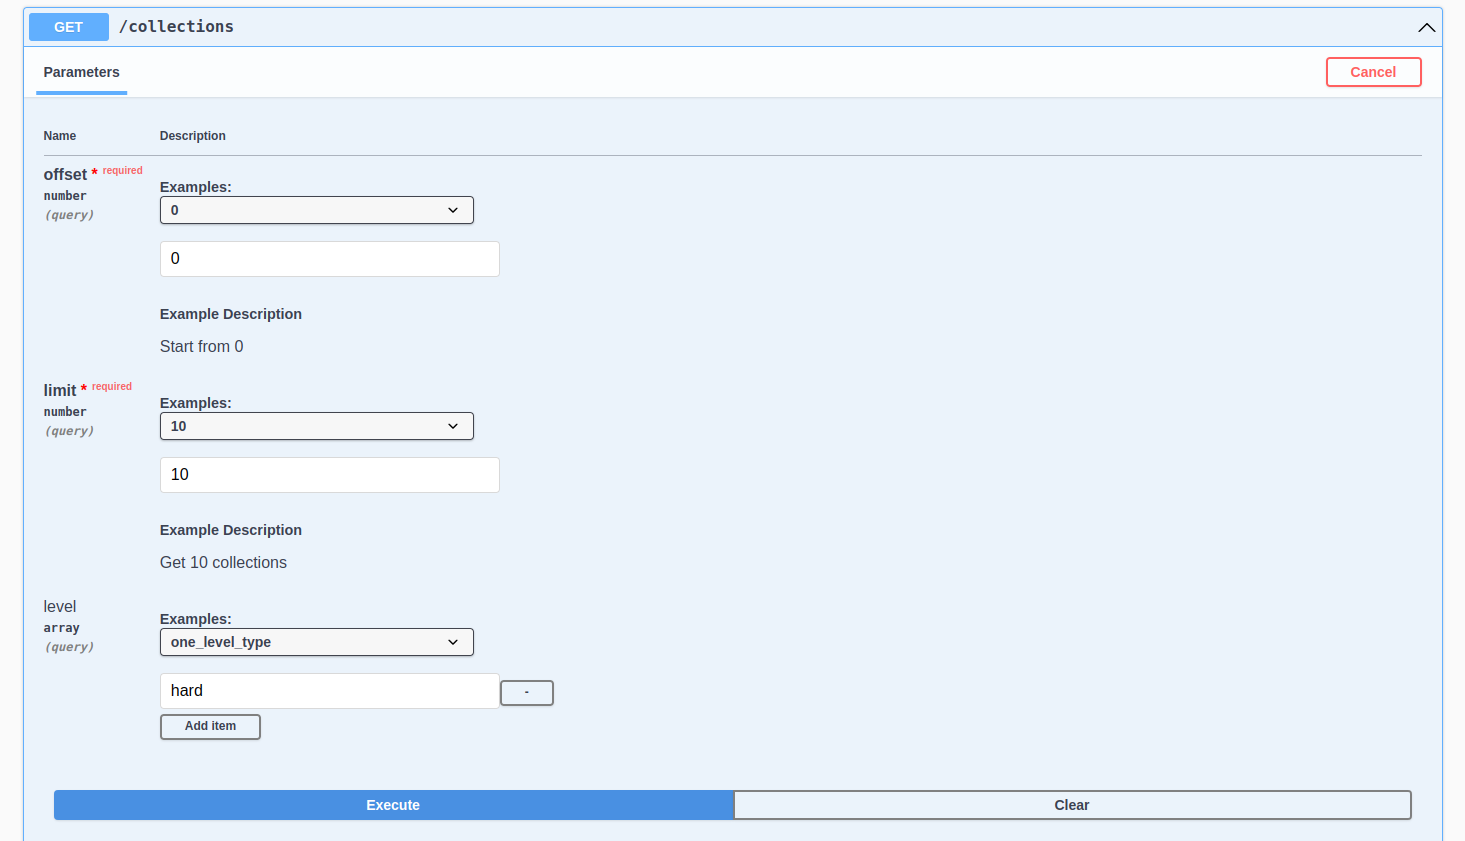
Vậy là với 2 decorator trên đã giúp chúng ta rút gọn lại được kha khá dòng code. Các module còn lại các bạn có thể tự triển khai dựa theo các ví dụ trên.
4.2 Refresh trang nhưng vẫn giữ lại token
Trong quá trình dev hoặc sử dụng document, khi muốn truy cập vào các API được auth với token chúng ta cần phải login để lấy token và sau đó gắn vào Swagger UI, trong trường hợp các bạn code có thay đổi nội dung document cần reload lại trang hoặc bấm nhầm F5 thì chúng ta lại phải login lại, việc đó tuy không mất nhiều thời gian nhưng mình cảm thấy khá là bất tiện. Rất may là Swagger có cung cấp cho chúng ta cách giải quyết vấn đề đó, đó là option persistAuthorization trong swaggerOptions. Option này giúp chúng ta không cần phải nhập lại token sau khi refresh trang (về bản chất thì nó lưu thông tin token vào local storage). Cách dùng option này như sau:
import { INestApplication } from '@nestjs/common';
import { DocumentBuilder, SwaggerModule } from '@nestjs/swagger';

export function configSwagger(app: INestApplication) {
	...
    const document = SwaggerModule.createDocument(app, config);
	SwaggerModule.setup('api-docs', app, document, {
		swaggerOptions: { persistAuthorization: true },
	});
}
Các bạn thử nhập token sau đó refresh lại để xem kết quả.
4.3 Tự động đăng nhập để lấy token
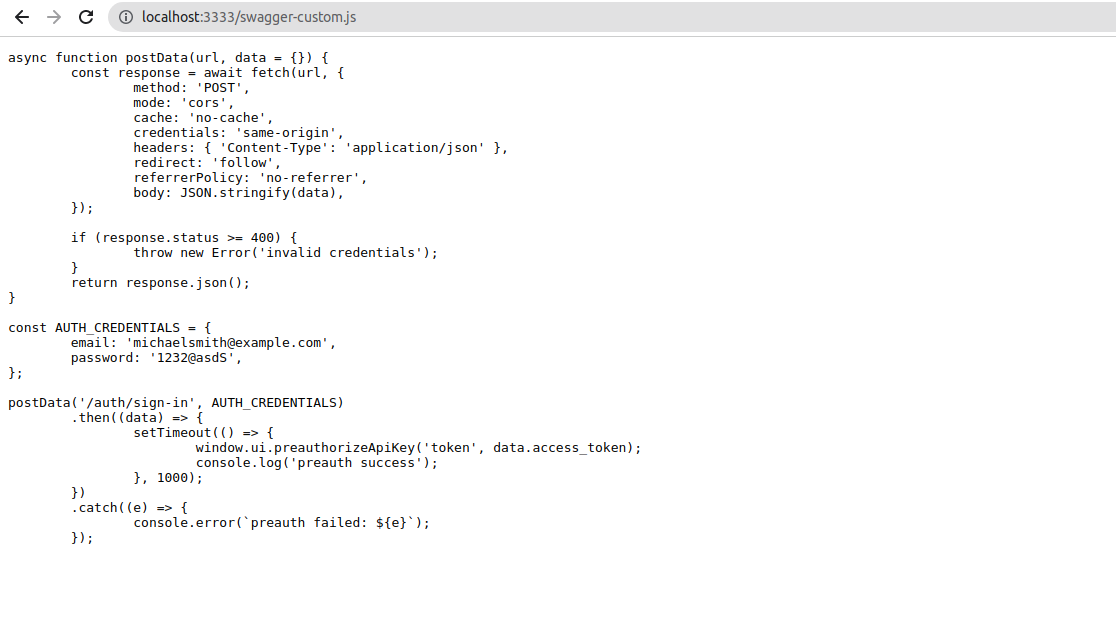
Với persistAuthorization chúng ta đã không còn lo lắng khi refresh trang token bị mất. Nhưng nếu trong trường hợp khi token có thời gian hết hạn ngắn hoặc các bạn không muốn phải đăng nhập để lấy token cho mất thời gian thì có thể xem xét trick này. Swagger cung cấp cho chúng ta option để chạy custom script. Mình sẽ tạo ra script với chức năng lấy token từ API login sau đó nhập vào token của Swagger. Tạo folder served và tạo file swagger-custom.js
async function postData(url, data = {}) {
	const response = await fetch(url, {
		method: 'POST',
		mode: 'cors',
		cache: 'no-cache',
		credentials: 'same-origin',
		headers: { 'Content-Type': 'application/json' },
		redirect: 'follow',
		referrerPolicy: 'no-referrer',
		body: JSON.stringify(data),
	});

	if (response.status >= 400) {
		throw new Error('invalid credentials');
	}
	return response.json();
}

const AUTH_CREDENTIALS = {
	email: 'michaelsmith@example.com',
	password: '1232@asdS',
};

postData('/auth/sign-in', AUTH_CREDENTIALS)
	.then((data) => {
		setTimeout(() => {
			window.ui.preauthorizeApiKey('token', data.access_token);
			console.log('preauth success');
		}, 1000);
	})
	.catch((e) => {
		console.error(`preauth failed: ${e}`);
	});
Nội dung file đơn giản là gọi đến API login của chúng ta bằng thông tin trong AUTH_CREDENTIALS (các bạn đổi thông tin dựa theo data mà các bạn tạo). Sau khi đăng nhập thành công thì thêm access_token vào bằng method window.ui.preauthorizeApiKey.
Tiếp theo để Swagger có thể đọc được file javascript trên chúng ta cần serve nó ra bên ngoài. Mình sẽ dùng method useStaticAssets để làm việc này.
import { NestExpressApplication } from '@nestjs/platform-express';
import { join } from 'path';
...

async function bootstrap() {
	const app = await NestFactory.create<NestExpressApplication>(AppModule);
	configSwagger(app);
	app.useStaticAssets(join(__dirname, './served')); // <-- Thêm vào đây
	...
Nếu chúng ta truy cập http://localhost:3333/swagger-custom.js vào lúc này thì sẽ gặp lỗi Not Found. Do đây là file javascript và NestJS chúng ta đang cấu hình typescript nên file sẽ không được build vào thư mục dist. Để giải quyết chúng ta cần thêm vào option assets trong nest-cli.json.
{
	...
	"compilerOptions": {
		"deleteOutDir": true,
		"plugins": ["@nestjs/swagger"],
		"assets": [
			{
				"include": "served/**/*",
				"watchAssets": true
			}
		]
        ...
Chúng ta cần restart lại NestJS để apply những thay đổi trong nest-cli.json. Truy cập http://localhost:3333/swagger-custom.js để xem file swagger-custom.js đã được serve chưa
Việc cuối cùng là thêm vào option customJs trong config Swagger để nó đọc nội dung file này.
import { INestApplication } from '@nestjs/common';
import { DocumentBuilder, SwaggerModule } from '@nestjs/swagger';

export function configSwagger(app: INestApplication) {
	...
    const document = SwaggerModule.createDocument(app, config);
	SwaggerModule.setup('api-docs', app, document, {
		swaggerOptions: { persistAuthorization: true },
        customJs: '/swagger-custom.js', // <--- thêm vào đây
	});
}
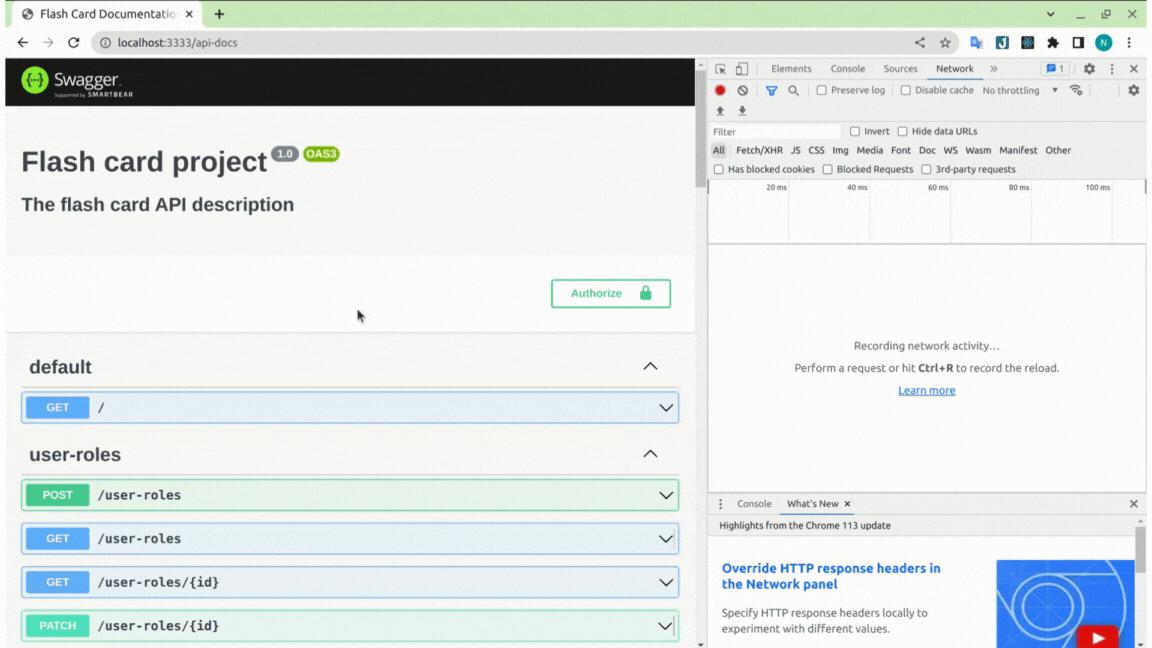
Thử refresh lại trang để xem kết quả, có thể thấy ở tab Network có một request gọi đến API login để lấy token, và sau khi có token Swagger UI tự động thêm vào authorization header.
4.4 Secure access cho API documentation (username/password)
Việc lập trình chúng ta luôn bảo mật cho API mà thường không để ý đến việc bảo mật API documentation vì nghĩ rằng chỉ có người trong dự án mới có thể có url để truy cập. Suy nghĩ đó rất không an toàn, vì trong API documentation có rất nhiều thông tin về phía backend nên lỡ như ai đó bên ngoài biết được url và họ có mục đích xấu thì sẽ dẫn đến các rủi ro tiềm ẩn. Vậy nên chúng ta cũng cần bảo mật cho API documentation của dự án.
Để làm được việc này chúng ta cần viết ra một middleware để xác thực trước khi user truy cập vào route của docs. Chỉnh sửa lại file config Swagger
import { INestApplication } from '@nestjs/common';
import { DocumentBuilder, SwaggerModule } from '@nestjs/swagger';
import { NextFunction, Request, Response } from 'express';

const api_documentation_credentials = {
	name: 'admin',
	pass: 'admin',
};

export function configSwagger(app: INestApplication) {
	const config = new DocumentBuilder()
		.setTitle('Flash card project')
		.setDescription('## The flash card API description')
		.setVersion('1.0')
		.addSecurity('token', { type: 'http', scheme: 'bearer' })
		.build();
	const document = SwaggerModule.createDocument(app, config);

	const http_adapter = app.getHttpAdapter();
	http_adapter.use(
		'/api-docs',
		(req: Request, res: Response, next: NextFunction) => {
			function parseAuthHeader(input: string): { name: string; pass: string } {
				const [, encodedPart] = input.split(' ');

				const buff = Buffer.from(encodedPart, 'base64');
				const text = buff.toString('ascii');
				const [name, pass] = text.split(':');

				return { name, pass };
			}

			function unauthorizedResponse(): void {
				if (http_adapter.getType() === 'fastify') {
					res.statusCode = 401;
					res.setHeader('WWW-Authenticate', 'Basic');
				} else {
					res.status(401);
					res.set('WWW-Authenticate', 'Basic');
				}

				next();
			}

			if (!req.headers.authorization) {
				return unauthorizedResponse();
			}

			const credentials = parseAuthHeader(req.headers.authorization);

			if (
				credentials?.name !== api_documentation_credentials.name ||
				credentials?.pass !== api_documentation_credentials.pass
			) {
				return unauthorizedResponse();
			}

			next();
		},
	);
	SwaggerModule.setup('api-docs', app, document, {
		swaggerOptions: { persistAuthorization: true },
		customJs: '/swagger-custom.js',
	});
}
Giải thích:
- Khi truy cập vào url của API docs chúng ta sẽ nhập vào username và password, Swagger UI sẽ encode bằng base64 nội dung đó và gửi đi trong authorization header.
- Middleware của chúng ta decode thông tin từ header và so sánh với thông tin chúng ta lưu trong server. Nếu hợp lệ thì được phép truy cập còn không sẽ báo không có quyền truy cập. Từ giờ chúng ta sẽ an tâm hơn khi API document được secure (trừ trường hợp bị leak username/password nguyên nhân con người thì chúng ta không bàn tới).
4.5 Custom lại CSS của Swagger UI
Nếu các bạn thấy giao diện mặc định của Swagger không phù hợp có thể custom lại với option customCssUrl. Các bạn có thể viết file css và serve tương tự với file javascript khi nảy. Sau đó thêm vào customCssUrl: '/swagger-custom.css'.
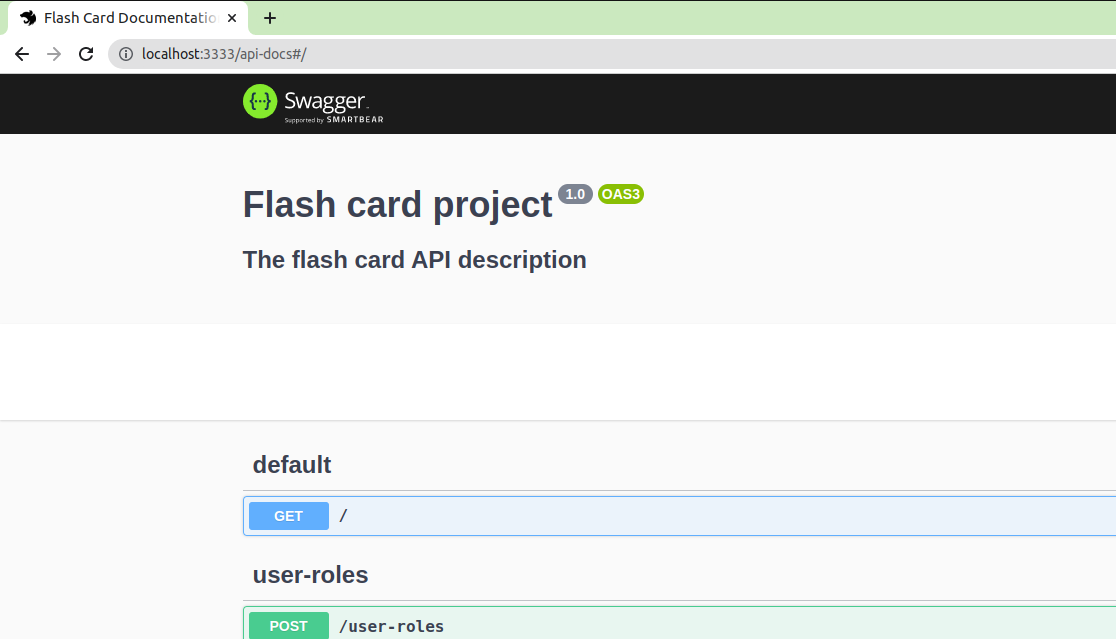
Các bạn cũng có thể đổi icon và page title lần lượt với option customfavIcon và customSiteTitle. Ví dụ như bên dưới:
...
export function configSwagger(app: INestApplication) {
	...
	SwaggerModule.setup('api-docs', app, document, {
		swaggerOptions: { persistAuthorization: true },
		customJs: '/swagger-custom.js',
        customSiteTitle: 'Flash Card Documentation',
		customfavIcon: '/swagger.ico',
	});
}
Chúng ta sẽ thu được giao diện như bên dưới
4.6 Transfer documentation từ swagger sang Postman
Cuối cùng chúng ta có thể export nội dung Swagger ra file để import vào Postman hoặc bất kỳ API platform nào khác có dùng OpenAPI. Có 2 cách để chúng ta lấy nội dung file:
- Thêm vào postfix
jsonhoặcyamlsau url của API documentation, chúng ta sẽ có được nội dung dựa theo postfix. Ví dụ http://localhost:3333/api-docs-json hoặc http://localhost:3333/api-docs-yaml - Dùng
fsđể lưu nội dungdocumentfile vào local. Ví dụ:
import * as fs from 'fs';
...
export function configSwagger(app: INestApplication) {
    ...
    const document = SwaggerModule.createDocument(app, config);
    fs.writeFileSync('swagger.json', JSON.stringify(document)); // <-- Save document to json file
    ...
Kết luận
Trên đây là phần hướng dẫn về cách sử dụng tối đa sức mạnh Swagger để cấu hình tài liệu API trong dự án NestJS mà mình thường sử dụng trong dự án thực tế, nếu như bạn nào có kiến thức hay hơn có thể comment để cùng chia sẻ với mọi người. Đừng quên đón đọc bài viết tiếp theo, chúng ta sẽ tìm hiểu về unit test và cách triển khai chúng một cách hiệu quả trong dự án NestJS.
Tài liệu tham khảo
- Moroz, I. (2022) Swagger API documentation tips and tricks, Trilon. Available at: https://trilon.io/blog/nestjs-swagger-tips-tricks (Accessed: 23 May 2023).
- Ekete, D. (2022) Documenting NestJS apis with swagger, MUO. Available at: https://www.makeuseof.com/nestjs-apis-swagger-documentation/ (Accessed: 23 May 2023).
All rights reserved
