Setup Boilerplate cho dự án NestJS - Phần 2: Mongoose với Repository Pattern và Generic Service/Repository Pattern
Bài đăng này đã không được cập nhật trong 2 năm
Đây là bài viết nằm trong Series NestJS thực chiến, các bạn có thể xem toàn bộ bài viết ở link: https://viblo.asia/s/nestjs-thuc-chien-MkNLr3kaVgA
Xin chào mọi người, ở bài viết trước chúng ta đã setup dự án với các package hỗ trợ cho môi trường dev. Hôm nay mình sẽ đi sâu hơn vào quá trình cài đặt database và sử dụng Design Pattern để tối ưu codebase của dự án.
Đặt vấn đề 📜
MongoDB thì mọi người cũng đã quá quen thuộc, cơ sở dữ liệu No-SQL được sử dụng rộng rãi trên khắp thế giới. Vì thế trong dự án này mình sẽ sử dụng MongoDB để lưu trữ dữ liệu và thực hiện các tác vụ liên quan.
Đôi khi trong quá trình lập trình của một vài dự án đặc thù, chúng ta không phân tách logic giữa các layer với nhau, mặc dù ứng dụng vẫn có thể hoạt động nhưng khi phát sinh yêu cầu thay đổi về mặt công nghệ thì lúc đó sẽ mất rất nhiều thời gian để chỉnh sửa. Lấy ví dụ ban đầu chúng ta dùng TypeORM, nhưng trong quá trình phát triển do một nguyên nhân chủ quan hoặc khách quan nào đó mà chúng ta cần đổi qua ODM khác như Mongoose hoặc Prisma. Chúng ta sẽ phải truy tìm từng dòng code có sử dụng TypeORM để chỉnh sửa bất kể nó nằm ở đâu trong codebase, việc đó dẫn đến hao phí thời gian của các thành viên cũng như dự án.
Trong bài viết này mình sẽ cùng các bạn giải quyết vấn đề đó với Repository Pattern và Generic Service/Repository Pattern.
Thông tin package 📦️
- "mongoose": "^7.0.3"
- "@nestjs/mongoose": "^9.2.2"
- "typescript": "^4.7.4" (nếu bạn nào gặp lỗi
"Type 'Document<unknown, {}, T> & BaseEntity & { _id: ObjectId; }' is not assignable to type 'T'. 'Document<unknown, {}, T> & BaseEntity & { _id: ObjectId; }' is assignable to the constraint of type 'T', but 'T' could be instantiated with a different subtype of constraint 'BaseEntity'."thì có thể check lại version Typescript, thanks bác Hoang Thien đã contribute)
Các bạn có thể tải về source code của phần này ở đây
1. MongoDB và Mongoose
1.1 Khái niệm
Bạn nào đã hiểu rõ về khái niệm có thể bỏ qua phần này để sang phần cài đặt
Trước khi bắt đầu cùng mình điểm lại các công dụng chính của MongoDB:
-
Lưu trữ dữ liệu dưới dạng document: khác cấu trúc bảng của cơ sở dữ liệu quan hệ giúp đơn giản hóa việc lưu trữ các tài liệu dữ liệu không có cấu trúc rõ ràng hoặc dữ liệu có cấu trúc phức tạp.
-
Mở rộng dễ dàng: MongoDB được thiết kế để mở rộng dễ dàng bằng cách thêm các node vào một cluster, do đó có thể giải quyết các vấn đề về tải cao một cách hiệu quả.
-
Cung cấp các tính năng đa dạng: MongoDB cung cấp các tính năng như indexing, replication, sharding, aggregation, và full-text search giúp cho việc truy vấn và xử lý dữ liệu trở nên dễ dàng và nhanh chóng hơn.
-
Sử dụng tài nguyên ít hơn so với cơ sở dữ liệu quan hệ: giúp giảm chi phí phát triển và duy trì hệ thống.
Mục cuối cùng mình không thật sự hiểu rõ và chưa kiểm thử nhiều nên sẽ để ChatGPT giải thích:

Nếu đã sử dụng MongoDB thì không thể nào bỏ qua ODM phổ biến của nó là Mongoose. Nó cung cấp một giao diện ổn định và dễ sử dụng để tương tác với cơ sở dữ liệu MongoDB. Có một số lý do tại sao chúng ta nên sử dụng:
-
Validation: cung cấp tính năng validation cho các document trong cơ sở dữ liệu MongoDB, giúp đảm bảo rằng các dữ liệu được lưu trữ đúng định dạng và giá trị.
-
Schema: cho phép định nghĩa các schema để định dạng dữ liệu, giúp đảm bảo rằng các tài liệu được lưu trữ theo cùng một định dạng và các trường bắt buộc.
-
Middleware: cung cấp middleware để xử lý các sự kiện trong quá trình tương tác với cơ sở dữ liệu, giúp bạn tùy chỉnh hành vi của ứng dụng.
-
Query Building: cung cấp một API query builder để tạo các truy vấn dữ liệu phức tạp, giúp đơn giản hóa việc tương tác với cơ sở dữ liệu.
-
Populating: cung cấp tính năng populating để liên kết các tài liệu trong cơ sở dữ liệu và lấy dữ liệu từ các bảng khác.
Vì những lý do này, Mongoose là một lựa chọn tốt cho việc tương tác với cơ sở dữ liệu MongoDB trong NodeJS nói chung và NestJS nói riêng, đặc biệt là trong các ứng dụng có quy mô lớn và phức tạp. Mình sẽ áp dụng tất cả các công dụng vừa nêu trên vào dự án này để các bạn có cái nhìn tổng quan nhất.
1.2 Cài đặt 🛠
-
Tiến hành cài đặt với lệnh dưới theo như docs của NestJS:
npm i @nestjs/mongoose mongoose -
Tiếp theo mình sẽ chạy MongoDB container với Docker Compose, thêm service vào file docker-compose.dev.yml, mình sẽ giải thích cụ thể trong comment của file.
Trong dự án của series này nếu có sử dụng thêm các công cụ khác thì mình đều sử dụng với Docker để tách biệt hoàn toàn với môi trường local
version: '3.8' services: flash_cards_api_dev: container_name: flash_cards_api_dev image: flash_cards_api_dev:1.0.0 build: context: . target: development ports: - ${PORT}:${PORT} depends_on: - flash_cards_mongodb # Đảm bảo mongoDB đã start thành công mới chạy container api volumes: - ./:/usr/src/app command: npm run start:dev restart: unless-stopped flash_cards_mongodb: container_name: ${DATABASE_HOST} image: mongo:latest environment: MONGO_INITDB_ROOT_USERNAME: ${DATABASE_USERNAME} # Lưu ý 2 biến này từ file env MONGO_INITDB_ROOT_PASSWORD: ${DATABASE_PASSWORD} # và dùng --env-file để đọc từ .env.dev expose: - ${DATABASE_PORT} volumes: - ./mongo-data:/data/db # Mount data ra bên ngoài để tránh dữ liệu bị xóa khi remove container restart: unless-stopped networks: default: driver: bridge -
Chỉnh sửa lại
DATABASE_HOSTtrong file .env.dev thành tên container... DATABASE_HOST=flash_cards_mongodb DATABASE_NAME=flash_cards DATABASE_URI=mongodb://${DATABASE_USERNAME}:${DATABASE_PASSWORD}@flash_cards_mongodb -
Do chúng ta có mount volume của MongoDB container ra folder mongo-data bên ngoài, nên cần chỉnh sửa lại các file ở dưới để ignore folder đó tránh lỗi khi format và build.
...
mongo-data
... mongo-data... ignorePatterns: ['.eslintrc.js','mongo-data'], ... -
Chúng ta cũng cần loại bỏ folder này khỏi repo git
/mongo-data ... -
Sau khi đã cấu hình xong với Docker, chúng ta sẽ cấu hình kết nối:
@Module({ imports: [ ConfigModule.forRoot({...}), MongooseModule.forRootAsync({ imports: [ConfigModule], useFactory: async (configService: ConfigService) => ({ uri: configService.get<string>('DATABASE_URI'), dbName: configService.get<string>('DATABASE_NAME'), }), inject: [ConfigService], }), ... -
Start Docker Compose với lệnh
npm run docker:devđể kiểm tra kết quả. Có thể thấy ở phần mình bôi đen, NestJS server của chúng ta đã kết nối thành công đến MongoDB![image.png]()

1.3 Cài đặt Mongo Express ( Optional )
Phần này nếu các bạn muốn dùng MongoDB Compass hay các phần mềm quản lý MongoDB khác hoặc dự án dùng nhiều aggregate pipeline cần công cụ hỗ trợ thì có thể bỏ qua phần này.
Mongo Express là một công cụ quản lý cơ sở dữ liệu MongoDB trên Web thay cho Desktop như MongoDB Compass hoặc Robo3T. Giúp cho việc quản lý và thao tác với các tài nguyên của MongoDB trở nên dễ dàng hơn. Sau này khi deploy lên các môi trường khác sẽ không cần phải public port database ra khỏi server. Mongo Express cung cấp các tính năng quản lý như:
- Tạo, xóa và sửa đổi cơ sở dữ liệu, bảng dữ liệu và các chỉ mục
- Thực thi các truy vấn MongoDB để tìm kiếm, lọc và sắp xếp các bản ghi dữ liệu
- Hỗ trợ cho các tính năng của MongoDB như Indexes, Replica Sets và Sharding.
- Hỗ trợ các tính năng nâng cao như import/export dữ liệu, tạo backup, restore dữ liệu, ... ( phần này mình không đánh giá cao, có nhiều lỗi vặt khi sử dụng )
Quá trình cài đặt chỉ đơn giản là thêm service vào file docker-compose.dev.yml
version: '3.8'

services:
  flash_cards_api_dev:
    container_name: flash_cards_api_dev
    image: flash_cards_api_dev:1.0.0
    build:
      context: .
      target: development
    ports:
      - ${PORT}:${PORT}
    depends_on:
      - flash_cards_mongodb # Đảm bảo mongoDB đã start thành công mới chạy container api
    volumes:
      - ./:/usr/src/app
    command: npm run start:dev
    restart: unless-stopped

  flash_cards_mongodb:
    container_name: ${DATABASE_HOST}
    image: mongo:latest
    environment:
      MONGO_INITDB_ROOT_USERNAME: ${DATABASE_USERNAME} # Lưu ý 2 biến này từ file env
      MONGO_INITDB_ROOT_PASSWORD: ${DATABASE_PASSWORD} # và dùng --env-file để đọc từ .env.dev
    expose:
      - ${DATABASE_PORT}
    volumes:
      - ./mongo-data:/data/db
    restart: unless-stopped

  flash_cards_mongo_express:
    container_name: flash_cards_mongo_express
    image: mongo-express:latest
    environment:
      ME_CONFIG_BASICAUTH_USERNAME: ${DATABASE_USERNAME} # 2 biến này dùng làm basic
      ME_CONFIG_BASICAUTH_PASSWORD: ${DATABASE_PASSWORD} # auth khi truy cập mongo_express
      ME_CONFIG_MONGODB_URL: ${DATABASE_URI}?authSource=admin # Đây là thông tin kết nối tới database
    ports:
      - 8002:8081 # Expose ra port 8002 để truy cập
    depends_on:
      - flash_cards_mongodb
    restart: unless-stopped

networks:
  default:
    driver: bridge
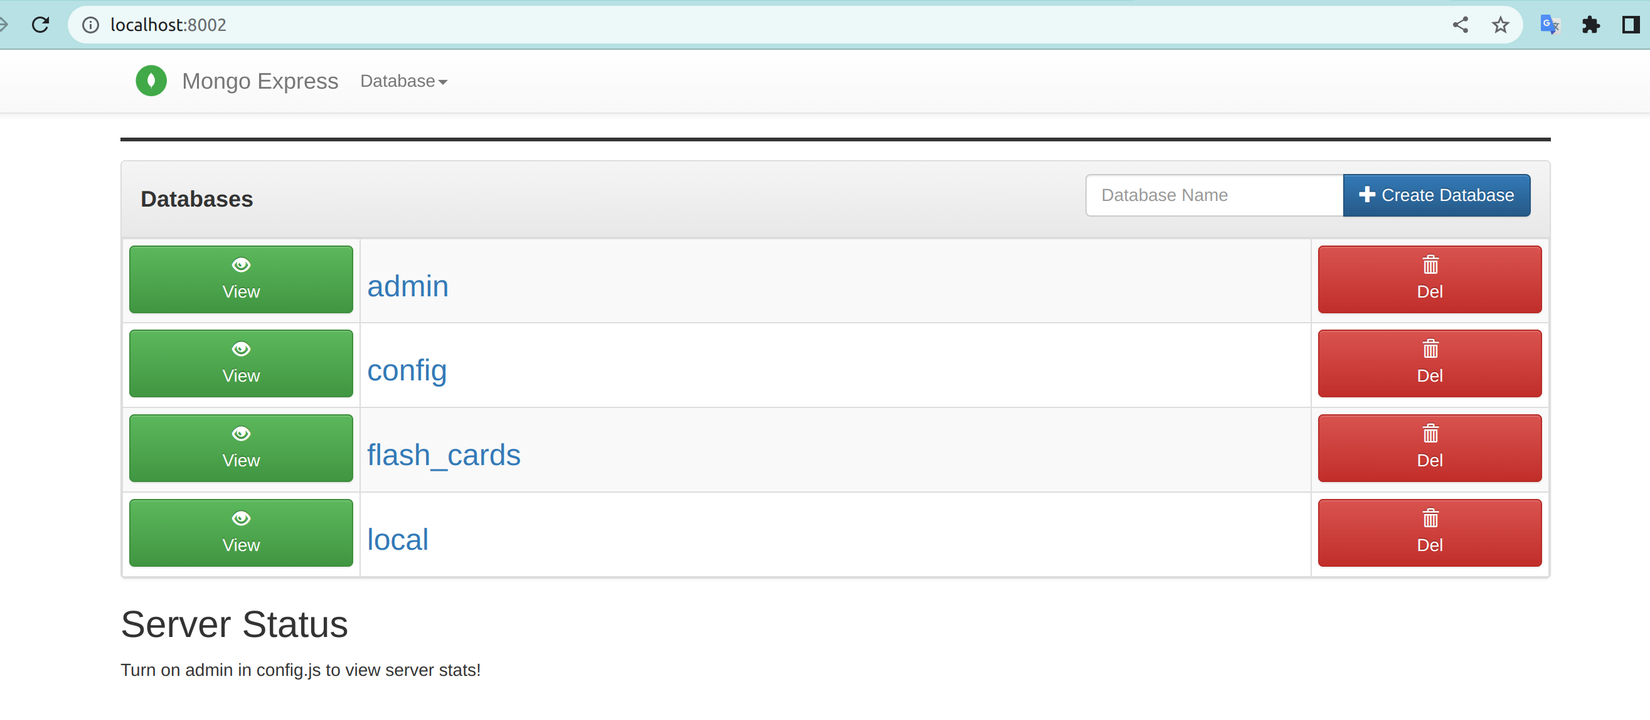
Start lại Docker Compose với lệnh npm run docker:dev và truy cập http://localhost:8002 kiểm tra kết quả.
1.4 Cơ sở dữ liệu

Chúng ta sẽ bắt đầu với cơ sở dữ liệu căn bản như trên, sau này khi phát triển thêm các tính năng ( verify email, phone number, token auth...) chúng ta sẽ tiếp tục cập nhật và thêm vào sau.
Lưu ý: cập nhật thêm các field mới vào schema giúp chúng ta linh hoạt hơn nhưng cũng cần xem xét kĩ lưỡng. Việc sử dụng tính năng này có thể dẫn đến những vấn đề về hiệu suất và quản lý dữ liệu. Vì vậy, nếu có thể, các bạn nên định nghĩa cấu trúc của schema trước và tạo schema cho nó để tránh các vấn đề này.
Dự án của chúng ta trước mắt sẽ đáp ứng các yêu cầu bên dưới, các bài viết tiếp theo sẽ mở rộng thêm các yêu cầu này.
- User đăng ký/ đăng nhập.
- User tạo và quản lí các Flash card.
- User tạo và quản lí các Collection, thêm Flash Card vào Collection.
- Flash Card và Collection có thể có một hoặc nhiều Topic
1.5 Tạo các entity
Trước tiên chúng ta sẽ dùng NestJS CLI để khởi tạo các module, hiện tại chúng ta có 5 module chính: User, User role, Topic, Flash card và Collection.
-
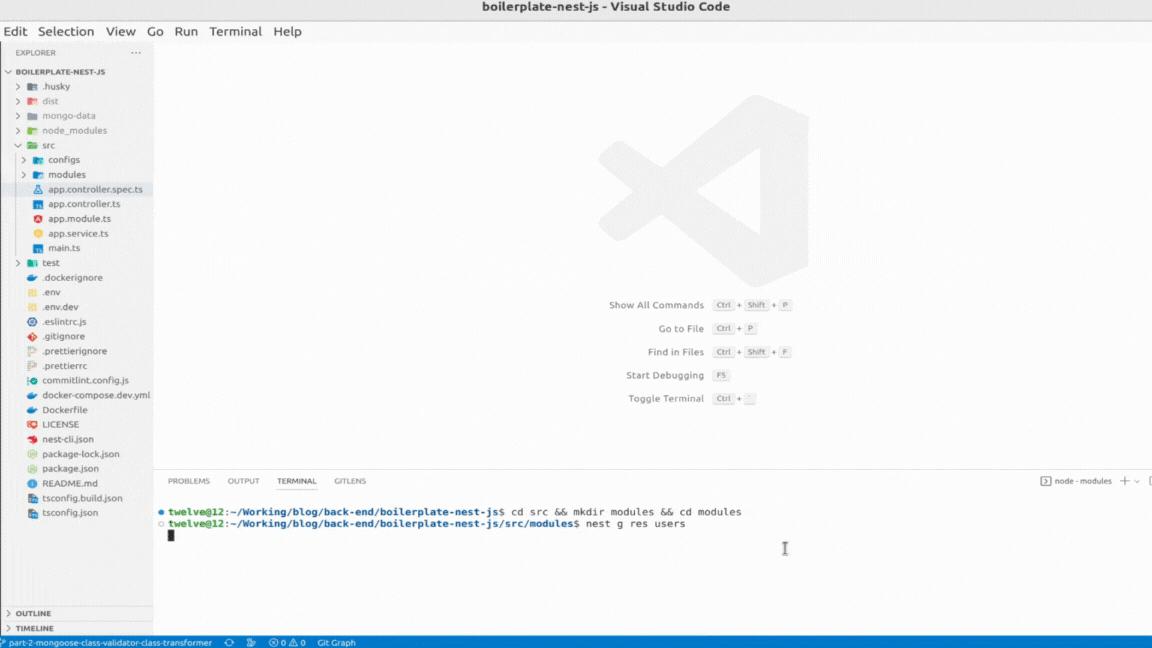
Tạo folder modules bên trong folder src để quản lí các module tách biệt với các folder khác. Lần lượt tạo các module trên:
nest g res users, tương tự với các moduleuser-roles,topics,flash-cardsvàcollection![]()
-
Tiếp theo tạo BaseEntity để lưu các property dùng chung cho các schema để tránh lặp lại code
import { Prop } from '@nestjs/mongoose';

export class BaseEntity {
    _id?: string; // Sau này sẽ dùng với class-transformer để serialize dữ liệu response

    @Prop({ default: null })
    deleted_at: Date; // Dùng cho soft delete
}
Việc tạo schema hơi mất thời gian đặc biệt khi chúng có nhiều property nên chúng ta sẽ dùng ChatGPT để hỗ trợ việc tạo thì sẽ tiện hơn, mình sẽ thử với User schema. Có thể thấy kết quả khá là ổn

- Chỉnh sửa lại 1 tí kết quả từ ChatGPT
import { BaseEntity } from '@modules/shared/base/base.entity';
import { Prop, Schema, SchemaFactory } from '@nestjs/mongoose';
import { HydratedDocument } from 'mongoose';
import { UserRole } from '@modules/user-roles/entities/user-role.entity';

export type UserDocument = HydratedDocument<User>;

export enum GENDER {
	Male = 'MALE',
	Female = 'FEMALE',
	Other = 'OTHER',
}
@Schema({
	timestamps: {
		createdAt: 'created_at',
		updatedAt: 'updated_at',
	},
})
export class User extends BaseEntity {
	@Prop({ required: true, minlength: 2, maxlength: 60 })
	first_name: string;

	@Prop({ required: true })
	last_name: string;

	@Prop({
		required: true,
		unique: true,
		match: /^\w+([.-]?\w+)*@\w+([.-]?\w+)*(\.\w{2,3})+$/,
	})
	email: string;

	@Prop({
		match: /^([+]\d{2})?\d{10}$/,
	})
	phone_number: string;

	@Prop({
		required: true,
		unique: true,
	})
	username: string;

	@Prop({
		required: true,
		select: false,
	})
	password: string;

	@Prop({
		default:
			'https://cdn.pixabay.com/photo/2016/08/08/09/17/avatar-1577909_960_720.png',
	})
	avatar: string;

	@Prop()
	date_of_birth: Date;

	@Prop({
		enum: GENDER,
	})
	gender: string;

	@Prop({ default: 0 })
	point: number;

	@Prop({
		type: mongoose.Schema.Types.ObjectId,
		ref: UserRole.name,
	})
	role: UserRole;

	@Prop()
	headline: string;

    @Prop()
	friendly_id: number;
}

export const UserSchema = SchemaFactory.createForClass(User);
-
Các option thường dùng trong
@Props- type: với các kiểu dữ liệu thông thường như string, number, boolean thì Typescript metadata và reflection sẽ giúp chúng ta tự động ép kiểu. Tuy nhiên với các kiểu dữ liệu như array hoặc nested object thì chúng ta cần sử dụng option này để chỉ định rõ kiểu dữ liệu.
- required: bắt buộc và phải được cung cấp một giá trị.
- unique: giá trị của nó phải là duy nhất trong collection. Cần lưu ý khi kết hợp
unique:truevớirequired:false, nếu không cẩn thận sẽ dễ gây ra lỗi duplication. - select: nếu là
falsethì khi truy vấn dữ liệu từ cơ sở dữ liệu, giá trị của thuộc tính này sẽ không được trả về. - match: phải phù hợp với một regex được định nghĩa mới có thể lưu vào database.
- default: dữ liệu khởi tạo mặc định nếu không được truyền vào.
- immutable: nếu là
truethì không cho phép thay đổi giá trị của property.
-
Import
UservàUserSchemavào trongUserModulesử dụng nó.import { User, UserSchema } from './entities/user.entity'; ... @Module({ imports: [ MongooseModule.forFeature([{ name: User.name, schema: UserSchema }]), ], ... -
Các module còn lại các bạn thay mình làm tương tự như module User để tránh bài viết quá dài. Bên cạnh đó, vì chúng ta tạo thêm folder modules trong src nên NestJS/CLI không tự import các module trên (
UserModule,TopicModule, ...) vàoAppModulenên chúng ta phải tự thêm vào.import { UserRolesModule } from '@modules/user-roles/user-roles.module'; import { UsersModule } from '@modules/users/users.module'; import { TopicsModule } from '@modules/topics/topics.module'; import { FlashCardsModule } from '@modules/flash-cards/flash-cards.module'; import { CollectionsModule } from '@modules/collections/collections.module'; ... @Module({ imports: [ ... UserRolesModule, UsersModule, TopicModule, FlashCardsModule, CollectionsModule, ...
1.6 Relationship
Tương tự như SQL chúng ta cũng có các relationship sau:
One-to-one
Để lấy ví dụ cho quan hệ one-to-one, khi tạo user chúng ta sẽ nhận vào thêm thông tin địa chỉ để lưu vào thông tin cá nhân của họ. Trong MongoDB chúng ta có 2 kiểu thể hiện quan hệ là References vs Embedding, ở ví dụ này mình sẽ dùng Embedding để lưu address vào trong user.
-
Đầu tiên chúng ta tạo Address schema với các thuộc tính như trên sơ đồ:
import { BaseEntity } from '@modules/shared/base/base.entity'; import { Prop, Schema, SchemaFactory } from '@nestjs/mongoose'; import { HydratedDocument } from 'mongoose'; export type AddressDocument = HydratedDocument<Address>; @Schema() export class Address extends BaseEntity { @Prop({ minlength: 2, maxlength: 120 }) street?: string; @Prop({ required: true, minlength: 2, maxlength: 50 }) state: string; @Prop({ required: true, minlength: 2, maxlength: 50 }) city: string; @Prop({ required: false, minlength: 2, maxlength: 50 }) postal_code?: number; @Prop({ required: true, minlength: 2, maxlength: 50 }) country: string; } export const AddressSchema = SchemaFactory.createForClass(Address); -
Tạo quan hệ giữa User schema và Address schema. Vì Address được embed thẳng vào collection User nên có thể tăng tốc độ truy vấn, và do được embedded nên type sẽ là
AddressSchemathay vìmongoose.Schema.Types.ObjectId.import { Address, AddressSchema } from './address.entity'; ... export class User extends BaseEntity { ... @Prop({ type: AddressSchema, }) address: Address; } ... -
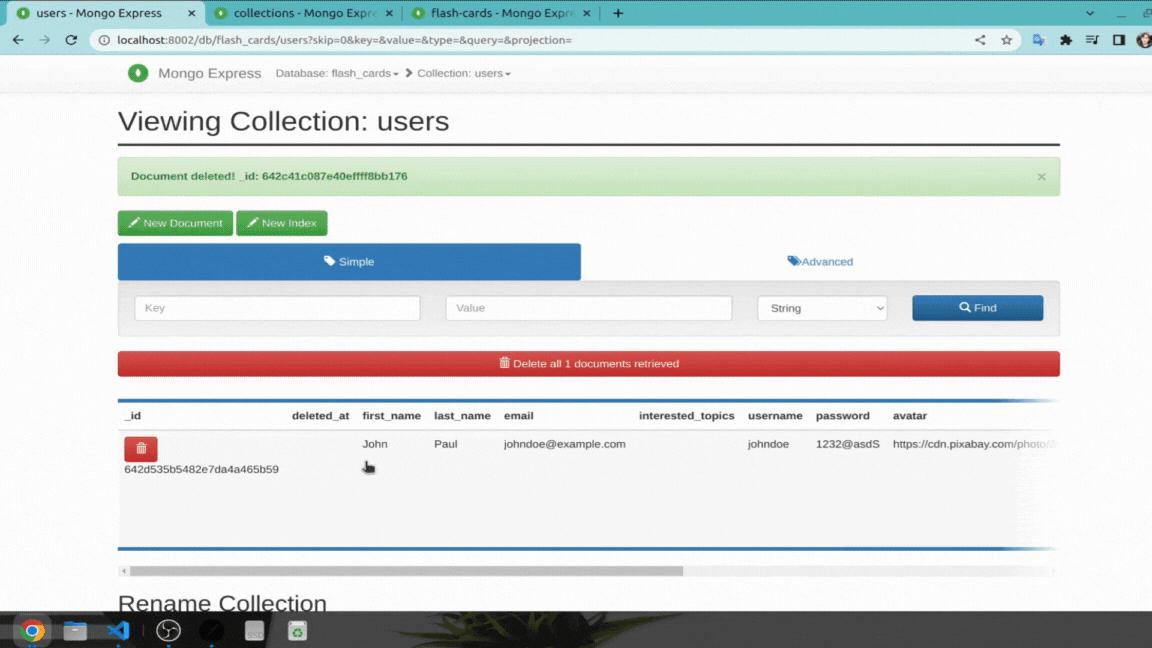
Thử tạo User với Address bên trong ( lưu ý ví dụ minh họa ở dưới là khi mình đã setup xong repository, service và controller ).
![image.png]()

One-to-many
Chúng ta triển khai quan hệ one-to-many và many-to-one khi một document từ collection đầu tiên có thể được liên kết với nhiều document từ collection thứ hai. Document từ collection thứ hai có thể được liên kết với chỉ một document từ collection đầu tiên. Ví dụ cụ thể là quan hệ giữa Flash Card với User, User có thể có nhiều Flash Card và Flash Card chỉ thuộc về một User. Flash Card schema sẽ như bên dưới:
import { BaseEntity } from '@modules/shared/base/base.entity';
import { User } from '@modules/users/entities/user.entity';
import { Prop, Schema, SchemaFactory } from '@nestjs/mongoose';
import * as mongoose from 'mongoose';

export type FlashCardDocument = mongoose.HydratedDocument<FlashCard>;

@Schema({
	collection: 'flash-cards',
})
export class FlashCard extends BaseEntity {
	@Prop({ required: true })
	vocabulary: string;

	@Prop({ required: true })
	image: string;

	@Prop({ required: true })
	definition: string;

	@Prop({ required: true })
	meaning: string;

	@Prop()
	pronunciation?: string;

	@Prop({ default: [], type: [String] })
	examples: string[];

	@Prop({ default: false })
	is_public: boolean;

	@Prop({ type: mongoose.Schema.Types.ObjectId, ref: 'User', required: true })
	user: User;
}

export const FlashCardSchema = SchemaFactory.createForClass(FlashCard);
Many-to-many
Một quan hệ quan trọng khác chúng ta cần xem xét là many-to-many. Một document từ collection đầu tiên có thể tham chiếu đến nhiều document từ collection thứ hai và ngược lại. Chúng ta sẽ lấy ví dụ một Flash Card có nhiều Topic và Topic thì cũng có nhiều Flash Card.
- Topic Schema:
import { BaseEntity } from '@modules/shared/base/base.entity';
import { Prop, Schema, SchemaFactory } from '@nestjs/mongoose';
import { HydratedDocument } from 'mongoose';

export type TopicDocument = HydratedDocument<Topic>;

@Schema()
export class Topic extends BaseEntity {
	@Prop({
		unique: true,
		required: true,
	})
	name: string;

	@Prop()
	description: string;
}

export const TopicSchema = SchemaFactory.createForClass(Topic);
- Cập nhật lại FlashCard schema:
import { BaseEntity } from '@modules/shared/base/base.entity';
import { User } from '@modules/users/entities/user.entity';
import { Prop, Schema, SchemaFactory } from '@nestjs/mongoose';
import * as mongoose from 'mongoose';

export type FlashCardDocument = mongoose.HydratedDocument<FlashCard>;

@Schema({
	collection: 'flash-cards',
})
export class FlashCard extends BaseEntity {
	...
	@Prop({ type: [{ type: mongoose.Schema.Types.ObjectId, ref: 'Topic' }] })
	topics: Topic[];
}

export const FlashCardSchema = SchemaFactory.createForClass(FlashCard);
Vậy là chúng ta đã đi sơ qua khái niệm cũng như các thế mạnh mà MongoDB và Mongoose mang lại. Chúng ta cũng đã tạo được của schema và biểu thị mối quan hệ giữa chúng. Tiếp theo đây chúng ta sẽ cùng áp dụng các Design Pattern và sau đó test với các schema mà chúng ta vừa tạo xem đã hoạt động ổn chưa.
1.7 Mongoose Middleware ( Optional )
Một tính năng cũng khá hữu ích của Mongoose đó là Middleware ( hay còn gọi là pre và post hooks ), giúp chúng ta thực thi các logic trước hoặc sau khi method được thực thi. Có 4 loại Middleware: document middleware, model middleware, aggregate middleware, và query middleware.
Ví dụ trực quan nhất mình hay sử dụng là dùng query middleware để triển khai hook xóa các document liên quan từ các schema khác khi document hiện tại bị xóa. Lấy ví dụ chúng ta có method xóa vĩnh viễn user, khi xóa user đó thì chúng ta cần xóa tất cả các flash card cũng như collection của user đó để tránh dư thừa dữ liệu. Chúng ta sẽ triển khai như sau:
- Vì ở đây chúng ta đang trong scope User để có thể sử dụng model FlashCard và Collection chúng ta cần inject chúng vào User. Để làm việc đó mình sẽ dùng
useFactoryvớiMongooseModule:
import {
	FlashCard,
	FlashCardSchema,
} from '@modules/flash-cards/entities/flash-card.entity';
import {
	Collection,
	CollectionSchema,
} from '@modules/collections/entities/collection.entity';
import { User, UserSchemaFactory } from './entities/user.entity';
...
@Module({
	imports: [
		MongooseModule.forFeatureAsync([
			{
				name: User.name,
				useFactory: UserSchemaFactory,
				inject: [getModelToken(FlashCard.name), getModelToken(Collection.name)],
				imports: [
					MongooseModule.forFeature([
						{ name: FlashCard.name, schema: FlashCardSchema },
						{ name: Collection.name, schema: CollectionSchema },
					]),
				],
			},
		]),
        ...
- Tạo
UserSchemaFactorybên trong file user.entity.ts để triển khai hook:
...
export const UserSchemaFactory = (
	flash_card_model: Model<FlashCardDocument>,
	collection_model: Model<CollectionDocument>,
) => {
	const user_schema = UserSchema;

	user_schema.pre('findOneAndDelete', async function (next: NextFunction) {
		// OTHER USEFUL METHOD: getOptions, getPopulatedPaths, getQuery = getFilter, getUpdate
		const user = await this.model.findOne(this.getFilter());
		await Promise.all([
			flash_card_model
				.deleteMany({
					user: user._id,
				})
				.exec(),
			collection_model
				.deleteMany({
					user: user._id,
				})
				.exec(),
		]);
		return next();
	});
	return user_schema;
};
- Giải thích:
- Mình sử dụng pre hook để đảm bảo các flash-card và collection phải được xóa trước khi user đó bị xóa.
- Ở đây chúng ta sẽ gắn hook vào method
findOneAndDeletecủa user schema vì lát nữa ở dưới chúng sẽ dùng method này để xóa user. - Do chúng ta dùng pre hook nên không có thông tin của user, để lấy ra user mình sẽ dùng
this.getFilterđể lấy ra filter được truyền vào trongfindOneAndDelete. Nếu không cần thông tin user thì các bạn có thể bỏ qua bước này và truyền thẳngthis.getFiltervàodeleteManycủa 2 model dưới - ở đây mình chỉ dùng để minh họa. - Sau khi có user tiến hành xóa các flash-card và collection liên quan tới user đó.
Lưu ý: khi gọi next() các code nằm ở dưới vẫn được thực thi. Để tránh các lỗi không mong muốn thì các bạn nên sử dụng return trước next() như mình ở trên.
- Thử xóa User để kiểm tra xem flash-card và collection có được xóa hay không.
Mình đổi method
removetrongBaseServiceAbstracttừsoftDeletesangpermanentlyDeleteđể có thể kích hoạt hook
1.8 Getter & Setter ( Optional )
Getter
Đối với một vài property chúng ta cần chỉnh sửa lại trước khi trả về cho người dùng. Ví dụ ở đây mình sẽ chỉnh lại phone_number chỉ hiển thị ra 3 số cuối trong số điện thoại của người dùng nếu có.
...
@Schema({
	timestamps: {
		createdAt: 'created_at',
		updatedAt: 'updated_at',
	},
	toJSON: {
		getters: true,
	},
})
export class User extends BaseEntity {
    ...
    @Prop({
		match: /^([+]\d{2})?\d{10}$/,
		get: (phone_number: string) => {
			if (!phone_number) {
				return;
			}
			const last_three_digits = phone_number.slice(phone_number.length - 4);
			return `****-***-${last_three_digits}`;
		},
	})
	phone_number: string;
    ...
- Cách sử dụng
- Đầu tiên để sử dụng getter các bạn phải sử dụng option
toJSON: { getters: true } - Sau đó chúng ta dùng option
gettrong decorator@Prop, callback sẽ chính là function xử lí các logic chúng ta cần.
- Đầu tiên để sử dụng getter các bạn phải sử dụng option
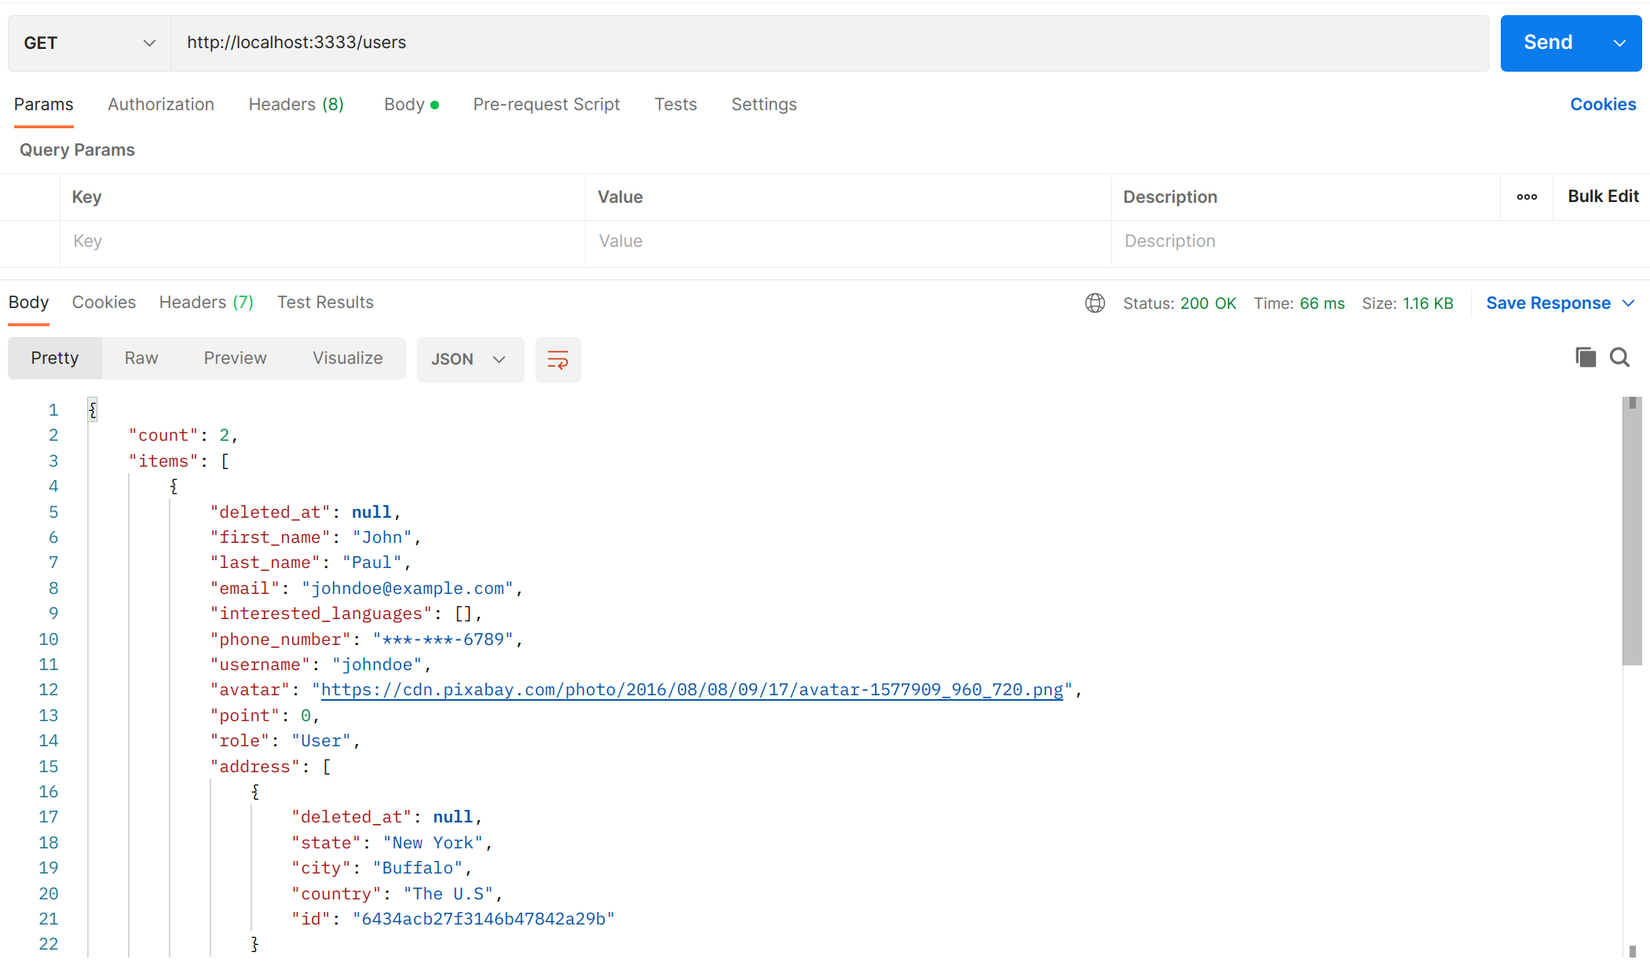
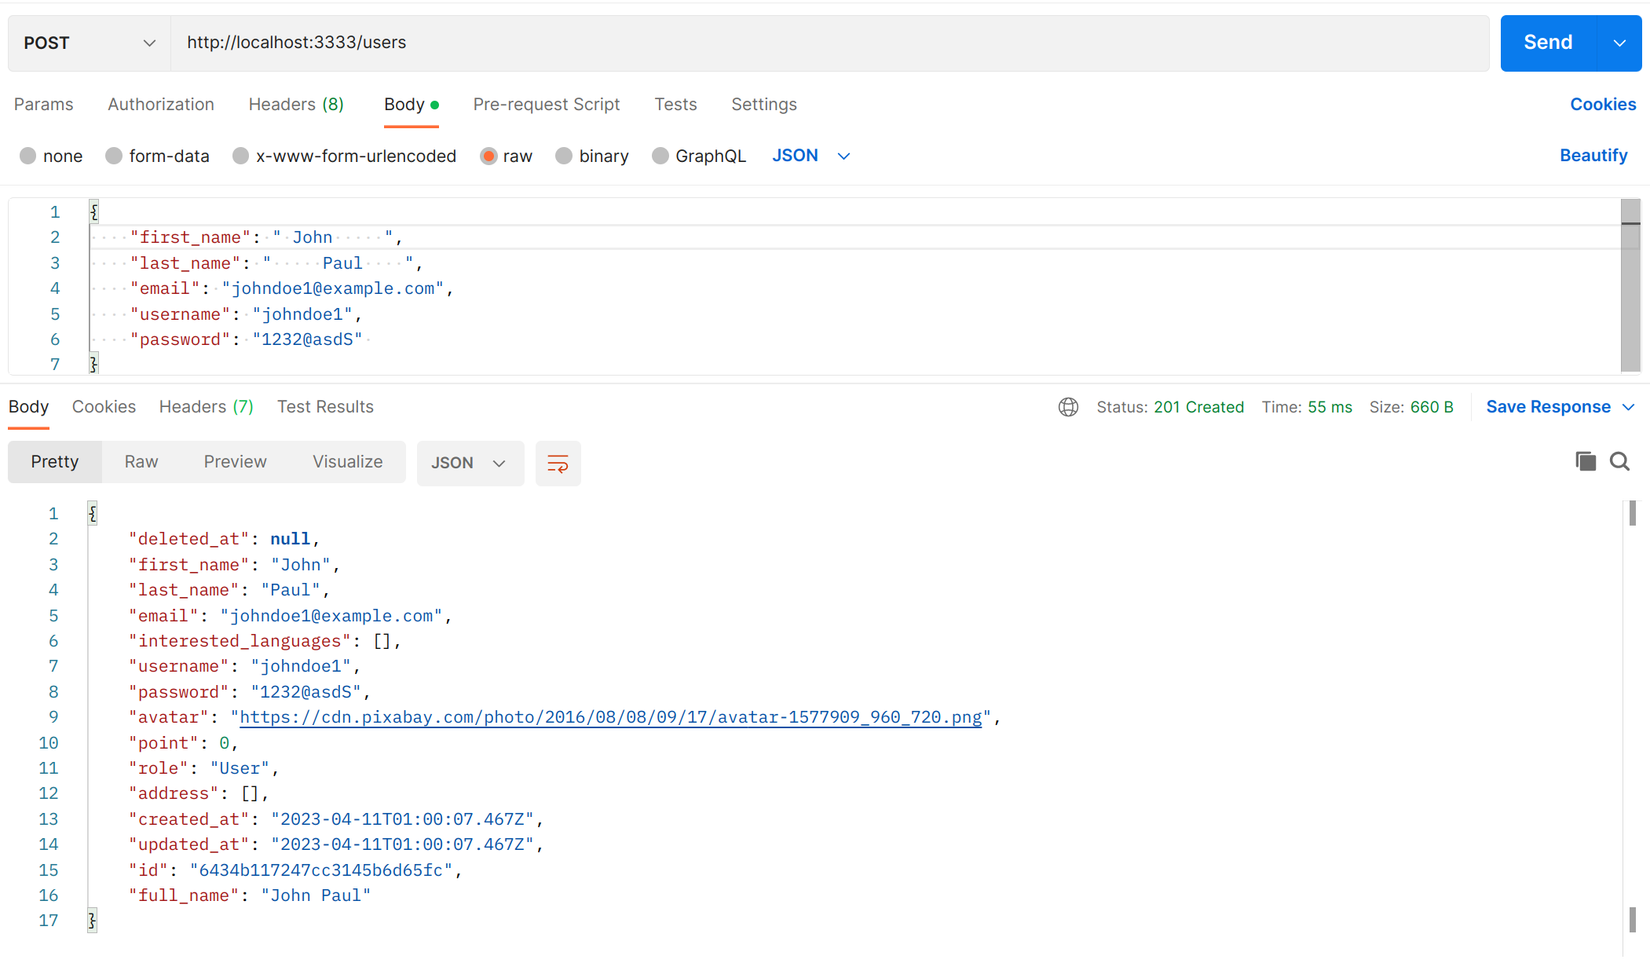
- Gọi lại http://localhost:3333/users để kiểm tra kết quả
![image.png]()
Setter
Thông thường chúng ta sẽ dùng setter để chỉnh sửa value của property trước khi lưu vào database, mọi người hay dùng để hash password trước khi lưu vào database.
Mình thì hash pasword ở service layer chứ không dùng database layer vì không muốn trộn lẫn logic giữa 2 tầng này.
- Ví dụ ở đây mình sẽ loại bỏ các khoảng trắng trong
first_namevàlast_nametrước khi lưu vào database
...
export class User extends BaseEntity {
    ...
      @Prop({
		required: true,
		minlength: 2,
		maxlength: 60,
		set: (first_name: string) => {
			return first_name.trim();
		},
	})
	first_name: string;

	@Prop({
		required: true,
		minlength: 2,
		maxlength: 60,
		set: (last_name: string) => {
			return last_name.trim();
		},
	})
	last_name: string;
    ...
- Tạo user để xem kết quả
1.9 Virtual properties ( Optional )
Getter
Ví dụ trong trường hợp các bạn muốn user có cả thông tin first_name, last_name và full_name. Việc lưu first_name và last_name mà còn thêm full_name vào database sẽ gây ra dư thừa dữ liệu. Rất may là Mongoose có cung cấp cho chúng ta tính năng virtual properties. Như tên gọi của nó giúp tạo ra các virtual property từ các property trong schema. Mình sẽ lấy ví dụ chúng ta lấy ra muốn tạo ra property default_address dùng để lấy địa chỉ đầu tiên trong mảng địa chỉ của người dùng.
Mình tạm thời không lấy full_name làm ví dụ cho phần này vì sẽ dùng nó cho bài viết sau về class-transformer.
...
@Schema({
	timestamps: {
		createdAt: 'created_at',
		updatedAt: 'updated_at',
	},
	toJSON: {
		getters: true,
		virtuals: true, // Thêm vào option này
	},
})
export class User extends BaseEntity {
    ...
    default_address?: string; // Thêm vào giúp IDE xác định User có property default_address. Có thể loại bỏ nếu không sử dụng.
}
export const UserSchemaFactory = (
    ...
    user_schema.virtual('default_address').get(function (this: UserDocument) {
		if (this.address.length) {
			return `${(this.address[0].street && ' ') || ''}${this.address[0].city} ${
				this.address[0].state
			} ${this.address[0].country}`;
		}
	});
    ...
- Cách sử dụng:
- Để thêm virtual properties chúng ta cần dùng option
virtuals: truetrongtoJSON. - Sau đó chúng ta sẽ thêm
virtualvàouser_schemavới methodget, callback sẽ là logic chúng ta xử lí trả về value cho virtual property này. Nếu các bạn không return gì virtual property đó sẽ không hiển thị.
- Để thêm virtual properties chúng ta cần dùng option
Setter và Populating
Thường thì 2 trường hợp này mình thấy ít phổ biến và bản thân mình cũng không sử dụng nhiều. Cần set cho property nào thì chúng ta xử lí luôn ở service layer, và populate thì chúng ta xử lí ở respository layer. Nếu các bạn vẫn muốn sử dụng thì có thể tham khảo từ bài viết này của tác giả Wanago.
Vậy là chúng ta đã đi qua đa số các chức năng hữu ích mà package Mongoose đã mang lại, tiếp theo mình sẽ triển khai Repository Pattern và Generic Service/Repository Pattern để các bạn có thể thấy được công dụng mà nó mang lại.
Lúc đầu mình dự định sử dụng package mongoose sequence ( Auto Increment ) để nói về các Plugin trong Mongoose. Tuy nhiên package đó đã 3 năm không được maintain và chỉ hỗ trợ đến Mongoose v6, do chúng ta đang dùng v7 nên nếu gắn vào schema nào thì sẽ gặp lỗi treo request khi gọi method
savecủa schema đó. Các bạn nên lưu ý khi sử dụng package này.
2. Repository Pattern và Generic Service/Repository Pattern
2.1 Mục đích sử dụng
Thông thường chúng ta học về Design Pattern đa phần là lý thuyết nên sẽ có phần khó hình dung và ghi nhớ. Vì thế trong phạm vi bài viết này mình muốn sử dụng Repository Pattern cho database layer kết hợp với Generic Pattern giúp tái sử dụng code để giúp các bạn phần nào hiểu được công dụng của nó trong dự án thực tế. Các lợi ích của Repository Pattern có thể kể đến như:
- Giúp tách biệt phần xử lý database khỏi phần xử lý logic của ứng dụng. Việc này làm cho code trở nên rõ ràng và dễ hiểu hơn, và cũng giúp cho việc maintain code trở nên dễ dàng hơn.
- Làm giảm sự phụ thuộc vào MongoDB hay bất kỳ hệ quản trị cơ sở dữ liệu nào khác. Chúng ta có thể thay đổi sang cái khác nếu thật sự cần
- Giảm độ phức tạp của các lớp service. Bằng cách sử dụng các phương thức được định nghĩa trong repository, các lớp service có thể tập trung vào việc thực hiện logic chức năng thay vì phải xử lý các câu truy vấn dữ liệu phức tạp.
- Cung cấp một cách thức để test database layer một cách độc lập. Chúng ta có thể tạo ra các đối tượng repository giả (mock repository) để test lớp service mà không cần kết nối đến cơ sở dữ liệu thật.
2.2 Cách sử dụng
Tùy theo đặc thù dự án mà các bạn có thể tự tạo thêm
UserServiceInterfacecho tường minh.
Chúng ta sẽ tách logic ra thành 2 layer riêng biệt với nhau.
- Repository layer: chịu trách nhiệm gọi đến database để lấy và xử lý data
- Service layer: nhận data từ controller và xử lý các logic mà không liên quan đến truy vấn database. Khi cần truy vấn database thì sẽ gọi đến để lấy dữ liệu từ repository layer.
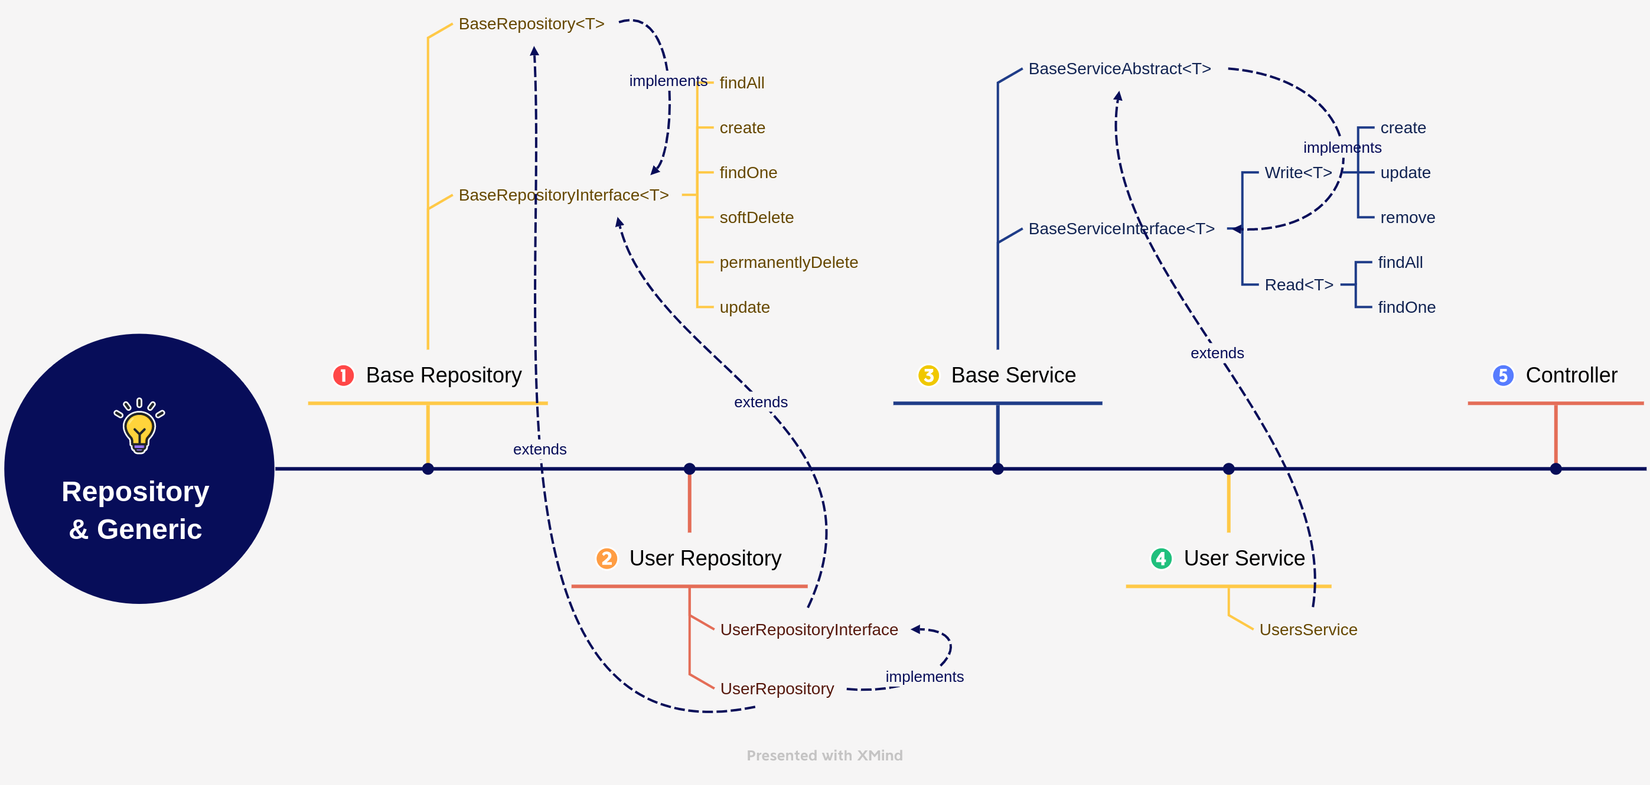
Repository layer
Sau khi đã chia layer với Repository Pattern chúng ta sẽ ứng dụng Generic Repository Pattern tạo BaseRepositoryInterface và BaseRepository với nhiệm vụ chứa các method căn bản dùng chung cho các module để tránh code bị lặp lại.
- Tạo folder repositories trong folder src, mục đích mình để riêng với folder modules để chuẩn bị cho trường hợp sau này có thay đổi database ( VD: từ Mongoose sang TypeORM, từ No-SQL sang SQL,... ), thì chỉ cần vào folder này chỉnh sửa thay vì để riêng trong từng module, sẽ đỡ mất thời gian tìm kiếm hơn.
- Tiếp tạo folder base để chứa
BaseRepository, sau đó tạo thêm 2 file interface và abstract bên trong. Khi chúng ta tạo một Repository mới, chỉ cần kế thừa từ lớp abstract và override các phương thức cần thiết theo logic riêng của module đó.- base.interface.repository.ts: interface để định nghĩa các phương thức cơ bản mà chúng ta hay gọi đến database.
import { FindAllResponse } from 'src/types/common.type';

export interface BaseRepositoryInterface<T> {
    create(dto: T | any): Promise<T>;

    findOneById(id: string, projection?: string): Promise<T>;

    findOneByCondition(condition?: object, projection?: string): Promise<T>;

    findAll(
        condition: object,
        options?: object,
    ): Promise<FindAllResponse<T>>;

    update(id: string, dto: Partial<T>): Promise<T>;

    softDelete(id: string): Promise<boolean>;

    permanentlyDelete(id: string): Promise<boolean>;
}
export type FindAllResponse<T> = { count: number; items: T[] }; ... - base.abstract.repository.ts: lớp abstract để implement interface trên, chúng ta sẽ viết logic theo cú pháp ORM đang sử dụng.
import { BaseEntity } from '@modules/shared/base/base.entity';
import { FilterQuery, Model, QueryOptions } from 'mongoose';
import { FindAllResponse } from 'src/types/common.type';
import { BaseRepositoryInterface } from './base.interface.repository';

export abstract class BaseRepositoryAbstract<T extends BaseEntity>
    implements BaseRepositoryInterface<T>
{
    protected constructor(private readonly model: Model<T>) {
        this.model = model;
    }

    async create(dto: T | any): Promise<T> {
        const created_data = await this.model.create(dto);
        return created_data.save();
    }

    async findOneById(id: string): Promise<T> {
        const item = await this.model.findById(id);
        return item.deleted_at ? null : item;
    }

    async findOneByCondition(condition = {}): Promise<T> {
        return await this.model
            .findOne({
                ...condition,
                deleted_at: null,
            })
            .exec();
    }

    async findAll(
        condition: FilterQuery<T>,
        options?: QueryOptions<T>,
    ): Promise<FindAllResponse<T>> {
        const [count, items] = await Promise.all([
            this.model.count({ ...condition, deleted_at: null }),
            this.model.find({ ...condition, deleted_at: null }, options?.projection, options),
        ]);
        return {
            count,
            items,
        };
    }

    async update(id: string, dto: Partial<T>): Promise<T> {
        return await this.model.findOneAndUpdate(
            { _id: id, deleted_at: null },
            dto,
            { new: true },
        );
    }

    async softDelete(id: string): Promise<boolean> {
        const delete_item = await this.model.findById(id);
        if (!delete_item) {
            return false;
        }

        return !!(await this.model
            .findByIdAndUpdate<T>(id, { deleted_at: new Date() })
            .exec());
    }

    async permanentlyDelete(id: string): Promise<boolean> {
        const delete_item = await this.model.findById(id);
        if (!delete_item) {
            return false;
        }
        return !!(await this.model.findByIdAndDelete(id));
    }
}
- base.interface.repository.ts: interface để định nghĩa các phương thức cơ bản mà chúng ta hay gọi đến database.
- Giải thích:
BaseRepositoryInterfacelà interface mà chúng ta sẽ quy định các method mà một repository phải có. Chúng ta cần phải thiết kế các interface làm sao cho nội dung không thay đổi dù có thay đổi ORM hoặc hệ quản trị cơ sở dữ liệu.BaseRepositoryAbstractlà class implement các method từBaseRepositoryInterface, logic query tùy theo loại database sẽ được triển khai ở đây. Sẽ bị thay đổi khi đổi ORM hoặc hệ quản trị cơ sở dữ liệu.T extends BaseEntity: chỉ định T sẽ bao gồm các field trong BaseEntity. Nếu không extends thì IDE sẽ báo lỗiProperty deleted_at does not exist on...khi chúng ta gọiitem.deleted_atbên trong các method củaBaseRepositoryAbstract.
Sự khác nhau giữa việc gọi
exec()trong các method của mongoose với asynchronous: các function đó có kiểu trả về làQueryvà nó là thenable object nên chúng ta vẫn có thể dùng với await keyword để chờ kết quả trả về tương tự với gọiexec. Nhưng cần lưu ý về mặt bản chấtQuerykhông phảiPromise. Lợi ích duy nhất của việc gọiexeclà giúp stack traces rõ ràng hơn khi gặp lỗi . Đọc thêm từ tài liệu của Mongoose tại đây và ở đây. Vì thế các bạn có thể gọiexechay không đều được
Bước tiếp theo tạo UserRepositoryInterface để định nghĩa các method cho module User. Do hiện tại logic chúng ta chưa cần thêm gì nên chỉ cần extends BaseRepositoryInterface, sau này sẽ là nơi thêm các method cho các chức năng khác khi cần gọi xuống database layer. File này sẽ không bị thay đổi khi có sự thay đổi về database nên sẽ được để trong folder modules/users
import { User } from '@modules/users/entities/user.entity';
import { BaseRepositoryInterface } from '@repositories/base/base.interface.repository';

export interface UserRepositoryInterface
    extends BaseRepositoryInterface<User> {}
Kế đến tạo UsersRepository implement UsersRepositoryInterface và kế thừa logic từ BaseRepository.
import { User } from '@modules/users/entities/user.entity';
import { UserRepositoryInterface } from '@modules/users/interfaces/users.interface';
import { Injectable } from '@nestjs/common';
import { InjectModel } from '@nestjs/mongoose';
import { Model } from 'mongoose';
import { BaseRepositoryAbstract } from './base/base.abstract.repository';

@Injectable()
export class UsersRepository
    extends BaseRepositoryAbstract<User>
    implements UserRepositoryInterface
{
    constructor(
        @InjectModel(User.name)
        private readonly users_repository: Model<User>,
    ) {
        super(users_repository);
    }
}
Service layer
-
Tạo
BaseServiceInterfacevàBaseServicecho các method mặc định của các service. Giúp chúng ta hạn chế được phải viết lại các method CRUD cơ bản ở mỗi module. Nếu method của module đó có logic khác thì hoàn toàn có thể override lại các method ởBaseService.import { FindAllResponse } from 'src/types/common.type'; export interface Write<T> { create(item: T | any): Promise<T>; update(id: string, item: Partial<T>): Promise<T>; remove(id: string): Promise<boolean>; } export interface Read<T> { findAll( filter?: object, options?: object, ): Promise<FindAllResponse<T>>; findOne(id: string): Promise<T>; } export interface BaseServiceInterface<T> extends Write<T>, Read<T> {}import { BaseEntity } from '@modules/shared/base/base.entity'; import { BaseRepositoryInterface } from '@repositories/base/base.interface.repository'; import { PaginateParams, SortParams, SearchParams, FindAllResponse, } from 'src/types/common.type'; import { BaseServiceInterface } from './base.interface.service'; export abstract class BaseServiceAbstract<T extends BaseEntity> implements BaseServiceInterface<T> { constructor(private readonly repository: BaseRepositoryInterface<T>) {} async create(create_dto: T | any): Promise<T> { return await this.repository.create(create_dto); } async findAll( filter?: object, options?: object, ): Promise<FindAllResponse<T>> { return await this.repository.findAll(filter, options); } async findOne(id: string) { return await this.repository.findOneById(id); } async update(id: string, update_dto: Partial<T>) { return await this.repository.update(id, update_dto); } async remove(id: string) { return await this.repository.softDelete(id); } } -
Cập nhật lại
UsersServicethêm vào logic sử dụngUserRepository. Bên dưới ngoài các method mặc định, mình đã override lại methodcreateđể thêm vào logic set role cho user.import { Inject, Injectable } from '@nestjs/common'; import { BaseServiceAbstract } from 'src/services/base/base.abstract.service'; import { User } from './entities/user.entity'; import { UsersRepositoryInterface } from './interfaces/users.interface'; import { CreateUserDto } from './dto/create-user.dto'; import { UserRolesService } from '@modules/user-roles/user-roles.service'; import { USER_ROLE } from '@modules/user-roles/entities/user-role.entity'; @Injectable() export class UsersService extends BaseServiceAbstract<User> { constructor( @Inject('UsersRepositoryInterface') private readonly users_repository: UsersRepositoryInterface, private readonly user_roles_service: UserRolesService, ) { super(users_repository); } async create(create_dto: CreateUserDto): Promise<User> { let user_role = await this.user_roles_service.findOneByCondition({ name: USER_ROLE.USER, }); if (!user_role) { user_role = await this.user_roles_service.create({ name: USER_ROLE.USER, }); } const user = await this.users_repository.create({ ...create_dto, role: user_role, }); return user; } } -
Vì có sử dụng
UserRoleServicenên chúng ta phải inject vàoUserModuleđể không bị lỗi.import { UserRolesModule } from '@modules/user-roles/user-roles.module'; ... @Module({ imports: [ UserRolesModule, ... providers: [ UsersService, { provide: 'UsersRepositoryInterface', useClass: UsersRepository }, ], ...
Nếu để ý kỹ các bạn có thể thấy 1 mistake nhỏ, các file entity của chúng ta có sử dụng logic liên quan đến Mongoose nhưng mình vẫn để chung trong module, nếu cần thiết các bạn có thể chuyển ra ngoài giống như folder repository.
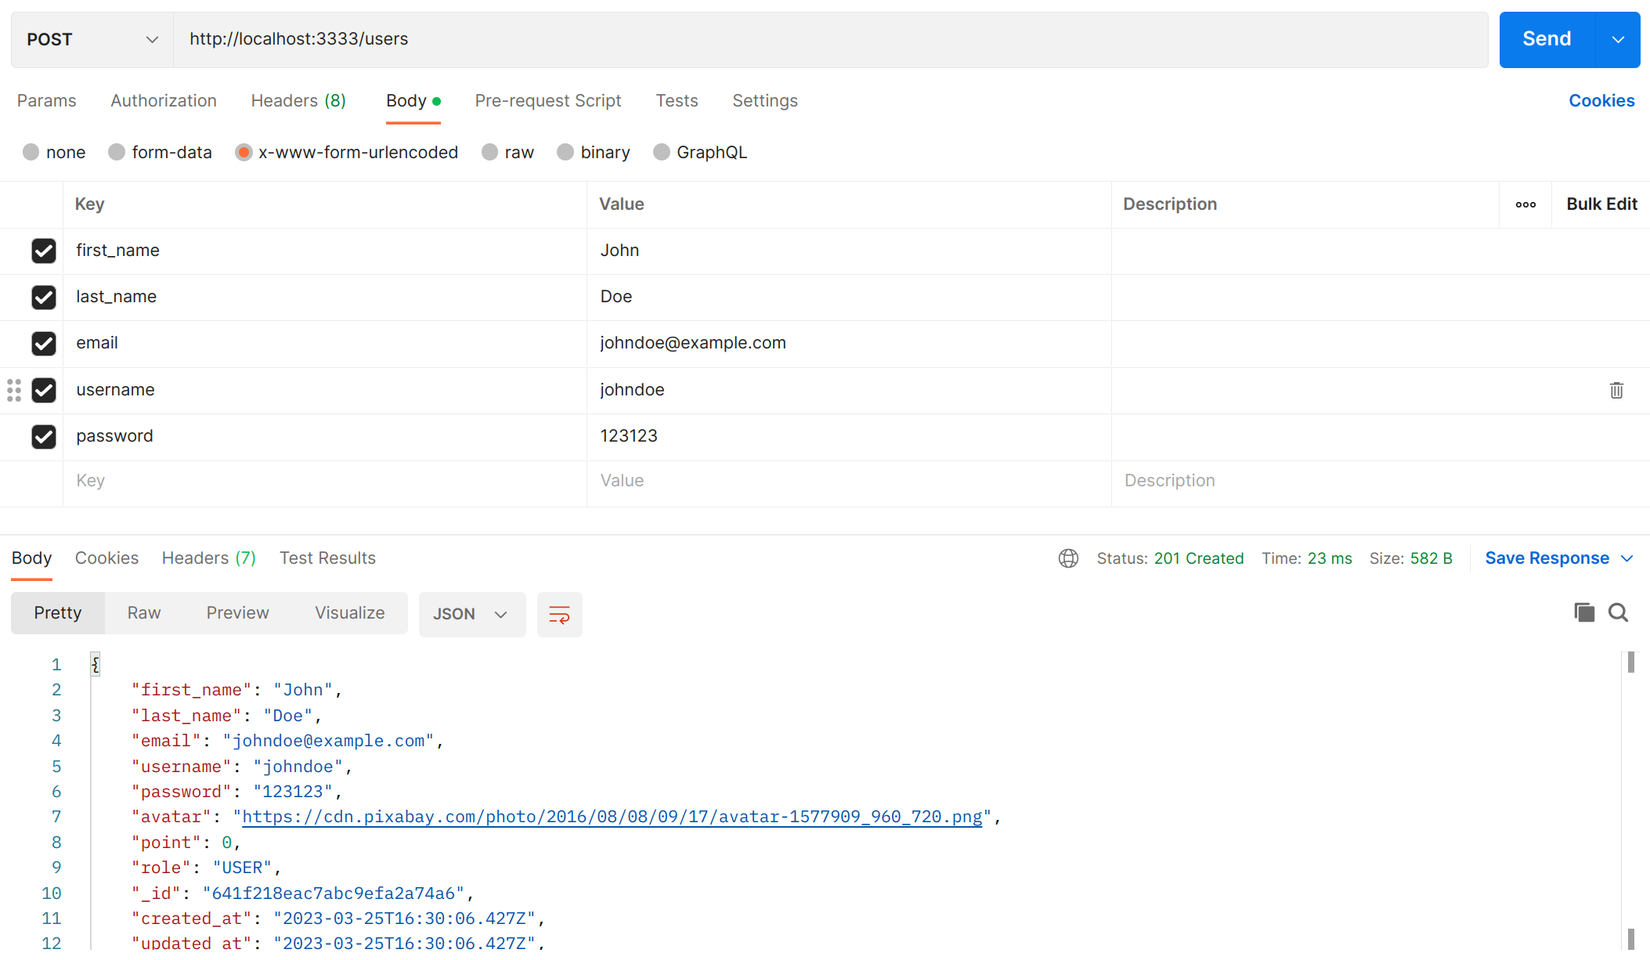
- Thử test xem chúng ta đã cài đặt và sử dụng thành công hay chưa. Do có thay đổi id sang kiểu string nên các bạn nhớ chỉnh lại cho 2 method handler là update và delete trong
UserController.- Create user:
![image.png]()
- Get users:
![image.png]()
- Create user:
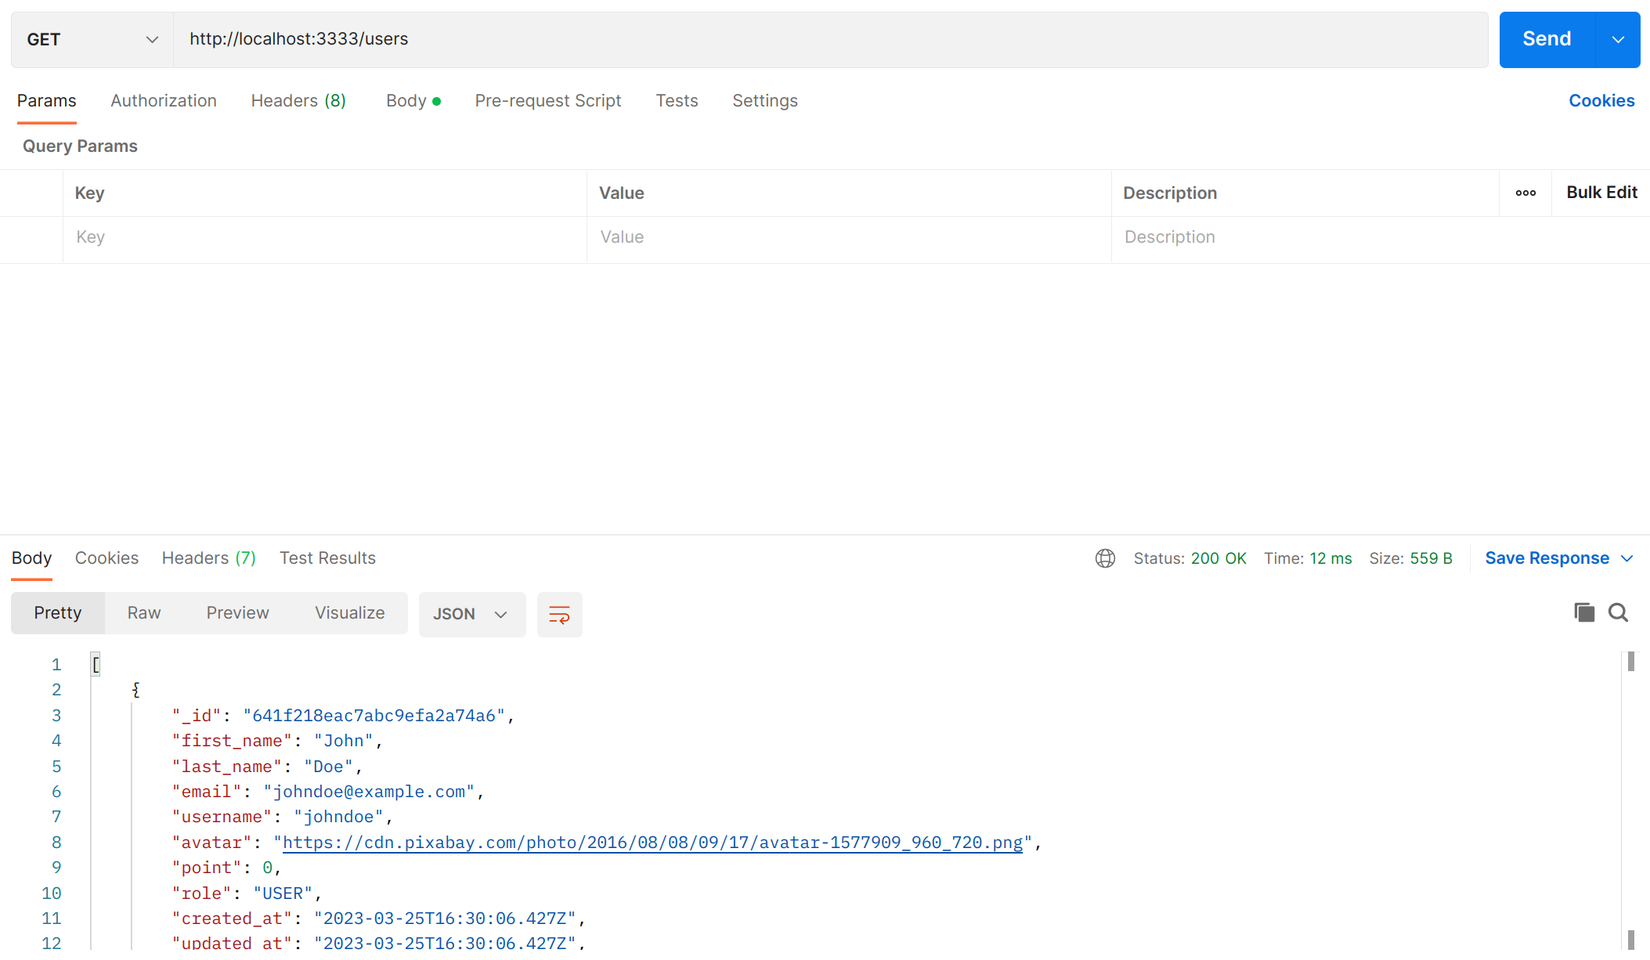
Có thể thấy chúng ta đã tách biệt được logic service layer với database layer, sau này việc thay đổi ở database layer sẽ không gây tác động đến service layer. Sau này nếu có phát sinh trường hợp cần đổi database hoặc đổi ORM, chúng ta chỉ cần thay nội dung file base.abstract.repository.ts và các file *.repository.ts bên trong folder src/repositories. Các file còn lại đã được tách biệt với database layer nên không bị ảnh hưởng.
3. Kết luận 📝
Vậy là chúng ta đã cài đặt và viết chức năng CRUD cơ bản với Mongoose kết hợp Repositorty Pattern và Generic Pattern, các bạn có thể tự mình thêm vào các module còn lại hoặc tải về từ source code. Quá trình cài đặt kiến trúc này ở bước đầu có thể mất thời gian nhưng sau khi cài đặt xong thì khi thêm các module mới sẽ đơn giản hơn nhiều.
Hiện tại chúng ta chỉ mới dùng các option của @Prop để validate dữ liệu trước khi lưu trữ vào MongoDB. Ở bài viết tiếp theo tăng độ bảo mật chúng ta sẽ kết hợp với class-validator để validate user input và class-transformer để serialize response từ API.
Bài viết này dựa vào kinh nghiệm cá nhân của mình nên nếu có thắc mắc gì các bạn có thể comment bên dưới hoặc inbox mình để chúng ta cùng thảo luận. Hẹn gặp các bạn ở bài viết tiếp theo, chúc các bạn chơi lễ vui vẻ ^_^
Tài liệu tham khảo 🔍
- Documentation: Nestjs - a progressive node.js framework (no date) NestJS. Available at: https://docs.nestjs.com/techniques/mongodb (Accessed: April 6, 2023).
- Patterns - generic repository with typescript and node.js (no date) HackerNoon. Available at: https://hackernoon.com/generic-repository-with-typescript-and-node-js-731c10a1b98e (Accessed: April 6, 2023).
- Nestjs (no date) Inject model into schema for post hook · issue #7 · nestjs/mongoose, GitHub. Available at: https://github.com/nestjs/mongoose/issues/7 (Accessed: April 6, 2023).
Change log 📓
- May 6, 2023: Init document
- June 4, 2023:
- Merge projection option into options param.
- Update logic method update inside abstract repository
All rights reserved
