Sending SMS from Web with Express and Nexmo
Bài đăng này đã không được cập nhật trong 4 năm
Short Message Service (SMS) không phải là một công nghệ mới, nó đã được sử dụng từ rất lâu trước cả khi World Wide Web ra đời. Hiện nay vói API bạn có thể dễ dàng tích hợp SMS vào website. Với SMS API bạn có thể xây dựng nhiều sản phẩm và dịch vụ như xác thực người dùng, cảnh báo, thông báo, công cụ truyền thông, v.v... Trong bài viết này mình sẽ hướng dẫn bạn cách tạo một ứng dụng web đơn giản gửi tin nhắn SMS bằng Express và Nexmo SMS API nhé.

Cài đặt ứng dụng
Trước tiên chắc chắn bạn cần cài đặt Node.js trên máy của bạn.
Cài đặt các modules cần thiết.
Bây giờ bạn cần phải cài đặt các modules cho ứng dụng như: nexmo, express, body-parser, ejs và socket.io.
npm install nexmo express body-parser ejs socket.io --save
Tạo cấu trúc ứng dụng
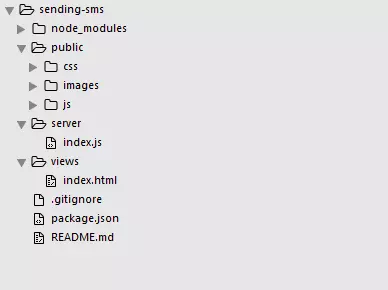
Ứng dụng này mình sẽ dùng cấu trúc như bên dưới nhé.

Tạo file ứng dụng index.js:
const express = require('express');
const app = express();
const server = app.listen(4000);
Ở ứng dụng này chúng ta sử dụng body-parser (body parsing middleware) và ejs (template engine).
const bodyParser = require('body-parser');
const ejs = require('ejs');

app.set('views', __dirname + '/../views');
app.set('view engine', 'html');
app.engine('html', ejs.renderFile);
app.use(express.static(__dirname + '/../public'));
app.use(bodyParser.json());
app.use(bodyParser.urlencoded({ extended: true }));

app.get('/', (req, res) => {
  res.render('index');
});
Tạo giao diện người dùng
Bây giờ chúng ta tạo một file index.html ở trong thư mục views để xây dựng giao diện người dùng, sử dụng file app.js qua thẻ <script>
<input type="tel" name="number" placeholder="15551231234">
<input type="text" name="text" placeholder="Hello">
<input type="button" value="Send SMS">
Toàn bộ html sẽ như sau:
<!doctype html>
<html lang="en">
<head>
    <meta charset="utf-8">
    <meta http-equiv="X-UA-Compatible" content="IE=edge,chrome=1">
    <title>Sending SMS with nexmo</title>
    <meta name="viewport" content="width=device-width, initial-scale=1.0">
    <link rel="stylesheet" href="css/style.css">
</head>
<body>
    <header>
        <h1>Sending SMS</h1>
    </header>
    <section id="main" role="main">
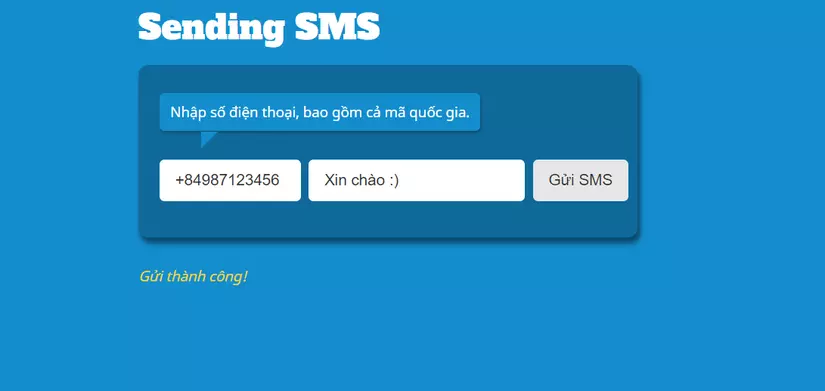
        <p class="intro">Nhập số điện thoại, bao gồm cả mã quốc gia.</p>
        <form>
            <input type="tel" name="number" placeholder="+84987123456" value="+84987123456" required>
            <input type="text" name="text" placeholder="Xin chào :)" value="Xin chào :)">
            <input type="button" value="Gửi SMS">
        </form>
    </section>
    <p id="response"></p>
    <script src="js/app.js"></script>
</body>
</html>
Xử lý form submit
Tạo file app.js trong thư mục /public/js.
var numberField = document.querySelector('input[name=number]');
var textField = document.querySelector('input[name=text]');
var button = document.querySelector('input[type=button]');
var msg = document.querySelector('.response');

textField.addEventListener('keyup', function(e) {
  if ((e.keyCode || e.charCode) === 13) send();
}, false); // when a user presses a Return key

button.addEventListener('click', send, false); // when a user click the "Send" button
Khai báo hàm send() để gửi các giá trị đầu vào cho Node.
function send() {
  var number = numberField.value.replace(/\D/g,''); // Remove all non-numeric chars
  var text = textField.value;
  // ... will send the form using fetch here
}
Tiếp theo chúng ta sẽ gửi input thông qua Fetch API.
if(!self.fetch) {
    alert("Bummer, your browser doesn't support Fetch API!");
    return;
    // Ideally, use XHR as the fallback for fetch.
}

fetch('/', {
    method: 'post',
    headers: {
        'Content-Type': 'application/json'
    },
    body: JSON.stringify({
        number: number,
        text: text
    })
})
.then(function(res){
    document.getElementById("response").innerHTML = "Gửi thành công!";
})
.catch(function(error){
    document.getElementById("response").innerHTML = "Gửi thất bại!";
});
Bây giờ chúng ta trở lại file index.js và thêm code bên dưới vào.
app.post('/', (req, res) => {
  res.send(req.body);
  console.log(req.body);
  let toNumber = req.body.number;
  let text = req.body.text;
 // Sending SMS via Nexmo
});
Sử dụng Nexmo SMS API
Nexmo SMS API cho phép bạn gửi và nhận một lượng lớn tin nhắn SMS bất kỳ nơi nào trên thế giới. Khi bạn nhận được số điện thoại ảo của mình, bạn có thể sử dụng API để quản lý tin nhắn gửi đi và tin nhắn gửi đến. Trong ứng dụng này, API sẽ được sử dụng cho tin nhắn gửi đi. Để bắt đầu với Nexmo SMS, hãy đăng ký một tài khoản Nexmo. Khi bạn đã đăng ký, hãy đi tới Dashboard của bạn để nhận số ảo của Nexmo cũng như API key và secret.
Sử dụng Nexmo cho ứng dụng Nodejs
Cài đặt: npm install nexmo --save
Tại file index.js:
const Nexmo = require('nexmo');
const nexmo = new Nexmo({
  apiKey: API_KEY,
  apiSecret: API_SECRET,
}, {debug: true});
Gửi tin nhắn
app.post('/', (req, res) => {
  res.send(req.body);
  const toNumber = req.body.number;
  const text = req.body.text;
  nexmo.message.sendSms(
    NUMBER, toNumber, text, {type: 'unicode'},
    (err, responseData) => {
      if (err) {
        console.log(err);
      } else {
        console.dir(responseData);
        // Optional: add socket.io -- will explain later
      }
    }
  );
 });
Bây giờ bạn hãy chạy ứng dụng lên:
node server/index.js
Hãy thử gửi SMS đến số điện thoại của bạn! Bạn có thể sử dụng đựợc emoji icon nhé 
 Và đây là thành quả.
 Để xóa bỏ text [FREE SMS DEMO, TEST MESSAGE] khi gửi sms bạn cần nâng cấp nexmo lên nhé =))
Chúc các bạn thành công. Tham khảo:
All rights reserved