Send Mail by MailCatcher Testing
Bài đăng này đã không được cập nhật trong 7 năm
Overview
Testing mail sending always contains troublesome. Even you don't waste much time checking text and grammar, it is still necessary to check whether the mail was actually sent.
So, you can check it by actually sending a mail to the address of yourself by preparing the SMTP server. But yet still there are sad things like broadcasting to another person's real address.
And if you are looking for something good to solve the problem, here goes the MailCatcher.
I tried it by making a docker file and thought it would be very convenient to make it a simple SMTP server for development (although it was not actually sent), because it was a really good library.
Environment
I am currently using docker-machine because my build environment is on mac.
So the IP address of docker host is assumed to be 192.168.99.100.
Please set your environment up carefully.
ruby 2.3.0
MailCatcher 0.6.4
docker version 1.11.1, build 5604cbe
docker-machine version 0.7.0,
MailCatcher
Some MailCatcher's characteristic:
-
Although it can be used as an SMTP server, it does not actually send mail, it saves the sent mail.
-
You can check the saved mail from the browser on the web screen which MailCatcher prepares separately.
-
You can also retrieve saved mails with api
Which make it closely to a library.
Dockerize the MailCatcher
Since it is only necessary at the development phase, I want to make it as simple as possible, so I made it based on alpine based on a ruby container.
- Dockerfile
FROM ruby:2.3.0-alpine

RUN apk --no-cache --update add \
                            libstdc++ \
                            build-base \
                            openssl-dev \
                            sqlite \
                            sqlite-dev \
                            ruby-dev && \
    gem install mailcatcher && \
    apk del build-base ruby-dev && \
    rm -rf /tmp/* /var/tmp/* /var/cache/apk/*

EXPOSE 1025 1080

CMD ["mailcatcher", "-f", "--ip=0.0.0.0"]
Since I upload the content of this Dockerfile to Docker hub, I don't have to build it
MailCatcher will be launched with the following command.
docker run -d -p 1080:1080 -p 1025:1025 pocari/mailcatcher
Here, 1080 and 1025 are ports for web screen reference and SMTP port respectively.
Access to Webscreen
Since the Web screen and the SMTP server are usable after starting the above container, check it from the Web screen.
I access from the browser at http://192.168.99.100:1080.
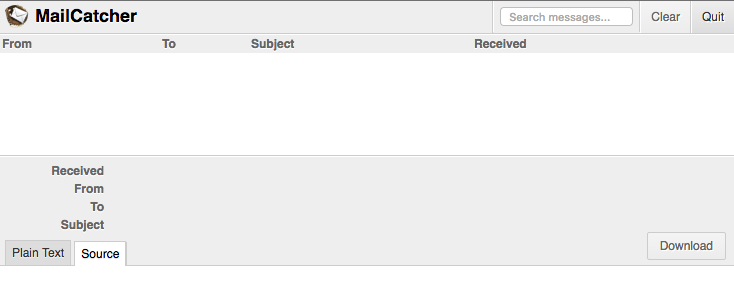
There is no mail yet so nothing is displayed, but it is a simple and beautiful screen.
According to the official page, it seems that you are using WebSocket, and when mail transmission occurs, the screen will be updated in real time without reloading the page.
Send mails
Well, now we had the environment, let's actually send a mail.
I think that mails are sent from rails again, I will test it with ActionMailer this time.
However, it is hard to make it from an rails application, so let's use ActionMailer only.
This time I will send a blank mail and a HTML mail one by one.
Gemfile
Create and install Gemfile
// Create Gemfile
$ bundle init
$ echo 'gem "actionmailer"' >> Gemfile
// install
$ bundle install --path=vendor/bundle
Script for testing
This part is for writing a test script.
In this case, the host of the setting of the SMTP server is the docker host (1025) which was set when the docker port ran.
I also want to send HTML mails, so I specify the location of the template file separately.
Other than that I think that it is the same as how to use regular ActionMailer
- test.rb
require 'action_mailer'

// Settings for SMTP
ActionMailer::Base.smtp_settings.merge!(
  address: '192.168.99.100',
  port: 1025
)

// Set root folder of template file location
ActionMailer::Base.prepend_view_path File.dirname(File.expand_path(__FILE__))

// send mail class
class TestMailer < ActionMailer::Base
  default from: 'from@example.com'

  def test_mail(to, subject, body)
    mail(to: to, subject: subject, body: body)
  end

  def test_html_mail(to, subject, arg1, arg2)
    @arg1 = arg1
    @arg2 = arg2
    mail(to: to, subject: subject)
  end
end

// send normal mail
TestMailer.test_mail(
  'to_address@example.com',
  'test subject',
  'Hello, World'
).deliver_now

#Send HTML mail
TestMailer.test_html_mail(
  'to_address@example.com',
  'test subject',
  'World',
  'Hoge',
).deliver_now
Don't forget we also have a template file. We made the root of the template file the script file directory this time,
Place the template file in ./test_mailer/test_html_mail.html.erb.
- ./test_mailer/test_html_mail.html.erb
<!DOCTYPE html>
<html>
  <head>
    <meta content='text/html; charset=UTF-8' http-equiv='Content-Type' />
  </head>
  <body>
    <h1>Hello, <%= @arg1 %></h1>
    <h2>This is HTML mail.</h2>
    <p>arg2 is <%= @arg2 %></p>
  </body>
</html>
Execute!
Well, let's run it!
$ bundle exec ruby test.rb
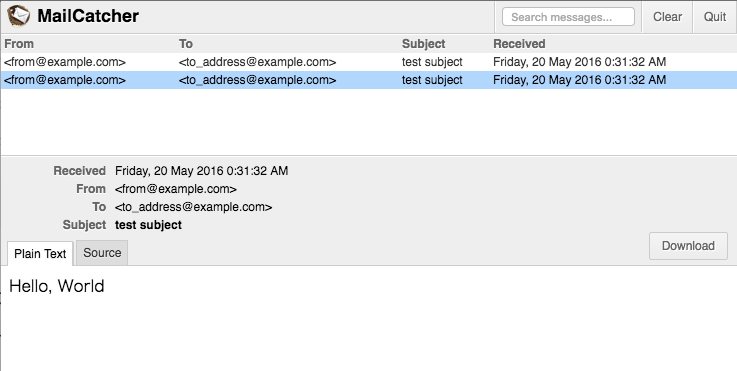
Jump in the previous web page I think that it looks like this.
Let's open the HTML mail:
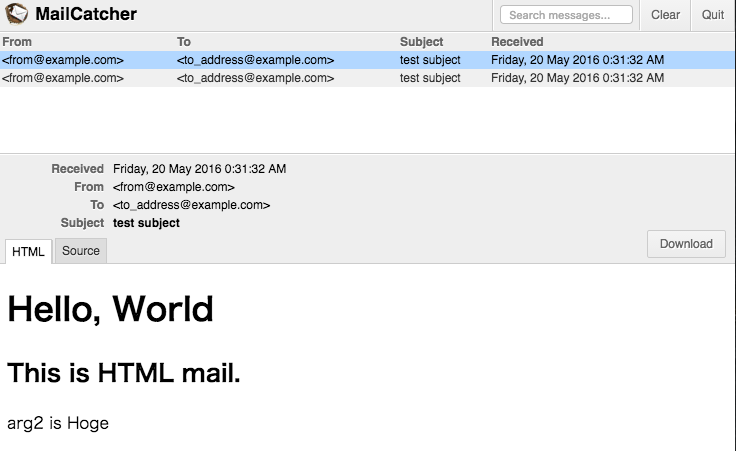
All mails are saved properly!
API
Let's check the API as well.
You can get a summary of saved mails at 192.168.99.100: 1080/message.
(Here We use jq to format json.)
$ curl -s 192.168.99.100:1080/messages | jq
[
  {
    "id": 1,
    "sender": "<from@example.com>",
    "recipients": [
      "<to_address@example.com>"
    ],
    "subject": "test subject",
    "size": "296",
    "created_at": "2016-05-19T15:31:32.000+00:00"
  },
  {
    "id": 2,
    "sender": "<from@example.com>",
    "recipients": [
      "<to_address@example.com>"
    ],
    "subject": "test subject",
    "size": "517",
    "created_at": "2016-05-19T15:31:32.000+00:00"
  }
]
The body of each mail can also be obtained with api. Using the id of the above summary result to identify the mail You can check it by:
192.168.99.100: 1080/messages/: id(.format)
The part of .format is plain or html .
In this case id:1 is plain and id:2 is html, so let's check the contents following that.
- Content of the mail:
$ curl -s 192.168.99.100:1080/messages/1.plain
Hello, World
- Content of HTML
$ curl -s 192.168.99.100:1080/messages/2.html
<!DOCTYPE html>
<html>
  <head>
    <meta content='text/html; charset=UTF-8' http-equiv='Content-Type' />
  </head>
  <body>
    <h1>Hello, World</h1>
    <h2>This is HTML mail.</h2>
    <p>arg2 is Hoge</p>
  </body>
</html>
Those are saved properly right?
Others: You can acquire the whole mail contents including the header by id.source.
$ curl -s 192.168.99.100:1080/messages/2.source
Date: Fri, 20 May 2016 00:31:32 +0900
From: from@example.com
To: to_address@example.com
Message-ID: <573ddc543bc77_8ff73fcdbe03fa18274e5@paganini.local.mail>
Subject: test subject
Mime-Version: 1.0
Content-Type: text/html;
 charset=UTF-8
Content-Transfer-Encoding: 7bit

<!DOCTYPE html>
<html>
  <head>
    <meta content='text/html; charset=UTF-8' http-equiv='Content-Type' />
  </head>
  <body>
    <h1>Hello, World</h1>
    <h2>This is HTML mail.</h2>
    <p>arg2 is Hoge</p>
  </body>
</html>
Conclusion
In this case you can send as much mails as you want with confidence in your own development environment.
All rights reserved
