Selenium và Framework
Bài đăng này đã không được cập nhật trong 4 năm
Nguồn: https://vntesters.com http://toolsqa.com/selenium-webdriver
I. Giới thiệu công cụ kiểm thử tự động Selenium
Selenium là một trong những công cụ kiểm thử phần mềm tự động mã nguồn mở (open source test automation tool) mạnh mẽ nhất hiện nay cho việc kiểm thử ứng dụng Web. Selenium script có thể chạy được trên hầu hết các trình duyệt như IE, Mozilla FireFox, Chrome, Safari, Opera; và hầu hết các hệ điều hành như Windows, Mac, Linux. Trong loạt bài viết về Selenium, mình sẽ giới thiệu công cụ kiểm thử tự động Selenium ở mức cơ bản dành cho những bạn lần đầu đến với công cụ Selenium này dựa trên những kinh nghiệm mà bản thân mình đã tìm hiểu.
1. Về cấu trúc thì Selenium có 4 phần
• Selenium IDE • Selenium RC (Selenium 1 – Selenium Remote Control) • Selenium Gird • Selenium WebDriver (Selenium 2)
Selenium IDE (Integrated Development Environment) là một công cụ cho phép chúng ta Record/Playback một test script. Đây là một add-on hỗ trợ cho FireFox. Chúng ta chỉ có thể Record trên trình duyệt FireFox, nhưng bù lại, chúng ta có thể Playback trên các trình duyện khác như là IE, Chrome…. Selenium Gird là một hệ thống hỗ trợ người dùng thực thi test script trên nhiều trình duyệt một cách song song mà không cần phải chỉnh sửa test script. Selenium RC, Selenium WebDriver là một thư viện cho phép chúng ta lập trình (scripting) test script trên các ngôn ngữ lập trình khác nhau như Python, Java, C#, Ruby.
2. Các đặc điểm của Selenium
- Mã nguồn mở. Phải nói điểm này là điểm mạnh nhất của Selenium khi so sánh với các test tool khác. Vì là mã nguồn mở nên chúng ta có thể sử dụng mà không phải lo lắng về phí bản quyền hay thời hạn sử dụng.
- Cộng đồng hỗ trợ. Vì là mã nguồn mở nên Selenium có một cộng đồng hỗ trợ khá mạnh mẽ. Bên cạnh đó, Google là nơi phát triển Selenium nên chúng ta hoàn toàn có thể yên tâm về sự hổ trợ miễn phí khi có vấn đề về Selenium. Tuy nhiên, đây cũng là một điểm yếu của Selenium. Cơ bản vì là hàng miễn phí, cộng đồng lại đông nên một vấn đề có thể nhiều giải pháp, và có thể một số giải pháp là không hữu ích. Mặc khác, chúng ta không thể hối thúc hay ra deadline cho sự hỗ trợ.
- Selenium hỗ trợ nhiều ngôn ngữ lập trình.
- Selenium hỗ trợ chạy trên nhiều OS khác nhau với mức độ chỉnh sửa script hầu như là không có. Thực sự thì điều này phụ thuộc phần lớn vào khả năng viết script của chúng ta.
- Chạy test case ở backround. Khi chúng ta thực thi một test scrpit, chúng ta hoàn toàn có thể làm việc khác trên cùng một PC. Điều này hỗ trợ chúng ta không cần tốn quá nhiều tài nguyên máy móc khi chạy test script.
- Không hỗ trợ Win app. Selenium thực sự chỉ hỗ trợ chúng ta tương tác với Browser mà không hỗ trợ chúng ta làm việc với các Win app, kể cả Win dialog như Download/Upload – ngoại trừ Browser Alarm. Vậy nên, để xử lý các trường hợp cần tương tác với hệ thống hay một app thứ ba, chúng ta cần một hay nhiều thư viện khác như AutoIt hay Coded UI.
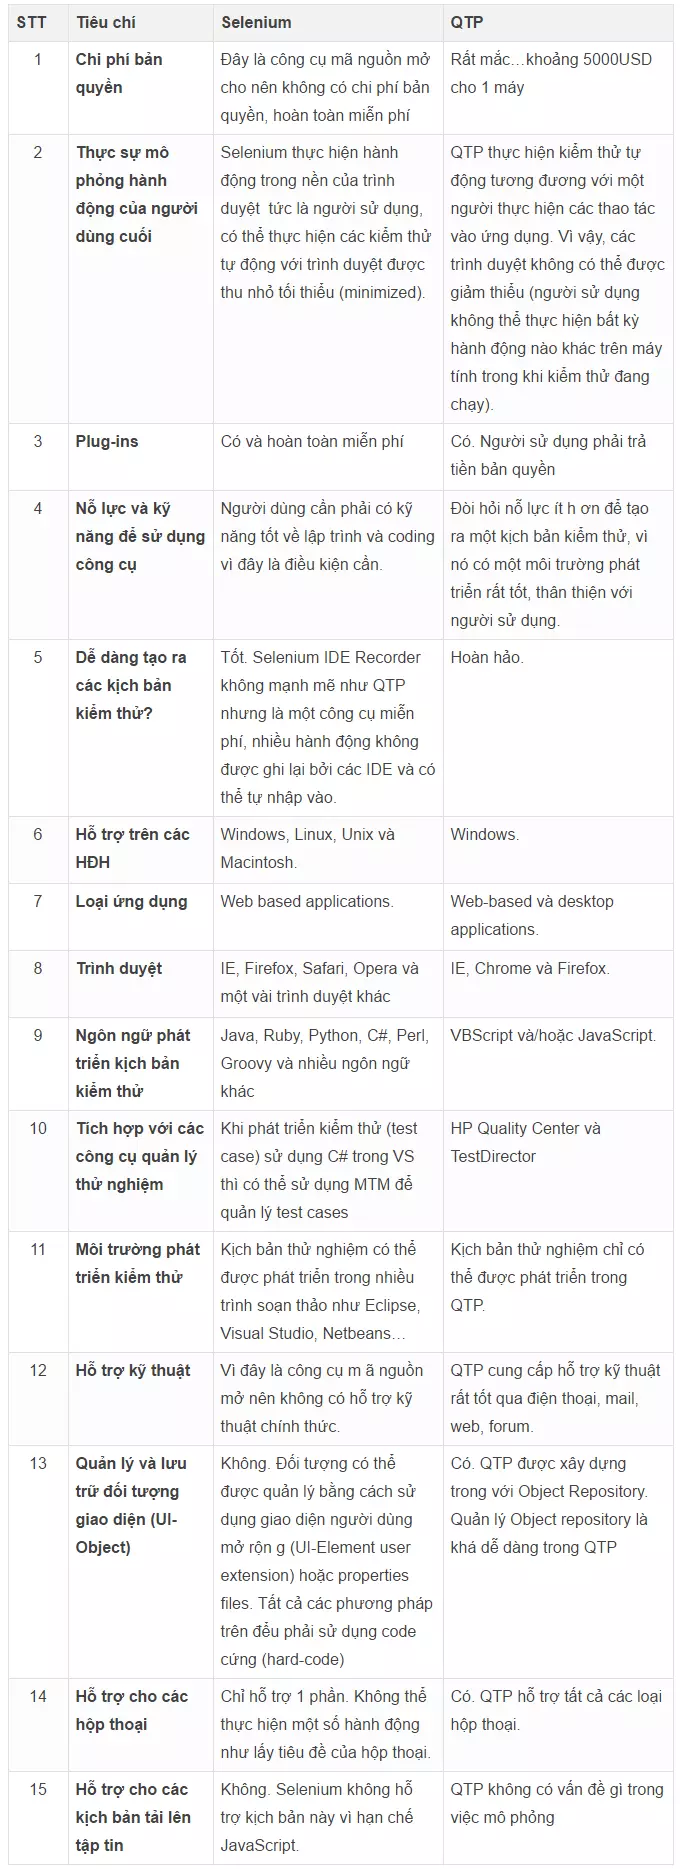
3. Về một số so sánh giữa Selenium và Test Tool khác như QTP
Dưới đây là bảng so sánh nhanh giữa Selenium và QTP dựa trên một số tiêu chí cơ bản để so sánh các công cụ kiểm thử tự động
 Selenium là lựa chọn hoàn hảo nếu…
• Developer chịu trách nhiệm phát triển và bảo trì các kiểm thử
• Những kiểm thử bạn đang phát triển sẽ là 1 phần của một cơ sở hạ tầng lớn hơn
• Chắc chắn là bạn sẽ thực hiện những kiểm thử trên trình duyệt mà thôi
• Bạn nghĩ là bạn sẽ thực hiện những kiểm thử trên những môi trường khác ngoài Windows
• Bạn muốn sử dụng những công cụ miễn phí
Selenium là lựa chọn hoàn hảo nếu…
• Developer chịu trách nhiệm phát triển và bảo trì các kiểm thử
• Những kiểm thử bạn đang phát triển sẽ là 1 phần của một cơ sở hạ tầng lớn hơn
• Chắc chắn là bạn sẽ thực hiện những kiểm thử trên trình duyệt mà thôi
• Bạn nghĩ là bạn sẽ thực hiện những kiểm thử trên những môi trường khác ngoài Windows
• Bạn muốn sử dụng những công cụ miễn phí
QTP có lẽ là lựa chọn tốt nếu…
• Bạn muốn phát triển và duy trì các kiểm thử một cách nhanh chóng và dễ dàng.
• Nếu bạn cần kiểm thử đáng kể bên ngoài trình duyệt
II. Getting Started with Selenium IDE
1. Important preliminary points:
Trước khi bắt đầu, cần cài đặt Mozilla Firefox. Truy cập: http://www.getfirefox.com/.
2. What is Selenium IDE
(Integrated Development Environment) là một công cụ cho phép chúng ta Record/Playback một test script. Đây là một add-on hỗ trợ cho FireFox. Chúng ta chỉ có thể Record trên trình duyệt FireFox
3. Set up IDE
B1. Mở trình duyệt firefox. Truy cập: https://addons.mozilla.org/en-us/firefox/addon/selenium-ide/ B2. Download và cài đặt Selenium IDE. Cài đặt selenium IDE giống như cài đặt một plugin trên trình duyệt Firefox. Click Add to Firefox
và cài đặt. B3. Khởi động lại trình duyệt Firefox B4. Lần đầu khởi động Selenium IDE Click vào icon Selenium trên menu Bar của firefox giao diện selenium IDE sẽ hiển thị như hình bên dưới
4. Selenium IDE Features
4.1. Tool Bar-Các biểu tượng của Selenium IDE:
Base URL — Nhập URL sẽ tiến hành kiểm thử. (tốc độ trượt): Điều khiển testcase chạy nhanh hay chậm. Chạy tất cả các testcase đang được mở. Nhấp vào nút Run để chạy thử nghiệm hiện đang được chọn. Khi chỉ có một thử nghiệm duy nhất được nạp vào thì nút này và nút Run All có tác dụng tương tự. Tạm dừng kiểm thử hiện đang chạy. Sau khi click vào biểu tượng Pause nó sẽ chuyển sang biểu tượng Resume. Với nút này cho phép bạn có thể tiếp tục chạy thử nghiệm của bạn tại đoạn bạn đã dừng. Chạy từng bước của một testcase tại một thời điểm. Sử dụng để debug testcase Áp dụng quy tắc Rollup: tính năng tiên tiến cho phép lặp đi lặp lại các câu lệnh Selenium được nhóm lại thành một hoạt động riêng lẻ. Tài liệu hướng dẫn chi tiết về quy tắc Rollup được trình bày ở mục UI-Element Documentation trên menu Help. Đây là nút record, nó được sử dụng khi các kiểm thử được ghi lại.
4.2. Menu Bar:
Menu File có các tùy chọn cho Test Case và Test Suite. Sử dụng cho việc thêm một Test Case mới, mở một Test Case, lưu một Test Case, xuất ra Test Case bằng ngôn ngữ mà bạn lựa chọn . Bạn cũng có thể mở các Test Case gần đây. Các tùy chọn này cũng có sẵn cho Test Suite. Menu Edit cho phép copy, paste, delete, undo và lựa chọn tất cả các thao tác cho chỉnh sửa các câu lệnh trong Test Case của bạn. Menu Options cho phép thay đổi các thiết lập. Bạn có thể thiết lập giá trị timeout cho một số các câu lệnh, add user-defined user extensions để làm cơ sở thiết lập cho các câu lệnh Selenium, và xác định định dạng (ngôn ngữ) được sử dụng khi lưu các test case của bạn.
4.3. Cửa sổ Test Case:
Kịch bản của bạn được hiển thị trong cửa sổ Test Case. Nó có 2 thẻ: table và source. Table/Source danh sách các action trong test case
4.3.1. Thẻ table: Thẻ table hiển thị câu lệnh và các thông số của chúng. Các trường Command (danh sách các action mà Selenium IDE đang hỗ trợ), Target (định nghĩa control mà chúng ta đang tương tác) và Value (dữ liệu test) Trong trường Target: Định dạng của một bộ định vị là: Kiểu bộ định vị = đối số Selenium hỗ trợ các kiểu bộ định vị sau:
- id
- name
- xpath
- dom
- identifier
- link
- css id and name: Khi bạn mở một trang web bất kỳ, kích chuột phải vào đối tượng xem mã nguồn. Bạn sẽ thấy được id hoặc name của đối tượng web đó. Các đối tượng web: textbox, listbox, radio button…đều có id và name riêng của nó. xpath: XML Path (Xpath) là ngôn ngữ đóng một vai trò quan trọng trong công tác trao đổi dữ liệu giữa các computer hay giữa các chương trình ứng dụng vì nó cho phép ta lựa chọn hay sàng lọc ra những dữ liệu nào mình muốn để trao đổi hay hiển thị. Ví dụ:
Link: Lựa chọn yếu tố liên kết trong đó chứa văn bản phù hợp với khuôn mẫu quy định. • link= văn bản liên kết. CSS: Lựa chọn phần tử sử dụng các bộ lọc css. css=a[href="#id3"] DOM: Document Object Model (DOM) là giao diện độc lập platform và ngôn ngữ cho phép chương trình và script truy xuất động và cập nhật nội dung, cấu trúc và style của tài liệu. Dom=javascriptExpression. 4.3.2. Thẻ Source: Thẻ Source hiển thị test case với định dạng có nguồn gốc trong tập tin sẽ được lưu trữ. Định dạng mặc định là HTML có thể thay đổi bằng ngôn ngữ lập trình Java, C#, hoặc ngôn ngữ kịch bản Python…Source cũng cho phép chỉnh sửa các test case ở nguyên dạng của nó, bao gồm các thao tác sao chép, cắt, dán.
4.4. Cửa sổ Log/Reference/UI-Element/Rollup
Cửa sổ phía dưới của Selenium sử dụng 4 chức năng khác nhau: Log, Reference, UI-Element, và Rollup tương ứng với 4 tab. 4.4.1. Log - thông tin về action đang được thực thi Khi bạn chạy test case, các thông báo lỗi và các thông báo thông tin tiến trình được hiển thị tự động. Các thông tin này có ích cho việc gỡ lỗi các test case. Nút Clear để xóa Log. Nút Info cho phép hiển thị các mức khác nhau của thông tin.
4.4.2. Reference - hướng dẫn sử dụng action đang được chọn Thẻ Reference là lựa chọn mặc định bất cứ khi nào bạn đăng nhập hoặc chỉnh sửa Selenese và các thông số trong chế độ Table. Cửa sổ Reference sẽ hiển thị tài liệu cho câu lệnh hiện tại (hiện đang được chọn).
4.4.3. UI-Element và Rollup: Thông tin chi tiết về hai cửa sổ này có thể được tìm kiếm trong tài liệu UI-Element trong menu Help.
5. Working with IDE:
5.1. Tạo testcase
Khởi động màn hình Selenium IDE Vào File -> New Test Case
5.2. Tạo testsuite
Khởi động màn hình Selenium IDE Vào file New Test Suite
5.3. Debug test
5.3.1. Recording test
-
Bắt đầu ghi lại một test case từ các tương tác của người dùng với website. Khi mở Selenium IDE, nút record mặc định là ON. Nếu bạn không muốn Selenium IDE bắt đầu ghi lại một cách tự động, bạn có thể tắt chức năng này bằng cách vào Options -> Options...và bỏ chọn “Start recording immediately on open.” Trong quá trình record Selenium IDE sẽ tự động chèn các câu lệnh vào trong test case của bạn. Thông thường là: • Nhấp chuột vào một liên kết – các câu lệnh click hoặc clickAndWait. • Nhập vào các giá trị - câu lệnh type. • Lựa chọn các tùy chọn từ hộp danh sách thả xuống – câu lệnh select. • Click vào các checkbox hoặc radio button – câu lệnh click. Với record Selenium IDE, đi đến trình duyệt mà bạn đang kiểm thử, kích phải chuột vào bất cứ đâu trên trang web sẽ hiện lên menu các câu lệnh verify và/hoặc assert. Khi kích phải chuột lên một văn bản hay một tiêu đề trên trang web hiện ra menu có chứa câu lệnh verifyTextPresent và tham số được đề xuất nên có cho chính văn bản đó. Bạn có thể click vào một hình ảnh hoặc một kiểm soát người dùng như là một button hoặc một checkbox chọn Show All Available Commands để thấy được tất cả các tùy chọn khác ngoài verifyTextPresent, ví dụ như verifyElementPresent…, bạn có thể lựa chọn các câu lệnh và cho vào trong test case của bạn. Như các bạn thấy, chúng ta làm đến đâu là Selenium IDE sẽ copy và tạo ra một dòng action tương ứng…
-
Edit (chỉnh sửa): • Chèn lệnh: Trong Table View: Chọn nơi trong test case mà bạn muốn chèn câu lệnh. Trên bảng Test case kích trái chuột trên dòng mà bạn muốn chèn câu lệnh mới. Kích phải chuột và chọn Insert Command, IDE sẽ thêm một dòng trống trước dòng bạn đã chọn. Bây giờ sử dụng các lệnh chỉnh sửa văn bản để nhập lệnh mới và các thông số của nó. Trong Source View: Chọn nơi trong test case mà bạn muốn chèn câu lệnh. Trên bảng Test case kích trái chuột vào giữa các lệnh nơi mà bạn muốn chèn câu lệnh mới và nhập vào các thẻ html cần thiết để tạo ra một hàng ba cột có chứa: câu lệnh, tham số đầu tiên (nếu nó được yêu cầu bởi câu lệnh) và tham số thứ hai (lặp lại, nếu được yêu cầu). • Chèn chú thích: Chú thích có thể được thêm vào test case của bạn để cho dễ đọc hơn. Nhưng khi chạy các test case thì các chú thích được bỏ qua. Trong Table View: Chọn một dòng trong test case của bạn, nơi bạn muốn chèn ghi chú. Kích chuột phải và chọn Insert Comment. Bây giờ sử dụng trường Command để nhập vào ghi chú. Ghi chú của bạn sẽ xuất hiện trong văn bản màu tím.
Trong Source View: Chọn điểm trong test case mà bạn muốn chèn chú thích, thêm một chú thích kiểu html. Ví dụ: <!—chú thích của bạn ở đây -->. 5.3.2. Saving Test Giống như hầu hết các chương trình, có lưu và mở các câu lệnh trong menu File. Tuy nhiên, trong Selenium IDE phân biệt giữa các test case và test suite. Để lưu các kiểm thử Selenium IDE cho lần sử dụng sau, bạn có thể lưu các test case hoặc test suite. Cần phải lưu các test case trước khi lưu test suite. Chúng ta lưu test case lại để có thể tái sử dụng vào lần sau (Regression Test). Ở đây, Selenium IDE có hai chức năng, Save và Export. Chức năng Save sẽ lưu test case của chúng ta ở dạng html, giống như những gì chúng ta thấy trong tab Source. Chức năng Export dùng để phát sinh ra code ở nhiều ngôn ngữ khác nhau như Python, Java, C#, Ruby. Các bạn chú ý là Export sẽ ra hai dạng code khác nhau, RC và WebDriver. Đây là hai dạng của Selenium Scripting mà mình đã đề cập ở phần một. Khi Save test case ở dạng html, chúng ta có thể mở lại test case trong Selenium IDE và Playback. Khi Export test case ra code, chúng ta không thể import lại Selenium IDE để Playback, mà chúng ta chỉ có thể sử dụng nó trong một framework khác như VS, Eclipse hay RobotFramework. Khi bạn mở một test case hoặc test suite đã tồn tại, Selenium IDE hiển thị các câu lệnh Selenium trong bảng Test case.
- Chạy các Test case: IDE cho phép nhiều tùy chọn để chạy các test case của bạn. Bạn có thể chạy tất cả test case cùng một lúc, dừng lại và bắt đầu, chạy mỗi dòng một lần, chạy một câu lệnh đơn hiện đang phát triển, bạn có thể chạy một loạt toàn bộ test suite. Các test case được thực hiện rất linh hoạt trong IDE.
- Chạy một test case: Click vào nút Run để chạy test case hiện đang hiển thị.
- Chạy một test suite: Click vào nút Run All để chạy tất cả các test case trong test suite đã nạp hiện tại. Sau khi chạy, thực hiện Save:
III. Locators
1. Important preliminary points
Để thực hiện lấy vị trí element cần cài đặt các ứng dụng:
- Firebug: https://addons.mozilla.org/firefox/addon/firebug
- Firefinder: https://addons.mozilla.org/vi/firefox/addon/firepath/
- IE Developer Tools: Đó là các bản IE7, IE8 and IE9 mà có thể xem vị trí element qua F12. Bản này cũng có một số các tính năng như Firebug có.
- Google Chrome Developer Tools: Cũng như IE, có thể đi tới trình duyệt và cho phép tìm vị trí elements trên trang và có thể làm việc với Xpath.
2. Locating element by Id
2.1. finding IDs of elements on the page with Firebug
- B1. Điều hướng tới: http://book.theautomatedtester.co.uk/chapter2 và click đến icon Firebug
- B2. Click chọn icon Element trên Firebug.
- B3. Di chuyển con trỏ tới vị trí mà bạn muốn lấy locate
- B4. Nhìn vào Firebug thấy bôi đậm vị trí element đó.
2.2. finding elements by ID
- B1. Mở Selenium IDE
- B2. Điều hướng đến http://book.theautomatedtester.co.uk/chapter2 và Click icon Firebug
- B3. Tìm bất kì Element mà bạn muốn tương tác trên page.Trong textbox Target của Selenium IDE, set vào Target là thuộc tính ID (chắc chắn rằng element đó có thuộc tính ID). Ví dụ tìm element có id là but1 trên page: http://book.theautomatedtester.co.uk/chapter2
- B4. Type command là click
- B5. Chạy script
Cuối cùng sẽ tìm được element tương ứng với ID truyền theo lệnh click như trong IDE như trên.
3. Moving elements on the page
finding elements by name:
-
B1. Mở Selenium IDE
-
B2. Điều hướng đến http://book.theautomatedtester.co.uk/chapter2 và Click icon Firebug
-
B3. Tìm bất kì Element mà bạn muốn tương tác trên page.Trong textbox Target của Selenium IDE, set vào value là thuộc tính name (chắc chắn rằng element đó có thuộc tính name). Ví dụ tìm element có id là but2 trên page : http://book.theautomatedtester.co.uk/chapter2
-
B4. Type command là click
-
B5. Chạy script
4. Adding filters to the name
4.1. finding elements by link text
- B1. Bạn muốn follow 1 link bạn nên sử dụng target link =link.
- B2. Trên http://book.theautomatedtester.co.uk/chapter2 , đi đến link Index của site. Trên Target của Selenium IDE, add link=Index. Click [Find] trên Selenium IDE, bạn sẽ nhìn thấy như sau:
4.2. finding elements by accessing the DOM via JavaScript
- B1. Bạn muốn follow 1 button.
- B2. Trên http://book.theautomatedtester.co.uk/chapter2, đi đến Element cần tìm. Trên Target của Selenium IDE, truy cập dom thông qua JS. Click [Find] trên Selenium IDE, bạn sẽ nhìn thấy như sau:
4.3. finding elements by XPath
Có 2 cách xác định xPath:
- Xác định tuyệt đối “/” Một dấu slash “/” xác định một đường dẫn tuyệt đối đến một đối tượng UI. Ví dụ: “/html/body/table” cho phép chúng ta lấy ra toàn bộ các bảng html trên trang web ngay sau thẻ body.
- Xác định tương đối “//” Hai dấu slash “//” cho chúng ta xác định một đối tượng UI một cách tương đối, không cần chính xác vị trí của thẻ html ở đâu trong toàn bộ mã nguồn của trang web. Ví dụ: “//div” cho phép chúng ta lấy ra toàn bộ thẻ div trong mã nguồn. “//div//span” cho phép chúng ta lấy ra toàn bộ thẻ span mà trước đó có một thẻ div, không quan tâm đến mức độ của thẻ div và span trong mã nguồn.
- Xác định bằng thuộc tính “@” Ký hiệu “@” cho phép chúng ta lọc lại các đối tượng UI được trả về thông qua một thuộc tính có bên trong thẻ html. Ví dụ: “//div[@class=’abc’]” cho phép chúng ta lấy ra tất cả thẻ div trong mã nguồn mà có thuộc tính class là ‘abc’.
Từ đó ta tìm được element bởi Xpath như sau:
- B1. Mở Selenium IDE
- B2. Điều hướng đến http://book.theautomatedtester.co.uk/chapter2.
- B3. Set type Click tới selectbox Command
- B4. Set Type xpath=//input tới textbox Target
- B5. Click [Find] trên Selenium IDE, bạn sẽ nhìn thấy như sau:
Xpath= lúc bắt đầu cho Selenium về Element cần lấy vị trí bởi Xpath. //: Query cần stop ở vị trí đầu tiên mà nó tìm thấy.
5. Using direct XPath in your test
finding elements by direct XPath:
- B1. Mở Selenium IDE
- B2. Điều hướng tới http://book.theautomatedtester.co.uk/chapter2
- B3. Set xpath= /html/body/div[2]/div[3]/input vào Target
- B4. Click button [Find], ta được kết quả như sau:
6. Xác định bằng nội dung text()
Chức năng text() cho phép chúng ta lọc các đối tượng UI được trả về dựa trên nội dung text bên trong một thẻ html. Ví dụ: “//div[text()=’abc’]” cho phép chúng ta lấy ra tất cả các thẻ div trong mã nguồn có text là ‘abc’. Tìm kiếm tuyệt đối theo text.
7. Xác định bằng innertext “.”
Tương tự như trường hợp trên. Ký hiệu “.” cho phép chúng ta lọc các đối tượng UI được trả về dựa trên nội dung innertext bên trong một thẻ html. Ví dụ: “//div[.=’abc’]” cho phép chúng ta lấy ra tất cả các thẻ div trong mã nguồn có innertext là ‘abc’.
8. Xác định bằng các chức năng xử lý chuỗi
Trong XPath, chúng ta có một số hàm chức năng để xử lý chuỗi như contains(), startwith() hay endwith() để lọc các đối tượng UI. Ví dụ: “//div[contains(text(),’abc’)]” cho phép chúng ta lấy ra tất cả các thẻ div trong mã nguồn có text chứa đoạn ‘abc’. “//div[startwith(.,’abc’)]” cho phép chúng ta lấy ra tất cả các thẻ div trong mã nguồn có innertext bắt đầu bằng ‘abc’. “//div[endwith(text(),’abc’)]” cho phép chúng ta lấy ra tất cả các thẻ div trong mã nguồn có text kết thúc bằng ‘abc’.
9. Xác định đối tượng cha “/..”
Ký hiệu “/..” cho phép chúng ta xác định đối tượng UI ở trên một cấp. Ví dụ: “//div/..” cho phép chúng ta lấy ra tất cả các thẻ html mà có thẻ div ngay bên dưới nó một cấp.
10. Xác định đối tượng từ một vị trí xác định preceding và following
Hai từ khoá preceding và following cho phép chúng ta lọc ra các đối tượng UI từ một đối tượng đã được xác định trước đó. Hai từ khoá này không phụ thuộc vào mức độ level của thẻ html trong mã nguồn. Ví dụ: “//div[@id=’abc’]/following::a” cho phép chúng ta lấy ra tất cả các thẻ a trong mã nguồn bên dưới một thẻ div có id là ‘abc’. “//div[@id=’abc’]/preceding::a” cho phép chúng ta lấy ra tất cả các thẻ a trong mã nguồn bên trên một thẻ div có id là ‘abc’. Ví dụ: //div[@id=divontheleft]/following::a
11. Using XPath to find the nth element of a type
- B1. Mở Selenium IDE
- B2. Điều hướng tới http://book.theautomatedtester.co.uk/chapter2
- B3. Set //input[2] vào Target , type Click vào Command
- B4. Click button [Find], ta được kết quả như sau:
12. Using element attributes in XPath queries
Ký hiệu “@” cho phép chúng ta lọc lại các đối tượng UI được trả về thông qua một thuộc tính có bên trong thẻ html. Ví dụ: “//div[@class=’abc’]” cho phép chúng ta lấy ra tất cả thẻ div trong mã nguồn mà có thuộc tính class là ‘abc’.
- B1. Mở Selenium IDE
- B2. Điều hướng tới http://book.theautomatedtester.co.uk/chapter2
- B3. Set //div[@class='centerdiv'] vào Target
- B4. Click button [Find], ta được kết quả như sau:
13. CSS Selectors
13.1. Finding elements by their attributes
-
B1. Mở Selenium IDE
-
B2. Điều hướng tới http://book.theautomatedtester.co.uk/chapter2 Xem html rồi lấy CSS/ Firepath như sau:
-
B3. Set css=input[name="but2"] vào Target
-
B4. Click button [Find], ta được kết quả như sau:
Theo cú pháp: node[attribute='value'] =>input[value='chocolate']=> css=input[value='chocolate']
IV. Overview of Selenium WebDriver
1. Selenium Introduction
Selenium là một công cụ kiểm thử phần mềm tự động, được phát triển bởi ThoughtWorks từ năm 2004 với tên ban đầu là JavaScriptTestRunner. Các đặc điểm của Selenium:
- Mã nguồn mở. Phải nói điểm này là điểm mạnh nhất của Selenium khi so sánh với các test tool khác. Vì là mã nguồn mở nên chúng ta có thể sử dụng mà không phải lo lắng về phí bản quyền hay thời hạn sử dụng.
- Cộng đồng hỗ trợ. Vì là mã nguồn mở nên Selenium có một cộng đồng hỗ trợ khá mạnh mẽ. Bên cạnh đó, Google là nơi phát triển Selenium nên chúng ta hoàn toàn có thể yên tâm về sự hổ trợ miễn phí khi có vấn đề về Selenium. Tuy nhiên, đây cũng là một điểm yếu của Selenium. Cơ bản vì là hàng miễn phí, cộng đồng lại đông nên một vấn đề có thể nhiều giải pháp, và có thể một số giải pháp là không hữu ích. Mặc khác, chúng ta không thể hối thúc hay ra deadline cho sự hỗ trợ.
- Selenium hỗ trợ nhiều ngôn ngữ lập trình.
- Selenium hỗ trợ chạy trên nhiều OS khác nhau với mức độ chỉnh sửa script hầu như là không có. Thực sự thì điều này phụ thuộc phần lớn vào khả năng viết script của chúng ta.
- Chạy test case ở backround. Khi chúng ta thực thi một test scrpit, chúng ta hoàn toàn có thể làm việc khác trên cùng một PC. Điều này hỗ trợ chúng ta không cần tốn quá nhiều tài nguyên máy móc khi chạy test script.
- Không hỗ trợ Win app. Selenium thực sự chỉ hỗ trợ chúng ta tương tác với Browser mà không hỗ trợ chúng ta làm việc với các Win app, kể cả Win dialog như Download/Upload – ngoại trừ Browser Alarm. Vậy nên, để xử lý các trường hợp cần tương tác với hệ thống hay một app thứ ba, chúng ta cần một hay nhiều thư viện khác như AutoIt hay Coded UI.
2. Set Up Selenium WebDriver
2.1. Set Up Java
-
B1. Tới page : http://www.oracle.com/technetwork/java/javase/downloads/index.html Tìm Java SE version cuối và Download JDK
-
B2. Click accept để Download và lưu về máy.
-
B3. Cài đặt JDK:
2.2. Set Up Eclipse
-
B1. Đi đến page: http://www.eclipse.org/downloads.
-
B2. Chọn version phù hợp với cấu hình máy
-
B3: Lưu và extract file. Chạy file .exe
Tạo workspace lưu trữ project:
2.3. Set Up WebDriver Client
- B1. Đi tới page: http://docs.seleniumhq.org/download/ Tìm tới WebDriver Java client driver. Click “Download”.
- B2: Extract file. Quan sát thấy có folder “libs” và 2 file zar.
2.4. Configure Eclipse with WebDriver
- B1. Click file .exe và tạo workplace
- B2. Tạo project . Vào File-> New->Project
. Chọn Java Project và click Next . Lấy tên project “OnlineStore” và Finish
- B3. Tạo package . Nhấn chuột phải vào project. Chọn New-> Package.
. Lấy tên package automationFramework rồi Click Finish
- B4. Tạo Class . Click chuột phải vào package chọn New-> Class
.Lấy tên class FirstTestCase, click Finish, ta được:
- B5. Add External JARs tới build path của project . Chuột phải project -> Select Properties-> Java build path-> Libraries tab Add External JARs. . Add Selenium-java và các jar trong thư mục libs
. Cấu hình xong hoàn chỉnh như sau:
2.5. First Test Case with FF Browser
- Script test: . Mở trình duyệt firefox . Mở website www.Store.DemoQA.com . Hiển thị MSG thông báo mở website thành công . Đợi 5s . Đóng trình duyệt Triển khai Script trên Eclipse như sau:
package automationFramework;

public class FirstTestCase {

	public static void main(String[] args) {

		// Create a new instance of the Firefox driver
		WebDriver driver = new FirefoxDriver();

        //Launch the Online Store Website
		driver.get("http://www.store.demoqa.com");

        // Print a Log In message to the screen
        System.out.println("Successfully opened the website www.Store.Demoqa.com");

		//Wait for 5 Sec
		Thread.sleep(5);
        // Close the driver
        driver.quit();
    }
}
-
Chạy testcase . Vào Run -> Run As -> Java Application hoặc Click chuột phải trên code Eclipse và Click Run As -> Java Application.
-
Giải thích Code: . Import thư viện: org.openqa.selenium.WebDriver org.openqa.selenium.firefox.FirefoxDriver . Khởi tạo đối tượng: WebDriver driver = new FirefoxDriver(); . Hiển thị trạng thái MSG: System.out.println(“Successfully, opened the website www.Store.Demoqa.com”); . Trạng thái tạm thời delay thực hiện script: Thread.sleep(5); . Comment: //
V. Selenium Tutorial – WebDriver Advance
1. Data Driven Technique with Apache POI (EXCEL)
1.1. Download Apache POI
-
B1. Đi tới page: http://poi.apache.org/
-
B2. Tìm đến version cuối. Click Available Downloads
-
B3. Click trên zip để download:
Follow:
- B4. Extract file và sử dụng.
1.2. Add Apache POI
Add Apache POI Jar tới thư viện của Project
-
B1. Chuột phải project-> Build Path-> Configure Build Path
-
B2. Click Add External JARS-> click chọn file zar từ folder
Add từ hết các folder trong hình.
1.3. Test Case with Excel
Demo theo dõi : http://toolsqa.wpengine.com/selenium-webdriver/data-driven-testing-excel-poi/
1.4. Đợi đối tượng UI hoặc sự kiện với Selenium WebDriver
Trong kiểm thử tự động, đôi khi tốc độ của công cụ kiểm thử tự động nhanh hơn tốc độ của ứng dụng cần kiểm thử (AUT/SUT) dẫn đến việc thực thi kiểm thử của chúng ta thất bại (Failed). Hầu hết các công cụ kiểm thử tự động đều hỗ trợ cho chúng ta cách để có thể chờ đợi một đối tượng UI hoặc một sự kiện của đối tượng UI xảy ra. Selenium WebDriver cung cấp cho chúng ta hai phương thức để làm việc này: Explicit (công khai) và Implicit (ngầm).
- Chờ đợi Implicit
Chờ ngầm là việc sử dụng một thời gian nhất định để Selenium WebDriver cố gắng tìm một đối tượng UI trong trường hợp đối tượng UI không xuất hiện ngay lập tức. Giá trị mặc định là 0 giây, và giá trị này được gắn kèm với đối tượng IWebDriver. Một khi được thiết lập, giá trị này sẽ bắt đầu ảnh hưởng đến toàn bộ vòng đời của đối tượng IWebDriver, cho đến khi được thiết lập giá trị mới hoặc kết thúc đối tượng IWebDriver. Sau khi thiết lập giá trị này, trong các đoạn mã kiểm thử, chúng ta không cần phải thêm bất kỳ câu lệnh nào nữa. Việc chờ đợi được đối tượng IWebDriver quản lý. Đây cũng là lý do mà chúng ta gọi là chờ “ngầm”
 .
Cách thiết lập cho việc chờ này như sau:
driver.Manage().Timeouts().ImplicitlyWait(TimeSpan.FromSeconds(10));
Đối số của hàm ImplicitlyWait là một đối tượng TimeSpan của C#, và chúng ta hoàn toàn toàn quyền thiết lập giá trị tối đa cho việc chờ đợi trước khi trả về lỗi Không-Tìm-Thấy-Đối-Tượng.
.
Cách thiết lập cho việc chờ này như sau:
driver.Manage().Timeouts().ImplicitlyWait(TimeSpan.FromSeconds(10));
Đối số của hàm ImplicitlyWait là một đối tượng TimeSpan của C#, và chúng ta hoàn toàn toàn quyền thiết lập giá trị tối đa cho việc chờ đợi trước khi trả về lỗi Không-Tìm-Thấy-Đối-Tượng.
- Chờ đợi Explicit Chờ đợi công khai là một phương thức chèn mã ngay trong kịch bản kiểm thử tự động của chúng ta, đặc biệt để đợi một sự kiện của đối tượng UI. Đối với việc chờ ngầm, chúng ta chỉ đợi một sự kiện là đối tượng UI xuất hiện trên trang, hay đúng hơn là trong mã nguồn HTML của trang web. Sử dụng phương thức công khai, chúng ta có thể chờ đợi những sự kiện đặc biệt khác của đối tượng UI, như hiển thị, sẵn sàng để sử dụng, thay đổi kích thước, vị trí, v.v… Chúng ta đặc biệt sử dụng cách này khi tương tác với các đối tượng UI Ajax, vì những đối tượng này thường thay đổi trạng thái khi máy chủ/máy khách hoạt động. Với cách này, chúng ta cần một đối tượng trong Selenium WebDriver để quản lý thời gian chờ đợi, WebDriverWait. Cách viết mã cho việc này như sau: WebDriverWait wait = new WebDriverWait(driver, TimeSpan.FromSeconds(30)); wait.Until(ExpectedConditions.ElementToBeClickable([IWebElement])); Đối tượng ExpectedConditions WebDriverWait waitst = new WebDriverWait(driver, 0); waitst.until(ExpectedConditions.visibilityOfElementLocated(By.name("sourceTitle")));
Để việc sử dụng phương thức chờ đợi công khai này dễ dàng hơn, Selenium WebDriver hỗ trợ chúng ta đối tượng ExpectedConditions, dùng cho việc khai báo các điều kiện chờ đợi trong từng trường hợp cụ thể.
- Các điều kiện chờ thường sử dụng: • ElementExists: đợi một đối tượng UI tồn tại trong mã HTML của trang web • visibilityOfElementLocated: đợi một đối tượng UI hiển thị trên trang • ElementToBeClickable: đợi một đối tượng UI sẵn sàng được tương tác • TextToBePresentInElement: đợi một đối tượng UI với một đoạn chữ mong muốn • FrameToBeAvailableAndSwitchToIt: đợi một đối tượng Frame sẵn sàng tương tác
2. Log4j Logging and its advance Usage
2.1. Log4j Introduction
Log4j là một framework đơn giản và linh hoạt. Log4j hỗ trợ ghi lỗi ở nhiều mức khác nhau (Trace, Debug, Info, Warn, Error and Fatal) Log4j có 4 thành phần chính: – LogManager – Loggers – Appenders – Layouts
- LogManager Đây là lớp tĩnh giúp lấy về những ghi chép với tên và cấp bậc khác nhau. Bạn có thể xem xét LogManager như một bộ máy sản xuất ra các object logger. Code:
package Log4jSample;

import org.apache.log4j.BasicConfigurator;
import org.apache.log4j.LogManager;
import org.apache.log4j.Logger;

public class SampleEntry {

	//mainLogger is a logger object that we got from LogManager. All loggers are
        //using this method only. We can consider LogManager as a factory to create
        //Logger objects
	static Logger mainLogger = LogManager.getLogger(SampleEntry.class.getName());

	public static void main(String[] args) {
		// TODO Auto-generated method stub

		BasicConfigurator.configure();
		mainLogger.info("This is just a logger");

	}
}
- Loggers Đây là một lớp giúp bạn ghi thông tin ở các mức độ bản ghi khác nhau.Trong ví dụ trên có thể thấy rằng chúng ta có thể tạo logger lấy tên là mainLogger sử dụng lớp tĩnh LogManager
- Appenders Đây là đối tượng giúp Logger viết log với các output khác nhau. Appenders có thể chỉ định một tập tin, console, một cơ sở dữ liệu như vị trí output. package Log4jSample;```
import org.apache.log4j.BasicConfigurator; import org.apache.log4j.ConsoleAppender; import org.apache.log4j.LogManager; import org.apache.log4j.Logger;
public class SampleEntry {
//All the loggers that can be used static Logger mainLogger = LogManager.getLogger(SampleEntry.class.getName());
public static void main(String[] args) { // TODO Auto-generated method stub
BasicConfigurator.configure();
//Create a console appender and attach it to our mainLogger ConsoleAppender appender = new ConsoleAppender(); mainLogger.addAppender(appender); mainLogger.info("This is just a logger"); } }
* Layouts
Lớp này giúp cho việc bố trị lại cách sắp xếp thông tin hiển thị trong output. Dưới đây sử dụng lớp PatternLayout để thay đổi format của logs:
package Log4jSample;
import java.util.Enumeration;
import org.apache.log4j.Appender; import org.apache.log4j.BasicConfigurator; import org.apache.log4j.ConsoleAppender; import org.apache.log4j.Layout; import org.apache.log4j.LogManager; import org.apache.log4j.Logger; import org.apache.log4j.PatternLayout;
public class SampleEntry {
//All the loggers that can be used
static Logger mainLogger = LogManager.getLogger(SampleEntry.class.getName());

public static void main(String[] args) {
	// TODO Auto-generated method stub

	BasicConfigurator.configure();
	ConsoleAppender appender = new ConsoleAppender();
	appender.activateOptions();
	PatternLayout layoutHelper = new PatternLayout();
	layoutHelper.setConversionPattern("%-5p [%t]: %m%n");
	layoutHelper.activateOptions();
    //mainLogger.getAppender("ConsoleAppender").setLayout(layoutHelper);
	appender.setLayout(layoutHelper);
	mainLogger.addAppender(appender);
	//Create a console appender and attach it to our mainLogger
	mainLogger.info("Pattern 1 is displayed like this");
	layoutHelper.setConversionPattern("%C %m%n");
	mainLogger.info("Pattern 2 is displayed like this");

}
}
### 2.2.	Download Log4j
* B1. Đi tới trang: http://logging.apache.org/ và click Apache log4j

* B2. Download:

Follow:
B3. Extract file
### 2.3.	Add Log4j Jars
Add tới thư viện của Project
* B1. Chuột phải Project-> Build Path-> Configure Build Path


* B2. Click Add External JARS-> select  tới Log4j jar.

### 2.4.	Test Case with Log4j Logging
* Tạo file xml log4j.xml, code:
<log4j:configuration xmlns:log4j="http://jakarta.apache.org/log4j/" debug="false">
<appender name="fileAppender" class="org.apache.log4j.FileAppender"><param name="File" value="logfile.log"/> <layout class="org.apache.log4j.PatternLayout"> <param name="ConversionPattern" value="%d %-5p [%c{1}] %m %n" /> </layout> </appender> <root> <level value="INFO"/> <appender-ref ref="fileAppender"/> </root>
</log4j:configuration>
* Tạo test script class Log4j, code:
import java.util.concurrent.TimeUnit;
import org.apache.log4j.Logger;
import org.apache.log4j.xml.DOMConfigurator;
import org.openqa.selenium.By;
import org.openqa.selenium.WebDriver;
import org.openqa.selenium.firefox.FirefoxDriver;
public class Log4j {
private static WebDriver driver;

private static Logger Log = Logger.getLogger(Log4j.class.getName());

public static void main(String[] args) {

	DOMConfigurator.configure("log4j.xml");

	// Create a new instance of the Firefox driver

    driver = new FirefoxDriver();

    Log.info("New driver instantiated");

    //Put a Implicit wait, this means that any search for elements on the page could take the time the implicit wait is set for before throwing exception

    driver.manage().timeouts().implicitlyWait(10, TimeUnit.SECONDS);

    Log.info("Implicit wait applied on the driver for 10 seconds");

    //Launch the Online Store Website

    driver.get("http://www.onlinestore.toolsqa.wpengine.com");

    Log.info("Web application launched");

    // Find the element that's ID attribute is 'account'(My Account)

    driver.findElement(By.id("account")).click();

    Log.info("Click action performed on My Account link");

    // Find the element that's ID attribute is 'log' (Username)

    // Enter Username on the element found by above desc.

    driver.findElement(By.id("log")).sendKeys("testuser_1");

    Log.info("Username entered in the Username text box");

    // Find the element that's ID attribute is 'pwd' (Password)

    // Enter Password on the element found by the above desc.

    driver.findElement(By.id("pwd")).sendKeys("Test@123");

    Log.info("Password entered in the Password text box");

    // Now submit the form. WebDriver will find the form for us from the element

    driver.findElement(By.id("login")).click();

    Log.info("Click action performed on Submit button");

    // Print a Log In message to the screen

    System.out.println(" Login Successfully, now it is the time to Log Off buddy.");

     // Find the element that's ID attribute is 'account_logout' (Log Out)

    driver.findElement(By.id("account_logout"));

    Log.info("Click action performed on Log out link");

    // Close the driver

    driver.quit();

    Log.info("Browser closed");

}
}
* Check file đầu ra logfile.log

## 3.	TestNG Framework
### 3.1.	Introduction
**3.1.1.	Lợi ích của TestNG**
-	Nó mang lại khả năng tạo báo cáo dạng HTML của việc tiến hành thực hiện Script.
-	Chú thích cho việc kiểm thử dễ dàng
-	Testcase có thể được nhóm lại và đặt mức ưu tiên một cách dễ dàng.
-	Có thể thử nghiệm song song
-	Tạo ra Logs
-	Có thể tham số hóa dữ liệu
**3.1.2.	Viết testcase**
* B1. Viết luồng nghiệp vụ cần test
* B2. Thêm TestNG vào code
* B3. Thêm thông tin về vấn đề test (ex tên lớp, tên phương thức, tên nhóm) trong file testing.xml
* B4. Chạy TestNG
( follow:
**Step 1 **– Write the business logic of the test
**Step 2 **– Insert TestNG annotations in the code
**Step 3 **– Add the information about your test (e.g. the class names, methods names, groups names etc…) in a testng.xml file
**Step 4 **– Run TestNG)
**3.1.3.	Chú giải trong TestNG:**
-	@BeforeSuite:
-	@AfterSuite
-	@Test: viết các hàm khi chạy test case. Là annotation cho class chúng ta cần test, nó có vai trò định hướng class chúng ta cần test là class gì.
-	@BeforeTest: viết các hàm trước khi chạy test case (ví dụ cài đặt app, kết nối server), run trước khi @Tested class khởi tạo.
-	@AfterTest: Các hành động sau khi chạy hết test cases
-	@BeforeGroups
-	@AfterGroups
-	@BeforeClass
-	@AfterClass
-	@BeforeMethod
-	@AfterMethod
### 3.2.	Install TestNG
Cài đặt TestNG trên Eclipse:
* B1. Mở Eclipse-> Help-> Install New Software

* B2. Click [Add]
Điền tên Name, Location:

Click Ok
* B3. Click TestNG rồi nhấn Next:

* B4. Click I accept the terms of the license agreement-> Finish

* B5. Hiển thị TestNG trong menu:


### 3.3.	First Test Case with TestNG
* B1. Nhấn Ctrl+N-> TestNG-> TestNG Class
Hoặc: Chuột phải package-> TestNG-> TestNG Class

* B2. Đặt tên lớp TestNG
Ở phần Annotations, check @BeforeMethod, @AfterMethod. Click Finish, ta được:

* B3: Testcase:
@BeforeMethod : Mở trình duyệt Firefox
@Test: Nhập username, password->Login-> hiển thị MSG-> Logout
@AfterMethod: Đóng trình duyệt
	```
package automationFramework;

import java.util.concurrent.TimeUnit;

import org.openqa.selenium.By;

import org.openqa.selenium.WebDriver;

import org.openqa.selenium.firefox.FirefoxDriver;

import org.testng.annotations.Test;

import org.testng.annotations.BeforeMethod;

import org.testng.annotations.AfterMethod;

public class TestNG {

	public WebDriver driver;

  @Test

  public void main() {

	// Find the element that's ID attribute is 'account'(My Account)

      driver.findElement(By.id("account")).click();

      // Find the element that's ID attribute is 'log' (Username)

      // Enter Username on the element found by above desc.

      driver.findElement(By.id("log")).sendKeys("testuser_1");

      // Find the element that's ID attribute is 'pwd' (Password)

      // Enter Password on the element found by the above desc.

      driver.findElement(By.id("pwd")).sendKeys("Test@123");

      // Now submit the form. WebDriver will find the form for us from the element

      driver.findElement(By.id("login")).click();

      // Print a Log In message to the screen

      System.out.println(" Login Successfully, now it is the time to Log Off buddy.");

      // Find the element that's ID attribute is 'account_logout' (Log Out)

      driver.findElement(By.id("account_logout"));

  }

  @BeforeMethod

  public void beforeMethod() {

	  // Create a new instance of the Firefox driver

      driver = new FirefoxDriver();

      //Put a Implicit wait, this means that any search for elements on the page could take the time the implicit wait is set for before throwing exception

      driver.manage().timeouts().implicitlyWait(10, TimeUnit.SECONDS);

      //Launch the Online Store Website

      driver.get("http://www.onlinestore.toolsqa.wpengine.com");

  }

  @AfterMethod

  public void afterMethod() {

	  // Close the driver

      driver.quit();

  }

}
-
B4. Run test:
-
B5. Xem report gen ra dạng html: Vào thư mục test-output, xem emailable-report.html mở dưới trình duyệt
-
B6. Xem TestNG report dạng Groups & Reporter Output
3.4. TestNG Test Suite
Tạo file testng.xml và xử lý nhiều lớp test. Trong đó có test dependency, method, class hoặc package và set priority.
- B1. Tạo TestNG Xml . Click chuột phải project -> New -> File
. Thêm file name=testing.xml
- B2. Write code:
11 <suite name="Any Name" >
<test name="Any Name" >
<classes> <class name="PackageName.TestCaseName" />
</classes>
</test>
</suite>
Follow:
Đầu tiên là tag Suite tag<suite>,sau đó là Test tag<test> và rồi Class tag<classes>. Bạn có thể lấy tên Suite là bất kì, nhưng cần cung cấp đúng tên của classes bao gồm tên Package và tên Test Case.
- B3. Chạy testng.xml Chuột phải trên file testing.xml -> Run As > TestNG Suite.
3.6. TestNG Reporters & Asserts
- B1. Viết testcase cho ứng dụng Sign In và triển khai Log4j log trên mỗi Step.
- B2. Insert Reporter logs trên sự kiện chính của test.
package automationFramework;

import java.util.concurrent.TimeUnit;

import org.apache.log4j.Logger;

import org.apache.log4j.xml.DOMConfigurator;

import org.openqa.selenium.By;

import org.openqa.selenium.WebDriver;

import org.openqa.selenium.firefox.FirefoxDriver;

import org.testng.Reporter;

import org.testng.annotations.Test;

import utility.Log;

public class ReporterLogs {

	private static WebDriver driver;

	private static Logger Log = Logger.getLogger(Log.class.getName());

    @Test

	public static void test() {

		DOMConfigurator.configure("log4j.xml");

        driver = new FirefoxDriver();

        Log.info("New driver instantiated");

        driver.manage().timeouts().implicitlyWait(10, TimeUnit.SECONDS);

        Log.info("Implicit wait applied on the driver for 10 seconds");

        driver.get("http://www.store.demoqa.com");

        Log.info("Web application launched");

        // Our first step is complete, so we produce a main event log here for our reports.

        Reporter.log("Application Lauched successfully | ");

        driver.findElement(By.xpath(".//*[@id='account']/a")).click();

        Log.info("Click action performed on My Account link");

        driver.findElement(By.id("log")).sendKeys("testuser_1");

        Log.info("Username entered in the Username text box");

        driver.findElement(By.id("pwd")).sendKeys("Test@123");

        Log.info("Password entered in the Password text box");

        driver.findElement(By.id("login")).click();

        Log.info("Click action performed on Submit button");

        // Here we are done with our Second main event

        Reporter.log("Sign In Successful | " );

        driver.findElement(By.id("account_logout"));

        Log.info("Click action performed on Log out link");

        driver.quit();

        Log.info("Browser closed");

        // This is the third main event

        Reporter.log("User is Logged out and Application is closed | ");

	}

}
- B3. Run test: Log4j logging output:
Reporters log:
Log4j logging sẽ giúp bạn report một bug hoặc step trong suốt quá trình run test. Đưa ra kết quả kiểm tra chia sẻ đến lead (lead chỉ quan tâm tới kết quả test chứ k quan tâm nhiều đến test step) Cũng có thể sử dụng reporter’s logs trong verification trong quá trình test. E.x:
if(Text1.equals(Text2)){

			Reporter.log("Verification Passed forText");

		}else{

			Reporter.log("Verification Failed for Text");

		}
TestNG Asserts Different Asserts Statements *** Assert.assertTrue() & Assert.assertFalse() ***
package automationFramework;

import java.util.concurrent.TimeUnit;

import org.openqa.selenium.By;

import org.openqa.selenium.WebDriver;

import org.openqa.selenium.WebElement;

import org.openqa.selenium.firefox.FirefoxDriver;

import org.testng.Assert;

import org.testng.annotations.Test;

public class Asserts {

	private static WebDriver driver;

  @Test

  public void f() {

	  driver = new FirefoxDriver();

      driver.manage().timeouts().implicitlyWait(10, TimeUnit.SECONDS);

      driver.get("http://www.store.demoqa.com");

      // Here driver will try to find out My Account link on the application

      WebElement myAccount = driver.findElement(By.xpath(".//*[@id='account']/a"));

      //Test will only continue, if the below statement is true

      //This is to check whether the link is displayed or not

      Assert.assertTrue(myAccount.isDisplayed());

      //My Account will be clicked only if the above condition is true

      myAccount.click();

  }

}
Assert.assertTrue() có nghĩa là nếu bạn muốn test tiếp tục chỉ khi một vài element quan trọng hiển thị trên page. Bạn sẽ sử dụng Assert false vì nó sẽ làm fail test trong case mà element không hiển thị trên page. Assert.assertEquals()
 @Test

  public void test() {

	  String sValue = "Lakshay Sharma";

	  System.out.println(" What is your full name");

	  Assert.assertEquals("Lakshay Sharma", sValue);

	  System.out.println(sValue);

  }
assertEquals cũng làm việc tương tự như assert true and assert false. Nó sẽ stop thực hiện, nếu như giá trị không bằng và tiếp tục thực hiện nếu như giá trị tương đương.
3.7. TestNG DataProvider with Excel
- B1. Tạo 1 test case của ứng dụng Login với TestNG Data Provider.
- B2. Tạo 1 sheet test data.
- B3. Tạo function Open và Read dữ liệu từ file Excel.
- B4. Tạo test case TestNG để chấp nhận dữ liệu từ Excel sử dụng ata Provider.
- B5. Run test. Follow: http://toolsqa.wpengine.com/selenium-webdriver/testng-data-provider-excel/
VI. Selenium Tutorial – Automation Framework
1. Keyword Driven Framework
1.1. Introduction
Keyword Driven Framework là một loại Framework test tự động chức năng. Cơ bản, Keyword Driven Framework làm việc là chia Test case thành 4 phần khác nhau. Phần đầu tiên gọi là Test Step, phần 2 là Object của test step, phần 3 là Action của Test Object, phần 4 là Data của Test Object.
- Test Step: Nó là mô tả nhỏ của Test step hoặc mô tả của Action sẽ thực hiện trên Test Object.
- Test Object: Là tên của Page object/element, như Username & Password.
- Action: Là tên của action, được thực hiện trên bất kì Object nào như: click, open browser, input etc
- Test Data: Dữ liệu giúp cho Object thực hiện bất kì action nào. E.x: giá trị Username cho filed Username 1.1.1. How to do:
- B1. Mở trình duyệt
- B2. Điều hướng tới URL Page Web
- B3. Click button My Account
- B4. Nhập Username, Password
- B5. Click button Login
- B6. Click button Logout
- B7. Đóng trình duyệt 1.1.2. Ưu điểm:
- Less Technical Expertise: Không cần nhiều chuyên môn về kỹ thuật, manual tester hoặc các non technical tester có thể dễ dàng viết kịch bản cho test tự động.
- Easy To Understand: Dễ dàng để hiểu, được thiết lập trên Excel sheet, nên test script dễ dàng đọc và hiểu. Keyword và action cũng chặt chẽ như manual test case, dễ dàng để viết và duy trì.
- Early Start: Dễ dàng bắt đầu để tạo Keyword Driven test cases trước khi ứng dụng được bàn giao.
- Re-usability of component: Có khả năng tái sử dụng các thành phần, nhờ việc thực hiện module hóa trong Keyword Driven
- Re-usability of code: Sử dụng lại mã code Steps to Set up Keyword Driven Framework E.x: Step 1: Automate an End 2 End flow Step 2: Identify & Implement Action Keywords Step 3: Set Up Data Engine – Excel Sheet ***Step 4: ***Implement Java Reflection class to create Action Keywords run time Step 5: Set Up Java Constant Variables for fixed data Step 6: Set Up Object Repository properties file ***Step 7: ***Set Up Test Suite Execution Engine
***Step 8: ***Set Up Log4j Logging in Framework ***Step 9: ***Set Up Exception Handling in Framework Step 10: Set Up Test Result Reporting ***Step 11: ***Set Up Data Driven Technique in Framework
Step 12: Set Up Framework for Manual Testers St1. Automate an End 2 End flow
- Mở trình duyệt
- Điều hướng tới URL Web page test
- Click button My Account
- Nhập Username, Password
- Click LogIn button
- Click LogOut button
- Đóng trình duyệt Pre: Set up Java, Eclipse, Set up WebDriver Java Client, Config Eclipse với WebDriver How to do:
package executionEngine;

import java.util.concurrent.TimeUnit;
import org.openqa.selenium.*;
import org.openqa.selenium.firefox.FirefoxDriver;

public class DriverScript {
        private static WebDriver driver = null;
    public static void main(String[] args) {
        driver = new FirefoxDriver();
        driver.manage().timeouts().implicitlyWait(10, TimeUnit.SECONDS);
        driver.get("http://www.store.demoqa.com");

        driver.findElement(By.xpath(".//*[@id='account']/a")).click();
        driver.findElement(By.id("log")).sendKeys("testuser_3");
        driver.findElement(By.id("pwd")).sendKeys("Test@123");
        driver.findElement(By.id("login")).click();
        driver.findElement (By.xpath(".//*[@id='account_logout']/a")).click();
        driver.quit();
            }
    }
1.2. Identify and Implement Action Keywords
1.2.1. Identify Action Keywords Keyword Driven Testing là một kỹ thuật lập trình sử dụng các tập tin dữ liệu không chỉ chứa các dữ liệu kiểm thử và kết quả mong đợi, mà còn chứa các “từ khóa” liên quan đến ứng dụng đang được kiểm thử Tạo package dataEngine Tạo ExcelSheet
1.2.2. Implement Action Keywords Tạo package config Tạo class ActionKeywords Tạo các method Static cho mỗi Action Keyword để có thể ghi lại trên Excel
package config;

import java.util.concurrent.TimeUnit;

import org.openqa.selenium.By;
import org.openqa.selenium.WebDriver;
import org.openqa.selenium.firefox.FirefoxDriver;

public class ActionKeywords {

		public static WebDriver driver;

	public static void openBrowser(){
		driver=new FirefoxDriver();
		}

	public static void navigate(){
		driver.manage().timeouts().implicitlyWait(10, TimeUnit.SECONDS);
		driver.get("http://www.store.demoqa.com");
		}

	public static void click_MyAccount(){
		driver.findElement(By.xpath(".//*[@id='account']/a")).click();
		}

	public static void input_Username(){
		driver.findElement(By.id("log")).sendKeys("testuser_3");
		}

	public static void input_Password(){
		driver.findElement(By.id("pwd")).sendKeys("Test@123");
		}

	public static void click_Login(){
		driver.findElement(By.id("login")).click();
		}

	public static void waitFor() throws Exception{
		Thread.sleep(5000);
		}

	public static void click_Logout(){
		driver.findElement(By.xpath(".//*[@id='account_logout']/a")).click();
		}
	public static void closeBrowser(){
			driver.quit();
		}
	}

Follow:
1.3. Set Up Data Engine – Apache POI (Excel)
Set Up Data Engine – Apache POI (Excel) Các class và method sẽ dùng để đọc dữ liệu từ Excel Sheet ở trong package ‘org.apache.poi.hssf.usermodel’ Reading Data from Excel
- B1. Download Apache POI, add library
- B2. Tạo package utility
- B3. Tạo class ExcelUtils
package utility;

import java.io.FileInputStream;
import org.apache.poi.xssf.usermodel.XSSFCell;
import org.apache.poi.xssf.usermodel.XSSFSheet;
import org.apache.poi.xssf.usermodel.XSSFWorkbook;
    public class ExcelUtils {
                private static XSSFSheet ExcelWSheet;
                private static XSSFWorkbook ExcelWBook;
                private static XSSFCell Cell;

            //This method is to set the File path and to open the Excel file
            //Pass Excel Path and SheetName as Arguments to this method
            public static void setExcelFile(String Path,String SheetName) throws Exception {
	                FileInputStream ExcelFile = new FileInputStream(Path);
	                ExcelWBook = new XSSFWorkbook(ExcelFile);
	                ExcelWSheet = ExcelWBook.getSheet(SheetName);
                   }

            //This method is to read the test data from the Excel cell
            //In this we are passing parameters/arguments as Row Num and Col Num
            public static String getCellData(int RowNum, int ColNum) throws Exception{
            	  Cell = ExcelWSheet.getRow(RowNum).getCell(ColNum);
                  String CellData = Cell.getStringCellValue();
                  return CellData;
            	}

    	}
Follow modify DriverScript ``` package executionEngine;
import config.ActionKeywords; import utility.ExcelUtils;
public class DriverScript {
public static void main(String[] args) throws Exception {
	// Declaring the path of the Excel file with the name of the Excel file
	String sPath = "D://Tools QA Projects//trunk//Hybrid Keyword Driven//src//dataEngine//DataEngine.xlsx";

	// Here we are passing the Excel path and SheetName as arguments to connect with Excel file
	ExcelUtils.setExcelFile(sPath, "Test Steps");

	//Hard coded values are used for Excel row & columns for now
	//In later chapters we will replace these hard coded values with varibales
	//This is the loop for reading the values of the column 3 (Action Keyword) row by row
	for (int iRow=1;iRow<=9;iRow++){
	    //Storing the value of excel cell in sActionKeyword string variable
		String sActionKeyword = ExcelUtils.getCellData(iRow, 3);

		//Comparing the value of Excel cell with all the project keywords
		if(sActionKeyword.equals("openBrowser")){
                    //This will execute if the excel cell value is 'openBrowser'
			//Action Keyword is called here to perform action
			ActionKeywords.openBrowser();}
		else if(sActionKeyword.equals("navigate")){
			ActionKeywords.navigate();}
		else if(sActionKeyword.equals("click_MyAccount")){
			ActionKeywords.click_MyAccount();}
		else if(sActionKeyword.equals("input_Username")){
			ActionKeywords.input_Username();}
		else if(sActionKeyword.equals("input_Password")){
			ActionKeywords.input_Password();}
		else if(sActionKeyword.equals("click_Login")){
			ActionKeywords.click_Login();}
		else if(sActionKeyword.equals("waitFor")){
			ActionKeywords.waitFor();}
		else if(sActionKeyword.equals("click_Logout")){
			ActionKeywords.click_Logout();}
		else if(sActionKeyword.equals("closeBrowser")){
			ActionKeywords.closeBrowser();}

		}
	}
}
### 1.4.	Use of Java Reflection Class
Như trên 1.4, chúng ta thấy rằng để thực hiện bất kì Action nào, chúng ta cần so sánh giá trị được lấy từ Excel Sheet với giá trị của mỗi method trong lớp Action Keyword. Thể hiện ở phần đánh dấu sau:
package executionEngine; import java.lang.reflect.Method; import config.ActionKeywords; import utility.ExcelUtils;
public class DriverScript { //This is a class object, declared as 'public static' //So that it can be used outside the scope of main[] method public static ActionKeywords actionKeywords; public static String sActionKeyword; //This is reflection class object, declared as 'public static' //So that it can be used outside the scope of main[] method public static Method method[];
//Here we are instantiating a new object of class 'ActionKeywords'
public DriverScript() throws NoSuchMethodException, SecurityException{
	actionKeywords = new ActionKeywords();
	//This will load all the methods of the class 'ActionKeywords' in it.
            //It will be like array of method, use the break point here and do the watch
	method = actionKeywords.getClass().getMethods();
}

public static void main(String[] args) throws Exception {

	//Declaring the path of the Excel file with the name of the Excel file
	String sPath = "D://Tools QA Projects//trunk//Hybrid Keyword Driven//src//dataEngine//DataEngine.xlsx";

	//Here we are passing the Excel path and SheetName to connect with the Excel file
    //This method was created in the last chapter of 'Set up Data Engine'
	ExcelUtils.setExcelFile(sPath, "Test Steps");

	//Hard coded values are used for Excel row & columns for now
	//In later chapters we will use these hard coded value much efficiently
	//This is the loop for reading the values of the column 3 (Action Keyword) row by row
	//It means this loop will execute all the steps mentioned for the test case in Test Steps sheet
	for (int iRow = 1;iRow <= 9;iRow++){
	    //This to get the value of column Action Keyword from the excel
		sActionKeyword = ExcelUtils.getCellData(iRow, 3);
        //A new separate method is created with the name 'execute_Actions'
		//You will find this method below of the this test
		//So this statement is doing nothing but calling that piece of code to execute
		execute_Actions();
		}
	}

//This method contains the code to perform some action
//As it is completely different set of logic, which revolves around the action only,
//It makes sense to keep it separate from the main driver script
//This is to execute test step (Action)
private static void execute_Actions() throws Exception {
	//This is a loop which will run for the number of actions in the Action Keyword class
	//method variable contain all the method and method.length returns the total number of methods
	for(int i = 0;i < method.length;i++){
		//This is now comparing the method name with the ActionKeyword value got from excel
		if(method[i].getName().equals(sActionKeyword)){
			//In case of match found, it will execute the matched method
			method[i].invoke(actionKeywords);
			//Once any method is executed, this break statement will take the flow outside of for loop
			break;
			}
		}
	}
}
### 1.5.	Set Up Java Constant Variables
**Set Up Java Constant Variables**
Là việc tạo class chứa các biến
* B1. Tạo Class Constants
* B2. Chỉ định các biến fix cố định trong class. E.x: Url, Username and Password.
package config;
public class Constants {
//This is the list of System Variables
//Declared as 'public', so that it can be used in other classes of this project
//Declared as 'static', so that we do not need to instantiate a class object
//Declared as 'final', so that the value of this variable can be changed
// 'String' & 'int' are the data type for storing a type of value
public static final String URL = "http://www.store.demoqa.com";
public static final String Path_TestData = "D://Tools QA Projects//trunk//Hybrid KeyWord Driven//src//dataEngine//DataEngine.xlsx";
public static final String File_TestData = "DataEngine.xlsx";

//List of Data Sheet Column Numbers
public static final int Col_TestCaseID = 0;
public static final int Col_TestScenarioID =1 ;
public static final int Col_ActionKeyword =3 ;

//List of Data Engine Excel sheets
public static final String Sheet_TestSteps = "Test Steps";

// List of Test Data
public static final String UserName = "testuser_3";
public static final String Password = "Test@123";
}
Nhìn trên ví dụ trên, ta thấy:
-	Khai báo ‘public static’, có nghĩa là có thể gọi các biến này trong một lớp khác, hoặc bất kì phương thức nào.
-	Khai báo ‘final’, có nghĩa không thể thay đổi trong suốt quá trình thực hiện.
* B3. Thay đổi required trong class ***Action Keyword***
package config;
import java.util.concurrent.TimeUnit;
import org.openqa.selenium.By; import org.openqa.selenium.WebDriver; import org.openqa.selenium.firefox.FirefoxDriver;
public class ActionKeywords {
	public static WebDriver driver;

public void openBrowser(){
	driver=new FirefoxDriver();
	}

public static void navigate(){
	driver.manage().timeouts().implicitlyWait(10, TimeUnit.SECONDS);
	//Constant Variable is used in place of URL
	//As it was declared as 'static', it can be used by referring the class name
	//Type the class name 'Constants' and press '.' dot, it will display all the memebers of the class Constants
	driver.get(Constants.URL);
	}

public static void click_MyAccount(){
	driver.findElement(By.xpath(".//*[@id='account']/a")).click();
	}

public static void input_Username(){
	//Constant Variable is used in place of UserName
	driver.findElement(By.id("log")).sendKeys(Constants.UserName);
	}

public static void input_Password(){
	//Constant Variable is used in place of Password
	driver.findElement(By.id("pwd")).sendKeys(Constants.Password);
	}

public static void click_Login(){
	driver.findElement(By.id("login")).click();
	}

public static void waitFor() throws Exception{
	Thread.sleep(5000);
	}

public static void click_Logout(){
		driver.findElement (By.xpath(".//*[@id='account_logout']/a")).click();
	}

public static void closeBrowser(){
		driver.quit();
	}

}
B4. Thay đổi require trong class ***Driver Script***
package executionEngine;
import java.lang.reflect.Method;
import config.ActionKeywords; import config.Constants; import utility.ExcelUtils;
public class DriverScript { public static ActionKeywords actionKeywords; public static String sActionKeyword; public static Method method[];
public DriverScript() throws NoSuchMethodException, SecurityException{
	actionKeywords = new ActionKeywords();
	method = actionKeywords.getClass().getMethods();
	}

public static void main(String[] args) throws Exception {

	//Instead of hard coded Excel path, a Constant Variable is used
	String sPath = Constants.Path_TestData;

	//Here we are passing the Excel path and SheetName to connect with Excel file
	//Again a Constant Variable is used in place of Excel Sheet Name
	ExcelUtils.setExcelFile(sPath, Constants.Sheet_TestSteps);

	//Hard coded values are used for Excel row & columns for now
	//In later chapters we will use these hard coded value much efficiently
	//This is the loop for reading the values of the column 3 (Action Keyword) row by row
	for (int iRow=1;iRow<=9;iRow++){
		//Constant Variable is used in place of Column number
		sActionKeyword = ExcelUtils.getCellData(iRow, Constants.Col_ActionKeyword);
		execute_Actions();
		}
	}

 private static void execute_Actions() throws Exception {
	for(int i=0;i<method.length;i++){
		if(method[i].getName().equals(sActionKeyword)){
			method[i].invoke(actionKeywords);
			break;
			}
		}
	}
}
Follow:
### 1.6. Object Repository
* Step 1: Set Up Object Repository properties file
Tạo file OR.txt trong package config
Lấy ra tất cả object properties từ lớp Action Keywords đẩy vào file OR.txt
Tất cả object sẽ được defined: Object Name = Object Property, với object property là locator của element
# Home Page Objects
btn_MyAccount=.//*[@id='account']/a
btn_LogOut=.//*[@id='account_logout']
# Login Page Object
txtbx_UserName=.//*[@id='log']
txtbx_Password=.//*[@id='pwd']
btn_LogIn=.//*[@id='login']
* Step 2: Modify Data Engine sheet to seperate Page Objects with Actions
Thêm một cột mới trong Excel Sheet dataEngine, tên là Page Object
Add tất cả objects trong column Page Object
Bỏ các objects name từ Action Keywords, chỉ có actions nên được để lại trong column Action Keywords
* Step 3: Modify Action Keyword class to work with OR properties
Thay thế tất cả các method click_MyAccount(), click_Login(),click_Logout() thành ‘click()‘.
Khi click method, method tìm đến element để thực hiện click action kèm theo argument của phương thức đó.
argument này sẽ lấy từ Object name từ column ‘Page Object‘ trong excel sheet.
Modify lại action methods, từ đó có thể sử dụng được OR properties.
package config;
import java.util.concurrent.TimeUnit; import static executionEngine.DriverScript.OR;
import org.openqa.selenium.By; import org.openqa.selenium.WebDriver; import org.openqa.selenium.firefox.FirefoxDriver;
public class ActionKeywords {
	public static WebDriver driver;

//All the methods in this class now accept 'Object' name as an argument
public static void openBrowser(String object){
	driver=new FirefoxDriver();
	}

public static void navigate(String object){
	driver.manage().timeouts().implicitlyWait(10, TimeUnit.SECONDS);
	driver.get(Constants.URL);
	}

public static void click(String object){
	//This is fetching the xpath of the element from the Object Repository property file
	driver.findElement(By.xpath(OR.getProperty(object))).click();
	}

public static void input_UserName(String object){
	driver.findElement(By.xpath(OR.getProperty(object))).sendKeys(Constants.UserName);
	}

public static void input_Password(String object){
	driver.findElement(By.xpath(OR.getProperty(object))).sendKeys(Constants.Password);
	}

public static void waitFor(String object) throws Exception{
	Thread.sleep(5000);
	}

public static void closeBrowser(String object){
	driver.quit();
	}

}
* Step 4: Changes in Constants class
Mục mới trong lớp Constants cho column mới của Page Objects.
Modify các giá trị của column Action Keyword, như đã insert new column trước column Action Keword trong excel Sheet dataEngine.
package config;
public class Constants {
//List of System Variables
public static final String URL = "http://www.store.demoqa.com";
public static final String Path_TestData = "D://Tools QA Projects//trunk//Hybrid KeyWord Driven//src//dataEngine//DataEngine.xlsx";
public static final String Path_OR = "D://Tools QA Projects//trunk//Hybrid KeyWord Driven//src//config//OR.txt";
public static final String File_TestData = "DataEngine.xlsx";

//List of Data Sheet Column Numbers
public static final int Col_TestCaseID = 0;
public static final int Col_TestScenarioID =1 ;
//This is the new column for 'Page Object'
public static final int Col_PageObject =3 ;
//This column is shifted from 3 to 4
public static final int Col_ActionKeyword =4 ;

//List of Data Engine Excel sheets
public static final String Sheet_TestSteps = "Test Steps";

//List of Test Data
public static final String UserName = "testuser_3";
public static final String Password = "Test@123";
}
* Step 5: Load OR properties in the Driver Script
package executionEngine;
import java.io.FileInputStream; import java.lang.reflect.Method; import java.util.Properties;
import config.ActionKeywords; import config.Constants; import utility.ExcelUtils;
public class DriverScript {
public static Properties OR;
public static ActionKeywords actionKeywords;
public static String sActionKeyword;
public static String sPageObject;
public static Method method[];

public DriverScript() throws NoSuchMethodException, SecurityException{
	actionKeywords = new ActionKeywords();
	method = actionKeywords.getClass().getMethods();
}

public static void main(String[] args) throws Exception {

	String Path_DataEngine = Constants.Path_TestData;
	ExcelUtils.setExcelFile(Path_DataEngine, Constants.Sheet_TestSteps);

	//Declaring String variable for storing Object Repository path
	String Path_OR = Constants.Path_OR;
	//Creating file system object for Object Repository text/property file
	FileInputStream fs = new FileInputStream(Path_OR);
	//Creating an Object of properties
	OR= new Properties(System.getProperties());
	//Loading all the properties from Object Repository property file in to OR object
	OR.load(fs);

	for (int iRow=1;iRow<=9;iRow++){
		sActionKeyword = ExcelUtils.getCellData(iRow, Constants.Col_ActionKeyword);
		sPageObject = ExcelUtils.getCellData(iRow, Constants.Col_PageObject);
		execute_Actions();
		}
	}

 private static void execute_Actions() throws Exception {

	for(int i=0;i<method.length;i++){
		if(method[i].getName().equals(sActionKeyword)){
			//This is to execute the method or invoking the method
			//Passing 'Page Object' name and 'Action Keyword' as Arguments to this method
			method[i].invoke(actionKeywords,sPageObject);
			break;
			}
		}
	}
}
Follow:
### 1.7. Test Suite Execution Engine
* Step 1: Create a sheet for Test Cases
Tạo new sheet tương tự như ‘DataEngine’ và lấy tên là ‘Test Cases‘
Tạo 3 cột tên: ‘Test Case ID‘, ‘Description‘, ‘Run Mode‘.
Đặt tên testcase ID tùy chọn. Ví dụ LogIn_001, LogIn_002
Mô tả ngắn gọn ở column description
Run Mode là trạng thái step cần test hay không. Có thể là ‘Yes‘ or ‘No‘
* Step 2: Update Constants file
Tạo constant variables cho column mới Test Case ID & Run Mode của Test Cases sheet.
Tạo liên hệ với class Constants
```
package config;
public class Constants {
//List of System Variables
public static final String URL = "http://www.store.demoqa.com";
public static final String Path_TestData = "D://Tools QA Projects//trunk//Hybrid KeyWord Driven//src//dataEngine//DataEngine.xlsx";
public static final String Path_OR = "D://Tools QA Projects//trunk//Hybrid KeyWord Driven//src//config//OR.txt";
public static final String File_TestData = "DataEngine.xlsx";
//List of Data Sheet Column Numbers
public static final int Col_TestCaseID = 0;
public static final int Col_TestScenarioID =1 ;
public static final int Col_PageObject =3 ;
public static final int Col_ActionKeyword =4 ;
//New entry in Constant variable
public static final int Col_RunMode =2 ;
//List of Data Engine Excel sheets
public static final String Sheet_TestSteps = "Test Steps";
//New entry in Constant variable
public static final String Sheet_TestCases = "Test Cases";
//List of Test Data
public static final String UserName = "testuser_3";
public static final String Password = "Test@123";
}
- Step 3: Modify ExcelUtils class Modify method ‘setExcelFile‘ của class ExcelUtils. Loại bỏ argument Excel Sheet Name từ function ‘ExcelUtils’. Modify function ‘getCellData‘, tất cả các method ‘Excelutils’ sẽ có thêm một số argument Sheet Name. Tạo new method ‘getRowContains‘, method này sẽ có 3 arguments (Test Case Name, Column Number, Sheet Name).Từ đó sẽ trả về số row của test case hiện tại. Tạo new method ‘getTestStepsCount ‘, method này sẽ có 3 arguments (Test Case ID, Test Case first step, Sheet Name). Từ đó sẽ trả về số lượng test step của test case.
Excel Utility Class:

package utility;

import java.io.FileInputStream;

import org.apache.poi.xssf.usermodel.XSSFCell;
import org.apache.poi.xssf.usermodel.XSSFSheet;
import org.apache.poi.xssf.usermodel.XSSFWorkbook;

import config.Constants;
    public class ExcelUtils {
                private static XSSFSheet ExcelWSheet;
                private static XSSFWorkbook ExcelWBook;
                private static XSSFCell Cell;
                //private static XSSFRow Row;

            //This method is to set the File path and to open the Excel file
            //Pass Excel Path and SheetName as Arguments to this method
            public static void setExcelFile(String Path) throws Exception {
                    FileInputStream ExcelFile = new FileInputStream(Path);
                    ExcelWBook = new XSSFWorkbook(ExcelFile);
            	}

            //This method is to read the test data from the Excel cell
            //In this we are passing Arguments as Row Num, Col Num & Sheet Name
            public static String getCellData(int RowNum, int ColNum, String SheetName ) throws Exception{
                	ExcelWSheet = ExcelWBook.getSheet(SheetName);
                	 try{
                   	  Cell = ExcelWSheet.getRow(RowNum).getCell(ColNum);
                         String CellData = Cell.getStringCellValue();
                         return CellData;
                         }catch (Exception e){
                           return"";
                         }
            	}

        	//This method is to get the row count used of the excel sheet
        	public static int getRowCount(String SheetName){
        			ExcelWSheet = ExcelWBook.getSheet(SheetName);
        			int number=ExcelWSheet.getLastRowNum()+1;
        			return number;
        		}

			//This method is to get the Row number of the test case
			//This methods takes three arguments(Test Case name , Column Number & Sheet name)
        	public static int getRowContains(String sTestCaseName, int colNum,String SheetName) throws Exception{
        		int i;
        		ExcelWSheet = ExcelWBook.getSheet(SheetName);
        			int rowCount = ExcelUtils.getRowCount(SheetName);
        			for (i=0 ; i<rowCount; i++){
        				if  (ExcelUtils.getCellData(i,colNum,SheetName).equalsIgnoreCase(sTestCaseName)){
        					break;
        				}
        			}
        			return i;
        			}

			//This method is to get the count of the test steps of test case
			//This method takes three arguments (Sheet name, Test Case Id & Test case row number)
        	public static int getTestStepsCount(String SheetName, String sTestCaseID, int iTestCaseStart) throws Exception{
        		for(int i=iTestCaseStart;i<=ExcelUtils.getRowCount(SheetName);i++){
        			if(!sTestCaseID.equals(ExcelUtils.getCellData(i, Constants.Col_TestCaseID, SheetName))){
        				int number = i;
        				return number;
        			}
        		}
        		ExcelWSheet = ExcelWBook.getSheet(SheetName);
        		int number=ExcelWSheet.getLastRowNum()+1;
        		return number;
        	}

    	}
- Step 4: Write code to drive execution from the Excel sheet Thiết lập một phép nối ngoài ‘for loop‘ trên column Test Case Id trên sheet Test Cases, điều này cho chạy từ test case đầu tiên tới test case cuối cùng của sheet. Giá trị của column Run Mode quyết định việc thực hiện của test case. Thiết lập một phép nối trong ‘for loop‘ trên column Test Case ID của sheet Test Step, điều này cho chạy từ test step đầu tiên của test case hiện tại tới test step cuối cùng. ***Driver Script ***Class:
package executionEngine;

import java.io.FileInputStream;
import java.lang.reflect.Method;
import java.util.Properties;

import config.ActionKeywords;
import config.Constants;
import utility.ExcelUtils;

public class DriverScript {

	public static Properties OR;
	public static ActionKeywords actionKeywords;
	public static String sActionKeyword;
	public static String sPageObject;
	public static Method method[];

	public static int iTestStep;
	public static int iTestLastStep;
	public static String sTestCaseID;
	public static String sRunMode;

	public DriverScript() throws NoSuchMethodException, SecurityException{
		actionKeywords = new ActionKeywords();
		method = actionKeywords.getClass().getMethods();
	}

    public static void main(String[] args) throws Exception {
    	ExcelUtils.setExcelFile(Constants.Path_TestData);

    	String Path_OR = Constants.Path_OR;
		FileInputStream fs = new FileInputStream(Path_OR);
		OR= new Properties(System.getProperties());
		OR.load(fs);

		DriverScript startEngine = new DriverScript();
		startEngine.execute_TestCase();
    }

    private void execute_TestCase() throws Exception {
		//This will return the total number of test cases mentioned in the Test cases sheet
    	int iTotalTestCases = ExcelUtils.getRowCount(Constants.Sheet_TestCases);
		//This loop will execute number of times equal to Total number of test cases
		for(int iTestcase=1;iTestcase<=iTotalTestCases;iTestcase++){
			//This is to get the Test case name from the Test Cases sheet
			sTestCaseID = ExcelUtils.getCellData(iTestcase, Constants.Col_TestCaseID, Constants.Sheet_TestCases);
			//This is to get the value of the Run Mode column for the current test case
			sRunMode = ExcelUtils.getCellData(iTestcase, Constants.Col_RunMode,Constants.Sheet_TestCases);
			//This is the condition statement on RunMode value
			if (sRunMode.equals("Yes")){
				//Only if the value of Run Mode is 'Yes', this part of code will execute
				iTestStep = ExcelUtils.getRowContains(sTestCaseID, Constants.Col_TestCaseID, Constants.Sheet_TestSteps);
				iTestLastStep = ExcelUtils.getTestStepsCount(Constants.Sheet_TestSteps, sTestCaseID, iTestStep);
				//This loop will execute number of times equal to Total number of test steps
				for (;iTestStep<=iTestLastStep;iTestStep++){
		    		sActionKeyword = ExcelUtils.getCellData(iTestStep, Constants.Col_ActionKeyword,Constants.Sheet_TestSteps);
		    		sPageObject = ExcelUtils.getCellData(iTestStep, Constants.Col_PageObject, Constants.Sheet_TestSteps);
		    		execute_Actions();
		    			}
					}
    			}
    		}

     private static void execute_Actions() throws Exception {

		for(int i=0;i<method.length;i++){
			if(method[i].getName().equals(sActionKeyword)){
				method[i].invoke(actionKeywords,sPageObject);
				break;
				}
			}
		}
 }
Follow:
1.8. Log4j Logging
Trong suốt quá trình chạy testcase người dùng muốn một vài thông tin được log trên console. Các thông tin này giúp người dùng hiểu test step hoặc mô tả lỗi bất kì trong suốt quá trình chạy test case. Thường thì cần set các thông tin:
- Một test step hoàn thành để sao chép các kịch bản
- Issue, Description của lỗi hoặc nguyên nhân thất bại của test case
- Nhãn thời gian (Time stamp) cho các developer để nghiên cứu các issue ở mức chi tiết. 1.7.1. Logging inside the Methods
- Step 1: Set up Log4j Download và add thư viện Log4j Tạo file xml ‘log4j.xml‘ và đặt nó trong thư mục gốc của dự án. log4j.xml file:
<!DOCTYPE log4j:configuration SYSTEM "log4j.dtd">

<log4j:configuration xmlns:log4j="http://jakarta.apache.org/log4j/" debug="false">

<appender name="fileAppender" class="org.apache.log4j.FileAppender">

<param name="Threshold" value="INFO" />

<param name="File" value="logfile.log"/>

<layout class="org.apache.log4j.PatternLayout">

<param name="ConversionPattern" value="%d %-5p [%c{1}] %m %n" />

</layout>

</appender>

<root>

<level value="INFO"/>

<appender-ref ref="fileAppender"/>

</root>

</log4j:configuration>
- Step 2: Set up Static Log class
- Chuột phải package ‘utility‘ -> New -> Class: ‘Log‘
- Tất cả các method của class đều là static, vì vậy method này có thể được truy cập bởi một class bất kì nào khác
package utility;
		import org.apache.log4j.Logger;

	public class Log {

		//Initialize Log4j logs
		private static Logger Log = Logger.getLogger(Log.class.getName());//

	// This is to print log for the beginning of the test case, as we usually run so many test cases as a test suite
	public static void startTestCase(String sTestCaseName){

	   Log.info("****************************************************************************************");
	   Log.info("****************************************************************************************");
	   Log.info("$$$$$$$$$$$$$$$$$$$$$                 "+sTestCaseName+ "       $$$$$$$$$$$$$$$$$$$$$$$$$");
	   Log.info("****************************************************************************************");
	   Log.info("****************************************************************************************");

	   }

	//This is to print log for the ending of the test case
	public static void endTestCase(String sTestCaseName){
	   Log.info("XXXXXXXXXXXXXXXXXXXXXXX             "+"-E---N---D-"+"             XXXXXXXXXXXXXXXXXXXXXX");
	   Log.info("X");
	   Log.info("X");
	   Log.info("X");
	   Log.info("X");

	   }

    // Need to create these methods, so that they can be called
	public static void info(String message) {
		   Log.info(message);
		   }

	public static void warn(String message) {
	   Log.warn(message);
	   }

	public static void error(String message) {
	   Log.error(message);
	   }

	public static void fatal(String message) {
	   Log.fatal(message);
	   }
	public static void debug(String message) {
	   Log.debug(message);
	   }
	}
- Step 3: Enter logs in Action Keyword Class
Action Keyword Class:
package config;
import java.util.concurrent.TimeUnit; import static executionEngine.DriverScript.OR; import org.openqa.selenium.By; import org.openqa.selenium.WebDriver; import org.openqa.selenium.firefox.FirefoxDriver; import utility.Log;
public class ActionKeywords {
	public static WebDriver driver;

public static void openBrowser(String object){
	Log.info("Opening Browser");
	driver=new FirefoxDriver();
	}

public static void navigate(String object){
	Log.info("Navigating to URL");
	driver.manage().timeouts().implicitlyWait(10, TimeUnit.SECONDS);
	driver.get(Constants.URL);
	}

public static void click(String object){
	Log.info("Clicking on Webelement "+ object);
	driver.findElement(By.xpath(OR.getProperty(object))).click();
	}

public static void input_UserName(String object){
	Log.info("Entering the text in UserName");
	driver.findElement(By.xpath(OR.getProperty(object))).sendKeys(Constants.UserName);
	}

public static void input_Password(String object){
	Log.info("Entering the text in Password");
	driver.findElement(By.xpath(OR.getProperty(object))).sendKeys(Constants.Password);
	}

public static void waitFor(String object) throws Exception{
	Log.info("Wait for 5 seconds");
	Thread.sleep(5000);
	}

public static void closeBrowser(String object){
	Log.info("Closing the browser");
	driver.quit();
	}
}
* Step 4: Initialize Logs in Driver Script
Sau khi chạy với logging bên trong các method của tất cả các lớp, chỉ cần khởi tạo các logs từ main driver script.
Driver Script:
	```
package executionEngine;

import java.io.FileInputStream;
import java.lang.reflect.Method;
import java.util.Properties;
import org.apache.log4j.xml.DOMConfigurator;
import config.ActionKeywords;
import config.Constants;
import utility.ExcelUtils;
import utility.Log;

public class DriverScript {

	public static Properties OR;
	public static ActionKeywords actionKeywords;
	public static String sActionKeyword;
	public static String sPageObject;
	public static Method method[];

	public static int iTestStep;
	public static int iTestLastStep;
	public static String sTestCaseID;
	public static String sRunMode;

	public DriverScript() throws NoSuchMethodException, SecurityException{
		actionKeywords = new ActionKeywords();
		method = actionKeywords.getClass().getMethods();
	}

    public static void main(String[] args) throws Exception {
    	ExcelUtils.setExcelFile(Constants.Path_TestData);

		//This is to start the Log4j logging in the test case
		DOMConfigurator.configure("log4j.xml");

    	String Path_OR = Constants.Path_OR;
		FileInputStream fs = new FileInputStream(Path_OR);
		OR= new Properties(System.getProperties());
		OR.load(fs);

		DriverScript startEngine = new DriverScript();
		startEngine.execute_TestCase();
    }

    private void execute_TestCase() throws Exception {
    	int iTotalTestCases = ExcelUtils.getRowCount(Constants.Sheet_TestCases);
		for(int iTestcase=1;iTestcase<=iTotalTestCases;iTestcase++){
			sTestCaseID = ExcelUtils.getCellData(iTestcase, Constants.Col_TestCaseID, Constants.Sheet_TestCases);
			sRunMode = ExcelUtils.getCellData(iTestcase, Constants.Col_RunMode,Constants.Sheet_TestCases);
			if (sRunMode.equals("Yes")){
				iTestStep = ExcelUtils.getRowContains(sTestCaseID, Constants.Col_TestCaseID, Constants.Sheet_TestSteps);
				iTestLastStep = ExcelUtils.getTestStepsCount(Constants.Sheet_TestSteps, sTestCaseID, iTestStep);
				Log.startTestCase(sTestCaseID);

				for (;iTestStep<=iTestLastStep;iTestStep++){
		    		sActionKeyword = ExcelUtils.getCellData(iTestStep, Constants.Col_ActionKeyword,Constants.Sheet_TestSteps);
		    		sPageObject = ExcelUtils.getCellData(iTestStep, Constants.Col_PageObject, Constants.Sheet_TestSteps);
		    		execute_Actions();
		    		}
				Log.endTestCase(sTestCaseID);
				}
    		}
    	}

    private static void execute_Actions() throws Exception {

		for(int i=0;i<method.length;i++){
			if(method[i].getName().equals(sActionKeyword)){
				method[i].invoke(actionKeywords,sPageObject);
				break;
				}
			}
		}
 }
Follow:
2.1. Exception Handling
2.1.1. What is an Exception
Exception là một sự kiện, nó xả ra trong quá trình thực hiện của 1 chương trình, làm gián đoạn flow thông thường của các lệnh của chương trình. Hay nói cách đơn giản là bất kì vấn đề nào mà làm cho testcase stop trong quá trình thực hiện được gọi là một Exception.
Sự khác nhau giữa Error và Exception:
Error là chỉ ra các vấn đề nghiêm trọng mà một ứng dụng đúng không nên cố gắng catch
Exception là Chỉ ra điều kiện rằng một ứng dụng đúng có thể muốn catch
Exception Handling đề cập đến dự đoán, phát hiện, giải pháp của ứng dụng lập trình, và các lỗi thông dụng. Nó là khối mã xử lý các object ngoại lệ.
2.1.2. Tầm quan trọng của Exception Handling
- Trong một số trường hợp bạn có một ngoại lệ và muốn hiển thị tin nhắn tùy chỉnh trong logs, điều này có thể cho toàn team hiểu được.
- Trong trường hợp bạn tạo một ngoại lệ vì là một sản phẩm hết hàng, sản phẩm k còn được hiển thị trên trang, lúc này ta muốn đi tới sản phẩm có sẵn trên trang.
- Trong trường hợp muốn xử lý một số loại ngoại lệ nhất định như: ElementNotSelectableException,ElementNotVisibleException, NoSuchElementException etc. exceptions. Các loại Exception trong selenium:
- NoSuchElementException: method FindBy không tìm thấy element
- StaleElementReferenceException: element không còn xuất hiện trên trang DOM.
- TimeoutException: execution is failed bởi vì command không hoàn thành đúng thời gian quy định.
- ElementNotVisibleException: Chỉ rằng có thể các phần tử bị disable (vô hiệu hóa), và như vậy là k thể chọn. 2.1.3. How to Handle Exception Try/Catch:
try{
    // Some code
}catch(Exception e){
    // Code for Handling the exception
    }
Multiple Catch blocks:
try{
    //Some code
}catch(ExceptionType1 e1){
    //Code for Handling the Exception 1
}catch(ExceptionType2 e2){
    //Code for Handling the Exception 2
   }
Throws:
// Method Signature\
public static void anyFunction() throws Exception{
    try{
        // write your code here
    }catch (Exception e){
        // Do whatever you wish to do here
        // Now throw the exception back to the system
        throw(e);
        }
    }
Multiple Exceptions:
public static void anyFunction() throws ExceptionType1, ExceptionType2{
    try{
         //Some code
     }catch(ExceptionType1 e1){
         //Code for Handling the Exception 1
     }catch(ExceptionType2 e2){
         //Code for Handling the Exception 2
     }
Finally:
try{
    //Protected code
}catch(ExceptionType1 e1){
    //Catch block
}catch(ExceptionType2 e2){
    //Catch block
}catch(ExceptionType3 e3){
    //Catch block
}finally{
    //The finally block always executes.
    }
2.1.4. Exception Handling in this Framework Nếu bạn không xử lý các ngoại lệ, test case sẽ dừng lại ngay ở đó và nó sẽ không thực hiện các test case khác trong lần chạy. ***Action Keyword ***Class
package config;

import java.util.concurrent.TimeUnit;
import static executionEngine.DriverScript.OR;
import org.openqa.selenium.By;
import org.openqa.selenium.WebDriver;
import org.openqa.selenium.firefox.FirefoxDriver;
import executionEngine.DriverScript;
import utility.Log;

public class ActionKeywords {

		public static WebDriver driver;

	public static void openBrowser(String object){
		try{
		Log.info("Opening Browser");
		driver=new FirefoxDriver();

		//This block will execute only in case of an exception
		}catch(Exception e){
			//This is to print the logs - Method Name & Error description/stack
			Log.info("Not able to open Browser --- " + e.getMessage());
			//Set the value of result variable to false
			DriverScript.bResult = false;
			}
		}

	public static void navigate(String object){
		try{
			Log.info("Navigating to URL");
			driver.manage().timeouts().implicitlyWait(10, TimeUnit.SECONDS);
			driver.get(Constants.URL);
		}catch(Exception e){
			Log.info("Not able to navigate --- " + e.getMessage());
			DriverScript.bResult = false;
			}
		}

	public static void click(String object){
		try{
			Log.info("Clicking on Webelement "+ object);
			driver.findElement(By.xpath(OR.getProperty(object))).click();
		 }catch(Exception e){
 			Log.error("Not able to click --- " + e.getMessage());
 			DriverScript.bResult = false;
         	}
		}

	public static void input_UserName(String object){
		try{
			Log.info("Entering the text in UserName");
			driver.findElement(By.xpath(OR.getProperty(object))).sendKeys(Constants.UserName);
		 }catch(Exception e){
			 Log.error("Not able to Enter UserName --- " + e.getMessage());
			 DriverScript.bResult = false;
		 	}
		}

	public static void input_Password(String object){
		try{
			Log.info("Entering the text in Password");
			driver.findElement(By.xpath(OR.getProperty(object))).sendKeys(Constants.Password);
		 }catch(Exception e){
			 Log.error("Not able to Enter Password --- " + e.getMessage());
			 DriverScript.bResult = false;
		 	}
		}

	public static void waitFor(String object) throws Exception{
		try{
			Log.info("Wait for 5 seconds");
			Thread.sleep(5000);
		 }catch(Exception e){
			 Log.error("Not able to Wait --- " + e.getMessage());
			 DriverScript.bResult = false;
         	}
		}

	public static void closeBrowser(String object){
		try{
			Log.info("Closing the browser");
			driver.quit();
		 }catch(Exception e){
			 Log.error("Not able to Close the Browser --- " + e.getMessage());
			 DriverScript.bResult = false;
         	}
		}

	}
***Excel Utils ***Class:
package utility;

import java.io.FileInputStream;
import java.io.FileOutputStream;

import org.apache.poi.xssf.usermodel.XSSFSheet;
import org.apache.poi.xssf.usermodel.XSSFWorkbook;
import org.apache.poi.xssf.usermodel.XSSFRow;

import config.Constants;
import executionEngine.DriverScript;
    public class ExcelUtils {
			private static XSSFSheet ExcelWSheet;
			private static XSSFWorkbook ExcelWBook;
			private static org.apache.poi.ss.usermodel.Cell Cell;
			private static XSSFRow Row;

		public static void setExcelFile(String Path) throws Exception {
			try {
				FileInputStream ExcelFile = new FileInputStream(Path);
				ExcelWBook = new XSSFWorkbook(ExcelFile);
			} catch (Exception e){
				Log.error("Class Utils | Method setExcelFile | Exception desc : "+e.getMessage());
				DriverScript.bResult = false;
				}
			}

		public static String getCellData(int RowNum, int ColNum, String SheetName ) throws Exception{
			try{
				ExcelWSheet = ExcelWBook.getSheet(SheetName);
				Cell = ExcelWSheet.getRow(RowNum).getCell(ColNum);
				String CellData = Cell.getStringCellValue();
				return CellData;
			 }catch (Exception e){
				 Log.error("Class Utils | Method getCellData | Exception desc : "+e.getMessage());
				 DriverScript.bResult = false;
				 return"";
				 }
			 }

		public static int getRowCount(String SheetName){
			int iNumber=0;
			try {
				ExcelWSheet = ExcelWBook.getSheet(SheetName);
				iNumber=ExcelWSheet.getLastRowNum()+1;
			} catch (Exception e){
				Log.error("Class Utils | Method getRowCount | Exception desc : "+e.getMessage());
				DriverScript.bResult = false;
				}
			return iNumber;
			}

		public static int getRowContains(String sTestCaseName, int colNum,String SheetName) throws Exception{
			int iRowNum=0;
			try {
				//ExcelWSheet = ExcelWBook.getSheet(SheetName);
				int rowCount = ExcelUtils.getRowCount(SheetName);
				for (; iRowNum<rowCount; iRowNum++){
					if  (ExcelUtils.getCellData(iRowNum,colNum,SheetName).equalsIgnoreCase(sTestCaseName)){
						break;
					}
				}
			} catch (Exception e){
				Log.error("Class Utils | Method getRowContains | Exception desc : "+e.getMessage());
				DriverScript.bResult = false;
				}
			return iRowNum;
			}

		public static int getTestStepsCount(String SheetName, String sTestCaseID, int iTestCaseStart) throws Exception{
			try {
				for(int i=iTestCaseStart;i<=ExcelUtils.getRowCount(SheetName);i++){
					if(!sTestCaseID.equals(ExcelUtils.getCellData(i, Constants.Col_TestCaseID, SheetName))){
						int number = i;
						return number;
						}
					}
				ExcelWSheet = ExcelWBook.getSheet(SheetName);
				int number=ExcelWSheet.getLastRowNum()+1;
				return number;
			} catch (Exception e){
				Log.error("Class Utils | Method getRowContains | Exception desc : "+e.getMessage());
				DriverScript.bResult = false;
				return 0;
			}
		}
	}
2.2. Test Result Reporting
-
Step 1: Tạo một column trong sheet Test Case tên là ‘Results‘
-
Step 2: Tạo một column trong sheet Test Steps sheet tên là ‘Results‘
-
Step 3: Tạo 2 Constants variables cho column results của sheet Test Case và sheet Test Steps
**public static final int ColResult =3 ; public static final int ColTestStepResult =5 ;
-
Step 4: Tạo 2 Constants variables cho Pass results & Fail result **public static final String KEYWORDFAIL = "FAIL"; public static final String KEYWORDPASS = "PASS";
-
Step 5: Tạo 1 method mới trong class Excel Util để thiết lập giá trị mong muốn vào sheet Excel Data Engine
@SuppressWarnings("static-access")
//This method is use to write value in the excel sheet
//This method accepts four arguments (Result, Row Number, Column Number & Sheet Name)
public static void setCellData(String Result,  int RowNum, int ColNum, String SheetName) throws Exception    {
	   try{

		   ExcelWSheet = ExcelWBook.getSheet(SheetName);
		   Row  = ExcelWSheet.getRow(RowNum);
		   Cell = Row.getCell(ColNum, Row.RETURN_BLANK_AS_NULL);
		   if (Cell == null) {
			   Cell = Row.createCell(ColNum);
			   Cell.setCellValue(Result);
		   } else {
				Cell.setCellValue(Result);
				}
			// Constant variables Test Data path and Test Data file name
			FileOutputStream fileOut = new FileOutputStream(Constants.Path_TestData);
			ExcelWBook.write(fileOut);
			//fileOut.flush();
			fileOut.close();
			ExcelWBook = new XSSFWorkbook(new FileInputStream(Constants.Path_TestData));
		 }catch(Exception e){
			DriverScript.bResult = false;
			}
		}
- Step 6: Modify Driver Script:
package executionEngine;

import java.io.FileInputStream;
import java.lang.reflect.Method;
import java.util.Properties;
import org.apache.log4j.xml.DOMConfigurator;
import config.ActionKeywords;
import config.Constants;
import utility.ExcelUtils;
import utility.Log;

public class DriverScript {

	public static Properties OR;
	public static ActionKeywords actionKeywords;
	public static String sActionKeyword;
	public static String sPageObject;
	public static Method method[];
	public static int iTestStep;
	public static int iTestLastStep;
	public static String sTestCaseID;
	public static String sRunMode;
	public static boolean bResult;

	public DriverScript() throws NoSuchMethodException, SecurityException{
		actionKeywords = new ActionKeywords();
		method = actionKeywords.getClass().getMethods();
	}

	//The main script is divided in to three parts now
	//First is main[] method, execution starts from here
    public static void main(String[] args) throws Exception {
    	ExcelUtils.setExcelFile(Constants.Path_TestData);
    	DOMConfigurator.configure("log4j.xml");
    	String Path_OR = Constants.Path_OR;
		FileInputStream fs = new FileInputStream(Path_OR);
		OR= new Properties(System.getProperties());
		OR.load(fs);

		DriverScript startEngine = new DriverScript();
		startEngine.execute_TestCase();
    }

	//Second method, this is to figure out the test cases execution one by one
	//And to figure out test step execution one by one
    private void execute_TestCase() throws Exception {
	    	int iTotalTestCases = ExcelUtils.getRowCount(Constants.Sheet_TestCases);
			for(int iTestcase=1;iTestcase<iTotalTestCases;iTestcase++){
				//Setting the value of bResult variable to 'true' before starting every test case
				bResult = true;
				sTestCaseID = ExcelUtils.getCellData(iTestcase, Constants.Col_TestCaseID, Constants.Sheet_TestCases);
				sRunMode = ExcelUtils.getCellData(iTestcase, Constants.Col_RunMode,Constants.Sheet_TestCases);
				if (sRunMode.equals("Yes")){
					iTestStep = ExcelUtils.getRowContains(sTestCaseID, Constants.Col_TestCaseID, Constants.Sheet_TestSteps);
					iTestLastStep = ExcelUtils.getTestStepsCount(Constants.Sheet_TestSteps, sTestCaseID, iTestStep);
					Log.startTestCase(sTestCaseID);
					//Setting the value of bResult variable to 'true' before starting every test step
					bResult=true;
					for (;iTestStep<iTestLastStep;iTestStep++){
			    		sActionKeyword = ExcelUtils.getCellData(iTestStep, Constants.Col_ActionKeyword,Constants.Sheet_TestSteps);
			    		sPageObject = ExcelUtils.getCellData(iTestStep, Constants.Col_PageObject, Constants.Sheet_TestSteps);
			    		execute_Actions();
						//This is the result code, this code will execute after each test step
						//The execution flow will go in to this only if the value of bResult is 'false'
						if(bResult==false){
							//If 'false' then store the test case result as Fail
							ExcelUtils.setCellData(Constants.KEYWORD_FAIL,iTestcase,Constants.Col_Result,Constants.Sheet_TestCases);
							//End the test case in the logs
							Log.endTestCase(sTestCaseID);
							//By this break statement, execution flow will not execute any more test step of the failed test case
							break;
							}

						}
					//This will only execute after the last step of the test case, if value is not 'false' at any step
					if(bResult==true){
					//Storing the result as Pass in the excel sheet
					ExcelUtils.setCellData(Constants.KEYWORD_PASS,iTestcase,Constants.Col_Result,Constants.Sheet_TestCases);
					Log.endTestCase(sTestCaseID);
						}
					}
				}
    		}

     private static void execute_Actions() throws Exception {

		for(int i=0;i<method.length;i++){

			if(method[i].getName().equals(sActionKeyword)){
				method[i].invoke(actionKeywords,sPageObject);
				//This code block will execute after every test step
				if(bResult==true){
					//If the executed test step value is true, Pass the test step in Excel sheet
					ExcelUtils.setCellData(Constants.KEYWORD_PASS, iTestStep, Constants.Col_TestStepResult, Constants.Sheet_TestSteps);
					break;
				}else{
					//If the executed test step value is false, Fail the test step in Excel sheet
					ExcelUtils.setCellData(Constants.KEYWORD_FAIL, iTestStep, Constants.Col_TestStepResult, Constants.Sheet_TestSteps);
					//In case of false, the test execution will not reach to last step of closing browser
					//So it make sense to close the browser before moving on to next test case
					ActionKeywords.closeBrowser("");
					break;
					}
				}
			}
     }

}
2.3. Data Driven Technique
Data-driven testing có nghĩa là sử dụng một single test để kiểm tra nhiều testcase khác bởi việc thử nghiệm với input và expected values từ một nguồn dữ liệu mở (external data source) thay vì sử dụng các value mã hóa cố định giống nhau mỗi thời gian run test.
- Step 1: Set up Data Engine excel sheet
- Tạo một column trong sheet test step và lấy tên là ‘Data Set‘.
- Nhập browser name, username and password vào column ‘Data Set‘cho các hàng có liên quan.
- Thay thế keyword ‘input_Username’ và ‘input_Password’ thành ‘input‘ Test Steps sheet:
- Step 2: Modify Constants class
- Tạo 1 constant variable mới cho column Data Set.
- Tăng số column cho Result constant variable.
- public static final int Col_DataSet =5 ;
- public static final int Col_TestStepResult =6 ;
- Step 3: Modify Action Keyword Class
- Thay đổi method trong class Action Keyword để chấp nhận data là các argument.
- Theo như mục 1.5 Use of Java Reflection Class, chúng ta đã phải thay đổi các method của class Action Keyword để accept data là argument.
- Thay đổi code của method input, thay đổi onstants variable của username tới data
- Thay đổi code của method open browser. Action keyword class:
package config;

import java.util.concurrent.TimeUnit;
import static executionEngine.DriverScript.OR;
import org.openqa.selenium.By;
import org.openqa.selenium.WebDriver;
import org.openqa.selenium.chrome.ChromeDriver;
import org.openqa.selenium.firefox.FirefoxDriver;
import org.openqa.selenium.ie.InternetExplorerDriver;
import executionEngine.DriverScript;
import utility.Log;

public class ActionKeywords {

		public static WebDriver driver;
	//This block of code will decide which browser type to start
	public static void openBrowser(String object,String data){
		Log.info("Opening Browser");
		try{
			//If value of the parameter is Mozilla, this will execute
			if(data.equals("Mozilla")){
				driver=new FirefoxDriver();
				Log.info("Mozilla browser started");
				}
			else if(data.equals("IE")){
				//You may need to change the code here to start IE Driver
				driver=new InternetExplorerDriver();
				Log.info("IE browser started");
				}
			else if(data.equals("Chrome")){
				driver=new ChromeDriver();
				Log.info("Chrome browser started");
				}

			int implicitWaitTime=(10);
			driver.manage().timeouts().implicitlyWait(implicitWaitTime, TimeUnit.SECONDS);
		}catch (Exception e){
			Log.info("Not able to open the Browser --- " + e.getMessage());
			DriverScript.bResult = false;
		}
	}

	public static void navigate(String object, String data){
		try{
			Log.info("Navigating to URL");
			driver.manage().timeouts().implicitlyWait(10, TimeUnit.SECONDS);
			//Constant Variable is used in place of URL
			driver.get(Constants.URL);
		}catch(Exception e){
			Log.info("Not able to navigate --- " + e.getMessage());
			DriverScript.bResult = false;
			}
		}

	public static void click(String object, String data){
		try{
			Log.info("Clicking on Webelement "+ object);
			driver.findElement(By.xpath(OR.getProperty(object))).click();
		 }catch(Exception e){
 			Log.error("Not able to click --- " + e.getMessage());
 			DriverScript.bResult = false;
         	}
		}
	//Now this method accepts two value (Object name & Data)
	public static void input(String object, String data){
		try{
			Log.info("Entering the text in " + object);
			driver.findElement(By.xpath(OR.getProperty(object))).sendKeys(data);
		 }catch(Exception e){
			 Log.error("Not able to Enter UserName --- " + e.getMessage());
			 DriverScript.bResult = false;
		 	}
		}

	public static void waitFor(String object, String data) throws Exception{
		try{
			Log.info("Wait for 5 seconds");
			Thread.sleep(5000);
		 }catch(Exception e){
			 Log.error("Not able to Wait --- " + e.getMessage());
			 DriverScript.bResult = false;
         	}
		}

	public static void closeBrowser(String object, String data){
		try{
			Log.info("Closing the browser");
			driver.quit();
		 }catch(Exception e){
			 Log.error("Not able to Close the Browser --- " + e.getMessage());
			 DriverScript.bResult = false;
         	}
		}

	}
- Step 4: Modify Driver Engine script
- Tạo variable mới cho Test Data ‘public static String sData;‘
- Add một câu lệnh để gán giá trị cho data variable từ column Data Set của sheet Test Step
- Trong block ‘execute_Action()‘ , pass variable ‘sData’ để invoke phương thức. ***Driver Script ***Class:
package executionEngine;

import java.io.FileInputStream;
import java.lang.reflect.Method;
import java.util.Properties;
import org.apache.log4j.xml.DOMConfigurator;
import config.ActionKeywords;
import config.Constants;
import utility.ExcelUtils;
import utility.Log;

public class DriverScript {

	public static Properties OR;
	public static ActionKeywords actionKeywords;
	public static String sActionKeyword;
	public static String sPageObject;
	public static Method method[];
	public static int iTestStep;
	public static int iTestLastStep;
	public static String sTestCaseID;
	public static String sRunMode;
	public static String sData;
	public static boolean bResult;

	public DriverScript() throws NoSuchMethodException, SecurityException{
		actionKeywords = new ActionKeywords();
		method = actionKeywords.getClass().getMethods();
	}

    public static void main(String[] args) throws Exception {
    	ExcelUtils.setExcelFile(Constants.Path_TestData);
    	DOMConfigurator.configure("log4j.xml");
    	String Path_OR = Constants.Path_OR;
		FileInputStream fs = new FileInputStream(Path_OR);
		OR= new Properties(System.getProperties());
		OR.load(fs);

		DriverScript startEngine = new DriverScript();
		startEngine.execute_TestCase();
    }

    private void execute_TestCase() throws Exception {
	    	int iTotalTestCases = ExcelUtils.getRowCount(Constants.Sheet_TestCases);
			for(int iTestcase=1;iTestcase<iTotalTestCases;iTestcase++){
				bResult = true
				sTestCaseID = ExcelUtils.getCellData(iTestcase, Constants.Col_TestCaseID, Constants.Sheet_TestCases);
				sRunMode = ExcelUtils.getCellData(iTestcase, Constants.Col_RunMode,Constants.Sheet_TestCases);
				if (sRunMode.equals("Yes")){
					iTestStep = ExcelUtils.getRowContains(sTestCaseID, Constants.Col_TestCaseID, Constants.Sheet_TestSteps);
					iTestLastStep = ExcelUtils.getTestStepsCount(Constants.Sheet_TestSteps, sTestCaseID, iTestStep);
					Log.startTestCase(sTestCaseID);
					bResult=true;
					for (;iTestStep<iTestLastStep;iTestStep++){
			    		sActionKeyword = ExcelUtils.getCellData(iTestStep, Constants.Col_ActionKeyword,Constants.Sheet_TestSteps);
			    		sPageObject = ExcelUtils.getCellData(iTestStep, Constants.Col_PageObject, Constants.Sheet_TestSteps);
						//Now we will use the data value and pass it to the methods
			    		sData = ExcelUtils.getCellData(iTestStep, Constants.Col_DataSet, Constants.Sheet_TestSteps);
			    		execute_Actions();
						if(bResult==false){
							ExcelUtils.setCellData(Constants.KEYWORD_FAIL,iTestcase,Constants.Col_Result,Constants.Sheet_TestCases);
							Log.endTestCase(sTestCaseID);
							break;
							}
						}
					if(bResult==true){
					ExcelUtils.setCellData(Constants.KEYWORD_PASS,iTestcase,Constants.Col_Result,Constants.Sheet_TestCases);
					Log.endTestCase(sTestCaseID);
						}

					}

				}
    		}

     private static void execute_Actions() throws Exception {

		for(int i=0;i<method.length;i++){

			if(method[i].getName().equals(sActionKeyword)){
				//This code will pass three parameters to every invoke method
				method[i].invoke(actionKeywords,sPageObject, sData);
				if(bResult==true){
					ExcelUtils.setCellData(Constants.KEYWORD_PASS, iTestStep, Constants.Col_TestStepResult, Constants.Sheet_TestSteps);
					break;
				}else{
					ExcelUtils.setCellData(Constants.KEYWORD_FAIL, iTestStep, Constants.Col_TestStepResult, Constants.Sheet_TestSteps);
					ActionKeywords.closeBrowser("","");
					break;
					}
				}
			}
     }

}
4.1. Hybrid Automation Framework
Example follow:
- Login to the demo application Online Store
- Selecting a product category from Top Menu
- Selecting a product and adding it to the cart
- Go to payment details page and complete the order
- Verify details from final Confirmation page How to do: Selenium Automation Hybrid Framework là Framework ở mức bắt đầu và dễ dàng để hiểu. Triển khai Page Object Model Technique, Data Driven Technique, Modular Driven Technique, Log4j Logging, TestNG Reporting & TestNG Reporter Logs.
All rights reserved
